Article Contents:
- Taxonomy of Corners: From Geometry to Decorative Meaning
- Internal Corners: Concealment and Softness
- External Corners: Accent and Protection
- Straight, Acute, and Obtuse: Geometric Diversity
- Internal Joints: The Art of Invisibility
- The "On the Chin" Mortise Method: The Classic of Carpentry
- Pre-Cut Corner Elements: When Mortising Is Not Needed
- The "Copying" Profile Method: For Virtuosos
- External Joints: A Challenge to Geometry and Protection Against Time
- Classic Mortise: Symmetry and Precision
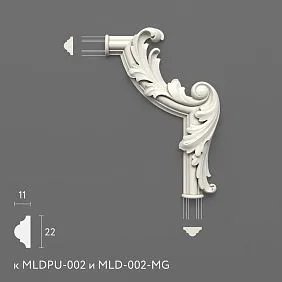
- Protective Corner Pieces: Function and Aesthetics
- PU Corner Elements: Modern Technologies
- Mortise and Mitering: The Master’s Surgical Precision
- Tools for the Perfect Mortise
- Mortise Technology: Step-by-Step Algorithm
- Joint Mitering: The Art of Invisible Repair
- Coloring: The Magic of Color Harmony
- Why Are Corner Elements Colored?
- Painting Technologies
- Techniques for Decorative Coloring of Corners
- FAQ: Corner Elements — Questions from Masters
- Question: Why does a gap appear in the corner after several months, even after a perfect mortise?
- Question: How to mortise a corner if the walls meet at an angle other than 90 degrees?
- Question: For hallway wall external corners, which is better — wooden or polyurethane corner pieces?
- Question: Can pre-cut corner elements with molding from one manufacturer be used with molding from another manufacturer?
- Question: Which is better for cutting polyurethane corner elements — a saw or a knife?
- Conclusion

A corner is the place where simplicity ends and craftsmanship begins. It is an architectural challenge that separates amateurs from professionals, amateur craftsmanship from fine work. In interior decoration, it is precisely the corners that reveal the quality of installation. A gap in the cornice corner, an uneven casing joint, a crooked baseboard mortise — these details can ruin the impression of an expensive renovation. But if the corner is executed perfectly, if lines meet without a single gap, if the contour is as clean as a poem — then the space achieves completeness and nobility. Today we discuss how to turn this architectural challenge into triumph. We will talk about decorative corner elements and the technologies that allow creating flawless joints — internal and external, simple and complex, on any material.


Taxonomy of Corners: From Geometry to Decorative Meaning
Before starting work, it is necessary to understand what type of angle we are dealing with. Each requires its own approach, its own tool, its own philosophy.


Internal Angles: Shelter and Softness
An internal angle is the meeting of two planes forming a concave shape. These are angles in rooms where walls converge, creating a protected space.
Features of internal angles:
-
The angle between planes is usually 90 degrees, but in older houses it may vary from 85 to 95 degrees.
-
Internal angles are visually less noticeable than external ones, so minor defects here are more easily forgiven.
-
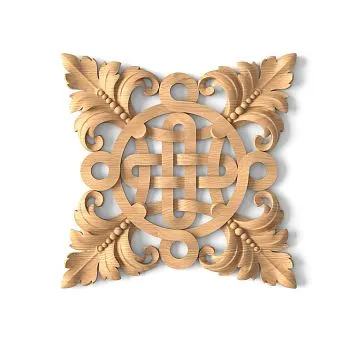
When installing decor in internal angles, elements are cut 'on the nose' (at 45 degrees) or ready-madeCorner decorative elementsare used to cover the joint and turn it into a decorative accent.
Where they are found:
-
Ceiling cornices and moldings
-
Baseboards
-
Wall panels and trim
-
Door and window casings
Our factory also produces:

External Angles: Accent and Protection
An external angle is the convex meeting of planes. These are angles of columns, pilasters, and protruding architectural elements.
Features of external angles:
-
External angles are the most vulnerable spots in interior design, susceptible to mechanical impacts and chipping.
-
They are in plain sight and require perfect execution, as any defect will be immediately noticeable.
-
For protection and decoration of external angles, specialWooden corner piecesare often used, which not only conceal joints but also serve as protective buffers.
Where they are found:
-
Wall angles in passageways and corridors
-
Columns and Pilasters
-
Niche and protrusions
-
Furniture structures
Get Consultation
Straight, Acute, and Obtuse: Geometric Diversity
Not all angles in real construction are 90 degrees. Architectural imagination and construction specifics create diversity.
Right angle (90°): Standard, on which most ready-made corner elements and miter-cut templates are based.
Obtuse angle (more than 90°): Found in bay windows, polygonal rooms, and designer constructions. Requires individual miter-cut calculations.
Acute angle (less than 90°): Rare in residential interiors but found in avant-garde architecture. Most difficult to process, requires virtuoso tool handling.
Internal Joints: The Art of Invisibility
An internal angle is where decor fades into shadow. The joint here must be so precise that its presence is forgotten.
Miter Cut 'On the Nose': The Classic of Carpentry Craft
The miter saw with a rotating table is the gold standard for precision.
Tools:
-
Miter saw with rotating table — the gold standard for precision.
-
Miter saw with hand saw — budget-friendly but requires experience.
-
Jigsaw with guide — for curved elements.
Technology:
-
Measure the exact length of the element from the wall to the inside corner.
-
Set the saw to a 45-degree angle.
-
Make a precise, clean cut without chips.
-
Check the joint 'dry' (without glue) and ensure there are no gaps.
-
If the angle in the room is not perfect (not 90°), adjust the cut angle using the 'trial and error' method.
Master's secret: For complex profiled elements (cornices, moldings), make a template from cardboard or thin plywood before cutting. This will prevent wasting expensive material.
Pre-Cut Corner Elements: When Cutting Is Not Needed
The modern decorative industry offers ready-made solutions — special corner inserts installed into the inside corner, to which straight sections of molding or cornice are then joined.
Advantages:
-
No complex cutting is required — the elements simply butt together.
-
Corner elements are often more elaborately decorated than the main molding, creating an accent.
-
Perfectly suited for angles that differ from 90 degrees.
Where to use:
Ready-madeMolding corner piecesEspecially relevant in classical interiors with abundant ornamental decoration, where they become part of the overall ornamental composition.
The 'Copying' Profile Method: For Virtuosos
This technique involves cutting one element at a 45-degree angle and pressing it against the wall, while the second element is cut to match the profile of the first, effectively 'copying' its contour. The joint becomes perfect because one element replicates the shape of the other.
When to Use:
This method is indispensable for complex multi-profile cornices and baseboards, especially in rooms with non-ideal angles.
External Joints: A Challenge of Geometry and Protection Against Time
The external angle is where decoration takes center stage. Here, there is no room for error.
Classic Miter Cut: Symmetry and Precision
As with internal angles, two elements are mitered at 45 degrees, but the direction of the cut is reversed.
Critical Moments:
-
External angles 'consume' more material — account for this when calculating.
-
The joint at an external angle is more visible, so the cut must be perfectly clean, without chips.
-
After installation, the joint must be filled with a thin layer of putty and sanded.
Protective Corner Pieces: Function and Aesthetics
External angles are the most vulnerable spots in the house. Here, wallpaper peeling, plaster cracks, and damage from accidental impacts occur most frequently.
Solution: Installation of special protectivewooden corner pieces. They are mounted on the outer corner of the wall and perform a dual function:
-
Protective: Bear mechanical impacts, protecting plaster and wallpaper.
-
Decorative: Transform the "naked" corner into an architectural element, especially if the corner piece is made of solid wood of valuable species or is adorned with carving.
Materials for protective corner pieces:
-
Solid oak, beech, ash — for classic interiors.
-
MDF for painting — a universal solution.
-
Polyurethane — lightweight, durable, perfectly imitating wood and plaster.
Corner Elements from PU: Modern Technologies
Polyurethanecorner elements— an innovative solution for exterior corners.
Advantages:
-
Lightweight — does not create load on the structure.
-
High impact resistance — does not fear accidental damage.
-
Moisture resistance — can be used in rooms with high humidity.
-
Easy installation — can be glued to any surface.
-
Ability to paint in any color.
Cutting and Filling: Master's Surgical Precision
Even an ideal cut does not guarantee an ideal result. Wood breathes, humidity changes, walls are not always flat. Therefore, final finishing is a mandatory step.
Tools for the Ideal Cut
Circular saw (circular saw): This is a must-have for anyone working with decor. Modern models allow setting the angle with precision down to 0.1 degrees and produce a perfectly clean, scratch-free cut.
Miter box: Budget alternative. Available in simple (fixed angles of 45° and 90°) and precision (adjustable angle) versions. It is important to use a sharp saw with fine teeth.
Chisel and sandpaper: For final finishing of the cut, removing minor irregularities and burrs.
Cutting Technology: Step-by-Step Algorithm
-
Marking: Use a pencil and square. Mark the cut line with a 1-2 mm allowance (for finishing).
-
Fixation: Securely fasten the piece in the saw or miter box. Any misalignment results in a ruined cut.
-
Cutting: Guide the saw smoothly, without jerking, allowing the teeth to do their work. Do not press down on the tool.
-
Checking: Align both pieces together and check the joint against light. An ideal joint does not let light pass.
-
Finishing: If necessary, refine the cut with a chisel or fine sandpaper.
Joint Filling: The Art of Invisible Repair
Even with an ideal cut, microscopic gaps are inevitable. They must be filled.
Materials:
-
Acrylic filler: For painted elements. It is elastic, does not crack, and easily sands.
-
Wood filler: For lacquered elements. Choose a color as close as possible to the wood grain.
-
Acrylic sealant: For flexible joints that may shift due to thermal expansion.
Technology:
-
Apply filler in a thin layer into the gap using a narrow putty knife or your finger.
-
Wipe away excess immediately with a damp cloth.
-
After drying (usually 2-4 hours), sand the joint area with fine sandpaper (P220-P320).
-
If the gap was deep, apply a second layer.
Professional secret: For particularly critical joints in visible areas, after filling, use the "liquid wood" method — a special repair compound that polymerizes and becomes harder than the original wood. It can be sanded, routed, and finished with lacquer without visible difference from the original material.
Coloring: The Magic of Color Harmony
Even perfectly matched elements may reveal themselves through color differences. Coloring is the final touch, transforming a set of details into a monolithic composition.
Why Are Corner Elements Colored?
Joint masking: Even the thinnest joint line becomes invisible if the color matches perfectly.
Creating accents: Corner elements can be painted in a contrasting color (e.g., gold or silver), turning them from a technical necessity into a decorative accent.
Adapting ready-made elements: Ready-made polyurethane or wooden elements are often supplied in a base white color or natural wood tone, which may not always match the interior design concept.
Painting technologies
For wooden elements:
-
Stain (toning): If you need to preserve the wood texture, use a water-based or alcohol-based stain. It penetrates the fibers and colors them from within.
-
Lacquer with color: Add coloring paste to transparent lacquer. This allows you to simultaneously color and protect the surface.
-
Enamel: For full coverage, use acrylic or alkyd enamels. Modern enamels can be tinted to any color according to RAL, NCS, or other catalogs.
For polyurethane elements:
Polyurethane is excellently painted with acrylic and latex paints. Before painting, always use a primer to improve adhesion.
For MDF elements:
MDF is an ideal base for painting. After priming, it can be painted with any enamel to achieve a perfectly smooth surface.
Techniques for Decorative Corner Coloring
Patina: Apply a base color (e.g., bone white), then dip the recesses of the profile into patina (gold, silver, brown). Remove excess patina. Result — an elegant aged effect.
Two-tone coloring: The main part of the molding — one color, the corner element — contrasting. This creates rhythm and emphasizes the geometry of the space.
Imitating premium woods: Using special lacquer techniques, you can transform pine into "redwood" or "walnut." This is achieved by applying multiple layers of semi-transparent paints of different shades.
FAQ: Corner Elements — Questions from Masters
Question: Why does a gap appear in the corner after perfect mitering, months later?
Answer: This is a natural process related to changes in humidity. Wood is a living material that expands when humidity increases and contracts when it decreases. This is especially noticeable in homes with seasonal heating. To minimize this effect, use well-dried wood (moisture content no more than 10-12%) and elastic acrylic fillers to fill joints. Alternatively, use stable materials such as MDF or polyurethane, which do not react to humidity changes.
Question: How to cut an angle if the walls meet at an angle other than 90 degrees?
Answer: First, determine the actual angle. Use a protractor (angle gauge) or make a cardboard template. Place a large sheet of cardboard in the corner, trace the wall lines, cut it out. Measure the resulting angle with a protractor. Divide it in half — this will be the miter angle for each element. For example, if the angle between walls is 88 degrees, each element should be mitered at 44 degrees. Modern miter saws allow setting any angle.
Question: What is better for exterior wall corners in a hallway — wooden or polyurethane corner pieces?
Answer: It depends on priorities. If maximum strength, naturalness, and prestige are important — choose solid oak. An oak corner piece will withstand decades of intensive use and can be restored and repainted. If ease of installation, budget, and water resistance are key — choose polyurethane. It is cheaper, easier to process, does not fear water, and after painting, visually indistinguishable from wood or plaster molding. The golden middle ground — high-density MDF for painting.
Question: Can ready-made corner elements with molding from another manufacturer be used?
Answer: Technically yes, but not recommended. The corner element must exactly match the profile (cross-section) of the main molding. Each manufacturer has unique profiles. If the profiles do not match, steps and gaps will be visible at the joints, which cannot be masked. Exception — minimalist smooth moldings with simple rectangular cross-sections, where minor discrepancies are not critical.
Question: What is better for cutting polyurethane corner elements — a saw or a knife?
Answer: Polyurethane is a soft and flexible material. For cutting, an sharp construction knife or a stationery knife with replaceable blades is ideal. The cut is clean, without chips or dust. For thicker elements, a fine-tooth hacksaw or a miter saw with a wood blade can be used, but always at low speeds to prevent the material from melting due to friction. After cutting, be sure to sand the edges with fine-grit sandpaper.
Conclusion
Corner elements are not just a technical way to join two molding strips or protect a protruding wall corner. It is a philosophy of attention to detail — the boundary between artisanal and professional approaches to interior design. A perfectly executed corner — without gaps, with a clean outline, and a thoughtfully chosen color scheme — is the master’s signature, a testament to respect for the material and space. Mastery of mitering techniques, understanding of geometry, knowledge of materials and finishing technologies transforms routine work into art, where every joint becomes a small architectural triumph.
For implementing the most ambitious projects, where every corner must be flawless, high-quality materials and ready-made solutions are required. The company STAVROS offers a complete range of corner elements for any task: from elegant carved wooden corner caps to modern polyurethane solutions. Every STAVROS product is a guarantee of precise geometry, perfect profile, and top-quality execution. Using STAVROS elements, you get not just decorative details, but ready-made tools for creating interiors where every corner is a work of architectural art.