


Article Contents:
- Kitchen as a space with contradictions
- Three kitchen zones from a design perspective
- Where slatted panels are appropriate in the kitchen: zoning by the 'works/doesn't work' principle
- Accent wall in the dining area
- TV zone or niche
- Wall along the bar counter or island
- Transition zone between kitchen and living room
- Where panels don't work in the kitchen
- Which material to choose for kitchen slatted panels
- MDF with lacquer or enamel coating
- Solid wood with oil or wax
- Moisture-resistant MDF (HDF)
- Ceiling molding in the kitchen: when and how
- Why molding works in the kitchen
- Molding material for the kitchen: why only polyurethane
- Which elements of molded decor are appropriate in the kitchen
- What molding in the kitchen does not tolerate
- How to work with height, lighting, and ventilation
- Ceiling height and scale of decor
- Lighting: how light interacts with battens and moldings
- Range hood and batten panels: how to avoid conflict
- What to choose for a modern kitchen, and what for a classic one
- Modern kitchen: minimalism in details, maximum in result
- Classical and neoclassical kitchen: architectural completeness
- Kitchen in Provence, country, rustic style
- Loft kitchen
- Mistakes that overload the kitchen interior
- First mistake: wooden panels in the zone of direct steam exposure without protection
- Second mistake: intricate molding with a low ceiling
- Third mistake: mismatched style of battens and molding
- Fourth mistake: batten panels on all kitchen walls
- Fifth mistake: ignoring compatibility with the kitchen set
- Sixth mistake: ceiling rosette not to scale
- Specific scenarios: how it looks in real projects
- First scenario: 25 sq.m. kitchen-living room, modern style
- Second scenario: 14 sq.m. classic kitchen, separate room
- Third scenario: 18 sq.m. kitchen in Provence style
- About the Company STAVROS
- FAQ: Answers to Popular Questions
The kitchen is the most multi-functional room in the house. Here, people cook, chop, fry, drink coffee, discuss family plans, watch the news, and entertain guests. And through it all, the kitchen must look beautiful. Not 'it'll do,' not 'oh well'—but truly beautiful: expressive, cohesive, with character. That's precisely whyslatted panels for the kitchenhave become one of the most sought-after solutions for modern kitchen interiors. And ceiling molding, long considered an exclusively 'classical' attribute, is increasingly appearing in modern, Scandinavian, and loft kitchens. Let's explore where and how these two tools work in the kitchen—and how to achieve a result that is 'expressive and clean' without turning the kitchen into an overloaded showroom.


The kitchen as a space of contradictions
Let's be honest: the kitchen is the most aggressive room in terms of material impact. Steam, grease, temperature fluctuations, humidity, mechanical contact every few minutes. This isn't a living room where walls remain untouched for years. These are combat conditions.
And yet, the kitchen is one of the most 'visible' spaces. Especially in open layouts where the kitchen and living room form a single space. You can't just do 'something' here: the kitchen area is always on display.
The contradiction is resolved by choosing the right materials and the right application zones. Slatted wall panels and molding decor in the kitchen are not about 'everywhere.' They're about 'where needed' and 'where they will work.'


Three kitchen zones from a design perspective
Before moving on to specific solutions, it's necessary to delineate the kitchen space into functional zones:
Work zone—the area of the stove, sink, cutting table, backsplash. Here, exposure to moisture, grease, and heat is maximum. For wooden or MDF slatted panels, this zone is contraindicated without special protection. For molding decor—completely excluded.
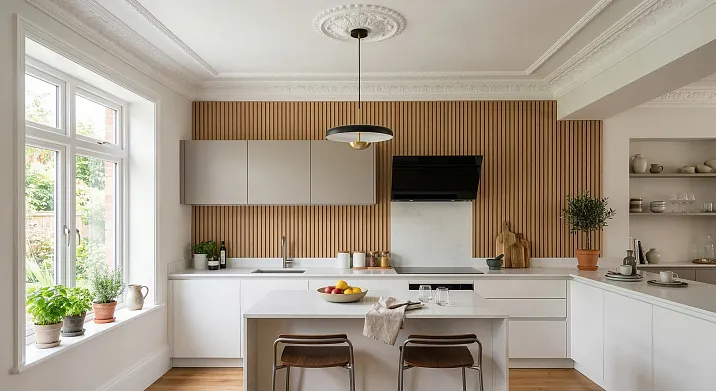
Dining zone—table, chairs, eating area. The load here is significantly less. Slatted panels work on an accent wall behind the dining group, creating a 'stage backdrop.' Ceiling molding decor—is appropriate and effective precisely in this zone.
Neutral zone — walls without direct contact with work processes: end wall, wall on the living room side (in open layouts), wall with a decorative cabinet or bar counter. Here, slatted panels work to their full potential without material restrictions.
Our factory also produces:


Where slatted panels are appropriate in the kitchen: zoning based on the 'works/doesn't work' principle
Not every spot in the kitchen is suitable for slatted panels. But where they are appropriate — the result is powerful.
Get Consultation
Accent wall in the dining area
This is the first and main position. The wall behind the dining table or at the end of a kitchen-living room is the ideal place forslatted wall panels in kitchen interior design. It does not receive direct exposure to steam and grease, does not come into contact with work processes, yet is always in sight.
Vertical slats on this wall create an 'anchor' for the dining area — the space gains a clear accent, and the dining set stops 'floating' in the open space. Warm wood tones (natural oak, oiled ash, walnut) or painted slats in a neutral tone — all of this creates a warm and cozy backdrop for the table.
TV zone or niche area
In many kitchens, especially in open layouts, there is a TV zone — either built into the kitchen unit facade or placed on a separate wall. A slatted panel as a backdrop for the TV zone is a classic design solution. The slats frame the screen, giving it an architectural context. Dark-toned slats (graphite, dark walnut, wenge) combined with hidden perimeter lighting around the niche — this is no longer just a 'wall with a TV,' but a full-fledged architectural element.
Wall along the bar counter or island
A bar counter or kitchen island is an area that requires a 'background'. If the island stands against a bare painted wall, it loses half of its visual weight. A slatted panel on the wall behind the island 'completes' the scene, providing it with support. Horizontal slats work better than vertical ones in this position: they echo the horizontal line of the countertop and create a sense of the zone's expanse.
Transitional zone between the kitchen and living room
In open-plan layouts, the kitchen and living room often flow into each other. A slatted panel on a 'junction' wall—a half-wall, column, or niche—visually demarcates the zones without a physical partition. This is a delicate yet architecturally clear solution.
Where panels in the kitchen don't work
-
Backsplash (the area between the countertop and wall cabinets)—direct contact with splashes, grease, and steam. Wood and MDF here require ceramic tile or glass.
-
Wall directly adjacent to the stove—thermal and steam exposure. Even with a lacquered finish, long-term use is problematic.
-
Area above the sink—constant moisture. Only with special moisture-resistant coating and ventilated installation.
What material to choose for slatted panels in the kitchen
In the kitchen, material requirements are stricter than in any other room. Let's consider the options.
MDF with lacquer or enamel coating
Optimal balance of price, appearance, and practicality for most kitchen applications. MDF with a quality lacquer coating is resistant to moderate moisture exposure, wipes easily with a damp cloth, and does not react to kitchen grease or cleaning agents.
Important: 'lacquer coating' does not mean 'any lacquer'. For a kitchen environment, a water-based dispersion lacquer with a hardener additive (two-component acrylic or polyurethane lacquer) is required. Thin furniture nitrocellulose lacquer is a poor choice for the kitchen: it yellows from heat and grease.
MDF panels can be painted in any color from the RAL catalog, allowing for precise matching with the kitchen set, countertop, or tiles.
Solid wood with oil or wax
Natural wood is the pinnacle of aesthetics but requires proper protection. Solid wood treated with hard oil or wax (not lacquer) is easily restored if damaged: a scratch on an oiled surface can simply be retouched with the same oil. A lacquered surface, if damaged, requires complete re-lacquering.
For kitchen use, hardwoods are chosen: oak, ash, walnut. Softwoods (pine, linden) do not last in the kitchen—mechanical damage is inevitable.
Oil creates a matte surface with a living texture—this is precisely what is valued in woodenslatted wall panels for the kitchenin modern and Scandinavian interiors.
Moisture-resistant MDF (HDF)
For kitchens with high humidity—when lacking a sufficiently powerful exhaust hood, or with sinks and stoves placed close together—panels made of moisture-resistant MDF (HDF) with an impregnated core are recommended. This material retains its shape under prolonged exposure to humid air.
Ceiling molding in the kitchen: when and how
This question raises more doubts than it deserves an answer. Many considerceiling moldingan attribute of classic interiors—living rooms with antique furniture, bedrooms with canopies. But modern design practice has long disproven this view.
Why molding works in the kitchen
The kitchen is the ceiling. Seriously: it's the kitchen ceiling that's constantly in your line of sight. At the dining table, by the bar counter, in the lounge area of an open-plan layout—your gaze regularly drifts upward. A ceiling without decoration in this situation is a missed opportunity.
Ceiling moldingas a cornice around the perimeter of the kitchen ceiling—is the minimal and most appropriate solution. It:
-
Completes the vertical wall system, creating a frame for the ceiling plane.
-
Conceals the transition between the wall and ceiling, which in kitchens is often uneven due to usage conditions.
-
Creates a visual 'barrier' between the wall and ceiling — especially important in open kitchens where the ceiling transitions from the kitchen area to the living room without architectural separation.
Material for kitchen molding: why only polyurethane
In the kitchenCeiling moldingmust be made of polyurethane. There are no alternatives for this room.
Plaster in the kitchen is a poor choice. Plaster is hygroscopic: under constant exposure to kitchen steam, it absorbs moisture, slowly deteriorates, darkens, and crumbles at the joints. Painting plaster with water-repellent paint is possible, but it's a temporary solution.
Polyurethane fundamentally does not absorb moisture — it is a closed-cell polymer. Kitchen steam, condensation, accidental splashes — none of this leaves marks on polyurethane decor. The surface can be wiped with a damp cloth and is resistant to kitchen cleaning agents (without aggressive solvents).
The weight of a polyurethane cornice is 3–5 times less than that of a plaster equivalent — this is important for adhesive mounting on the ceiling, where the entire load is held by adhesion.
Which elements of decorative molding are appropriate in the kitchen
Ceiling cornice — a basic and mandatory element. The size is determined by the ceiling height and the scale of the kitchen. For a kitchen with a 2.5 m ceiling: a cornice 60–90 mm in a simple or moderately relief profile.
Central ceiling rosette — appropriate in the dining area under a chandelier. Creates an architectural accent on the ceiling, turning the dining area into a 'ceremonial' one. Rosette diameter: 200–350 mm for a standard kitchen-dining room.
Ceiling molding belts — create a framed field on the ceiling plane (coffer). This is a more complex solution, requiring sufficient ceiling area (from 12–14 sq.m.) and a height from 2.7 m.
Decorative polyurethane beams are a separate topic for the kitchen. Ceiling beams create a 'rustic' or 'Provence' character. In a country, Provence, or rustic-style kitchen, this is an absolutely organic solution.
What plasterwork in the kitchen does not tolerate
Plaster decor on the ceiling above the stove is a risk zone. Grease vapors settle on any surface, and the plaster relief in this area becomes a trap for grease and soot. If the hood above the stove has sufficient power (350–500 cubic meters/hour for a standard stove), the risk is minimal. If the hood is weak or absent, no plasterwork above the work zone.
How to work with height, lighting, and ventilation
The kitchen is a space with strict practical limitations. Design should work with them, not against them.
Ceiling height and decor scale
Table of scale solutions depending on kitchen ceiling height:
| Ceiling Height | Slat panels | Crown Molding | Additional decor |
|---|---|---|---|
| Up to 2.5 m | Narrow slats 30–60 mm, vertical orientation | 50–70 mm, simple profile | Only baseboard and cornice |
| 2.5–2.7 m | Slats 50–80 mm | 70–90 mm | Cornice + socket in dining area |
| 2.7–3 m | Slats 60–100 mm | 80–110 mm | Cornice + socket + molding belts |
| from 3 m | Slats 80–140 mm | 100–150 mm | Full system + beams |
Lighting: how light interacts with slats and molding
In the kitchen, lighting serves several functions simultaneously: functional (task lighting), decorative (accent lighting), atmospheric (general lighting for the dining area). Each type of lighting interacts differently with slatted panels and decorative molding.
Side lighting from sconces emphasizes the relief of the slats: shadows in the gaps become deeper, the panel gains volume and liveliness. For an accent slatted wall in the dining area — one or two wall lights with side direction create precisely that depth effect for which the slats are installed.
Cornice backlighting (LED strip in a cornice box) in the kitchen solves two tasks at once: creates soft diffused light around the perimeter of the ceiling and 'raises' the ceiling visually. In a kitchen with a low ceiling (2.5 m), this is especially valuable.
Recessed ceiling lights above the work area — functional lighting. Their position should not conflict with the ceiling cornice: lights are placed no closer than 150 mm from the cornice.
A chandelier over the dining table combined with a rosette — a classic pair. The rosette frames the chandelier's mounting point, creating an architectural context for the light fixture.
Range hood and slatted panels: how to avoid creating conflict
A range hood over the stove is a mandatory element of a modern kitchen. Its presence and power determine how safe it is to use wooden panels in the work area.
The rule is simple: slatted panels made of wood or MDF are placed no closer than 600–800 mm from the stove. With a range hood with a fan power of at least 350 cubic meters/hour and regular filter cleaning — the risk for panels in the dining table area and accent walls is practically eliminated.
A built-in range hood in a wall cabinet (hidden) — does not create conflicts with slatted panels on adjacent walls. A dome range hood — occupies vertical space above the stove, and when planning an accent slatted wall, its body needs to be considered as part of the composition.
What to choose for a modern kitchen, and what for a classic one
This is the key question of style. And the answer to it determines the entire set of specific solutions.
Modern kitchen: minimalism in details, maximum in result
A modern kitchen features clean lines, neutral tones, and high-quality materials without excessive decor. Here, slatted panels and moldings operate in a 'delicate presence' mode.
Slatted panels: MDF or solid wood, narrow slats 40–60 mm, vertical orientation, color — white, light gray, bleached oak, graphite (accent wall). Installation from floor to ceiling without additional horizontal divisions.
Molding: cornice 60–80 mm of rectangular profile without ornamentation. The same color as the ceiling (monochrome). No baroque or classic profiles. Rosette — only if the chandelier is the central element of the dining area design, and even then — in a minimalist round execution with a diameter of 200–250 mm.
Classical and neoclassical kitchen: architectural completeness
A classic kitchen features facades with milling, cornice strips above cabinets, stained glass inserts, and brass hardware. Here, slatted panels and moldings play to their full potential.
Slatted panels: solid oak or ash with oil, slats 60–90 mm, vertical orientation or horizontal panel field with a molding frame. Color — natural warm wood tone or white enamel.
Molding: cornice 90–120 mm with a round and shelf, horizontal belt, ceiling rosette 280–350 mm. Color — white or ivory. All elements are in the same stylistic key, coordinated in scale.
Kitchen in Provence, country, or rustic style
This is a special case where both slatted panels and moldings are given complete freedom.
Slatted panels: wooden, made of solid wood with knots and natural texture, with aged or stained finishes. Horizontal orientation—imitates rustic cladding.
Ceiling decor: polyurethane beams on the ceiling—the main decorative element. They imitate load-bearing ceiling beams, creating a country house atmosphere. Beam color—dark tone like stained wood or terracotta for a Mediterranean style.
Loft-style kitchen
Loft is a style that loves contrasts. Slatted panels made of dark wood or brushed MDF against a brick background, metal inserts in the structure—this is loft in the full sense. Moldings in the classical sense are inappropriate here, but a minimalist rectangular polyurethane cornice is quite organic as a finishing architectural element.
Mistakes that overload the kitchen interior
First mistake: wooden panels in the direct steam exposure zone without protection
Solid wood or MDF without moisture-resistant coating in the area above the stove or sink—guaranteed swelling, deformation, and mold growth within the first year. Either special protection or a different material in this zone.
Second mistake: intricate moldings with a low ceiling
A massive 150 mm cornice with a 2.4 m ceiling literally 'presses down' on the kitchen. The principle: in a kitchen with a low ceiling — only light, delicate profiles.
Mistake three: uncoordinated style of slats and molding
Modern minimalist slats + a Baroque cornice with acanthus — this is not a 'rich contrast', it's a stylistic disaster. All decorative elements must belong to the same architectural language.
Mistake four: slatted panels on all kitchen walls
The kitchen is a small space (usually 8–16 sq.m.). Slatted panels on all four walls create a 'wooden box' effect. Maximum — one accent slatted wall + delicate decor on the remaining surfaces.
Mistake five: ignoring compatibility with the kitchen unit
Slatted panels in the dining area must be coordinated with the kitchen unit facades in color and style. Dark wenge slats with a white unit create a sharp contrast — this is an intentional design technique requiring architectural justification. If there is no such justification — the contrast looks random.
Mistake six: ceiling rosette not to scale
A small rosette (100–150 mm) in the center of a large open-plan kitchen-living room ceiling looks like a decorative misunderstanding. The rosette must correspond to the scale of the chandelier and the height of the room: the rosette diameter — not less than the diameter of the chandelier's base shade.
Specific scenarios: how this looks in real projects
Scenario one: 25 sq.m. kitchen-living room, modern style
Kitchen area: slatted panels on the wall behind the bar counter — 60 mm MDF slats, RAL 7047 color (warm gray), vertical, full height. 70 mm polyurethane ceiling cornice along the entire perimeter, RAL 9010 color (white). Lighting behind the cornice.
Dining area: slatted wall behind the dining table — dark oak oil finish, 50 mm slats, vertical. 280 mm ceiling rosette for a chandelier. Sconces on the sides of the slatted wall.
Effect: the kitchen and dining areas are architecturally separated, each has its own character, but are united by a common cornice along the perimeter.
Scenario two: classic kitchen 14 sq.m., separate room
Wall behind the dining table: 70 mm solid oak slats, white enamel, vertical, with a horizontal molding belt at a height of 1.0 m. The lower part of the wall — panel field, the upper part — neutral.
Ceiling: 100 mm cornice with a round molding, white. 320 mm rosette for a chandelier above the table.
Effect: a small space gains architectural significance — it is no longer a 'kitchen', but a 'dining room'.
Scenario three: kitchen in Provence style, 18 sq.m.
Ceiling: three polyurethane beams across the room (imitation of oak beams). Dark walnut-stained color. Distance between beams 500–600 mm.
Walls: horizontal wooden battens up to 1.2 m high with an aged finish. Above — decorative plaster in a warm tone.
Effect: the atmosphere of a country house without a single square meter of actual country real estate.
About the company STAVROS
The kitchen is a space that demands the best materials. Because everything here is on display, everything is in use, and everything is for the long term. STAVROS produces batten panels from solid wood and MDF with coatings designed for the kitchen environment: durable varnishes, oil-based compounds, moisture-resistant enamels. Battens in the full range of widths and textures — for any style and any scale of kitchen space.
STAVROS decorative polyurethane products — cornices, rosettes, moldings, beams — are specially designed for the humid kitchen environment. Closed-cell polyurethane does not react to steam and moisture, is easy to clean, and can be painted any color. A wide range of profiles allows you to find a solution for both a minimalist modern kitchen and a classic dining room with full architectural decor.
STAVROS is a full-cycle production where each product undergoes geometry and coating quality control. By choosing STAVROS, you get a material that will perform in your kitchen as well as it looks in the project photo.
FAQ: Answers to popular questions
Can wooden batten panels be used in the kitchen near the stove?
At a distance of at least 600–800 mm from the stove — yes, provided there is a functional hood with a capacity of at least 350 cubic meters/hour and a high-quality varnish or oil finish. Directly next to the stove — no.
What cornice is suitable for a kitchen with a 2.5 m ceiling?
A 60–80 mm cornice with a simple profile without complex ornamentation. In a modern style — a rectangular profile with a chamfer. In a classic style — a profile with a round molding up to 80–90 mm.
Is a ceiling rosette needed in the kitchen?
If a chandelier is planned for the dining area — yes, an outlet is appropriate. The diameter is chosen to match the scale of the chandelier: 200–350 mm for a standard kitchen. Above the work zone — not needed: there are built-in lights there, and an outlet in combination with them looks out of place.
What is better for the kitchen — acrylic or polyurethane mounting adhesive for molding?
Acrylic mounting adhesive (like 'liquid nails') is a reliable choice for most situations. In the kitchen, additional point mechanical fastening (concealed finish nails) is recommended for cornices in high-humidity areas.
Can slatted panels and tiles be combined on one kitchen wall?
Yes. A standard solution: the lower zone up to 1.0–1.2 m — tile or stone (work apron or continuation), the upper zone — slatted panels. The border is finished with a horizontal molding.
Is it necessary to prime a polyurethane cornice before painting in the kitchen?
Yes. Light sanding (grit 180–220) + acrylic primer is mandatory preparation before applying the finish paint. This ensures even coverage and durability of the paint in the kitchen environment.


