Article Contents:
- What are flat balusters and how do they differ
- Material savings during cutting
- Templates: foundation of accuracy and repeatability
- Choosing Wood Species
- Cutting technology
- Edge treatment for durability
- Protective stains: foundation of durability
- Mounting methods: reliability above all
- Accounting for angle of inclination during installation
- Step-by-step installation process
- Typical mistakes and how to avoid them
- Design solutions for flat balusters
- Comparison with turned balusters
- Maintenance and care
- Normative requirements and safety
- Economic feasibility
- Modern design trends
- Frequently Asked Questions
- Conclusion

Choosing railings for stairs is always a compromise between beauty, reliability, and installation effort. Turned balusters look impressive but require a lathe, expensive blanks, and meticulous handwork. What if there is a solution that combines the expressiveness of traditional wooden architecture, simplicity of manufacture, and lightning-fast installation?
Flat wooden balustersrepresent exactly such an alternative. Cut from a single board using a jigsaw or router, they open up limitless possibilities for implementing original ornaments. Meanwhile, cutting flat elements saves up to half the wood compared to turning, and installation takes significantly less time.
Why do professional carpenters and DIYers increasingly prefer flat balusters? The answer is simple: technological efficiency. No special equipment is needed, no years of lathe experience required. Just a template, basic power tools, and understanding of woodworking principles. The result is impressive — a strong, aesthetic railing that creates a unique interior character.


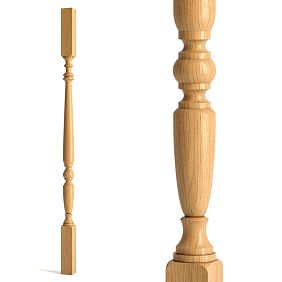
What are flat balusters and how do they differ
Unlike traditional turned round balusters, flat balusters have a rectangular geometry and are cut from a board of specific thickness. This fundamentally changes the approach to designing, manufacturing, and installing the entire staircase structure.
The thickness of such elements usually varies from 20 to 45 millimeters. For internal residential staircases, 30-35 mm is considered optimal — this ensures the necessary rigidity with a small weight.wooden balustersstandard height for stair treads is 900 mm and can reach 1100 mm for balcony railings.
The width of flat balusters is determined by the chosen design and usually ranges from 60 to 150 millimeters. Narrow, elegant posts with delicate ornamentation create a sense of lightness and airiness. Wide, solid elements with large geometric patterns give the structure solidity and monumentality.
The main advantage of flat geometry is the ability to create any ornament and silhouette. Symmetrical classical patterns, asymmetrical modern compositions, geometric patterns, botanical motifs — all this is realized through simple profile cutting. Turning such forms is physically impossible.
Structurally, flat balusters work on bending in their strongest plane. When the wood grain is properly oriented along the length of the element, an optimal strength-to-weight ratio is achieved. This allows using a smaller cross-section of material without compromising the rigidity of the entire railing.


Material savings during cutting
Rational use of wood is one of the key arguments in favor of flat balusters. Turned elements require square blanks with a cross-section exceeding the maximum diameter of the finished part. During turning, corners are shaved into shavings, which account for 30-40% of the original material volume.
Flat balusters are cut from standard lumber. From a 150 mm wide board, you can cut two 70 mm wide balusters with allowance for edge processing and cutouts. Waste is minimal — only sawdust from sawing and shavings from edge routing.
The ability to use wooden planks of arbitrary width makes cutting even more economical. If boards of different widths are available, one can select the optimal option for a specific baluster width. Narrow boards are used for thin elements, while wide boards are used for solid ones.
Rational layout of patterns on a board allows minimizing waste. Professional craftsmen pre-model the cutting, selecting the optimal placement of parts taking into account the grain direction and wood defects. Modern furniture production programs automate this process.
Using short offcuts for manufacturing decorative elements further reduces waste. Small pieces can be used to make overlays, rosettes, corner elements — everything that decorates the staircase and gives it individuality. In the end, only very small offcuts and sawdust end up as waste.
Our factory also produces:


Templates: the basis of precision and repeatability
Manufacturing a series of absolutely identical balusters is impossible without a quality template. This is a key element of the technology, determining the accuracy of geometry and production speed.
The template material must be stable and wear-resistant. Plywood 6-10 mm thick is the optimal choice for most tasks. It does not deform from humidity, is easy to process, and lasts long. Acrylic glass 4-6 mm thick is an alternative for highly precise work, allowing you to see the marking on the blank through the template.
Template manufacturing begins with transferring the drawing to the material at actual size. A pencil, marker, or tracing paper is used. Line accuracy is critically important — any error will be reproduced on each baluster in the series.
Template cutting is performed with a jigsaw using a fine-toothed blade or on a band saw. The cut is made precisely along the marking line, without rushing. After cutting, the template edges are carefully processed with files and sandpaper until they are perfect.
Template quality control is a mandatory stage. The finished template is placed on a control drawing, all deviations are recorded and eliminated. Symmetry of the ornament, smoothness of curves, absence of angularities and irregularities are checked. Only after full compliance with the drawing is the template approved for use.
Template marking helps avoid errors during cutting. The direction of wood grain, top and bottom of the part, and mounting points are indicated on the template. If balusters of several types are being manufactured, each template is numbered and labeled.
Template storage requires care. They are hung on the workshop wall or laid horizontally in special boxes. It is important to protect templates from mechanical damage and deformation — any dent or bend will ruin all subsequent parts.
Get Consultation
Wood species selection
Material determines the appearance, strength, and durability of balusters. Various wood species are suitable for their manufacture, each with its own characteristics.
Oak — the classic for stair railings. This hard and strong wood is practically immune to deformation and lasts for decades. Natural color ranges from light beige to dark brown, expressive texture with clear annual rings adds elegance.Oak balustersare resistant to abrasion and mechanical damage.
Beech is similar to oak in strength characteristics, but has a lighter, almost white color with a pinkish tint. The texture is fine and uniform, and the surface after sanding is exceptionally smooth. Beech stains and paints beautifully, but requires moisture protection — this species is hygroscopic and may deform under high humidity.
Ash has high elasticity and toughness. Its wood does not splinter under dynamic loads, which is important for stair structures. The color is light, with gray or yellowish tones, and the texture is expressive and decorative. Ash is easy to process and finish.
Larch is an ideal choice for outdoor staircases and high-humidity rooms. Natural resins in the wood protect against rot, mold, and wood-boring insects. The color is warm, ranging from light yellow to reddish, and the texture is expressive. Larch does not require complex protective treatment and can be used even without a finish.
Spruce is the most affordable material. Soft wood is easy to process, but requires care during sanding due to the difference in density between early and late wood. Spruce balusters are suitable only for indoor spaces with normal humidity and require mandatory protective treatment.
Wood moisture content is a critical parameter. Using un-dried material leads to warping and cracking of finished products. Optimal moisture content for manufacturingstaircase componentsis 8-12%, which corresponds to the microclimate of heated rooms.
Cutting technology
Transforming a board into a baluster begins with marking. The template is placed on the blank, taking into account the grain direction — it should run along the length of the baluster to ensure maximum strength. The contour is traced with a sharp pencil, and the line must be clear and continuous.
The position of the template on the board is chosen considering wood defects. Knots, cracks, and resin pockets must be outside the part's contour. If defects fall within the working zone, the blank is rejected or the template is shifted to another location.
Cutting is performed with a jigsaw using a blade for clean cuts. The tool feed speed should be moderate — rushing leads to blade deviation and inaccurate cuts. On curved sections, the speed is reduced, and the tool is guided smoothly without jerks.
Internal cuts in the ornament require pre-drilling holes for the saw blade. The hole diameter must be sufficient for the blade to pass freely, usually 8-10 mm. The hole is drilled strictly within the area to be removed, as close as possible to the contour line for ease of work.
Band saws provide higher cutting quality compared to jigsaws. A narrow blade with fine teeth allows performing curved cuts of any complexity. A benchtop band saw is compact and affordable — an excellent solution for a home workshop.
CNC milling — a high-tech cutting method for mass production. The program is created once in specialized software, then the machine automatically produces any quantity of identical parts. The accuracy of processing is unattainable with manual methods, and productivity is several times higher.
Cutting quality control is performed by comparing the finished part with the template. All deviations from the contour are recorded and evaluated. Permissible deviations are 0.5-1 mm on straight sections and up to 1.5 mm on complex curves. More significant deviations require rework or remachining of the part.
Edge processing for durability
Edge quality determines not only aesthetics but also the longevity of balusters. Unprocessed edges absorb moisture, are prone to cracking, and quickly lose their appearance.
Rough processing begins immediately after cutting. Rough saw marks are removed with a rasp or coarse sandpaper on a hard block. The goal is to bring the edge to a single plane, eliminating waves and irregularities. Work is done along the grain to avoid deep scratches.
Beveling is a mandatory operation. Sharp edges on the edges are not only unpleasant to the touch but also concentrate stress in the wood. A small bevel of 1-2 mm, removed around the baluster, solves both problems. The bevel can be formed using a handheld router with a beveling bit or simply with sandpaper.
Intermediate sanding with 120-180 grit sandpaper removes traces of rough processing. Sanding must be done along the grain — crosswise scratches will be visible after applying the finish. Special attention is paid to internal angles of the ornament, where machine processing is impossible.
Final sanding with fine paper 220-320 brings the surface to an ideal state. Properly sanded wood is silky and smooth, without scratches or marks. After sanding, the surface is thoroughly dusted — dust reduces the adhesion of the finish.
Wool raising — a professional trick for achieving flawless smoothness. The sanded wood is lightly moistened with water from a spray bottle, microfibers swell and rise. After drying, these fibers are removed with light sanding using fine paper. The procedure is repeated 2-3 times.
End processing is especially important — end cuts absorb moisture most actively. Ends are sanded with the same care as longitudinal edges. After sanding, they are treated with special sealing impregnations that penetrate the structure and create a moisture barrier.
Protective impregnations: the foundation of durability
Wood without protection quickly loses its appeal and deteriorates. Properly selected and applied protective coatings can extend the life of balusters for decades.
Antiseptic impregnations protect against biological threats — rot, mold, insects. These compounds penetrate deeply into the wood structure and create an unfavorable environment for microorganisms. Water-soluble antiseptics are safe and odorless but require subsequent finishing coating. Oil-based antiseptics additionally repel water.
Primers improve the adhesion of the finish and reduce its consumption. Special wood primers fill pores and equalize the wood's absorption capacity. This is especially important for coniferous species with uneven density and soft woods with large pores.
Oils — traditional finish that highlights the natural beauty of wood. Oil-based formulations based on linseed or tung oil penetrate the structure, protect against moisture, and impart a silky sheen. Oil is easy to apply and easy to renew without removing old layers.
Waxes create a protective film on the surface and give wood a pleasant matte or semi-gloss finish. Oil-wax combines the advantages of both components: oil penetrates the wood, wax protects the surface. Wax finishes are pleasant to the touch and non-slippery.
Lacquers form a strong, highly durable protective film. Polyurethane lacquers are ideal for stair balusters subjected to heavy use. Alkyd lacquers give a warm amber tone. Water-based acrylic lacquers dry quickly and do not yellow.
Stains change the color of wood while preserving the visibility of the texture. Staining allows imitation of valuable species or simple color correction. After staining, wood must be coated with a protective lacquer or oil — stain alone does not protect.
Application technology determines the quality of the result. Wood must be clean, dry, and dust-free. The first layer is applied generously for deep penetration. After drying, the surface is lightly sanded to remove raised fibers. Subsequent layers are thinner, with full drying between them.
Methods of mounting: reliability above all
Safety of the railing depends on the reliability of baluster mounting. There are many ways to fix it, each with specific applications.
Mounting on dowels — a traditional method of high strength. In the end of the baluster and at the point of installation on the step, coaxial holes of 8-12 mm diameter and 30-40 mm depth are drilled. A wooden dowel is inserted with wood glue, ensuring precise positioning and monolithic connection. Advantage — complete concealment of fasteners.
Mounting with screws — a fast, efficient method. 6-8 mm screws are screwed into pre-drilled holes in the baluster body. For concealment, decorative caps in wood color or recesses are filled with wooden plugs on glue. The method allows for disassembly if needed.
Mounting through a baluster guide simplifies installation and ensures perfect geometry. A baluster guide — a guide rail — is mounted to the steps, and balusters are fixed to it. A section can be pre-assembled in the workshop and installed as a whole. The baluster guide guarantees precise spacing and angle of inclination.
“Birdsmouth” joint provides maximum strength with concealed fasteners. Trapezoidal profiles are milled into the base of the baluster and the installation point, engaging with each other. The joint is additionally glued. Requires high precision, but the result is impressive — the joint holds without additional fasteners.
Metal fasteners are used for installation on concrete or stone bases. Anchor plates or sleeves are fixed to the base with anchors, and the baluster is secured with screws. Modern systems allow adjustment of the angle of inclination and compensation for unevenness.
Combined mounting combines several methods for absolute reliability. For example, the baluster is fixed on a dowel and additionally pulled with a concealed screw at an angle. Or installation on a baluster guide is supplemented with polyurethane glue.
Combined fastening combines several methods for absolute reliability. For example, a baluster is fixed to a post and additionally secured by a hidden screw at an angle. Or, installation on a sub-baluster is supplemented with polyurethane glue.
Accounting for the angle of inclination during installation
Correct accounting for the staircase's angle is critically important — it determines the verticality of posts and the geometry of the entire railing.
Marking the cutting angles begins with determining the installation line. If balusters are installed strictly vertically (the most common solution), the bottom end is cut at an angle equal to the staircase's incline. The top end is cut parallel to the bottom or at another angle depending on the node construction with the handrail.
The cutting angles are marked starting from determining the installation line. If balusters are installed strictly vertically (the most common solution), the bottom end is cut at an angle equal to the staircase's incline. The top end is cut parallel to the bottom or at another angle depending on the node construction with the handrail.
An angle marking template accelerates mass production. The simplest option is a block with ends cut at the required angles. When applied to the baluster, it quickly marks the cutting line. Professionals make complex templates with saw guides, ensuring perfect accuracy.
A miter saw with a rotating table is the ideal tool for precise cuts at a specified angle. Set it once, and you can cut any number of balusters with identical geometry. For small volumes, a miter box with intermediate angles is suitable.
Compensation for step irregularities — a moment often overlooked. Even in quality staircases, individual steps may have minor deviations. If balusters are cut identically, posts will not stand vertically. A professional approach — individual fitting of each baluster with measurement of the actual angle.
Verticality control is performed at every installation stage. A builder's level or plumb bob — simple, reliable tools. Laser levels allow simultaneous control of all balusters' verticality and instantly reveal deviations.
Step-by-step installation process
Quality installation of flat balusters requires sequence and attention to detail. Each stage is important for the final result.
Preparation begins with checking the staircase geometry. Steps must lie in one plane without misalignment or sagging. The surface must be clean, dry, and dust-free. If a sub-baluster is planned, its installation line is marked with a string or laser level.
Installation marking is performed according to the selected spacing. Traditionally, balusters are placed one per step, but options with two posts or skipping steps are possible. It is important to accurately mark the first and last baluster, then evenly distribute the intermediate ones. All gaps are checked — they must be equal.
Drilling holes for fasteners requires maximum precision. Holes must be strictly perpendicular or at the specified angle. Guides and bushings eliminate drill deviation. Depth is controlled by a stop or mark on the drill.
Trial installation without glue and final fixation allows assessing the accuracy of marking and fitting. All discrepancies are identified and corrected. Verticality, joint tightness, and spacing are checked. Problems are resolved before final installation.
Installation with glue and fastening begins with applying wood or polyurethane glue to the mating surfaces. Glue is applied evenly without gaps. The baluster is positioned as designed, verticality is checked, and it is temporarily secured with clamps or wedges. Then, additional fastening with selected fasteners.
Installation of sub-balusters and handrails completes the railing assembly. Sub-balusters are fastened to steps with screws or anchors at 300-400 mm spacing. Handrails are mounted on top of balusters and secured from below with angled screws or special brackets. All joints are glued for additional strength.
Final finishing includes filling mounting points with wooden plugs glued in, sanding joints, and applying protective coating. If balusters were pre-finished, only cut and mounting areas are touched up. After drying, the railing is ready.
Typical mistakes and how to avoid them
Knowing common mistakes helps avoid problems and rework. Analyzing others' experience is the path to a professional result.
Using unseasoned wood is a dangerous mistake. Balusters made from green material will inevitably deform after installation, disrupting the railing geometry. Wood must have a moisture content of 8-12% and be acclimated under conditions close to service conditions for at least one week.
Incorrect grain orientation reduces strength and increases the likelihood of cracking. Grains must run along the baluster's length. This is especially critical for thin, complex-shaped elements. Grain direction is controlled during cutting; incorrect blanks are rejected.
Insufficient edge treatment creates problems during coating application and in service. Poorly sanded surfaces absorb coating unevenly, forming spots. Sharp edges quickly wear out and become sources of splinters. Quality sanding and bevel removal are mandatory.
Saving on protective treatment leads to rapid wear and destruction. Unprotected wood absorbs moisture, darkens, and develops mold. Antiseptic treatment and final coating are mandatory operations — saving on them is unacceptable.
Inaccurate marking leads to uneven baluster spacing and a curved railing. Each mark must be carefully checked and rechecked. Using measuring tools and templates eliminates errors.
Weak fastening creates a safety hazard. The railing must withstand a standard load of 100 kg on the handrail. Saving on fasteners is unacceptable. Combined fastening with glue and mechanical fasteners ensures maximum reliability.
Ignoring base irregularities leads to baluster misalignment. If steps have deviations, each baluster requires individual fitting. Installation without verticality control results in a crooked railing.
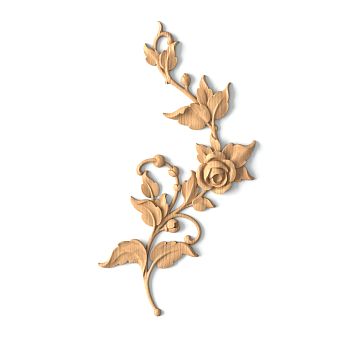
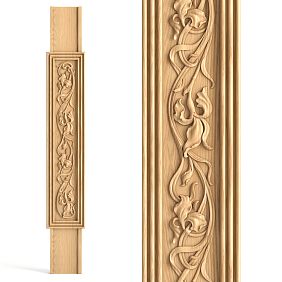
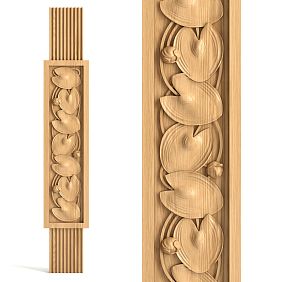
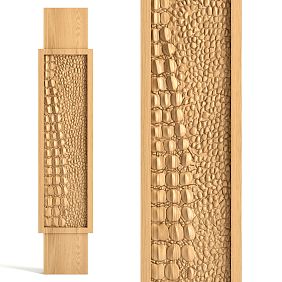
Design solutions for flat balusters
Flat geometry opens up limitless creative possibilities. The ornament and silhouette of balusters define the character of the entire staircase.
Classic symmetrical ornaments with smooth lines and elegant curves suit traditional interiors. Central thickening with decorative cutouts on the sides creates a play of light and shadow. Vegetal motifs stylized as carving add artistic flair.
Geometric patterns are relevant for modern minimalist interiors. Strict vertical or diagonal elements, rhombuses, triangles, circles — all are realized through shaped cutting. Contrasting combinations of solid and open sections create dynamism.
Asymmetric compositions — a bold solution for designer interiors. Balusters with different patterns alternate in a specific rhythm or each post is unique. Such an approach requires careful design, but the result impresses with originality.
Multi-layered constructions create a volumetric visual effect. Two or three layers of wood with different thicknesses and colors are glued with offset, forming a complex relief. Such balusters look expensive and exclusive.
Combining flat balusters with other elements expands design possibilities. Alternating flat and turned posts, metal or glass inserts, applied carved elements — all create a unique staircase appearance.
Staining and toning allow achieving various color effects. Natural wood color with transparent varnish highlights the texture. Stains change the shade while preserving wood grain visibility. Enamels create dense, solid color coatings. Patination and brushing add vintage character.
Integration with other componentswooden staircase componentsensures the harmony of the structure.Handrails and balustersmust match in style, color, and proportions with the handrail, balusters,staircase posts.
Comparison with turned balusters
Flat and turned balusters — two fundamentally different approaches to stair railing design. Each has advantages and limitations.
The manufacturing technology differs significantly. Turned balusters require a lathe, special cutters, and high lathe operator skill. Flat balusters are cut from boards using basic power tools accessible to any craftsman. The entry threshold for manufacturing flat balusters is minimal.
Material consumption during turning is 30-40% higher due to the removal of corners from square blanks. Flat balusters are cut from boards with minimal waste. At large production volumes, wood savings become significant.
The variety of shapes and ornaments is incomparably greater for flat balusters. Turning is limited to rotational bodies — everything that can be made on a lathe has a round cross-section. Flat elements can realize any contours and silhouettes.
Structural strength under proper design is comparable. Turned balusters work uniformly in all directions. Flat balusters are strongest in the plane of their surface, which is taken into account when calculating the railing.
Installation speed of flat balusters is higher due to simplicity of marking and fixing. Turned elements require complex connections and more labor-intensive mounting. At large-scale projects, the difference in labor input is significant.
The cost of finished products depends on complexity and wood species. Under equal conditions, flat balusters are cheaper due to lower material consumption and simpler technology. Exclusive custom works may be more expensive than standard turned ones.
Aesthetic perception is subjective. Turned balusters are associated with classicism and tradition. Flat balusters appear more modern and graphic. The choice depends on the overall interior concept and personal preferences.
Care and Maintenance
Proper care extends the life of balusters and preserves their attractiveness for decades. Regular maintenance prevents problems.
Regular cleaning from dust and dirt is performed with a soft dry cloth or slightly damp cloth. Excessive wetting is avoided — water must not penetrate the wood. Dirt is removed with specialized wood care products.
Coating condition is checked annually. Areas of intensive contact — top ends of balusters, hand contact points — are inspected. Scratches, chips, and damage are recorded and repaired. Timely local restoration prevents defect spread.
Coating renewal is performed as needed. Oil-based coatings require renewal every 2-3 years — a new layer of oil is applied to cleaned surfaces. Lacquer coatings are more durable, but when damaged, they require complete sanding and reapplication.
Checking the strength of fastening — mandatory procedure once a year. The railing must not wobble or squeak. Loose fasteners are tightened, cracked elements are replaced. Safety of the railing — priority.
Controlling room humidity prevents wood deformation. Optimal relative air humidity is 40-60%. During heating season, air becomes overly dry — humidifiers are recommended. Excessive humidity is also harmful — ventilation is required.
Protection from direct sunlight prevents fading and drying. If the staircase is near a window, curtains or blinds are recommended. Ultraviolet radiation destroys coatings and alters wood color.
Prevention of mechanical damage — simple usage rules. Do not strike balusters with hard objects, do not hang heavy items on handrails, do not allow children to swing the railing. Careful handling ensures longevity.
Normative requirements and safety
Stair railings must comply with construction norms and ensure user safety. Ignoring requirements is unacceptable.
The height of internal stair railings is at least 900 mm from the step surface to the top of the handrail. For external staircases and balconies above the first floor — at least 1100 mm. Lower height creates a fall risk.
The distance between balusters in clear space should not exceed 100 mm for child safety. A child’s head should not pass between posts. This is a critical requirement for residential buildings.
Railing strength is tested with a horizontal load of 100 kg applied to the handrail. The structure must not break or suffer residual deformation. Strength calculation is performed during the design stage.
Absence of sharp edges and protruding elements ensures contact safety. All edges are rounded or chamfered. Fasteners are recessed and covered with caps. Surface is smooth without splinters.
Fastener reliability is checked by manually wiggling balusters. Play and wobbling are not allowed. Each baluster must be rigidly fixed at the lower and upper points. Loose fasteners are immediately reinforced.
Wood fire resistance is increased by treating with fire retardants. These compounds reduce flammability and prevent flame spread. Fire retardant treatment is mandatory for evacuation routes and public buildings.
Documentation confirming compliance is required for structures put into operation. Execution documentation includes drawings, strength calculations, and material certificates. Private construction is less regulated, but basic safety requirements are mandatory.
Economic feasibility
The choice of flat balusters is justified not only technologically but also economically. Let's examine where cost savings are achieved.
Material cost is reduced by using cheaper boards instead of square beams. Standard thickness planed boards are available and cost less than calibrated blanks. The difference is noticeable in large volumes.
The absence of need for special equipment reduces capital costs. A lathe is expensive and requires space in the workshop. For flat balusters, a jigsaw, router, and drill — tools that most craftsmen already have — are sufficient.
Reducing labor costs for manufacturing increases productivity. Cutting a flat baluster is faster than turning a round one. In mass production, using CNC machines makes the process fully automated.
Cost savings during installation are achieved through simplicity and speed. No complex joints or precise fitting of each element is required. Installing a section of railing takes hours instead of days.
Design flexibility allows optimizing the structure for specific conditions. Thickness, width, and baluster spacing can be varied to achieve the optimal balance of strength and material usage.
The ability to manufacture them yourself eliminates the manufacturer's markup. A homeowner with basic skills can make balusters for their staircase, saving a significant amount on buying ready-made items.
Durability and repairability reduce operating costs. Well-made and properly installed flat balusters last for decades. When damaged, individual elements can be easily replaced without dismantling the entire railing.
Modern design trends
The world of interior design is constantly evolving, offering new solutions for staircase decoration. Flat balusters fit perfectly into current trends.
Minimalism requires simplicity and functionality. Simple geometric forms without excessive decoration, monochromatic color schemes, emphasis on material texture — all of this is achieved with flat balusters. Thin vertical slats create rhythm and graphic appeal.
Scandinavian style, with its love for natural wood and light tones, finds an ideal partner in flat balusters. Flat balusters made of pine or birch, painted white or gray while retaining visible texture, create a cozy atmosphere.
Loft and industrial aesthetics welcome material combinations. Wooden flat balusters combined with metal elements, exposed fasteners, and rough textures — an expressive solution for urban interiors.
Eco-style and nature-inspired motifs dictate the use of natural forms and unprocessed surfaces. Solid wood balusters with minimal processing, preserving natural irregularities and texture, emphasize the connection to nature.
Neoclassicism combines traditional forms with modern execution. Symmetrical ornaments of classic balusters are simplified and stylized, retaining recognizable silhouette while gaining simplicity.
Ethnic motifs use folk traditions' ornaments. Carved flat balusters with Slavic, Scandinavian, or Eastern motifs create a unique interior atmosphere.
Personalization and uniqueness are the main trends of modernity. Everyone wants an interior unlike others. Authorial ornaments, individual design, exclusive solutions — all of this is easily achieved with flat baluster technology.
Frequently asked questions
What board thickness is optimal for flat balusters?
For indoor staircases, a thickness of 30-35 mm is recommended. This ensures necessary rigidity with minimal weight. For balcony railings and outdoor structures, 40-45 mm is preferable.
Can flat balusters be made without special equipment?
Yes, a jigsaw, drill, and sandpaper are sufficient. A quality result is achievable even with a minimal toolset. The key is an accurate template and careful execution.
How to calculate the required number of balusters for a staircase?
The length of the stair run is divided by the chosen baluster spacing (usually 120-150 mm between centers). A few extra balusters are added to account for defects or damage.
What finish is best for stair balusters?
Polyurethane lacquer provides maximum wear resistance for heavy use. Wax-oil creates a pleasant tactile surface but requires regular reapplication. The choice depends on priorities.
Is antiseptic treatment needed for balusters on indoor staircases?
In rooms with normal humidity, antiseptic is not mandatory but recommended as an extra precaution. For humid rooms and outdoor structures, antiseptic treatment is required.
Can flat balusters be installed on a metal staircase?
Yes, special mounting elements — anchor plates or sleeves — are used, which are welded to the metal frame. Balusters are attached to them with screws.
How often should the finish on balusters be renewed?
How far apart should balusters be for children's safety?
Maximum 100 mm center-to-center between adjacent balusters. This prevents a child's head from slipping between balusters.
Yes, alternating different types of balusters creates an interesting visual effect. It is important to maintain a uniform height and ensure compatibility of connection joints.
How long does it take to manufacture and install flat balusters on a standard staircase?
An experienced craftsman can manufacture a baluster set for a 12-15 step staircase in 2-3 days. Installation takes 1-2 days depending on the chosen mounting method.
Flat wooden balusters are a technologically advanced, economical, and aesthetically expressive solution for stair railings. Their simple cutting, minimal wood waste, quick installation, and limitless design possibilities make them the optimal choice for both professional builders and DIY enthusiasts.
Mastering the technology of manufacturing and installing flat balusters does not require years of experience or expensive equipment. Basic carpentry skills, attention to detail, and following proven methods guarantee a professional result.
Conclusion
A properly designed, high-quality, and correctly installed flat baluster railing will last for decades, maintaining its strength and attractiveness. Regular maintenance and timely servicing extend the life of the structure and keep it in perfect condition.
Mastering the technology of manufacturing and installing flat balusters does not require years of experience or expensive equipment. Basic carpentry skills, attention to detail, and adherence to proven methods guarantee a professional result.
A properly designed, well-made, and correctly installed railing of flat balusters will last for decades, maintaining its strength and attractiveness. Regular maintenance and timely servicing extend the life of the structure and keep it in perfect condition.
STAVROS offers a wide range ofwooden staircase balusters, staircase componentsand many other solid wood and polyurethane products to create a harmonious and safe interior. Professional consultants will help you select the optimal solution for your project, and the quality of our products is proven by years of experience in the market.