Article Contents:
- Anatomy of a Stair Railing: What Consists of What
- Posts – The Load-Bearing Skeleton of the System
- Balusters – Rhythm and Protection
- Handrail – The Functional Horizontal Element
- Stringer or Carriage – The Foundation of the Entire Structure
- Tool Arsenal: What You Can't Start Without
- Essential Tools
- Consumables
- Parameter Calculation: The Math You Can't Skip
- Railing Height
- Baluster Installation Spacing
- Number of Balusters per Flight
- Handrail Length in Linear Meters
- Material Selection: The Wood Species Decides Everything
- Step-by-Step Installation: From Marking to Handrail
- Step One: Material Acclimatization
- Step Two: Marking
- Step Three: Installation of Support Posts
- Step Four: Preparing Balusters for Installation
- Step Five: Installing Balusters on the Stringer
- Step Six: Installing the Handrail
- Common Mistakes: An Honest Post-Mortem
- Mistake One: Inaccurate End-Cutting Angle
- Mistake Two: Axial Hole Not on Axis
- Mistake Three: Fastening Without Glue
- Mistake Four: Handrail Height Not Accounted For
- Mistake Five: Uneven Spacing Between Balusters
- Mistake Six: Post Without Additional Wall Mounting
- Mistake Seven: Final Finishing Before Glue Fully Sets
- Final Finishing: The Overall Impression
- Sanding
- Finish
- About STAVROS: Twenty Years Behind Every Element
- FAQ: Answers to Key Questions
Let's be honest. Most guides for installing stair railings are either too brief—'screw the balusters from the top and bottom'—or so academic that by the third page you're falling asleep with a pencil in your hand. This article is different. There's no fluff, no empty encouragement like 'you'll manage.' Here is a specific, professional-tested technology, explaining every decision and analyzing every mistake that later costs you a second repair.
Handrails and balusters— is the part of the staircase touched by hand every day. It's the only structural element that physically contacts everyone who goes up or down. And that's precisely why shoddy work is unacceptable here. A swing instead of a handrail, a wheeled mount instead of a rigid connection, a baluster that gets kicked by a shoe toe with every step—it's not just unsightly. It's dangerous.
We'll cover everything from start to finish: structure, material selection, tools, marking, installation, finishing, and typical mistakes everyone makes the first time. Read to the end—and there won't be a second time.


Anatomy of a Stair Railing: What Consists of What
Before picking up a drill, you need to understand the system.Installing Handrails and Balusters— is work with four different elements, each bearing its own load and having its own installation logic.


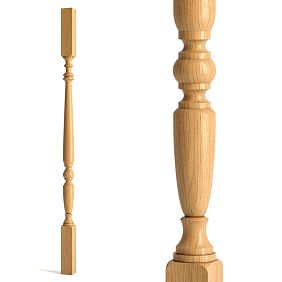
Posts—The Load-Bearing Skeleton of the System
Support posts are installed at the start of a flight, at the end, at all turns, and on landings. These are the most massive elements: a standard post cross-section ranges from 80×80 to 120×120 mm. They bear the main loads: horizontal from the handrail and vertical from the system's own weight.
The post is the foundation of the entire railing. If it's installed crookedly or unreliably, no subsequent stage will fix it.Wooden Stair Postsfrom STAVROS come in several profiles—with square cross-sections, with shaped milled faces, with a lower skirt-foot. The top of the post is crowned with awooden finial—spherical, pyramidal, or shaped: the final point of the entire vertical composition.
Our factory also produces:


Balusters—Rhythm and Protection
wooden balusters for staircases— are intermediate vertical posts that fill the space between the posts. They serve a protective function (preventing falls) and a decorative one (creating the railing's rhythm). Typical cross-section is 40–60 mm in diameter or square side.
Balusters distribute the handrail load along the entire flight length. They shouldn't be 'just decoration'—each one contributes to the system's rigidity. Therefore, each baluster's fastening must be as reliable as the post's—the difference is only in scale.
Get Consultation
Handrail—The Functional Horizontal
The handrail is the only railing element a person holds with their hand. This is important: its cross-section must be comfortable to grip—standard diameter is 60–70 mm. A handrail that's too thin (less than 40 mm) slips in the palm. One that's too wide (more than 90 mm) is uncomfortable to hold when descending.
Solid wood handrailsare produced in several profiles: classic oval, rectangle with rounded edges, shaped profile with a curve. The most crucial parameter is straightness: the handrail must not have propeller-like twisting along its axis. It's easy to check: lay it on a flat surface and ensure the entire length lies flat without bends.
Stringer or Carriage—The Foundation of the Entire Structure
Technically, the stringer and carriage are elements of the staircase itself, not the railing. But it's to them that the balusters are attached, and the quality of these elements determines the reliability of the entire installation. The stringer is the side inclined beam covering the step ends. The carriage is the load-bearing beam on which the steps rest from above. Depending on the staircase design, balusters are installed either on the stringer or directly on the steps.
Tool Arsenal: What You Can't Start Without
Mediocre tools yield mediocre results. This isn't a tautology—it's a law that manifests with every imprecise angle cut, every shaky marking line, every 'it stands okay' instead of 'it stands perfectly.'
Essential Tools
Miter saw with an angle stop—the cornerstone of the project. Without it, you can't make a precise 45° cut for balusters on an inclined flight. Hand-cutting with a saw 'by eye' is not an option for visible joints. If you don't own a miter saw—rent one.
Laser level—for marking horizontal lines around the perimeter and checking the verticality of each baluster. A bubble level will also work, but the job will take one and a half times longer.
Drill with a set of wood drill bits (Ø8, Ø10, Ø12, Ø14 mm) and spade bits for deep mounting holes. The bits must be sharp—a dull bit tears fibers instead of cutting them.
Protractor (preferably digital) — for measuring the precise angle of the staircase flight. This number will be needed to calculate the angle for cutting the ends of the balusters.
Corner clamps — if you plan to glue frame structures.
Screwdriver, rubber mallet, chisel, plane, calipers — no explanation needed.
Consumables
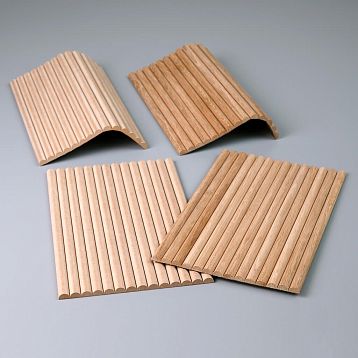
M8 or M10 metal threaded studs (stainless steel or galvanized), high-strength PVA wood glue or two-component epoxy, finishing nails Ø1.4×40 mm, wood filler, sandpaper grit 120–150–220–320, acrylic primer, finish coating (oil, varnish, enamel).
Parameter calculation: the math you can't skip
Installation doesn't start with tools — it starts with calculation. An error in the numbers at this stage will be discovered at the next one, when it can only be corrected with losses.
Railing height
According to regulatory requirements in residential buildings, the height of the staircase railing must be at least 900 mm from the surface of the step or landing floor. In homes with children, 1000–1050 mm is recommended. The height of the baluster is then = railing height − handrail thickness − gap under the lower end (if any).
Baluster installation spacing
Critical safety parameter: the gap between adjacent balusters in residential buildings must not exceed 100–120 mm. The formula is simple: spacing = baluster diameter + gap ≤ diameter + 100 mm.
Practice: with a turned baluster diameter of 55 mm, the optimal spacing is 150–155 mm (gap 95–100 mm). Beautiful and safe.
Number of balusters per flight
-
Determine the number of steps
-
Multiply by the chosen number of balusters per step (1 or 2)
-
Add balusters for the horizontal landing
-
Add 3–5 pieces as a reserve
Example: 14 steps × 2 balusters = 28 pieces per flight + 8 for the landing = 36 pieces. Order 40.
Handrail length in linear meters
Flight length along the incline + horizontal landing length + transition sections and a 10% reserve. Measure the actual length along a stretched cord following the handrail line — this is more accurate than calculating using the Pythagorean theorem from horizontal and vertical projections.
Material selection: the wood species decides everything
Several wood species are available for installing wooden railings — and each carries a different answer to the question 'what are you building and for how long'.
Oak — if the answer is 'forever'. Density 700–750 kg/m³, Brinell hardness 3.7. Resistant to wear, moisture, and biological decay. Expressive grain under clear oil — unmatched. Downside: working with oak is harder, tools require more power, price is higher.
Buy wooden balustersOak railings are an investment that won't require replacement in 15 years. Alongside oak furniture in the living room and oak baseboards around the hall perimeter — a unified material language for the home.with matching legsin the living room and oakbaseboardaround the perimeter of the hall — a unified material language for the home.
Beech — if the answer is 'for a long time and without compromises on precision'. The ideal species for complex turned profiles: sharp relief, even surface, accepts any finish well. Slightly softer than oak, but with proper treatment, it lasts for decades.
Pine — if the answer is 'country house, budget, rustic'. Softness (350–450 kg/m³) means impact marks over time — but for a country interior, this is organic aging, not a defect.
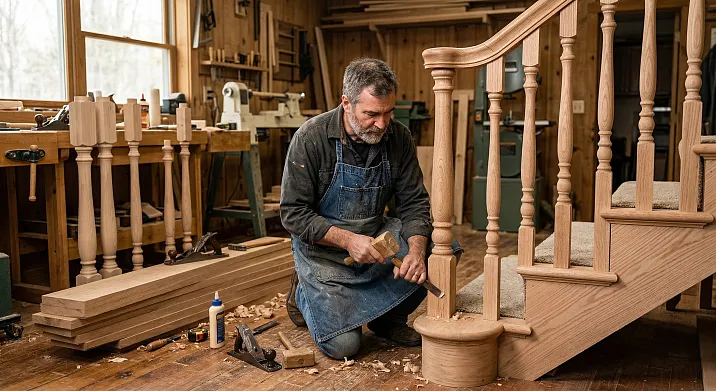
Step-by-step installation: from marking to handrail
Stage one: material acclimatization
Wooden railings and balusters must be acclimatized in the room for at least 72 hours before installation. This is not a ritual — it's physics. The wood reaches equilibrium moisture content with the environment, and if you install non-acclimatized material, it will reach equilibrium after installation — with warping, cracks, and joint separation.
Acclimatization conditions: temperature 18–23°C, air humidity 40–60%. The material is laid out horizontally, not stacked — with gaps for air circulation.
Stage two: marking
Using a laser level, mark a horizontal line on the wall at the height of the intended handrail. This is the control line. Now mark the installation points for the balusters on the stringer (or steps) — evenly, with the calculated spacing.
Check that the extreme points are symmetrical relative to the first and last step. Uneven spacing at the beginning and end of the flight is an error that is immediately noticeable.
Mark the installation points for the posts: at the beginning of the flight (bottom post), at the end (top post), on the landing (corner post if there is a turn). The posts must stand strictly vertical — check with a laser level in two perpendicular planes.
Stage three: installation of support posts
A post is not just a 'large baluster'. It is a load-bearing support on which the rigidity of the entire system depends. The fastening must be as reliable as possible.
On a wooden stringer or landing: drill a mounting hole Ø12–14 mm, 80–100 mm deep. Install an M12 stud into the hole using epoxy adhesive. After the adhesive cures (8–12 hours), screw the post onto it through an embedded nut in the bottom end. Additionally, apply PVA wood glue to the end plane of the post.
On a concrete slab or concrete step: install an M12 anchor bolt into a Ø14 mm hole, 80 mm deep. Fill the hole with epoxy or acrylic anchor compound. Curing time — according to the anchor manufacturer's instructions (usually 24–48 hours at 20°C). Then screw the post on.
Critical moment: after installing each post, check verticality with a level. Deviation of more than 1 mm per meter of height — redo it. Half a millimeter deviation at the bottom end at handrail level turns into 4–5 mm — and this is already visible to the naked eye.
Stage four: preparing balusters for installation
This is where the work that beginners underestimate begins. Each baluster requires:
a) Trimming the bottom end to match the flight angle. Measure the staircase inclination angle with a protractor along the stringer surface or along the step line. Standard angle — 30–38°. Set the miter saw to this angle and cut the bottom end of each baluster. The bottom plane should fit tightly against the stringer without gaps.
b) Trimming the top end. Cut at the same angle, but in the mirror direction — the top plane should be parallel to the handrail.
Check: take two trimmed balusters, place them side by side on the stringer — the top ends should lie in the same plane. If so, the angle is correct, and you can cut all the others using the same saw fence setting.
c) Drilling axial holes for studs. Drill a Ø10 mm hole, 50–60 mm deep, in the center of the bottom end of each baluster. It must be axial — any deviation will cause the installed baluster to be skewed. For accuracy, use a drilling jig or drill press.
Stage five: installing balusters on the stringer
The most labor-intensive stage. Work sequentially, baluster by baluster, without rushing.
Stud fastening technology (recommended):
-
Drill Ø10 mm holes, 40–50 mm deep, at the marked points on the stringer
-
Install M8 studs, 90–100 mm long, using epoxy adhesive (50 mm in the stringer, 40–50 mm protruding)
-
Curing time 2 hours for initial setting
-
Apply PVA wood glue to the bottom end of the baluster and the contact area with the stringer
-
Place the baluster onto the stud using the axial hole
-
Press until there is tight contact with the stringer
-
Check verticality with a level — in the plane of the flight and across it
-
If necessary, align by inserting wedge-shaped shims (remove after the adhesive sets)
Work on every other one: first the odd-numbered ones, after 4 hours — the even-numbered ones. This prevents disturbing already set connections when working nearby.
Alternative technology — installation on steps:
If the staircase is on stringers and balusters are attached not to the stringer but to the horizontal planes of the treads — step back 50–70 mm from the front edge of the step and install the baluster using a platform fastener. In this case, the bottom end is horizontal (without angular trimming), and the baluster verticality is checked in the usual way.
Stage six: handrail installation
After installing all balusters and allowing the glue to fully cure (minimum 24 hours), we proceed to the handrail.
Preparation: stretch a string along the top ends of the balusters — it should form a smooth straight line without protruding or recessed balusters. If there are deviations — trim the ends of the offenders with a chisel.
Handrail attachment:
First method — using dowels from below. Install an M6 dowel in each top end of the baluster, protruding 25–30 mm. In the bottom plane of the handrail, rout a groove or drill blind holes for these dowels. Apply glue to the ends of the balusters and fit the handrail from above. Apply even pressure along the entire length and check for straightness.
Second method — using screws from below. In the handrail, at the location of each baluster, drill a pilot hole from below at a 15–20° angle to the vertical. Drive a 4.5×70 mm screw through the bottom plane of the handrail into the body of the baluster. Countersink the head by 3–5 mm and cover with a wooden plug.
Connection to posts: at points where the handrail meets a support post, the connection is made via a horizontal M8 bolt or a special handrail screw at a 45° angle. This is a high-stress joint — pay special attention when making it.
Common mistakes: an honest post-mortem
First mistake: inaccurate end cut angle
A baluster with an incorrectly trimmed bottom end stands crooked — clearly visible from three meters away. Fixing it after installation requires removing the baluster. Cut precisely or don't cut at all.
Second mistake: off-center axial hole
The dowel enters the baluster at an angle — the baluster is tilted from vertical after installation. The cause — the drill was held 'by eye,' without a guide jig. Always use a depth stop or a drill stand.
Third mistake: fastening without glue
'Tighten it harder — it'll hold.' After six months of air drying during the winter heating season, the joint 'settles,' and the metal in the wood develops play. Glue is mandatory: on the dowel before entering the stringer and on the baluster end before installation.
Fourth mistake: handrail height not accounted for
Balusters of the required height were installed, the handrail was mounted — and the railing height turned out to be 950 mm. Good. Or 870 mm. Bad. Calculate in advance: railing height = baluster height + handrail thickness - depth of handrail seating on the baluster.
Fifth mistake: uneven spacing between balusters
If during marking it wasn't considered that the distance from the outermost baluster to the post is slightly different — 'gaps' form at the edges of the flight. This is noticeable. Calculate the spacing from post to post, taking into account the diameter of the posts themselves.
Sixth mistake: post without additional wall attachment
The bottom post at the start of the flight experiences horizontal load every time someone leans on the handrail. A dowel in the stringer alone is insufficient. Add a metal gusset or a wooden bracket to the wall.
Seventh mistake: finishing before glue fully cures
Varnish or oil applied before the wood glue is completely dry will crack at the joints during subsequent shrinkage. Wait 48–72 hours after the last joint — and only then proceed to finishing.
Finishing: the final impression
Sanding
Sequence: grit 120 → 150 → 220 → 320 (for oil or semi-matte varnish). Move strictly along the grain. Cross-grain scratches from sanding — these become ripples on the surface under a clear finish.
After each pass — remove dust. The best tools are a tack cloth or a special anti-static cloth. Dust under varnish is forever.
Finish
Oil: two to three coats with a 24-hour interval between coats. First coat — thin oil, applied generously, and excess wiped off after 20 minutes. Second and third coats — thicker. Result: a warm, matte surface that highlights the grain. Renew every 3–5 years.
Polyurethane varnish: primer + 2 coats of finish varnish with sanding using 320 grit between coats. Result: a glossy or semi-matte surface with maximum protection. Durability — 7–10 years under normal use.
White enamel (for classic interiors): primer → sanding with 220 grit → two coats of enamel with sanding using 320 grit between coats.Wooden stair railingsin white — this is Provence, neoclassical, modern classic. Next to whitewith wooden cornicesand whiteplinth— a unified spatial image.
About STAVROS: Twenty Years Behind Every Element
When you choosewooden stair componentsfrom the STAVROS catalog, each part carries a story that began in 2002. Artists Andrey Ragozin and Evgeny Tsapko founded a workshop that received an order to restore the Konstantinovsky Palace in Strelna just a year later. The Hermitage, Alexander Palace, Trinity-Izmailovsky Cathedral — these projects established the standard: every production element must be accurate to tenths of a millimeter.
Today STAVROS produces a complete set of wooden stair elements: over 60 baluster models, posts and finials, handrails in several profiles and species — beech, oak. In-house drying chambers ensure material moisture content of 8–14%. Production under constant temperature and humidity control is not marketing copy — it's protocol.
Orderstaircase componentswith STAVROS means getting a system where all elements are designed and produced together: the baluster will match the handrail in species, the post will match the baluster in tone, the finial will match the system in scale. Showrooms in Moscow and St. Petersburg, delivery across Russia, orders from a single unit.
FAQ: Answers to Key Questions
How many balusters per step?
Standard is one or two. One baluster per step — spacing about 300 mm (step width), gap about 250 mm. This is too wide from a safety perspective (norm is no more than 100–120 mm). Therefore, for residential stairs, two balusters per step are recommended: spacing about 150 mm, gap about 90–100 mm.
How to attach balusters to a metal stringer?
Via a special metal shoe-bracket bolted to the stringer. An M8–M10 stud is screwed into the bottom of the baluster, inserted into the bracket hole, and secured with a lock nut. Treat the wooden baluster with antiseptic at the bottom before installation.
Why does the handrail creak after a few months?
Three reasons. First — the connection between handrail and balusters developed play due to wood shrinkage: tighten the screws or add glue to the gap (PVA without pressure, drop by drop). Second — the handrail rubs against the wall or metal bracket: add a felt pad at the contact point. Third — the baluster has play at the bottom end: disassemble, inject epoxy glue into the joint, cure under pressure for 24 hours.
Can wooden railings be installed on a metal staircase?
Yes, this is widely practiced. The wooden handrail is attached to the metal railing via special bracket-holders fixed to a metal tube or profile. Balusters can be either wooden or metal — with a wooden handrail on top. The only condition: ensure a ventilation gap between metal and wood — without it, condensation will damage the wooden element from below.
How to check the reliability of an installed railing before handover?
Normative load for residential stair railings is 100 kg per linear meter applied horizontally. Practical test: press horizontally on the handrail with 50–60 kg of force. No play, no creaking. Pull each baluster by hand — it should stand firm. Press down on the handrail in the middle of the span between posts: deflection should not exceed 5–7 mm under an 80 kg load.
How to prevent beech balusters from darkening over time?
Beech under oil finishes darkens slightly — this is a natural oxidation process. To slow it, use oil with a UV filter or polyurethane varnish with a UV blocker. Refresh the top coat every 2–3 years. Bleached beech (with white pigment added to the oil) ages almost unnoticeably — a good option for white-themed interiors.