


Article Contents:
- What is a Floor Wooden Skirting Board — Function of the Decorative Strip at the Floor
- First Function: Structural — Conceal the Gap at the Wall
- Second Function: Protective — Takes Impacts
- Third Function: Architectural — Lower Tier of the Interior
- Why Wooden Skirting Board is Better Than Plastic
- Profiles: Shaped, Flat, Cove, Boot, Euro — Full Overview
- Flat Rectangular Profile
- Shaped Profile with Chamfer
- Cove (Quarter Circle)
- "Boot"
- Euro Skirting
- Profile with Cable Channel
- Which Wood Species Are Used — Oak, Pine, Beech, Larch
- Oak: Durability and Character
- Beech: Plasticity and Versatility
- Pine: Affordability and Ease of Installation
- Larch: Natural Resistance
- Dimensions: Width, Height, Thickness — How to Choose for the Ceiling
- Height (Width of the Front Surface)
- Thickness
- Plank length
- Size Table by Ceiling Height
- Installation of Wooden Skirting Board: Tools, Fasteners, Sequence
- Tools — Don't Start Without These
- Fasteners — What to Fix With
- Surface Preparation
- Step-by-Step Installation Sequence
- How to Hide the Gap Between Skirting Board and Wall
- Care and Painting — How to Extend Service Life
- Types of Finishes and Care for Each
- Regular Cleaning
- Repair and restoration
- Finishing Wall Base with Wood: Additional Possibilities
- Baseboard + wide wooden molding above
- Baseboard as part of a pilaster system
- Baseboard with lighting
- Where to buy solid wood floor baseboard — catalog, delivery
- What to look for when choosing a manufacturer
- FAQ - answers to popular questions
- About the Company STAVROS

Wooden floor baseboard is one of those interior elements that are only noticed when they're wrong. A plastic white profile against an oak parquet floor, a baseboard that's too low in a room with three-meter ceilings, a crooked joint in the corner — all of this instantly 'ruins the picture,' even if a person can't articulate exactly what's wrong. And conversely: a properly chosenthe wooden floor baseboardcreates what in design is called 'completeness' — the feeling that everything in the room is in its place.
This article is a complete practical guide. Everything you need to know toto buy wooden baseboarddo it once, correctly, and not return to this question for another twenty years. Types of profiles, wood species, sizes, installation from the first nail to the final painting, care and protection — all in one place, in order, without fluff.


What is a wooden floor baseboard — the function of a decorative strip at the floor
If you ask a non-specialist what a baseboard is for, they'll answer: 'To cover the gap at the wall.' That's true, but it's only a third of the truth. In fact, a wooden floor strip performs three completely different functions, and understanding each of them helps make the right choice.


First function: structural — to hide the gap at the wall
Any floor covering — parquet, laminate, engineered wood, tile — is installed with an expansion gap at the walls. Wood is alive: it expands with increased humidity and contracts when it decreases. Without an 8–12 mm gap at the walls, parquet will buckle at the first climate change. The baseboard covers this gap — hides the wall gap so that it's technically necessary but visually invisible.
Our factory also produces:


Second function: protective — takes the hits
The lower part of the wall is the most vulnerable. That's where chair and sofa legs rest, where the vacuum cleaner passes, where children's toys and bicycle pedals hit. The baseboard takes these hits instead of the wall. And ifWooden baseboarda solid oak one gets a scratch or chip — it can be sanded and restored. A wall — cannot.
Get Consultation
Third function: architectural — the lower tier of the interior
This is the least obvious function, but it's what distinguishes a good baseboard from a merely sufficient one. A decorative floor strip is a horizontal line encircling the entire room. It visually 'ties' the floor and walls together, creates a lower architectural tier, sets the tectonics of the space. A wide solid wood baseboard forms a true plinth — as if the walls are standing on it. Without a baseboard or with an inappropriate one — the space loses stability.
Why wooden baseboard is better than plastic
Comparison by key parameters puts everything in its place:
| Parameter | Wooden skirting board | Plastic baseboard |
|---|---|---|
| Service life | 30–50 years | 5–10 years |
| Repairability | Sanding, touch-up painting | Replacement |
| Finishing options | Oil, varnish, stain, paint | Factory only |
| Ecological | 100% natural | Contains PVC |
| Tactile sensation | Warm, alive | Cold, plastic |
| Price | Higher | Below |
| Visual effect | Architectural | Utilitarian |
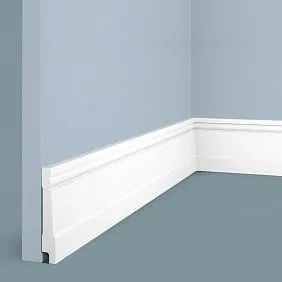
Profiles: shaped, flat, quarter-round, shoe, Euro — a complete overview
solid wood trim piecesare produced in several basic profiles, each with its own purpose and stylistic application. Choosing a profile means choosing the character of the interior.
Flat rectangular profile
The most laconic option. A flat rectangular strip without any bevels or rounding. It reads as a clear horizontal line at the floor — nothing extra. This exact profile is used in Scandinavian minimalism, loft, and modern functionalism. Width — from 50 to 100 mm, thickness — 12–18 mm.
Installation is maximally simple: straight ends are easily trimmed, joints in corners are made either at 45° or butt-jointed with a decorative corner block. The only requirement — walls must be level, because the flat profile "honestly" shows any base irregularities.
Shaped profile with bevel
A decorative floor profile strip with one or two bevels on the top edge. The bevel creates a shadow line along the top edge of the baseboard — this shadow stroke separates the baseboard from the wall, emphasizing it as an independent element. The profile is universal — works in both modern and classic interiors. Width — 60–120 mm.
Quarter-round (quarter circle)
A traditional baseboard in the shape of a quarter circle. The lower edge adjoins the floor, the upper edge — the wall, forming a smooth transition. In its pure form, quarter-round is rare today — it looks archaic and somewhat "Soviet." However, as an element of a more complex profile — the lower rounded part combined with a straight upper zone — quarter-round works excellently, giving the baseboard a soft transition to the floor.
"Shoe" profile
A profile with a characteristic lower protrusion — a "toe" — which presses the baseboard against the floor covering. This protrusion creates contact with the floor covering not along the entire width of the lower plane, but only along the edge. Practical advantage: small floor irregularities (up to 3–4 mm) are compensated without gaps — the "toe" presses against the covering, the rest of the lower plane does not touch the floor.
Eurobaseboard
Wide, typically not less than 80 mm, with a developed upper profile consisting of several steps. The upper edge has one or two horizontal ledges, which create an expressive play of shadows. This is a "mature" architectural profile, suitable in interiors with pretense to classicism or neoclassicism. In combination withwooden moldingsand pilasters, the Eurobaseboard creates a full-fledged order system for the lower tier of the wall.
Profile with cable channel
wooden floor profilelooks like a regular baseboard — no hints of a technical channel. Meanwhile, the power cable for outlets or wall lights runs inside, completely hidden. This is especially relevant in already finished rooms where wall chasing is undesirable.What wood species are used — oak, pine, beech, larch
Choosing a species means choosing a balance between durability, beauty, and budget. Let's examine four main options with their real characteristics.
Oak: durability and character
Oak is the undisputed leader for baseboards in residential spaces. Density 650–750 kg/m³, Brinell hardness 3.7 units (this means: even a stiletto heel won't leave a dent), natural tannin content — substances that protect the wood from fungus, insects, and rot without any additional treatment. Service life with normal care — 50 years or more.
Oak's texture is expressive: with tangential cut — wide wavy rings, with radial cut — characteristic medullary rays ("moire"). Can be tinted to any color — from bleached to graphite-dark. With oil finish, the texture is maximally open; with varnish — it shines, deepens.
One important property of oak — it contains acids that react with iron. Unprotected iron nails and screws will leave dark streaks in solid oak. Fasteners must be galvanized or stainless.
Beech: plasticity and versatility
Beech density 620–680 kg/m³, uniform fine-pored structure without a pronounced pattern. It is this uniformity that makes beech an ideal material for painting white, gray, or any other color: the surface is applied evenly, without spotting, paint adheres flawlessly.
Beech responds well to steaming and bending — it can be used to make radius baseboards for columns, rounded corners, bay windows. Minus: beech is more hygroscopic than oak. With air humidity fluctuations of more than ±10%, beech baseboard may slightly deform. In well-heated, air-conditioned spaces — no problems.
Pine: affordability and ease of installation
Pine baseboard — a budget option for dachas, country houses, temporary housing. Density 430–540 kg/m³ — this is a light, soft wood that is easy to cut, paint, and process. It also scratches easily: heels, chair legs, pets — everything will leave a mark on pine.
For a residential space with intensive use, pine baseboard requires a hard varnish finish of at least 3 coats. With it, it will last 15–20 years. Without protective coating, it wears out very quickly.
For residential spaces with heavy use, pine baseboards require a hard lacquer coating of at least 3 layers. With this, they will last 15–20 years. Without protective coating, they wear out very quickly.
Larch: Natural Durability
Larch is an underrated choice. Its density is 590–665 kg/m³, but the key points are its resinous nature and natural moisture resistance, which significantly surpass all other coniferous species. Pile foundations for Venetian palaces were built from larch—and they still stand today. For baseboards in a kitchen, bathroom, or any other space with periodically high humidity, larch is the optimal choice.
Larch texture—expressive annual rings, a rich reddish-orange hue. With oil coating, it acquires an amber glow, very vibrant and warm.
Dimensions: Width, Height, Thickness—How to Choose for the Ceiling
Baseboard size is not a matter of taste. It's mathematics related to ceiling height and room proportions. An incorrect size is immediately noticeable.
Height (width of the front surface)
This is the main visual parameter. In architecture, a simple rule applies: the baseboard should occupy approximately 1/24–1/30 of the room's height. For a 2.5 m ceiling—baseboard 80–100 mm. For 2.7 m—90–110 mm. For 3.0–3.2 m—100–130 mm. For 3.5 m and above—140–180 mm.
An oversized baseboard (too tall for the given ceiling) weighs the space down: the room appears lower than it is. An undersized one (too thin a strip) makes the interior look unfinished, 'skimpy'.
Thickness
Baseboard thickness—12–25 mm depending on height and profile. Thin baseboards (12–15 mm)—for minimalist interiors where lightness is important. Thick ones (20–25 mm)—for monumental classic solutions. Important: baseboard thickness should not exceed the projection of pilasters or moldings if they are used in the interior.
Plank Length
Standard plank lengthwooden trim—2.0–4.0 m. For long walls (over 4 m), the baseboard will need to be joined. The joint is made at a 45° angle or straight, but always in an inconspicuous place—behind furniture, not on a visible part of the wall.
Size table by ceiling height
| Ceiling Height | Recommended skirting board height | Profile |
|---|---|---|
| 2.4–2.6 m | 60–80 mm | Flat, Euro |
| 2.7–2.9 m | 80–100 mm | Shaped, Euro |
| 3.0–3.3 m | 100–130 mm | Euro, complex shaped |
| 3.4–3.8 m | 130–160 mm | Euro extended |
| Above 3.8 m | 160–200 mm + | Architectural |
Installing Wooden Baseboard: Tools, Fasteners, Sequence
Baseboard installation is work that can be done independently with the right tools and understanding of the sequence of actions. The cost of a mistake is low: make a mistake—cut again. But there are nuances that save time and money.
Tools—don't start without these
Miter saw—the only tool that provides precise cutting at a 45° angle. A regular handsaw or angle grinder is absolutely unsuitable for this: a 0.5° error on a long baseboard creates a gap in the joint that cannot be hidden with putty. A miter saw can be rented—it costs 500–800 rubles per day.
Laser level with linear projector—for checking the horizontal alignment of the baseboard's top edge. If the wall is slanted, which is common in panel buildings, the baseboard will 'drift' up or down without a level.
Finish nail set and hammer—for sinking nail heads into the solid wood. Protruding heads on the surface are a visual defect.
Caulking gun—for filling joints and corners.
Fasteners—how to secure
There are three methods for securing wooden baseboards, and each has its own area of application.
Liquid nails + finish nails. The most common method. Apply polyurethane construction adhesive in a zigzag pattern to the back of the baseboard, then press the baseboard against the wall and additionally secure it with 1.6×45 mm finish nails every 40–50 cm. Sink the nail heads and fill them with putty. Advantage: reliable, flexible, the baseboard doesn't 'shift'. Disadvantage: removal is difficult.
Construction adhesive only. Suitable for flat, thin baseboards (up to 15 mm thick) on perfectly smooth walls. Hold in place with painter's tape until the adhesive dries. Quick and no drilling, but requires a smooth surface.
Dowel plugs with screws. Used on concrete or brick walls where adhesive provides weak adhesion. Fastening spacing is every 40–50 cm. Screw heads are concealed with wooden plugs or wood putty.
Surface preparation
Before installation, the walls at the base must be puttied and painted. The baseboard is installed on the finished wall — paint does not go under it. The floor must be laid and installed. The baseboard is installed last among the floor elements, when all coverings are already in place.
Important: the moisture content of the solid wood before installation should be 8–12%. If the delivered baseboard has been stored in a warm, dry room with 30% humidity or, conversely, in a damp one — it will warp after installation. Allow the baseboard to 'acclimatize' in the installation room for at least 48 hours.
Step-by-step installation sequence
-
Measure the perimeter of the room. Calculate the length of each wall. Record the number of internal and external corners.
-
Calculate the total linear footage with a 10–15% margin (for cutting and errors).
-
Cut the planks. Start with the most visible, longest wall. Work clockwise or counterclockwise — the main thing is to stick to one direction.
-
Internal corners. One plank is cut at a 45° angle on the left, the second — at a 45° angle on the right. During installation, the ends butt against each other. Alternative: one plank is brought flush to the corner with a square end, the second 'rides' over it at a 45° angle — coping.
-
External corners. Both planks are cut at a 45° angle facing each other.
-
Apply adhesive to the back of the plank in a zigzag pattern.
-
Press the plank against the wall, check for level with a spirit level.
-
Secure with nails every 40–50 cm. Sink the heads with a nail set.
-
Fill all joints and corners with acrylic sealant. Smooth with a putty knife. Let dry.
-
Sand the puttied areas with P320 sandpaper.
How to hide the gap between the baseboard and the wall
If the wall is uneven (which is the case in 80% of residential buildings), a gap appears between the baseboard and the wall. There are two solutions. First — press the baseboard firmly against the wall (the construction adhesive 'fills' the space). Second — fill the gap with acrylic sealant matching the baseboard color or the wall paint color.
The third option, incorrect — to drive a wooden wedge under the baseboard. The wedge changes the geometry of the baseboard, the top edge pulls away from the wall even more. Never do this.
Care and painting — how to extend service life
Wooden floor trimin the form of a solid wood baseboard can last half a century — but only with proper care and timely renewal of the finish.
Types of finish coatings and care for each
Oil and oil-wax. The most 'natural' finish: emphasizes the wood grain, creates a matte surface with a soft tactile feel. Care: once a year — apply a thin layer of refreshing oil after cleaning. Every 5–7 years — complete renewal with light P320 sanding. Pros: can be repaired spot-on — apply oil to a scratch, and it's gone. Cons: requires regular maintenance, sensitive to water.
Polyurethane varnish. Hard glossy or matte finish, excellent protection against moisture and mechanical stress. Care: only dry and damp cleaning. Renewal — every 10–15 years (light sanding, 1–2 coats of varnish). Pros: minimal maintenance, high wear resistance. Cons: scratches are visible, spot repair is difficult.
Acrylic paint. For baseboards painted white or any other color. Care: damp cleaning. Renewal: when the paint starts to peel or fade — light P220 sanding and one refreshing coat of the same paint. Pros: easy to renew. Cons: hides the wood grain.
Regular cleaning
Weekly: dry wipe with a soft brush or vacuum attachment. Dust accumulating at the base of the wall is especially abrasive for oil finishes — it's abrasive.
Monthly: damp wipe with a well-wrung cloth. Water and wood are a bad combination. Never wipe the baseboard with a wet rag, do not pour water when washing floors — let the floor dry on its own, without the help of a 'river wave' at the wall.
Avoid: aggressive cleaning agents with chlorine and abrasives, direct contact with water during accidents (a burst pipe is a situation where the baseboard needs to be removed to dry the base).
Repair and Restoration
Minor scratch: sand with P320 along the grain, apply a spot repair compound (oil, varnish, paint — depending on the finish).
Deep chip: fill with wood putty of matching tone, after drying — sand with P220, apply coating.
Warped plank: remove, dry at room temperature without forced heating, reinstall with additional fastening points.
Full restoration: remove entire baseboard, sand P80–P120–P180 (remove old coating), apply primer, 2–3 coats of finish with intermediate P320 sanding. Result — baseboard like new.
Wall base finishing with wood: additional possibilities
Floor wooden skirting— is the basic element of the wall base finishing system. But it can be expanded to create a richer architectural solution.
Baseboard + wide wooden molding above
At a height of 80–120 mm from the top edge of the baseboard, a horizontal molding of the same wood species is installed. Between them — a 'field' of painted or decorated wall. This is a simplified version of English paneling: the lower wall zone gains architectural depth and a framed structure.
Baseboard as part of a pilaster system
When present in the interior,Wooden pilasters, the baseboard becomes their 'pedestal'. The pilaster literally grows from the baseboard: its base rests on the top edge of the baseboard, the lower tier of the wall acquires a monumental character. This is a classic architectural solution wheresolid wood trim pieces work in a unified system.
Skirting board with lighting
Baseboard with a groove on the lower edge (cable channel) allows an LED strip to be inserted into the groove. Light emerges under the baseboard, creating a 'floating' floor effect. The groove is milled 12–15 mm wide — it accommodates a 10 mm wide LED strip with an aluminum diffuser. The wire runs inside the baseboard through the cable channel.
Where to buy solid wood floor baseboard — catalog, delivery
When the understanding of the choice is formed, the practical question remains: whereto buy wooden baseboard to get the needed profile, the needed wood species, the needed tone, the needed quantity — without the 'almost the same' mismatch?
What to pay attention to when choosing a manufacturer
Product moisture content: should be 8–12%. Too dry baseboard (less than 6%) will expand after installation in normal atmosphere. Too moist (more than 14%) — will shrink and create gaps at joints. The manufacturer must indicate moisture content in technical specifications — this is not superfluous information, it's a guarantee of stable installation.
Geometric accuracy: straightness tolerance no more than ±1 mm per 2 m, cross-section — ±0.1 mm. Such tolerance ensures tight joints without fitting.
Possibility of a complete order: baseboard, moldings,Wooden Mouldings, cornices from the same batch of wood — guarantee of absolute color match of all elements.
FAQ — answers to popular questions
Should a wooden baseboard be painted before or after installation?
Professional answer — before installation, with final touch-up after. Before installation, apply primer and 1–2 coats of finish. After installation, when all joints are puttied — a final thin coat to even out the color. This is easier than painting an installed baseboard and gives a more uniform result.
How to correctly cut a baseboard for an inside corner if the angle is not 90°?
Measure the actual angle with a digital angle finder. Divide by two — this is the cutting angle for each plank. If the angle is 88° — each plank is cut at 44°, not 45°. A small deviation, but it's precisely what gives a tight joint.
Can a wooden baseboard be glued onto wallpaper?
Technically yes, but not recommended: the adhesive may eventually peel the wallpaper along with the baseboard. Correctly: the baseboard is installed on a painted or puttied wall, the wallpaper ends 5–10 mm above the top edge of the baseboard.
How to calculate baseboard quantity?
Room perimeter minus the total width of all door openings + 10% margin. For example: room 4×3 m = perimeter 14 m, one door 0.9 m = 13.1 m + 10% = 14.4 linear meters.
Can wooden baseboard be used in the kitchen and hallway?
Yes. Kitchen and hallway are areas of high traffic intensity. Use oak or larch (harder wood species) with a hard lacquer coating in 3 coats. Regular wet cleaning is not contraindicated with a good lacquer coating.
What to do if the baseboard starts to pull away from the wall?
Most likely, the adhesive did not bond due to poor surface preparation (dust, grease) or too hasty installation. Pry the baseboard away, clean the surface, apply fresh mounting adhesive, press and secure with painter's tape for 24 hours.
What color skirting board to choose for light oak parquet?
Three working solutions: 1) matching the parquet color — monochrome, modern; 2) one shade darker than the parquet — the skirting board becomes a 'frame' for the floor; 3) white or cream — a classic, relevant in any style. Avoid skirting boards lighter than the parquet: the floor appears unfinished.
How long does mounting adhesive take to dry under a wooden skirting board?
Polyurethane mounting adhesive reaches working strength in 24 hours. During this period, do not load the skirting board or remove painter's tape (if used). Final curing — 72 hours. Only after this can final puttying and painting be performed.
About the company STAVROS
When it's clear exactly what is needed, it remains to find a manufacturer that can be fully trusted. STAVROS is a Russian manufacturer of the full range ofsolid wood trimoak, beech, and larch.
All STAVROS products are manufactured on European four-sided equipment with a geometry tolerance of ±0.1 mm, from certified wood with a moisture content of 8–12%. The STAVROS catalog includes floor skirting boards of various heights and profiles,Wooden moldingsfor wall panels and cornices,Wooden Mouldingsdecorative slats, architraves, corner overlays, and structural blocks. The entire range is available for complete ordering from a single batch of wood.
STAVROS fulfills orders wholesale and retail, produces moldings according to individual drawings with a minimum batch from 50 linear meters, delivers throughout Russia and the CIS. Specialist consultation on profile selection, size, and wood species — free, by phone or online. This is exactly how it should be: one call — and the skirting board issue is solved once and for decades ahead.


