Article Contents:
- Preparation stage: foundation for successful installation
- Choosing tools for a professional result
- Materials and fastening elements
- Marking technology: accuracy as the foundation of quality
- Creating the basic installation line
- Taking into account the staircase incline angle
- Mounting methods: choosing the optimal technology
- Fastening with Threaded Rods
- Joining with Wooden Dowels
- Mounting with Structural Self-Tapping Screws
- Mounting on various types of bases
- Installation on Wooden Treads
- Mounting to the staircase stringer
- Mounting on a concrete base
- Installation technology for handrails
- Preparing the top part of balusters
- Installing the handrail support rail
- Handrail Installation
- Quality control and final finishing
- Checking geometric accuracy
- Preparing for final finishing
- Working with different materials: key features
- Installing wooden balusters
- Installing metal balusters
- Combined Constructions
- Typical Errors and Ways to Prevent Them
- Errors in marking and their consequences
- Mounting problems and their solutions
- Violations of processing technology
- Economic Aspects of DIY Installation
- Economic efficiency calculation
- Optimizing material costs
- Conclusion

Imagine a staircase without elegant vertical posts — it looks unfinished, like a house without a roof. Installing balusters by hand — it is an art that transforms an ordinary staircase structure into an architectural masterpiece, combining safety, functionality, and aesthetic perfection.
Many homeowners consider installing stair railings a complex task requiring professional skills. However, with the right approach, quality materials, and clear understanding of the technological process, installing balusters independently becomes a feasible task that brings not only economic benefits but also satisfaction from work done by one's own hands.


Preparation stage: foundation for successful installation


Choosing tools for a professional result
Quality tools are half the success of any construction project. Installing balusters requires a specialized set, each element of which plays a critically important role in achieving a professional result.
An electric drill with a set of drill bits of various diameters will be the main working tool. Special attention should be paid to twist drills with a diameter of 8-12 millimeters — they ensure clean drilling of holes without chips or cracks. A circular saw or miter saw is necessary for accurately trimming balusters to the required angle.
Measuring tools determine the accuracy of the entire structure. A laser level, tape measure, square, plumb bob — each performs a specific function during marking and quality control of installation. Clamps of various sizes will be needed for temporarily fixing elements during the drying of adhesive joints.
Our factory also produces:


Materials and fastening elements
Choosing fastening elements directly affects the durability and reliability of the staircase railing. Stainless steel threaded rods with a diameter of 8-10 millimeters provide maximum connection strength. The rod length should be 120-150 millimeters to ensure secure fixation in the base and baluster.
High-quality PVA wood glue creates additional joint strength and compensates for natural wood movement due to humidity changes. Wooden dowels with a diameter of 8-12 millimeters serve as an alternative fastening method for less heavily loaded structures.
Countersunk construction screws, 80-100 millimeters long, are used for concealed fastening through the base. Quality screws have a special coating that prevents corrosion and ensures long-lasting connections.
Get Consultation
Marking technology: accuracy as the foundation of quality
Creating the installation base line
Correct marking determines the geometric accuracy of the entire structure. The process begins by defining the installation line for balusters on the steps or base. The first and last balusters are installed 50-70 millimeters from the step edge, ensuring optimal load distribution and aesthetic appeal.
A construction string is stretched between the extreme points, serving as the base line for marking intermediate balusters. The distance between baluster axes must not exceed 150 millimeters according to safety requirements — this prevents children from slipping between the posts.
Each installation point is marked with a center punch or a thin drill bit to prevent displacement during the main drilling. Accuracy of the marking is checked by measuring distances between adjacent points — deviations must not exceed 2-3 millimeters.
Considering the staircase incline angle
Staircase treads have a specific incline angle that must be considered when marking upper baluster mounting points. The bevel angle of the top part of the balusters must exactly match the staircase incline to ensure the handrail remains horizontal.
The incline angle is measured using a protractor or calculated mathematically using the tangent formula. The obtained value is transferred to the miter saw for precise beveling of all balusters at the same angle.
Correctness of the angle is checked by installing one baluster and verifying the horizontal position of the imaginary handrail line using a level. The angle is adjusted as needed until an ideal result is achieved.
Mounting methods: choosing the optimal technology
Mounting with threaded rods
Mounting on threaded rods is considered the most reliable and technologically advanced method for installing balusters. This method ensures maximum joint strength and allows for disassembly if repair or replacement of components is needed.
The technological process begins with drilling axial holes at the ends of the balusters. The hole diameter should be 1-2 millimeters smaller than the rod diameter to ensure a tight fit. The drilling depth is 60-70 millimeters, ensuring secure fastening of the fastener.
Holes are drilled in the base to a depth of 50-60 millimeters, strictly vertically. Drilling accuracy is controlled using guide fixtures or dowels. The rod is screwed into the base using wood glue, with the protruding part measuring 60-70 millimeters.
After the glue has fully dried, the baluster is screwed onto the rod, with glue applied to the threaded portion and the baluster end beforehand. Final fixation is achieved by tightening to the stop, with vertical alignment checked.
Connection using wooden dowels
Installing balusters yourself using wooden dowels represents a traditional carpentry method, providing strong and aesthetically pleasing connections without using metal components.
Wooden dowels are made from hardwoods — oak, beech, ash. The dowel diameter is 8-12 millimeters, with a length of 80-100 millimeters. It is important to ensure precise matching of the dowel diameter and drilled hole for a tight fit without gaps.
Holes in the base and balusters are drilled with high precision using guide fixtures. The drilling depth in each element is half the dowel length plus 5-10 millimeters for glue placement.
The dowel is driven into the base hole through a wooden washer to prevent damage. The protruding part and end of the baluster are generously coated with wood glue before final assembly. The baluster is installed gently with light taps through the wooden washer until fully seated.
Fastening with Construction Screws
Using construction screws ensures quick and reliable baluster mounting with the option for concealed fastener placement. This method is especially effective when working with hardwoods, where drilling large holes may cause cracking.
Countersunk screws, 80-100 millimeters long, are screwed into the base from below through pre-drilled holes. The hole diameter in the base must be larger than the screw head diameter to ensure concealed mounting.
A guiding hole with a diameter of 4-5 millimeters and depth of 20-30 millimeters is drilled at the baluster end. This prevents wood cracking during screw insertion and ensures accurate positioning.
Wood glue is applied to the baluster end before installation for additional joint strength. The baluster is placed in position and secured with a screw driven from below through the base. The hole in the base is covered with a decorative plug.
Mounting on various base types
Installation on wooden steps
Wooden treads provide an ideal base for baluster installation due to material uniformity and ease of processing. The tread thickness must be at least 40 millimeters to ensure secure mounting without risk of fastener penetration through the tread.
Installation point marking is performed considering the tread’s structural features. Balusters are installed 50-70 millimeters from the front edge of the tread, ensuring optimal load distribution and preventing tread edge damage during use.
Drilling holes in wooden treads requires special care to prevent chipping at the drill exit. Using a backing board or drilling from both sides ensures a clean hole without damaging the face surface.
Drilling depth is calculated based on tread thickness and required fastener embedment depth. When using through-fastening, the hole on the opposite side is enlarged to accommodate the screw head or nut.
Attachment to the stair stringer
Installing balusters on the stringer requires pre-cutting the lower part of the balusters at an angle corresponding to the slope of the stair run. This method of attachment ensures even load distribution along the entire length of the stringer.
Marking the attachment points on the stringer is done using a template or pre-calculated dimensions. The distance between balusters is measured along the inclined line of the stringer, requiring recalculation to ensure even visual perception.
The cutting angle of the balusters is determined by the slope of the stairs and may range from 25 to 45 degrees depending on construction specifics. Cutting is performed using a circular saw with precise angle setting using a protractor.
Attachment to the stringer can be performed using any of the described methods, taking into account the thickness and material of the stringer. When the stringer is insufficiently thick, through-fastening with decorative plugs on the reverse side is used.
Mounting on a concrete base
Installing balusters on a concrete base requires the use of special fasteners and technologies ensuring reliable connection of dissimilar materials. This method is often used for stair railings on the first floor or in basements.
Marking attachment points on the concrete base is done with particular care, as correcting errors in concrete is significantly more difficult than in wood. Using a coring tool or a drill with a thin drill bit allows creating precise guide holes.
Holes in concrete are drilled using a drill with concrete drill bits of the appropriate diameter. The drilling depth should exceed the anchor element length by 10-15 millimeters to accommodate construction dust.
Fastening is performed using chemical or mechanical anchors, providing high load-bearing capacity in the concrete base. A waterproof gasket is installed between the concrete and wooden baluster to prevent capillary moisture absorption.
Rail installation technology
Preparation of the top part of balusters
After installing all balusters vertically, their top parts must be prepared for handrail attachment. The balusters' height should be uniform and equal to 900 millimeters from the stair level to the top of the handrail, in accordance with safety requirements.
Baluster height is leveled using a taut string and a circular saw. All balusters are cut at the same angle corresponding to the stair run slope to ensure the handrail is horizontal.
Each baluster's top may feature a groove for installing a handrail support rail or a tenon for connecting to the handrail. The dimensions and shape of the connecting elements must precisely match the handrail's construction.
Quality control of preparation includes checking height, cutting angle, and surface finish quality. All elements must be sanded and prepared for applying protective-decorative coating.
Installation of handrail support rail
The handrail support rail serves as an intermediate element between balusters and the handrail, providing additional structural rigidity and simplifying handrail installation. The rail is made from the same material as the balusters to ensure structural uniformity.
The cross-section of the handrail support rail is typically 20x40 or 30x50 millimeters, depending on baluster and handrail sizes. The rail length must precisely match the distance between the outermost balusters, accounting for the fastening method to end posts.
The rail is fastened to balusters using screws driven from above at an angle or from below in concealed fashion. When fastened from above, screw heads are covered with decorative plugs or countersunk and filled with putty afterward.
The accuracy of handrail support rail installation is checked using a level and tape measure. The rail must be strictly horizontal and maintain equal distance from all balusters along the entire length of the structure.
Installing the handrail
Self-installation of balusters is completed with handrail installation, which not only ensures the functional safety of the railing but also determines its aesthetic qualities. The handrail must have a comfortable grip shape and smooth surface without burrs or irregularities.
The handrail is mounted onto the handrail support rail using carpentry glue and screws driven from below through the rail. This fastening method ensures concealed connection without visible fasteners on the handrail’s front surface.
Handrail joints at turns and connections are made using special connecting elements or carpentry joints such as 'birdsmouth' or tenon-mortise. The quality of the joints determines the overall impression of the structure.
Final handrail finishing includes sanding all surfaces, removing bevels from sharp edges, and preparing for protective-decorative coating application. The handrail must be pleasant to the touch and safe for use.
Quality control and finishing
Geometric accuracy check
After completing the installation of all stair railing elements, a comprehensive geometric accuracy check of the structure must be performed. Baluster verticality is checked using a plumb bob or laser level — deviations must not exceed 2-3 millimeters at a height of 900 millimeters.
Handrail horizontal alignment is checked using a construction level along the entire length of the structure. Permissible deviations are no more than 5 millimeters per 3 meters of length. If deviations are detected, adjustments are made by adjusting fasteners or trimming.
Uniformity of distances between balusters is controlled by measuring gaps between adjacent elements' centers. Deviations must not exceed 3-5 millimeters, ensuring visual uniformity of the structure.
Connection strength is checked by gently rocking the balusters and handrail. The structure must be absolutely rigid with no play or movement. Weak connections are reinforced as necessary.
Preparation for Final Finish
Proper surface preparation determines the durability and appearance of the protective-decorative coating. All structural elements must be carefully sanded with abrasive materials, gradually reducing grit size from 120 to 240 units.
Special attention is given to processing end surfaces and connection areas where burrs and irregularities may form. All sharp edges are chamfered with a 2-3 mm radius for safety and improved appearance.
Surface cleaning from dust and contaminants is performed using a vacuum cleaner and adhesive cloth. Cleaning quality is critically important for adhesion of coatings and uniformity of finish.
Wood is primed with special compositions to ensure better adhesion of the final finish and protection against moisture. Primer selection depends on wood species and type of final finish.
Features of Working with Different Materials
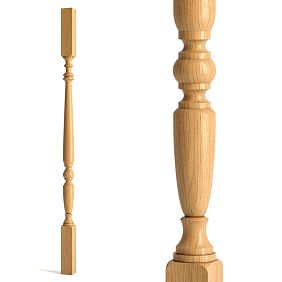
Installation of Wooden Balusters
Wood remains the most popular material for baluster fabrication due to its aesthetic qualities, ease of processing, and ecological safety. However, working with wood requires consideration of material-specific properties and adherence to technological requirements.
Wood moisture content must be 8-12% to prevent deformation and cracking after installation. Using undersaturated wood leads to cracks and weakened connections during operation.
The direction of wood grain must be considered when drilling holes and fastening elements. Drilling across the grain requires special care to avoid splintering, while fastening along the grain ensures maximum connection strength.
Different wood species have varying hardness and require appropriate handling approaches. Hardwoods (oak, beech, ash) require pre-drilling holes for screws, while softwoods (pine, spruce) allow screw insertion without pre-drilling.
Installation of Metal Balusters
Metal balusters offer high strength and durability but require specialized installation and connection techniques with other materials. The main challenge lies in ensuring secure attachment to wooden or concrete bases.
Metal balusters are fastened to wooden bases using flanges welded to the lower part of the post. The flange is secured to the base with screws or bolts through pre-drilled holes.
When installing on concrete bases, anchor bolts or chemical anchors are used, providing high load-bearing capacity. A waterproof gasket must be installed between the metal and concrete.
Connecting metal balusters to wooden handrails requires using special transition elements or brackets. Direct metal-to-wood contact may cause corrosion and weaken the connection.
Combined constructions
Modern design trends for stair railings involve combined constructions integrating various materials. Such solutions require special attention to design and installation of connection joints.
Connecting wood to metal must avoid direct material contact to prevent corrosion and rot. Using polymer gaskets or special coatings ensures long-term connection durability.
Different coefficients of thermal expansion among materials require provision of compensating gaps in joints. Rigid connections between materials with different expansion coefficients may lead to structural failure.
Aesthetic compatibility of materials is achieved through proper selection of color schemes and textures. Contrasting combinations can create interesting design effects but require professional design planning.
Typical errors and ways to prevent them
Errors in Marking and Their Consequences
Inaccurate marking is the most common error during self-installation of balusters. Misplacement of fastening points disrupts the structure’s geometry and degrades the railing’s appearance.
Using low-quality measuring tools or neglecting control measurements often leads to accumulation of errors. Each subsequent baluster is installed with deviation from the previous one, ultimately resulting in significant distortions.
Failure to account for staircase incline angle during marking of upper fastening points results in incorrect handrail positioning. Correcting such errors requires redoing a significant portion of the work.
Preventing marking errors is achieved by using quality tools, carefully verifying each measurement, and applying control templates. Marking should be performed in stages with intermediate accuracy checks.
Connection Problems and Their Solutions
Incorrect selection of fasteners or violation of installation technology leads to weakened connections and reduced structural reliability. Using screws of insufficient length or inappropriate diameter does not ensure required strength.
Over-drying or under-drying wood causes deformation and weakened connections. Balusters from over-dried wood may crack during installation, while under-dried wood shrinks, weakening connections.
Incorrect drilling — too large or small hole diameter, inaccurate direction, insufficient depth — results in poor connections. Correcting such errors often requires replacing damaged elements.
Solving connection problems involves careful selection of materials and fasteners, adherence to technological requirements, and quality control at every stage. Defects must be immediately corrected upon detection.
Violations of processing technology
Insufficient surface preparation before applying protective-decorative coatings leads to their premature failure. Dust, oily contaminants, and surface irregularities reduce coating adhesion.
Using low-quality coatings or violating their application technology reduces the protective properties of the coating. Applying thick layers, working under unsuitable temperature conditions, and insufficient drying between layers are typical violations.
Ignoring requirements for treating end surfaces of wood leads to intensive moisture absorption and development of decay processes. End surfaces require particularly careful treatment with protective compounds.
Preventing violations of processing technology is achieved by studying material manufacturers' instructions, following recommended operating modes, and using high-quality materials and tools.
Economic Aspects of DIY Installation
Economic efficiency calculation
Installing balusters by hand It allows significantly saving on labor costs, which may constitute 50-70% of the total project cost. With an average professional installation cost of 1500-2500 rubles per linear meter of railing, savings on a 10-meter staircase may amount to 15000-25000 rubles.
However, it is necessary to consider the costs of purchasing or renting specialized tools. A complete set of tools for quality installation may cost 15000-25000 rubles, but these tools can be used for other construction tasks.
The time required for self-installation significantly exceeds the time required by a professional crew. An inexperienced craftsman may require 3-5 days to complete the work, whereas professionals would complete it in 1-2 days.
The risk of errors and the need for redoing the work may negate the economic benefit of self-installation. The cost of correcting serious mistakes may exceed the cost of professional installation.
Optimizing material costs
Purchasing materials directly from manufacturers or large suppliers allows obtaining significant discounts compared to retail prices. Wholesale discounts may amount to 15-30% of the retail price.
Choosing materials with optimal price-to-quality ratio requires careful analysis of market offers. Not always the most expensive materials provide proportional quality improvement.
Planning purchases with consideration of seasonal price fluctuations allows additional savings. The winter period is typically characterized by lower prices for construction materials.
Accurate calculation of material requirements prevents both shortages and unnecessary purchases. Material reserves should be 5-10% of the calculated requirement to compensate for possible losses and defects.
Conclusion
Self-installation of staircase railings is an engaging and educational process that, with the right approach, allows achieving a professional result with significant cost savings. Key factors for success are thorough preparation, quality materials and tools, adherence to technological requirements, and continuous quality control.
Modern materials and technologies make self-installation accessible for DIYers with basic tool-handling skills. However, it is important to realistically assess one's capabilities and avoid taking on tasks beyond one's skill level.
Correctly installed balusters and handrails not only ensure the safety of staircase use but also become an important interior element, highlighting the homeowner's taste and craftsmanship. Quality work done by one's own hands brings special satisfaction and pride in the achieved result.
STAVROS Company occupies a special place in the world of quality construction materials and professional solutions, offering a wide range of staircase components and accessories. Years of experience, modern production technologies, and an individual approach to each project make STAVROS a reliable partner for those striving for perfection in staircase construction.