Article Contents:
- Choosing materials: types of wood, their advantages and disadvantages
- Tools and wood processing technology
- Types of wooden shelves: styles, shapes, mounting methods
- Tips for placing shelves in interior design
- Conclusion
Imagine a room where a soft sunbeam glides over the surface of old oak wood. On the wall hangs an elegant wooden shelf, upon which rest favorite books, lovely trinkets, or a pot with a lush green plant. Such a simple interior element as a wooden shelf fills the space with warmth and coziness. It seems to tell a story: about the craftsman who carved and sanded it by hand, about the wood whose growth rings capture decades.
Wooden shelves are valued by designers and homeowners not only for their practicality—they bring a special aesthetic to the home. Natural wood in interior design looks noble and natural, whether it's rustic-style shelves made of rough pine or smoothly sanded beech panels in modern minimalism. Such shelves serve both functional and decorative purposes: they help organize things and simultaneously decorate walls, creating accents. It's no wonder that many creative souls strive to make wooden shelves by hand, infusing them with part of their soul and receiving in return a unique piece of furniture.
In this article, we will discuss how to make beautiful wooden shelves by yourself, which will become a distinctive feature of your interior. We will consider material selection—what types of wood are suitable and how they differ, discuss necessary tools and wood processing techniques. We will also focus separately on the variety of styles and constructions of wooden shelves—from industrial loft to classic—and on options for their mounting. Finally, we will give a few tips on where to place shelves and how to integrate them into an existing setting. Let's begin this small journey into the world of wooden craftsmanship.


Choosing materials: types of wood, their advantages and disadvantages
What material to choose for the future shelf? Wood is a living, "breathing" material, and each species has its own character. Let's consider several popular options, each with its own pros and cons:
● Pine. One of the most accessible and workable materials. Pine wood is soft, easily processed with hand and electric tools—this forgives beginners' inaccuracies. It has a pleasant resinous aroma and a beautiful natural pattern with distinct rings. A pine shelf is perfect for rustic or eco styles: light wood with knots gives a rustic cozy feel. Advantages: low cost, ease of processing, aroma, and resistance to moderate humidity (thanks to resins). Disadvantages: pine is relatively soft—impressions and scratches easily remain on the surface, and over time, the color darkens. Also, it does not like heavy loads: under weight, a pine shelf may sag.
● Oak. The opposite of pine—hard, noble oak has long been renowned for its durability. Oak shelves can withstand heavy loads and last for decades. Oak's texture is expressive: dense growth rings and porous pattern create a sense of solidity. Pros: exceptional strength and durability, resistance to moisture and pests (oak wood is almost unaffected by mold), ability to retain shape for a long time. An oak shelf can be made thin, but it will still be strong. Cons: high material cost and difficulty in processing—hard oak requires sharp tools and experience, it is harder to saw and sand. However, the effort invested pays off with a magnificent result.
● Birch. Light birch wood is often used in furniture due to the combination of strength and beauty. Its tone is milk-cream, with barely noticeable golden or pinkish notes, and the cut pattern is fine and even. Advantages: birch shelves are sufficiently strong, can support the weight of books or dishes, yet are easy to process. The material is eco-friendly and hypoallergenic—ideal for a child's room. Disadvantages: birch is sensitive to moisture and temperature fluctuations, and without protective finishing, it may warp or darken over time. To ensure long service life, it needs to be coated with varnish or oil to protect against moisture and pests.
● Beech. Another hard species, not inferior to oak in strength. Beech is often used for elegant furniture and carved details. Beech color ranges from light cream to pink-beige, and the texture is uniform with smooth annual ring lines. Pros: heavy and dense wood, which gives a stable and reliable shelf. Beech is easy to sand and has a noble appearance even without staining. Cons: like birch, beech dislikes moisture—beech shelves will be uncomfortable in bathrooms or on damp balconies, as they may swell. Also, beech wood is quite heavy, so it will require strong wall mounting.
● Larch. If you plan to place the shelf on an unheated country house or in a room with variable humidity, consider larch. This coniferous tree has a beautiful warm tone and is famous for its resistance to rot. Pros: larch wood is strong, does not fear water—it is even used to make bridges and pilings. Color—golden-brown, which only becomes more beautiful over time. Cons: contains a lot of resin, so during processing, tools may "stick," and at high temperatures, resin droplets may appear. Additionally, larch is also quite hard and may splinter if nails are driven in carelessly.
Of course, there are other species: elegant ash with a grayish tone, luxurious dark walnut, exotic teak (ideal for humid rooms), etc. The choice of wood depends on your budget, material availability, and stylistic preferences. The main thing is to ensure that the wood is well-dried and free of signs of rot or insects. Quality material is the guarantee that your wooden shelves will last long and safely.


Tools and wood processing technology
Creating a wooden shelf is a creative process, but it requires a certain set of tools. If you have decided to make the shelf yourself, prepare carpentry tools and be ready to get your hands dirty with sawdust. Here are the master's main helpers:
● Saw or jigsaw. To cut a board to the required length, you will need a hand saw or an electric jigsaw (and for thick stock—a disc saw). A clean cut is the first step toward an elegant shelf. It is important to saw slowly, clamping the board with a vise to ensure a clean cut line.
● Hand plane and chisel. If the wood is not perfectly flat, a hand plane will help remove excess millimeters and level the surface. A chisel will be useful for carving small grooves or trimming sharp corners, and it is convenient for cutting decorative elements or recesses for mounting.
● Sanding materials. A rough texture may look brutal, but splinters will not please anyone. Therefore, after sawing and planing, proceed to sanding. You can use an electric sander to speed up the process, but in skilled hands, even a simple block with sandpaper can perform wonders. Start with medium grit, gradually moving to fine grit—this will make the surface smooth as silk, pleasantly gliding under your fingers. Don't forget to round the sharp edges of the shelf with gentle movements, giving them a slightly softer, streamlined profile.
● Drill and screwdriver. To mount the shelf, you need holes for screws or wall anchors. An electric drill simplifies this task: it drills holes in the shelf (if the mounting will be hidden) and in the wall. A screwdriver (or drill driver) will be needed to securely fasten the screws. Additionally, a drill can be used to carefully drill round holes if you plan a decorative pattern or need to cut a recess for a socket, for example.
● Measuring tools. Tape measure, level, and square—a trio without which it is difficult to create a level structure. A tape measure will help you measure the length of the board and the distance between mounting points, a level will help hang the shelf strictly horizontally (a slanted shelf will immediately catch the eye and disrupt harmony). A square will be useful to mark right angles during cutting and to check that the shelf's angles are 90 degrees.
When tools are prepared, you can proceed to processing the wood. Before assembling the shelf, it is advisable to treat the parts with special compounds and final finishing:
- Impregnation and primer. It is advisable to cover clean sanded wood with a layer of primer or impregnation. For example, antiseptic impregnation will protect the wood from mold and insects, which is especially relevant for soft species (pine, birch). Primer equalizes the wood's absorption capacity—this allows subsequent layers to lay more evenly.
- Stain or oil. At this stage, you impart the desired shade and highlight the texture. Stain (beyts) is a dye that penetrates into the wood's structure, coloring it while preserving the grain pattern. With its help, light pine can be "aged," giving it the color of oak or walnut. An alternative is natural oils (for example, linseed or special furniture blends): oil deepens the color and highlights the pattern, giving a noble matte sheen. Apply oil to the shelf, let it soak in, and wipe off excess with a soft cloth.
- Varnish or wax. The final touch—protective coating. Varnish forms a strong film that protects the wood from scratches, moisture, and fading. For shelves, transparent varnish (matte or glossy) is usually applied in several layers with sanding between layers. If you want a more "lively" surface, furniture wax is used. Waxed wood charms tactilely: running your hand over it, you feel the natural texture, while the surface is protected and slightly satin-like. Wax, however, requires periodic renewal, whereas varnish lasts for years.
During processing, do not forget about safety: work in a well-ventilated area, wear gloves and safety glasses when cutting and sanding, and a respirator when working with fine dust or applying varnish. Then the process of creating a shelf will bring only joy.
Our factory also produces:


Types of wooden shelves: styles, shapes, mounting methods
Wooden shelves are incredibly diverse. From the strict geometry of minimalism to deliberately rough rustic style – every interior has its own shelf. Let's consider some popular styles and forms of wooden shelves, as well as mounting options:
● Loft (industrial style). This style originated in repurposed factory spaces, so shelves here are characterized by ruggedness and simplicity. Imagine a rough solid wood plank with unprocessed edges, resting on black metal brackets made from water pipes – there it is, a loft-style shelf. Here, signs of time are welcomed: cracks, knots, scratches. The color is usually dark or gray-brown, aged. Such shelves look great against brick or concrete walls, complementing leather furniture and retro lamps.
● Minimalism and Scandinavian style. On the other end of the spectrum – light, almost weightless shelves with no unnecessary decoration. Simple shape (rectangular panel or set of square sections), hidden mounting without visible supports – it seems as if the shelf is floating against the wall. Light colors dominate: whitewashed oak, pine, painted white or gray. In Scandinavian interiors, they often leave the natural light wood tone, emphasizing its texture with a thin layer of transparent varnish. Minimalist shelves fit well in modern apartments, not cluttering space with details. On them, place a few carefully selected items – for example, one vase or a couple of books – and leave space around, highlighting the philosophy of minimalism: nothing extra.
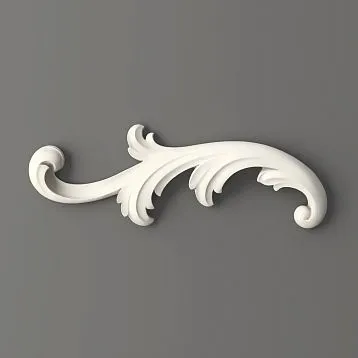
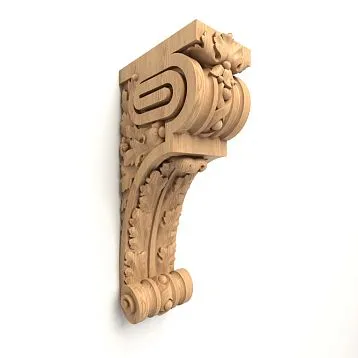
● Classic. In a classic interior, wooden shelves can look quite refined. This is no longer just a board, but a small architectural element. Imagine a shelf made of dark polished wood (mahogany, walnut, or stained oak) with ornate carved brackets or stylish wrought-iron supports in vintage style. The edges of the shelf may be decorated with routed profiles, giving an elegant curve. Such a shelf resembles an antique one: it suits porcelain trinkets, framed family photos, collector’s books. Classic shelves tend toward symmetry in placement and are usually part of a thought-out composition – for example, a pair of shelves on either side of a fireplace or one above a sofa, surrounded by paintings.
● Rustic and country style (countryside, Provence). Here, nature and simplicity reign. Rustic-style shelves are made from roughly processed boards, sometimes even retaining the untrimmed edge that follows the curve of the trunk. Finish is minimal: just enough to protect the wood, but not to hide its living pattern. Colors are warm, honey-toned; often pine, spruce, or old boards with history are used. In Provence, shelves may be painted in light pastel tones (white, lavender, olive) and slightly aged at the edges with sandpaper to reveal the lower layer of wood – a vintage charm. Wooden shelves in country style harmonize beautifully with woven baskets, earthenware, lace napkins, dried bouquets. They bring a sense of countryside tranquility, as if you are in a cozy country home.
Shelves differ not only by style, but also by construction. By shape, they can be: straight (classic horizontal shelf), corner (specifically designed to fit into a room’s corner and utilize that space), multi-tiered (several shelves connected by vertical supports or hanging one below another), and shaped (for example, shelves in the form of honeycombs, circles, or letters – here, the only limit is imagination). Special mention deserves so-called shelving units – open structures from floor to ceiling, consisting of many shelves, but they are hard to call "shelves" – these are already large furniture elements.
Equally important is how the shelf is mounted. The mounting method affects both appearance and reliability:
● Open mounting (wall brackets). The shelf is screwed into the wall from above using brackets or supported from below by decorative brackets. The mounting elements are visible – they are also chosen to match the style. Wrought iron angles add vintage charm, while simple metal brackets emphasize minimalism. Open mounting is the simplest and most intuitive method, ensuring strength: such shelves can support the weight of books, dishes, and electronics.
● Hidden mounting (floating shelves). Screws or special hangers are mounted in the wall, which fit into holes on the back of the shelf. As a result, the shelf appears to be held without visible supports – as if glued to the wall. It looks very stylish in modern interiors, creating an illusion that the wooden shelf is floating in the air. However, it is important to precisely level the shelf and use reliable mounting hardware, otherwise the structure may prove unreliable. Heavy items should not be placed on "floating" shelves; better to limit to decor and books.
● Hanging shelves. A creative option – hang the shelf on ropes, straps, or chains. Hooks are screwed into the ceiling or wall, to which, for example, jute ropes are attached, holding the wooden plank-shelf (usually threaded through holes at the corners). Hanging shelves sway slightly when touched, so they are suitable only for light items and flowers, but look very decorative, adding a boho touch. Often, they are made tiered – several boards hanging one below another on the same ropes.
● Built-in niches. Sometimes shelves are installed directly into the thickness of the wall or niche – especially in private homes or apartments with false walls made of gypsum board. A wooden shelf can be embedded into the niche, with its edges resting against the side walls. This approach saves space and looks minimalist: the shelf becomes part of the room’s architecture. Built-in shelf units are often placed in bathrooms (in the shower niche for shampoo bottles) or under stairs, in other "neutral" spaces.
As you can see, the varieties of wooden shelves are immense. This is a field for creativity: you can combine style and form according to your taste. For example, make a corner shelf in loft style or a hanging shelf in Provence style – any experiments will help achieve a unique result that will adorn your home.
Get Consultation
Tips for placing shelves in interior design
You’ve made a beautiful shelf – now it’s important to place it well. Where will it best showcase itself, delighting the eye and serving a purpose? Here are some recommendations for placing wooden shelves in interior design:
● Don’t overcrowd space. The shelf should look appropriate to its location. A single small shelf on a large empty wall may go unnoticed, while too many shelves filled with items will create clutter. Find a balance: if the wall is large, you can group several shelves asymmetrically or place them in a row. In a small corner, one corner shelf is enough to enliven the space.
● Height and convenience. Think about who and how will use the shelf. If it’s a decorative shelf in the living room, you can hang it at eye level for a standing person (approximately 150–170 cm from the floor) – it will immediately catch attention. Above a sofa or bed, shelves are mounted high enough so that a seated person won’t hit their head, but not too high, otherwise the composition will "disappear" under the ceiling. In a child’s room, shelves should be at a level accessible to the child, so they can take a book or toy themselves. However, spice shelves in the kitchen are best placed at eye level for the homeowner – this way, jars are always within reach.
● Composition with furniture. Wooden shelves should harmonize with surrounding furniture. Above a desk, a bookshelf matching the width of the desk is appropriate – it forms a unified ensemble, keeping necessary books within reach. In the living room, above a chest of drawers or side table, you can hang a decorative shelf matching the wood color of the table – this creates a harmonious corner. If you have furniture made of a specific wood (say, oak cabinets), try to choose a shelf made of oak or stained to match, so the wood tones harmonize. However, contrasts can also be advantageous: a white wooden shelf against a dark blue wall will become a striking accent.
● Functionality. Decide what will "live" on your shelf. This determines its position. For books, sufficient depth and secure mounting are important, and it’s better if the shelf is not too low (books prefer dryness and cleanliness). For flowers, the shelf needs sufficient light – ideally, hang it near a window, but not in direct sunlight, so plants won’t burn. A key rack in the hallway should be at a level convenient for tossing keys without removing shoes. A shelf for porcelain collections should be at guest eye level – let them admire. Always mentally try the shelf in place: what is it for, who will use it, and how will it be used?
● Decoration and filling. After installing the shelf, pay attention to how it is filled. Even the most beautiful wooden shelf will lose charm if you randomly pile everything on it. Try a decorative approach: alternate vertical and horizontal shapes. For example, several books (vertical dominance) stand on the shelf, next to them lies a horizontal stack of magazines, on top – a small vase. Beside it – a medium-sized photo frame (again vertical) and a small sculpture. Such alternation gives the composition rhythm. If the shelf is long, leave some empty space, don’t fill the entire length – let the eye rest on the free area. Remember, the shelf is like a mini-scene where you arrange your exhibits. And each item should have enough space to "speak."
Finally, check the mounting reliability, especially if expensive or breakable items are on the shelf. It’s better to over-insure with dowels and brackets than regret a broken vase later. And if the shelf is hanging – ensure the joints are secure, and the nail or hook in the wall is driven in properly.
Conclusion
Creating a beautiful wooden shelf by hand is not only about saving money or getting a needed interior item. There is a special magic of creativity in this process. Each shaving flying off the plane, each vein appearing after applying oil, makes your shelf unique. In an era when mass-produced items have flooded the market, handmade items are especially valued. They carry the warmth of the maker’s hands and tell guests stories – about how you chose boards at the sawmill in early morning, how you first hung a shelf slightly crooked and laughed, redoing it, how the scent of fresh wood filled your home.
Wooden shelves made by hand possess unique individuality. You choose the style yourself – whether brutal loft or gentle Provence – and realize exactly the idea that resonates with your heart. Such shelves become not just storage places, but art objects, part of your personal story. And, of course, practical advantages are not forgotten: a properly made shelf from quality wood will serve for many years, delighting the eye and soul.
In the world of interior design, natural materials always hold a prestigious place. And wood – perhaps the main one among them. By making a shelf yourself, you bring a piece of living nature into your home and feel proud of the result. May your wooden shelves, created with love and imagination, give you a sense of coziness and inspiration every day – for there is nothing more pleasant than seeing the fruits of your creativity in your own walls.