


Article Contents:
- Anatomy of a Wooden Staircase: What Holds the Entire Structure
- Load-Bearing Structure: The Foundation of Everything
- Steps: What We Step On
- Guardrail: Safety and Aesthetics
- Balusters: The Heart of the Guardrail
- Turned Balusters: Classic Art of Turning
- Square Balusters: Minimalist Rigidity
- Flat Balusters: From Ancient Russian Traditions to Modernity
- Carved Balusters: Exclusive Handcrafted Details
- Support Posts: Structural Framework of the Guardrail
- Post Dimensions and Construction
- Post shapes
- Post Caps
- Handrails: ergonomics and safety
- Handrail shapes
- Handrail material
- Handrail Connection Elements
- Additional Components: Details That Create the Whole
- Handrail Supports (Handrail Brackets)
- Receptacles and Decorative Covers
- Wall Handrail Brackets
- Fasteners and Hardware
- Material Selection: Wood Species Determines Everything
- Oak: The King Among Species
- Beech: Optimal Choice
- Ash: strength and beauty
- Larch: For Humid Conditions
- Birch: for stained solutions
- Pine: budget option
- Styles and Design: How to Create Harmony
- Classic Style: Luxury of Traditions
- Provence: romance of the French countryside
- Scandinavian style: minimalism and light
- Loft: industrial aesthetics
- Modern Minimalism: Purity of Forms
- Quantity Calculation: How Many Components Are Needed
- Balusters
- Posts
- Handrails
- Handrail Supports
- Finishing and Protection: How to Preserve Beauty for Decades
- Sanding: The Foundation of Foundations
- Lacquering: Transparent Protection
- Oil and Wax Treatment
- Painting
- Staining with Stain
- Installation: professional mounting technology
- Preparation stage
- Installing Support Posts
- Marking and Trimming Balusters
- Newel Installation
- Installing Handrail Support (if used)
- Handrail Installation
- Final Finishing After Installation
- Typical mistakes when choosing and installing
- Error 1: Incorrect Quantity Calculation
- Error 2: Different Shades
- Error 3: Inaccurate Corner Trimming
- Error 4: Weak Fastening
- Error 5: Installation Without Acclimatization
- Error 6: Neglecting Protective Coating
- Maintenance and operation: preserving beauty for decades
- Regular Cleaning
- Recoating
- Checking Mounting
- Repair of damage
- Where to Buy Quality Components
- Conclusion: Components as the Foundation of a Safe and Beautiful Staircase

Building a house? Renovating an old staircase? Want to turn a plain structure into an architectural masterpiece? Then you’ll face a choice that will determine your family’s safety, interior style, and the longevity of the entire structure.Wooden staircase components for saleThis is no simple task. The market offers thousands of options, from budget pine to premium oak, from minimalist forms to intricately carved Baroque masterpieces.
This article is your guide through the world of staircase components. We’ll examine each component in detail, explain how they work together, help you avoid critical mistakes, and create a staircase that will last a century.


Anatomy of a Wooden Staircase: What Holds the Entire Structure Together
Before Choosingcomponents for wooden staircasesYou need to understand how the staircase itself is constructed. It’s a complex engineering system where each element performs its own function.


Load-Bearing Structure: The Foundation of Everything
Stringers — inclined beams with tooth-shaped notches, onto which steps are laid. Stringers come in single (center of step, for narrow staircases), double (edges of step, classic variant), and triple (two on edges + one in center, for wide staircases over 120 centimeters).
Stringers are made from solid pine, larch, or oak with a cross-section of 60×250 or 80×300 millimeters. They bear the entire vertical load from steps and people, so they must be strong, free of cracks, and large knots.
Treads — inclined boards 50–80 millimeters thick, into which the ends of steps are inserted. Treads cover the staircase from the sides, creating visual continuity. They carry a load, but less than stringers, since steps are not supported from above but are inserted into grooves.
Balusters — metal rods or pipes onto which steps are mounted without visible load-bearing beams. Baluster staircases appear to float, weightless, and modern. Balusters are attached to walls or directly to steps, forming a rigid frame.
Our factory also produces:


Steps: What We Step On
Tread — the horizontal part of the step where the foot is placed. By norm, tread width (step depth) should be 25–32 centimeters — this is comfortable for an adult’s foot. Treads are made from solid oak, ash, or larch with a thickness of 40–50 millimeters or from glued laminated boards 40 millimeters thick.
Riser — the vertical part of the step, covering the space between treads. Risers are optional (staircases without risers are called open), but they add rigidity to the structure, hide space under the staircase, and create visual completeness.
By norm, riser height (step height) should be 15–20 centimeters. Optimal is 17–18 centimeters — convenient for most people. Risers are made from solid wood or MDF with a thickness of 18–25 millimeters.
Get Consultation
Handrail: Safety and Aesthetics
The railing consists of vertical elements (balusters, posts) and horizontal ones (handrails, balustrade rails). It is the railing that defines the style of the staircase, ensures safety, and completes the composition.
Balusters — vertical supports between steps and the handrail. They fill the space, prevent falls, and support the handrail. Balusters come in turned, carved, square, flat, and an infinite variety of profiles.
Support posts — massive vertical elements installed at key points (start of the flight, turns, landings, end of the flight). Posts bear the main load from the handrail and hold the entire railing system.
Handrails — horizontal elements to hold onto while ascending or descending. The handrail must be ergonomic (easy to grip with the palm), smooth (no splinters or roughness), and securely fastened.
Balustrade rails — additional horizontal rails on which the handrail is mounted. They increase stiffness and simplify installation.
Balusters: the heart of the railing
Balusters are the most noticeable elements of the railing. Their shape, material, and finish determine the style of the entire staircase.
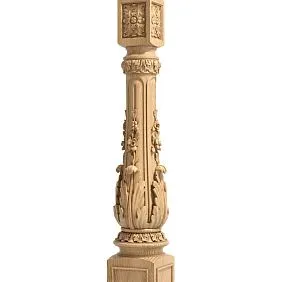
Turned balusters: classic craftsmanship
Turned balusters are made on a lathe from a cylindrical blank. Carbide cutters carve complex profiles: vase-like expansions, grips, cylinders, spheres, flutes. Classic structure: base (base), body (decorative profile), capital (top).
The diameter of turned balusters varies: minimum 40 millimeters at the narrowest point (less is insufficiently strong), maximum 80 millimeters at the expansions. Height 700–900 millimeters, depending on the railing height.
Turned balusters are made from oak, beech, ash, and birch. Oak — maximum strength and cost. Beech — balance of quality and cost. Ash — beautiful grain. Birch — for painted balusters.
Finishing of turned balusters: transparent lacquer (highlights wood texture), staining with dyes (changes color while preserving texture), painting (creates uniform color, hides texture), patination (antique effect).
Square balusters: minimalist rigidity
Square balusters with cross-sections of 40×40, 50×50, 60×60 millimeters — choice for modern, minimalist, Japanese interiors. Straight edges, no decoration, clean geometry.
Square balusters are made from planed timber, sanded to smoothness (grit 180–220), and coated with lacquer, oil, or paint. They are stronger than round ones of the same cross-section — the square profile has greater stiffness against bending.
Variants: square balusters with sharp edges (graphically modern, but corners may be hazardous for children), square balusters with chamfered edges (edges rounded with a 3–5 millimeter radius, softer visually and tactilely).
Flat balusters: from ancient Russian traditions to modernity
Flat balusters — thin vertical panels 20–40 millimeters thick and 80–150 millimeters wide. They come in two types:
Slavic flat balusters: expansion at top and bottom, narrowing in the middle, rounded edges, carved ornamentation (suns, rosettes, hearts, diamonds, floral motifs). Tradition of Russian wooden architecture, atmosphere of a terem, fairy tales.
Modern flat balusters: rectangular or trapezoidal panels without ornament or with minimal geometric milling. Graphic appeal, visual lightness, material savings (wood consumption 2–3 times less than turned balusters).
The drawback of flat balusters — lower bending strength, require more frequent installation (every 10–12 centimeters instead of 15).
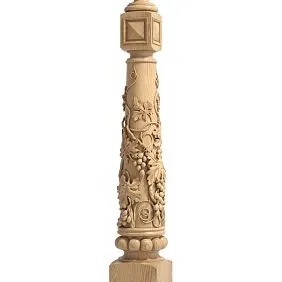
Carved balusters: exclusive handcrafted work
Carved balusters are created by hand by a master carver. Volume ornaments are carved from solid stock: grapevines, acanthus leaves, rosettes, geometric patterns, figures. Carving can be low-relief (ornament slightly protrudes), high-relief (ornament strongly protrudes, dramatic play of light and shadow), or pierced (ornament cut through, lace-like effect).
Carved balusters are unique and expensive (cost 5–10 times higher than simple turned ones), used in exclusive projects, mansions, palaces.
Support posts: structural frame of the railing
Posts — massive vertical elements that support the entire railing system. Without posts, the railing becomes unstable and loses strength.
Dimensions and construction of posts
Standard post cross-sections: 80×80, 100×100, 120×120 millimeters. For small staircases, 80×80 is sufficient; for large country houses — 100×100 or 120×120.
Post height depends on location:
-
Starting post (at the bottom of the flight): 120–150 centimeters from floor to top.
-
Turnpost (on the landing): 90–110 centimeters from the landing to the top.
-
Final post (at the top of the stair): 90–110 centimeters from the second-floor floor to the top.
Post shapes
Turned posts: with decorative profiles similar to balusters but larger. Base diameter 100–120 millimeters, body with vase-shaped enlargements, fluting, and a capital with a handrail mounting platform.
Square posts: smooth or with routed profiles (filigree, recesses, decorative bands). Minimalist or classical depending on detailing.
Carved posts: with three-dimensional carving — the pinnacle of decoration, exclusive.
Post finials
Finial (cap) — decorative element at the top of the post. Typical forms: sphere (universal classic), pyramid (strict geometry), cone, vase, acorn, pineapple (colonial style), ornamental carved elements.
Finials are either carved as part of the post (integral construction) or made separately and mounted on a spike (removable, replaceable). Finials add verticality, completeness, and decorative appeal.
Handrails: ergonomics and safety
Handrail — element held onto while moving up or down the stairs. Its shape should be ergonomic, surface smooth, and mounting secure.
Handrail shapes
Round handrail: diameter 50–60 millimeters. Easily grasped with the palm, universal, machined from round stock on a lathe.
Oval handrail: cross-section 50×70, 60×80 millimeters. More ergonomic — the palm grips the oval more comfortably. Popular in classical interiors.
Rectangular with rounded edges: cross-section 60×80, 70×90 millimeters. Modern, graphic. Edges must be rounded with a 5–10 millimeter radius for comfort.
Figured handrail: with routed profiles — recesses, bulges, decorative bands. Classic for traditional interiors.
Handrail material
Handrail is made from the same wood species as balusters and posts for uniformity. However, contrasting combinations are possible: white balusters + dark oak handrail, creating visual contrast.
Handrail must be perfectly sanded (grit 220–320) — any roughness may injure the palm. Lacquer or oil finish is mandatory.
Handrail connecting elements
For complex staircases with turns, connecting elements are required:
Corner elements: connect handrails at 90 or 135-degree angles at staircase turns.
End elements: handrail terminations (volutes — spiral curls, straight cuts with decorative caps).
Intermediate connectors: for joining straight handrail sections (when the stair run exceeds 3–4 meters, the handrail is made of multiple elements).
Additional components: details that complete the whole
Handrail supports (handrail brackets)
Handrail support — horizontal rail with cross-section 30×50, 40×60 millimeters, mounted from below onto the tops of balusters. The handrail rests on top of the support. The support increases structural rigidity, simplifies handrail installation, and conceals fasteners.
Handrail supports are made from the same wood species as balusters, painted or lacquered to match.
Rosettes and decorative caps
Rosettes — decorative elements installed at handrail-to-wall junctions, handrail ends, and posts. They conceal fasteners and add decorative appeal.
Rosettes can be round, square, oval, carved, with various ornaments. Made from solid wood, MDF, or polyurethane.
Wall Mounting Brackets for Handrails
If the staircase runs along the wall, an additional handrail is mounted on the wall using brackets. Brackets can be metal (chrome, black, bronze) or wooden (carved, turned, plain).
The distance between brackets is 80–100 centimeters. The handrail should be 5–7 centimeters away from the wall for comfortable grip.
Fasteners and hardware
For installingstaircase componentsrequire fastening elements:
Threaded spikes: steel rods with a diameter of 8–10 millimeters and a length of 80–150 millimeters for mounting balusters and posts.
Self-tapping screws: 50–100 millimeters long for mounting components. It is better to use self-tapping screws with concealed heads, which are sunk into the wood and masked with wooden plugs.
Wood glue: PVA, polyurethane, or epoxy for mortise joints, inserting spikes.
Anchors: for mounting posts to concrete floors and walls.
Metal plates, angles: for reinforcing connections in structures with high load.
Material selection: wood species determines everything
The wood species affects the strength, durability, appearance, and cost of all components.
Oak: king among species
Oak is the strongest hardwood. Density 700–800 kg/m³, hardness 3.7–4.0 on Brinell. Oak components withstand tremendous loads, do not deform, and last for centuries.
Oak has a coarse-grained texture with heartwood rays, creating an attractive pattern. Color ranges from light gold to dark brown. Oak stains beautifully and takes any shade.
The cost of oak components is 2–3 times higher than beech, but it is an investment for centuries. Oak is ideal for classic, English, and Victorian interiors.
Beech: optimal choice
Beech offers a balance of price and quality. Density 650–700 kg/m³, hardness 3.4–3.8. Beech is strong, easier to work with, excellent for turning, sanding, and staining.
Texture is calm and uniform, with fine heartwood rays. Color is pink-beige, warm. Beech is versatile — suitable for any style.
The cost of beech components is 30–50% lower than oak — optimal price-to-quality ratio.
Ash: strength and beauty
Ash combines high density (680–750 kg/m³) with elasticity. It absorbs and dampens impacts, does not crack. Texture is expressive, with contrasting stripes. Color is light, from cream to light brown.
Ash is ideal for Scandinavian, eco-friendly, and modern interiors. With oil, ash looks stunning — the texture reveals itself, creating depth.
Larch: for humid conditions
Larch is a coniferous species with density 650–700 kg/m³, high resin content, and exceptional resistance to moisture and rot. Larch becomes stronger under moisture.
Larch components are ideal for staircases in saunas, baths, open terraces, and porches. Color is honey-gold with reddish tones, texture with clear annual rings.
Birch: For Painted Solutions
Birch is optimal for painted components. Density 600–650 kg/m³ is sufficient. The main advantage — perfect receptivity to paint. Birch creates a smooth, uniform surface without spots.
Birch components are ideal for Provence, shabby chic, Scandinavian interiors, where elements are painted in white, gray, pastel tones. Cost is 20–40% lower than beech.
Pine: budget option
Spruce — the most affordable material. Density 450–550 kg/m³, soft, easy to work with. Spruce components are 3–4 times cheaper than oak.
Drawbacks: resinous (resin may seep through lacquer), soft (easily scratched or dented). For heavily used staircases, spruce is not the best choice, but for cottages or secondary staircases, it is suitable.
Styles and design: how to create harmony
The style of the staircase is determined by the shape of components, material, and finish.
Classic style: luxury of traditions
Classic interiors require turned or carved elements made of oak, walnut, mahogany. Balusters with vase-shaped profiles, fluting, columns with carved capitals and finials shaped like spheres or vases, decorative handrails.
Finishing: natural lacquer (emphasizes texture) or patination (gold, silver on white or beige base). Color — natural dark tones or staining in walnut, mahogany, or wenge.
Provence: romance of the French countryside
Provençal requires turned elements painted in light pastel tones: white, milk, lavender, mint, gray-blue. Aging effect is mandatory — wear marks, patina.
Balusters with soft rounded profiles, medium-sized columns (80×80 or 100×100), simple round or oval handrails. Often, wrought iron elements are added — scrolls, rosettes.
Scandinavian style: minimalism and light
Scandinavian interiors require minimalist elements: square balusters 50×50 mm or simple round ones with diameter 40–50 mm, painted in white, gray, or natural light wood (ash, birch) with oil finish.
No decoration, clean lines, dense baluster filling (spacing 10–12 cm). Square columns 80×80, rectangular handrails with rounded edges or simple round ones.
Loft: industrial aesthetics
Loft staircases often combine wood with metal. Wooden treads + metal railings. But if wooden elements are used, they are rough and massive: square balusters 60×60 from unplaned solid wood, columns 120×120 with visible grain and knots.
Finishing: dark stain or oil, emphasizing naturalness. No carved elements, only simplicity and ruggedness.
Modern minimalism: purity of forms
Modern interiors require geometric precision. Square balusters with beveled edges, flat panels without ornamentation, glass inserts, metal elements.
Contrasting colors: white balusters + black handrail, dark treads + light vertical elements. Finish matte (matte lacquer, matte paint) — no gloss.
Calculating quantity: how many components are needed
Correct calculation of component quantities is critically important — shortage leads to delays, excess leads to unnecessary expenses.
Balusters
One baluster per step: number of balusters = number of steps. For a standard staircase to the second floor (13–15 steps) you need 13–15 balusters.
Two balusters per step: quantity doubles — 26–30 balusters.
Flat balusters: installed more frequently. At 12 cm spacing per step 25 cm wide, you need 2 balusters; for a 30 cm wide step — 2–3 balusters.
Balusters for landings: if the staircase has an intermediate landing, additional balusters are needed for the landing railing. Calculated by landing railing length: length (in cm) / (spacing between balusters + baluster thickness).
Allowance: reserve 10–15% for defects, installation errors, or damage.
Columns
Starting column: 1 piece (at the bottom of the flight).
Ending column: 1 piece (at the top of the flight).
Turning columns: 1 per staircase turn (if there are turns or landings).
Additional columns: for long straight flights (over 3 meters) it is recommended to add an intermediate column for increased rigidity.
Total: for a simple straight staircase — 2 columns, for a G-shaped staircase with a landing — 3 columns, for a U-shaped staircase — 4 columns.
Handrails
Handrail length = length of the flight along the incline + lengths of landings’ railings (if any).
The length of the flight along the incline is calculated by the formula: √(L² + H²), where L is the horizontal projection of the flight, H is the height of the flight.
Example: horizontal projection length 3 meters, height 2.5 meters. Length along the incline = √(3² + 2.5²) = √(9 + 6.25) = √15.25 ≈ 3.9 meters.
Add 10–15 cm on each side for overhang beyond posts and trimming at the desired angle. The total handrail length required is 4.2 meters.
If standard handrails are sold in 2–3 meter lengths, you will need to use two sections and a connector piece.
Supports
Support length = handrail length minus 10–15 cm (supports are shorter than handrails since they do not extend beyond posts).
Finishing and Protection: How to Preserve Beauty for Decades
Finish protects wood, affects appearance, and determines longevity.
Sanding: The Foundation of Everything
Before any finishing, components are sanded with abrasives, gradually decreasing grit: 80 (coarse, removes large imperfections) → 120 (medium) → 180 (fine) → 220 (finish).
Sanding removes tool marks, opens wood pores for better absorption of protective coatings. On poorly sanded surfaces, the finish will apply unevenly.
Varnishing: transparent protection
Varnish creates a hard film, protects against moisture, dirt, mechanical damage, and preserves the visibility of the wood grain.
Polyurethane varnishes: the strongest and most durable, ideal for stairs. Two-component (mixed before application) are stronger than single-component ones.
Acrylic varnishes: water-based, odorless, eco-friendly, but less durable. Suitable for elements not subjected to heavy loads (balusters, posts).
Alkyd varnishes: inexpensive, but yellow over time, toxic during application.
Varnish is applied in 2–3 coats with a brush or spray. Each coat dries in 6–24 hours (depending on varnish type). Between coats, intermediate sanding with fine abrasive (320–400) is required to remove raised fibers.
Oil-based treatment
Oil penetrates wood, highlights texture, creates a matte surface. Wood remains tactilely pleasant and 'breathes'.
Linseed oil: natural, eco-friendly, takes a long time to dry (up to 7 days), may darken over time.
Tung oil: faster drying, does not darken, more expensive than linseed oil.
Danish oil: blend of oils and resins, fast drying, good protection.
Oil with hard wax: modern formulations combining oil and wax. Provide additional protection and a silky sheen.
Oil is applied in a thin layer with cloth or brush, excess wiped off after 10–15 minutes. Second coat applied after 12–24 hours. After full drying (3–7 days), surface is polished with soft cloth.
Advantages of oil: natural appearance, ease of local repair. Disadvantages: requires periodic reapplication (every 2–3 years).
Painting
Paint hides texture, creates a uniform colored surface. Ideal for birch and pine, where texture is not prominent.
Acrylic paints: water-based, odorless, fast-drying, eco-friendly. Create matte or semi-matte surfaces.
Alkyd enamels: durable, glossy, slow-drying, with odor during application.
Chalk paints: matte, velvety, create a vintage effect. Require a final finish with wax or varnish.
Technology: sanding → primer (equalizes absorption) → paint in 2–3 coats with intermediate sanding → finish (varnish or wax for additional protection).
Staining with dye
Dye (stain) changes the color of wood while preserving the visibility of the grain. Light beech can be transformed into dark walnut, birch into redwood.
Water-based Stains: eco-friendly, odorless, but raise fibers (requires intermediate sanding), dry slowly.
Alcohol-based stains: fast-drying (15–30 minutes), but toxic, raise fibers.
Oil-based stains: apply evenly, do not raise fibers, dry in 2–4 hours.
After staining, the surface must be sealed with varnish or oil — the stain itself does not provide protection.
Installation: professional installation technology
Quality installation is the guarantee of safety, durability, and absence of squeaks or looseness.
Preparation Stage
Ladder inspection: ensure load-bearing structure (stringers, risers) is properly installed, treads are level (tolerance 1–2 mm per meter), surfaces are clean.
Tools: drill, drill bits (spade, spiral, Forstner), impact driver, circular saw with adjustable angle, level (bubble and laser), square, tape measure, pencil, wood glue, screws, bolts, anchors.
Material acclimatization: components must remain in the room for 3–7 days before installation to equalize moisture content with the surrounding environment. This prevents deformation after installation.
Installation of Support Posts
Marking: indicate locations for post installation — start of run, landings, turns, end of run.
Foundation preparation: if the post is mounted to a wooden tread or landing, drill a hole for a bolt, 10–12 mm in diameter, 50–60 mm deep. If mounting to concrete — install an anchor.
Post preparation: screw a bolt 100–120 mm long into the bottom of the post to half its length. Or drill a hole at the end, insert the bolt using epoxy glue.
Installation: apply glue to the bolt and into the base hole, screw the post onto the bolt (as if screwing into a thread). Check vertical alignment using a level from both sides (perpendicular). Leave until the glue fully dries (12–24 hours).
Marking and trimming balusters
String tensioning: stretch a string from the top of the lower post to the top of the upper post. The string indicates the line along which baluster tops should be aligned.
Determining cut angles: measure the staircase’s incline using a protractor or angle gauge. Usually 30–40 degrees. Bottom ends of balusters are cut at this angle for tight fit against the tread. Top ends are cut at the same angle but in the opposite direction.
Trimming: use a circular saw with an adjustable angle. All balusters are trimmed identically — even a 1-degree deviation will create gaps.
Height check: after trimming, place the baluster on the tread and check if the top reaches the string. Adjust if necessary.
Installing balusters
Marking on treads: indicate baluster installation locations on treads. If one baluster per tread — center or closer to the front edge (5–10 cm from edge). If two — equally spaced.
Cutting mortises (for pegged joints): drill holes equal in diameter to the baluster peg, 20–30 mm deep. Use a Forstner bit for clean mortises with flat bottoms.
Installation: apply glue to the peg, insert the baluster into the mortise, press firmly. Check vertical alignment with a level. Optionally, secure with a screw from below (if access to the underside of the tread is available) or a bolt.
Alternative fastening — bolts: screw a bolt into the bottom of the baluster, drill a hole into the tread, screw the baluster onto the bolt with glue.
Installation of handrail supports (if used)
Preparation: handrail supports are cut at the same angle as balusters. Length equals distance between posts minus 5–10 cm (it does not extend beyond posts).
Fastening: handrail supports are attached to baluster tops with screws from above (later covered by handrail) or glue. Ensure the support runs straight without bends.
Handrail installation
Handrail preparation: if the handrail is installed in a mortise, a groove is routed on the underside, 15–20 mm deep, matching the thickness of baluster tops or the width of the support.
End trimming: ends of the handrail that meet posts are cut at an angle for tight fit.
Installation: apply glue to the mortise (or to baluster tops/supports), lay the handrail, press firmly. Optionally, secure with screws through the handrail into balusters or posts (screws are countersunk and masked with wooden plugs).
Joints: if the handrail consists of multiple sections, joints are made at 45-degree angles (beveled joints), glued, and reinforced with wooden dowels 8–10 mm in diameter or metal plates from below.
Finishing After Installation
Fastener concealment: cover visible screws with wooden plugs matching the wood tone. Plugs are glued, trimmed flush, and sanded.
Filling gaps: if small gaps remain (at joints or connections), fill with wood filler matching the tone. After drying, sand smooth.
Final finish: apply a final finish (varnish, oil, paint) to the entire railing — balusters, posts, handrail, supports. Use the same finish for a uniform appearance.
Typical Errors in Selection and Installation
Error 1: Incorrect Calculation
You purchase components exactly according to the calculation, without reserve. One baluster cracks during installation — everything is set. Or it turns out the calculation was inaccurate, two balusters are missing, and the model is no longer available.
Solution: always reserve 10–15%.
Error 2: Different Shades
You purchase components from different batches. It turns out that balusters from one batch are slightly lighter, from another darker. After lacquering, the difference becomes even more noticeable.
Solution: purchase all components from one batch. If this is impossible, choose pre-painted options where color is set by paint, not by natural wood tone.
Error 3: Inaccurate Corner Trimming
You trim balusters 'by eye', without using a miter saw with precise angle adjustment. Result — gaps between balusters and steps, balusters are not vertical, handrail does not lie flat.
Solution: use quality tools, check angles with a protractor, make a test cut on one baluster, verify, and only then cut the rest.
Error 4: Weak Fastening
You fasten balusters only with glue, without mechanical fasteners (screws, bolts). After several months, balusters start to wobble, the glued joint weakens.
Solution: always use a combination of glue + mechanical fastening. Glue ensures tight connection, mechanical fastening ensures strength.
Error 5: Installation Without Acclimatization
You bring components from the warehouse (where humidity is 50–60%) and immediately install them in the house (where humidity is 30–40%). After a month, wood dries out, gaps appear, fasteners weaken.
Solution: let components acclimate in the room for 3–7 days before installation.
Error 6: Neglecting Protective Coating
You install components thinking 'I'll coat them later'. After a month, wood darkens, gets dirty, absorbs grease from hands (especially the handrail), then the coating applies unevenly, leaving spots.
Solution: apply protective coating either before installation or immediately after, without delay.
Care and Maintenance: Preserve Beauty for Decades
Proper care extends service life and preserves aesthetics.
Regular cleaning
Wipe balusters, posts, and handrail with a damp soft cloth once a week. Handrail more often, as it accumulates fingerprints. Avoid aggressive cleaning agents, abrasives, and solvents.
For lacquered surfaces, use specialized lacquer furniture care products. For oil-based finishes — use a soft damp cloth, no chemicals.
Recoating
Lacquer: every 3–5 years, lightly sand surface with fine abrasive (320–400), apply fresh coat of lacquer. This restores gloss and refreshes protection.
Oil: every 2–3 years, clean surface, apply thin layer of oil, wipe off excess, polish.
Paint: if scratches or scuffs appear, sand, prime, repaint.
Checking fasteners
Check fence strength every six months. Shake the handrail — it should not rattle. Check balusters — they must stand vertically, not wobble. If looseness is detected, tighten screws, add glue.
Repair of damage
Scratches on lacquer: sand with fine abrasive (400–600), apply lacquer locally, polish.
Dents: moisten dent with water, cover with damp cloth, iron with hot iron. Steam will make fibers swell, dent will level out. Sand, lacquer.
Cracks: fill with wood-colored putty, sand, apply finish coat.
Broken baluster: replace with a new one. Unscrew or remove the broken one, and install the new one using the same technique.
Where to buy quality components
When choosing a supplier, pay attention to:
In-house production: manufacturers control quality at every stage and can produce non-standard elements.
Assortment: the wider the selection of shapes, sizes, and wood species, the easier it is to find elements that match your project.
Processing quality: the surface must be perfectly sanded, free of chips, cracks, or burrs. Dimensions are precise (deviation no more than 0.5 millimeters).
Ability to select a set: it is better to purchase all elements (balusters, posts, handrails) from one manufacturer in one batch — guarantee of material, color, and finish uniformity.
Warranties: serious manufacturers provide a minimum one-year warranty against deformation or cracking.
Consultations: professional consultants will help calculate the required quantity, select compatible elements, and provide installation recommendations.
Conclusion: components as the foundation of a safe and beautiful staircase
staircase componentsThese are not secondary details, but the foundation of safety, functionality, and aesthetics. The right choice of material, shape, and finish creates a staircase that is enjoyed, lasts for decades, and becomes a home’s decoration.
Quality wooden components — an investment for centuries. They do not require replacement, only periodic refinishing. They create the atmosphere of home, the warmth of natural wood, and a sense of reliability and solidity.
STAVROS offers a complete range of elements for solid wood staircases made from oak, beech, ash, and birch. Over 80 baluster models (classic-profiled turned, minimalist square, flat with cut-out ornamentation, smooth, carved exclusive), support posts in all sizes (80×80, 100×100, 120×120 mm) with turned profiles and carved finials (spheres, pyramids, vases, cones, decorative elements), handrails in all shapes (round 50–60 mm diameter, oval 60×80 mm, rectangular with rounded edges 70×90 mm, decorative profiles), baluster supports, turning connectors, rose joints, decorative overlays. Each item is manufactured on high-precision turning and milling equipment with CNC (for mass models) or by hand by master carvers (for exclusive carved elements), undergoes kiln drying to 8–12% moisture, and passes multi-stage quality control. Dimensional deviation does not exceed 0.5 mm, ensuring precise fitting during installation. STAVROS offers components with various finishes: natural oil with hard wax (emphasizes wood grain, creates a matte velvety surface, ideal for premium species), polyurethane lacquer (glossy, semi-gloss, or matte, maximum durability for high-load elements — handrails, treads), staining with stains (changes color while preserving grain visibility — walnut, oak, wenge, padauk, redwood), painting in any RAL catalog color (white, gray, black, pastel tones for Provence, vibrant accent colors), patina with vintage effect (gold, silver, bronze on white or beige base for classic and Provence interiors). Comprehensive approach: you receive all elements from the same wood species, batch, and finish — guarantee of visual unity. Custom solutions: manufacturing components according to your sketches and dimensions (non-standard baluster height, unique profiles, original carving), 3D visualization of your staircase with selected elements (see the result before purchase), professional calculation of required quantities of all elements based on staircase configuration, installation recommendations from specialists with 40 years of experience in staircases. In-house production in Russia, optimized logistics, nationwide delivery via transport companies, flexible discount system for large orders and regular clients. Visit STAVROS showrooms in Moscow and St. Petersburg to see the full range of components, feel the perfectly sanded surfaces, evaluate the quality of turning and carving, and choose elements that will create your dream staircase. STAVROS — traditions of carpentry craftsmanship passed down from generation to generation, modern high-precision processing technologies, strict multi-stage quality control at every production stage, care for your family’s safety, and creation of interiors that serve for centuries. Create staircases that become the pride of your home, passed down as a standard of quality, beauty, and reliability.


