


Article Contents:
- Revolution in understanding ceiling decoration
- Evolution from Function to Art
- Technological advantages of modern production
- The art of selection: criteria for quality material
- Visual quality diagnostics
- Technical specifications and certification
- Design possibilities: from classic to avant-garde
- Profile diversity
- Dimensional logic
- Color alchemy: transforming material into art
- Preparation for painting
- Techniques and effects
- Purchase: strategies and tactics for smart buying
- Planning and calculations
- Supplier Selection
- Seasonality and pricing
- Logistical solutions: from warehouse to site
- Transportation and storage
- Acceptance and quality control
- Preparation for installation: creating ideal conditions
- Climate adaptation
- Marking and Planning
- Installation technology: from theory to practice
- Mounting methods
- Processing corners and joints
- Painting installed valances
- Final preparation
- Priming on-site
- Final painting
- Quality control and acceptance of work
- Visual assessment
- Acceptance documentation
- Operation and maintenance
- Care guidelines
- Local repair
- Economic aspects of ownership
- Cost of Ownership Analysis
- Impact on property value
- Frequently Asked Questions
- Conclusion
Have you ever wondered why some interiors seem expensive and thoughtfully designed, while others appear flat and unfinished? The secret often lies in details that many consider secondary. Ceiling valances are one such element capable of radically changing the perception of space. When deciding buy MDF valances for paintingyou are choosing in favor of boundless design possibilities and long-lasting quality.
The modern market of finishing materials offers many solutions, but only a few combine universality, quality, and reasonable cost. MDF valances for painting have become a real breakthrough in the world of interior design, providing designers and homeowners with a tool to realize the most daring ideas.


Revolution in understanding ceiling decoration


Evolution from Function to Art
The history of ceiling cornices spans millennia — from simple wooden strips of ancient buildings to intricate plaster compositions of palace interiors. But a true revolution occurred with the advent of modern composite materials, which combined the best qualities of traditional solutions with the advantages of new technologies.
MDF (Medium Density Fibreboard) changed the rules of the game in the world of decorative elements. This material is made from wood fibers pressed under high pressure with eco-friendly binding agents. The result is a uniform, stable material that surpasses natural wood in many parameters.
What makes MDF cornices special? Primarily — predictable behavior. Unlike natural wood, which may deform due to changes in humidity, MDF maintains stable dimensions. This is critically important for ceiling elements, where even minor deformations are immediately noticeable.
Our factory also produces:


Technological advantages of modern production
The production of high-quality MDF cornices is a high-tech process where each stage is controlled with scientific precision. It begins with the preparation of wood raw material — carefully selected sawdust and shavings, which undergo multi-stage cleaning and sorting.
Defibration — the process of separating wood into the finest fibers — occurs at temperatures above 100°C in the presence of steam. This is not merely mechanical grinding, but a chemical-physical process that makes fibers more pliable and ready to form strong bonds.
Pressing is carried out at a pressure of up to 40 kg/cm² and a temperature of 200°C. These parameters, refined over years of research, ensure optimal material density — 750-870 kg/m³ for cornices. Too low a density reduces strength, too high a density complicates processing.
Get Consultation
The art of selection: criteria for quality material
Visual quality diagnosis
How to distinguish quality MDF from mediocre? An experienced eye will immediately notice key signs. The surface of quality material has a uniform color without spots or streaks. The structure is homogeneous, without inclusions or voids. When lightly tapped, the sound should be crisp and clear — a dull sound indicates internal defects.
The edges of quality MDF are smooth, without chips or delamination. When cut, the material should not crumble or produce dust. If you run your hand over the surface, it should be smooth, without roughness or irregularities.
Geometric accuracy is another important criterion. Deviations in thickness should not exceed ±0.3 mm, in width — ±0.5 mm. This can be checked with a caliper at several points. Quality MDF for Painting cornices have even stricter tolerances.
Technical characteristics and certification
The moisture content of the finished material is a critically important parameter, which should be 6-8%. Exceeding this value may lead to deformation after installation. Serious manufacturers indicate moisture content in technical specifications and control this parameter during production.
Formaldehyde emission class determines the ecological safety of the material. E1 — standard class for residential spaces, E0 — enhanced safety class for children’s rooms. Certificates of compliance must be publicly accessible and contain data from accredited laboratories.
Strength characteristics include bending strength (not less than 35 MPa), modulus of elasticity (not less than 3500 MPa), and impact toughness. These parameters determine the ability of the cornice to withstand loads during installation and operation.
Design possibilities: from classic to avant-garde
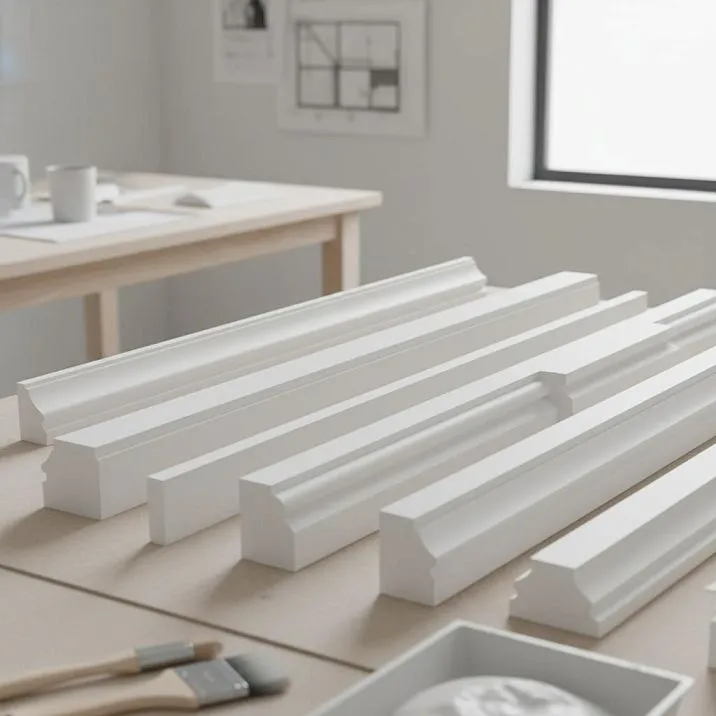
Profile diversity
The world of MDF cornice profiles is captivating. Simple rectangular cross-sections are suitable for minimalist interiors, where clean lines and absence of unnecessary details are important. Such cornices create a clear boundary between wall and ceiling, structuring the space.
Classic profiles with traditional elements — ovals, grooves, and moldings — evoke rich architectural heritage. Modern technologies allow reproducing the most complex historical profiles with museum-level accuracy. MDF moldings for painting Such profiles transform an ordinary room into a palace hall.
Asymmetric profiles — a modern interpretation of classical forms. They create dynamism, add individuality to interiors, and suit non-standard design solutions. Directional profiles can visually alter the proportions of a room.
Dimensional logic
Choosing the cornice size is not just a technical decision, but an important design accent. The height of the cornice should correspond to the ceiling height and overall room proportions. For standard apartments with 2.7-meter ceilings, an optimal height is 80-120 mm.
The cornice overhang determines the depth of shadow and affects visual perception. A small overhang of 20-30 mm creates a delicate shadow, a large overhang of 60-100 mm — a pronounced architectural accent. In high-ceilinged rooms, cornices with overhangs up to 150 mm can be used.
The standard length of planks is 2000-2500 mm, which is optimal for most rooms. Longer elements are more difficult to transport and install, but they allow minimizing the number of joints on long walls.
Color alchemy: transforming material into a work of art
Preparation for painting
The quality of painting depends 80% on surface preparation. MDF has a slightly porous structure that requires a special approach. The surface must be perfectly sanded with grit 220-320, thoroughly cleaned of dust, and degreased.
Priming is a mandatory stage that many underestimate. Special primer for MDF not only improves paint adhesion but also seals the material's pores, preventing uneven absorption. Isolating primers prevent migration of substances from the substrate, which could cause yellowing of the coating.
The choice of coating system is determined by operating conditions and desired appearance. For residential spaces, water-based acrylic paints are optimal — they are eco-friendly, odorless, provide good coverage, and ensure long-lasting finish.
Techniques and Effects
Solid-color painting remains the most popular solution. White color remains a favorite due to its versatility and ability to visually increase ceiling height. Various shades of white — from cool Arctic to warm cream — allow creating subtle mood nuances.
Material imitation opens new horizons for creativity. Modern paints allow creating convincing imitation of marble, valuable wood species, patinated metal. The technique requires skill, but the result exceeds expectations.
Multi-color solutions use gradients and transitions to create complex visual effects. The cornice can smoothly transition from ceiling color to wall color, creating an illusion of infinite space. and frames create a home atmosphere, making it truly cozy and individual. This is an investment in beauty, which pays off every day through aesthetic pleasure from admiring the beautiful. complement the overall composition.
Purchasing: Strategies and Tactics for Smart Buying
Planning and Calculations
Successful cornice purchase begins with precise planning. Create a detailed room plan indicating all dimensions. Consider not only the perimeter but also complex areas — bay windows, niches, columns. Each non-standard element requires additional material for trimming.
Quantity calculation is based on ceiling perimeter with an additional 10-15% for trimming and possible defects. For complex rooms with many angles, the reserve should be greater — up to 25%. Corner decorative elements can simplify installation and reduce waste.
Don't forget about additional materials — adhesive, fasteners, primer, paint. Their cost may account for 30-50% of the cornice price. Quality materials pay off through durability and appearance of the finish.
Supplier selection
Supplier reputation is a key factor in successful purchase. Study customer reviews, portfolios of completed projects, time on the market. Serious companies provide quality certificates, product warranties, professional consultations.
Delivery conditions are especially important for large orders. Cornices require careful transportation — they are easily damaged during improper loading. Inquire about packaging, whether the company has its own fleet, and whether goods are insured.
Service support includes consultations on selection, assistance with calculations, installation recommendations. Good suppliers offer additional services — custom cutting to size, selection of additional elements, technical support.
Seasonality and Pricing
The construction market has pronounced seasonality, which affects prices and product availability. The spring period (March-May) is characterized by a 15-25% price increase due to the start of the construction season. Prices peak in summer.
Autumn-winter period is the optimal time for purchase. Reduced demand leads to discounts and special offers. Savings can reach 30-40%, which is significant for large volumes. MDF Skirting Boards and cornices are often sold as a set with a discount.
Holiday promotions and sales provide additional opportunities for savings. Follow offers from major suppliers, subscribe to newsletters, participate in loyalty programs.
Logistical Solutions: From Warehouse to Site
Transportation and storage
MDF cornices require special handling during transportation. The material is relatively lightweight but bulky and fragile. Standard packaging includes protective film or cardboard, preventing mechanical damage to the surface.
Trucks must have sufficient cargo length — at least 2.5 meters for standard 2.4-meter-long planks. When transporting large quantities of cornices, special racks are used to prevent deformation due to self-weight.
Storage conditions prior to installation are critically important for preserving material quality. Cornices must be stored in a dry, well-ventilated space at 15-25°C temperature and humidity not exceeding 65%. Storage must be strictly horizontal, on flat supports with spacing no more than 1 meter.
Receiving and Quality Control
Receiving goods is a responsible step that determines the success of the entire project. Inspect each plank for mechanical damage, size conformity to order, absence of surface defects. All remarks must be recorded in the presence of the supplier's representative.
Geometric control includes checking plank length, cross-section, and straightness. Use a tape measure, caliper, and rule for inspection. Plank curvature must not exceed 2 mm per meter of length.
Packaging documents must correspond to actual contents. Check the number of planks, their dimensions, and article numbers. Certificates of quality and environmental safety must be attached to each batch of goods.
Preparation for installation: creating ideal conditions
Climate adaptation
Acclimatization is the process of adjusting the material's temperature and humidity to the installation room conditions. Cornices must remain in the room for at least 24 hours, and up to 48 hours if there is a significant difference in conditions. This prevents deformation after installation.
Room preparation includes completing all "wet" processes — plastering, screeding, tile work. Air humidity must not exceed 60%, and temperature must be stable within the 18–22°C range. Drafts are not permitted.
Tool preparation requires checking and adjusting all equipment. The circular saw must be equipped with a sharp fine-toothed blade, the miter gauge must have precise angle markings, and levels must be calibrated.
Marking and Planning
Accurate marking is the foundation of successful installation. Start by identifying the longest wall, where the full-length rail will be installed. From there, mark the entire perimeter, accounting for the length of standard rails and joint placement.
The laser level ensures perfect horizontal alignment of the mounting line. Check the ceiling level around the entire perimeter — deviations up to 5 mm can be compensated during installation, but larger deviations require ceiling leveling.
Planning the sequence of work helps avoid mistakes. Start with the most visible areas and finish with hidden ones. Joints should be placed in the least noticeable locations — behind curtains, in corners, above tall furniture.
Installation technology: from theory to practice
Methods of mounting
Adhesive mounting is the most popular method for MDF cornices. Modern polyurethane adhesives provide strong bonding with most substrates. Adhesive is applied in a zigzag pattern to the back of the cornice, the element is pressed against the ceiling and secured until the adhesive sets.
Mechanical mounting is used for heavy cornices or weak substrates. Self-tapping screws 60–80 mm long with concealed heads are installed every 40–60 cm. Screw locations are filled and painted after installation.
Combined mounting combines adhesive and mechanical fastening for maximum reliability. This method is recommended for cornices with complex profiles, large sizes, or in rooms with variable loads.
Corner and joint processing
Corner joints are the most critical part of installation. Internal corners are joined at 45°, and the cut must be perfectly accurate. Use a circular saw with fences or a quality miter gauge. Even minor inaccuracies will be visible after painting.
External corners require even greater precision since they are visible. First, trim the shorter element, then adjust the longer one to match. Check the fit before final mounting.
Straight joints on long walls are made at a 90° angle. Ends must be perfectly flat and perpendicular to the longitudinal axis. Joints are sealed with adhesive and additionally mechanically secured if necessary. MDF baseboards for painting are installed using the same technology.
Painting Installed Cornices
Final Preparation
After installation, cornices require final preparation before painting. All joints are filled with acrylic sealant matched to the future finish color. Excess sealant is wiped away with a damp cloth before it dries.
Areas of mechanical fastening are filled with wood-specific putty. After drying, the putty is sanded flush with the main surface using fine abrasive. Quality of preparation is checked with directional light — all defects must be eliminated.
Dust removal is performed using an industrial vacuum cleaner and sticky cloths. Even the smallest dust particles will create defects in the finish. Special attention is paid to textured profile areas, where dust accumulates in the greatest quantities.
On-site Priming
Priming installed cornices requires special technique. Use brushes of different sizes — wide for flat areas, narrow for textured areas. Brush direction must align with the grain of the MDF.
Priming quality is visually checked under side lighting. The surface must be evenly coated, without gaps or drips. Drying time for primer — at least 4 hours under normal conditions.
Inter-layer sanding removes raised fibers and minor defects. Use abrasive grit 320–400, working carefully to avoid sanding through the primer to the substrate. MDF rails for painting are processed similarly.
Final Painting
Paint application is the final stage determining the appearance of cornices. For complex profiles, a combination of tools is used: brushes for textured areas, rollers or spray guns for flat surfaces.
Brush application technique requires specific skills. Paint is applied in a thin layer along the profile direction, then blended with crosswise strokes. Each area is treated until brush marks disappear completely.
Number of coats depends on desired finish quality. For economical option, two coats suffice; for premium finish, three to four coats with intermediate sanding. Drying time between coats — at least 4 hours.
Quality control and acceptance of work
Visual assessment
Installation and painting quality is assessed under various lighting conditions — daylight, artificial, directional. Surface must be uniformly painted, without gaps, drips, or brush marks. Finish gloss must be consistent across the entire surface.
Geometric accuracy is checked with a level and tape measure. Cornices must be perfectly horizontal, joints tight, angles precise. Gaps between cornice and ceiling must not exceed 1 mm.
Functional check includes evaluating the strength of mounting. The cornice must not bend under light pressure, make squeaks or knocks. All elements must be securely fastened.
Acceptance documentation
The acceptance act records compliance of the result with the technical assignment. The document specifies the materials used, their quantity, deviations from the project (if any), and warranty obligations.
Photographic documentation of the result will be helpful in case of disputes or during warranty service. Photos should show the overall appearance, joint details, and coating quality under different lighting conditions.
Maintenance recommendations include care rules, service intervals, and load restrictions. Adhering to these recommendations will extend the lifespan of the cornices and maintain their attractive appearance.
Operation and Maintenance
Care Rules
Regular care ensures longevity and attractive appearance of the cornices. Dry cleaning is performed using a soft brush or vacuum cleaner with a soft attachment. Dust is the main enemy of decorative elements; it accumulates in relief and damages the appearance.
Wet cleaning is performed using slightly damp microfiber cloth without abrasive agents. For removing stubborn stains, use specialized cleaners for painted surfaces, diluted according to instructions.
Cleaning frequency depends on room conditions. In bedrooms and living rooms, weekly dry and monthly wet cleaning are sufficient. Kitchens and hallways require more frequent maintenance due to higher contamination levels.
Local repair
Minor coating damage is repaired by local touch-up. The damaged area is cleaned with fine abrasive, dusted, and primed if necessary. Paint is applied in a thin layer using a brush of appropriate size.
Mechanical damage to the base requires more serious repair. Dents and chips are filled with wood putty, sanded after drying, and coated with primer and paint matching the original finish.
Economic Aspects of Ownership
The rental cost of premises with quality finishing may be 15-25% higher than the average in the district. Investments in decorative elements are recouped through increased property income.
Analysis of ownership cost
Initial investment in quality MDF cornices pays off through long service life and minimal operating costs. With proper installation and care, cornices last 15-20 years without replacement.
Alternative materials may appear cheaper initially but require more frequent replacement or costly maintenance. Foam cornices last 3-5 years, gypsum ones require professional repair upon damage.
The ability to repaint is a unique advantage of MDF cornices. Changing the interior color scheme does not require replacing decorative elements — simply refresh the coating. This significantly saves costs during design updates.
Impact on property value
Quality finishing with decorative elements increases property attractiveness to buyers and tenants. Professionally finished interiors with cornices appear more expensive and prestigious.
Rent for spaces with quality finishing may be 15-25% higher than average in the district. Investments in decorative elements pay off through increased property income.
Can a damaged cornice be repaired?
Frequently asked questions
Can MDF cornices be used in rooms with high humidity?
Standard MDF is suitable for rooms with normal humidity. In bathrooms and kitchens, use moisture-resistant MDF grades and ensure proper ventilation. All joints must be sealed tightly.
How to calculate the required amount of cornices?
Measure the ceiling perimeter and add 10-15% for simple rooms, 20-25% for complex ones. Consider standard plank length of 2.4 meters and plan joint placement in least visible areas.
What tools are needed for cornice installation?
Essential tools: circular saw or miter gauge, drill, level, tape measure, pencil. For mounting, use adhesive or self-tapping screws; for finishing, use putty, sealant, and painting brushes.
How long does the full installation cycle take?
For a 20 sq.m. room: installation — 1 day, preparation for painting — 1 day, priming and drying — 1 day, painting — 2-3 days including drying between coats. Total: 5-6 days.
Can valances be mounted on a stretch ceiling?
Yes, but special technology is required. Cornices are mounted to pre-installed anchor elements before installing a suspended ceiling. Alternatively, use special adhesives safe for PVC film.
How to choose the color for cornices?
Classic solution — match ceiling color to visually increase height. Contrasting color creates a striking accent. Match wall color — for unified space. Avoid more than three colors in one room.
Can a damaged cornice be repaired?
Yes, minor damages are easily repaired with local touch-up. Serious defects require replacing the damaged section. The modular construction allows replacing part of the cornice without dismantling the entire system.
What is the service life of MDF cornices?
With proper installation and maintenance — 15-20 years. The finish may require renewal every 7-10 years depending on usage conditions. The material itself practically does not age.
Conclusion
Purchasing MDF cornices for painting is an investment in the beauty, comfort, and longevity of your interior. This material successfully combines traditional aesthetics with modern technologies, offering limitless opportunities for creativity and personalization of space.
The versatility of MDF cornices is demonstrated by their ability to adapt to any interior style — from strict classicism to modern minimalism. The possibility of painting in any color makes them an ideal tool for realizing design ideas.
The economic efficiency of the material is not only reflected in its reasonable cost, but also in its durability, ease of maintenance, repairability, and renewability. This makes MDF cornices a cost-effective investment in the long term.
Technological advantages — dimensional stability, uniform structure, excellent workability — ensure high-quality finished products and ease of installation. The ecological safety of modern MDF allows its use in any residential space.
Correct selection of the supplier, quality installation, and adherence to operating rules ensure that cornices will delight you with their beauty and functionality for many years. Investing in quality decorative elements is investing in comfort and aesthetic pleasure from living in a beautiful home.
STAVROS, a company with many years of experience in producing high-quality MDF products, offers a full range of solutions for creating ideal interiors. The use of advanced manufacturing technologies, strict quality control at all stages, and the application of only certified eco-friendly materials guarantee compliance with the highest international standards. STAVROS understands the importance of every detail in creating a harmonious space and offers products that combine functionality with flawless aesthetics. Choosing STAVROS products means you are not just acquiring building materials, but tools for creating dream interiors that will serve faithfully for many years, delighting you with their refined forms and unmatched craftsmanship.


