Article Contents:
- What does 'making wall molding' mean
- Three scenarios: from simple to complex
- What can realistically be done with your own hands without experience
- What beginners do well
- What is better left to professionals for the first time
- What materials to choose for wall molding
- Gypsum: tradition, weight, and character
- Polystyrene: lightness and compromise
- Polyurethane: The Modern DIY Standard
- Material Comparison Table
- What Tools and Supplies You'll Need
- For Installing Pre-Made Elements (Polyurethane, Polystyrene)
- For Installing Plaster Molding (Additional)
- For Making Your Own from Plaster
- How to Prepare a Wall for Molding
- Basic Surface Requirements
- Step-by-Step Preparation
- What to Do with Drywall
- Step-by-Step Scenario #1: Installing Pre-Made Molding on a Wall
- Step 1. Fitting and Layout
- Step 2. Wall Marking
- Step 3. Trimming
- Step 4. Applying Adhesive
- Step 5. Pressing and Curing
- Step 6. Removing Excess
- Step 7. Sealing Joints
- Step 8. Final Painting
- Step-by-Step Scenario #2: How to Make a Plaster Element Yourself
- What You'll Need
- Step 1. Mold Preparation
- Step 2. Mixing the plaster
- Step 3. Pouring
- Step 4. Leveling the back side
- Step 5. Curing and drying
- Step 6. Finishing
- Step 7. Installation
- How to attach heavy plaster molding
- Rules for installing heavy decor
- How to choose a pattern and format of molding for a wall
- Moldings and frames
- Molding around the mirror
- Molding by the fireplace
- Accent Wall
- What to choose for a small room
- How to incorporate molding into the interior
- Stucco in Classical Interior
- Molding in neoclassicism
- Ornament in modern interiors
- Matching molding to the wall color
- Molding a couple of shades lighter or darker
- Common mistakes when installing molding on the wall
- Mistake 1. Unprepared surface
- Mistake 2. Too heavy decor without reinforcement
- Mistake 3. Weak marking
- Error 4. Trying to tackle a complex ornament right away
- Error 5. Poor trimming of joints
- Error 6. Installation after finishing
- Error 7. Wrong adhesive
- When it's better to call a professional
- Wall molding: practical scenarios for different rooms
- Living Room
- Bedroom
- Entry Hall
- Office
- How to paint molding after installation
- Painting sequence
- What to paint with
- FAQ: answers to popular questions about wall molding
- What's easier: making plaster molding or buying ready-made elements?
- Can you install wall molding without experience?
- What material is best for the first time?
- Do I need to level the wall for molding?
- Can I install gypsum molding on drywall?
- How to attach heavy molding?
- How to make neat joints?
- Can I paint molding after installation?
- What to choose for an accent wall?
- When is it better to give up DIY and call a professional?
- About the Company STAVROS
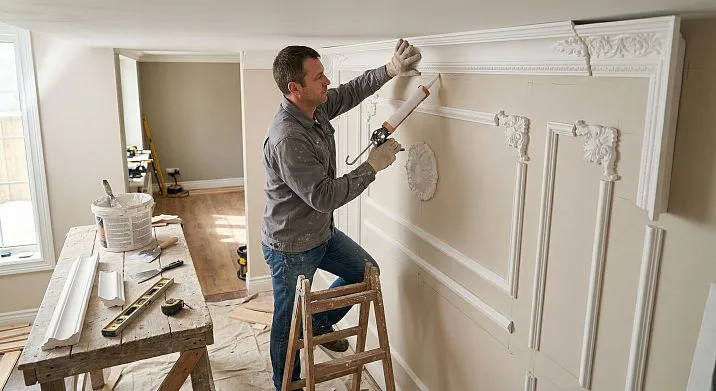
Wall molding is not just a decorative element from the past. It is a living architectural tool that can instantly change the character of a room, giving it depth, rhythm, and visual weight. And if before it was the domain of palaces and mansions, today installing wall molding yourself is a quite realistic task for anyone willing to understand the materials, properly prepare the base, and work methodically.
Another question is what exactly you want to do. Sculpt a bas-relief from scratch with your bare hands? Cast an element in a gypsum mold? Or take ready-made moldings and carefully mount them on the wall? These are three completely different scenarios in terms of complexity, time, and skill requirements. Let's start with that.


What does 'making wall molding' mean?
Before picking up tools, you need to honestly answer the question: what exactly do you want to do? Because the word 'molding' hides at least three fundamentally different tasks.


Three scenarios: from simple to complex
First scenario — install ready-made lightweight molding. This is the most accessible path for a beginner. You buy ready-made decorative elements — moldings, frames, rosettes, ornaments — and attach them to the wall. No manufacturing, minimal preparation, results visible within hours. This is the path most people choose when first encountering wall decor.
Second scenario — install ready-made plaster molding. This is more complex. Plaster elements are heavier, require more thorough surface preparation, sometimes additional mechanical fastening. But the result is closer to classical architecture: dense, heavy, textured decor that is unmistakable.
Third scenario — make a plaster element yourself. Casting in a mold, leveling, drying, finishing. This is a labor-intensive path requiring understanding of the material, patience, and readiness for defects. Suitable for those who want a unique ornament or non-standard size.
For most readers, the optimal choice is the first or second. The third should be considered a conscious creative choice, not a way to save money.
Our factory also produces:


What can realistically be done by hand without experience
Honest answer: a lot. But with caveats.
Lightweight polyurethane moldings can be installed literally by one person, without special training or expensive tools. A tape measure, a straight line, the right adhesive, and careful hands are enough. That's whyMoldings on the WallPolyurethane moldings have become the most popular choice for home DIY decor: they are lightweight, easy to cut, require no mixing, and set quickly.
Get Consultation
What beginners do well
-
Straight moldings along the wall perimeter — frame-style design
-
Simple decorative frames around a mirror or painting
-
Horizontal strips of molding on an accent wall
-
Corner elements with pre-cut miter joints
-
Small decorative rosettes and overlays
What is better left to professionals at first
-
Complex patterns with thin curved details
-
Radius elements for non-standard arches
-
Large gypsum panels weighing 5 kg and above
-
Multi-level compositions with the joining of several forms
-
Decorative elements on an unstable base (crumbling plaster, old limestone)
The key rule for a first experience: start with something simple. A straight molding along a horizontal line is already a decorative element. And it looks dignified if done neatly.
What materials to choose for wall molding
This is the most fundamental choice, on which everything depends: the installation process, requirements for the base, durability, and final appearance.
Gypsum: tradition, weight, and character
Gypsum molding is the historical standard. It was made in the 18th century and is still made today. Gypsum holds relief details well, polishes excellently, does not burn, and does not release toxins when heated. This is important for rooms near a fireplace or in the kitchen.
The main disadvantage of gypsum is its weight. Even a small element made of modeling gypsum is noticeably heavier than a similar polyurethane one. Large parts require not only good adhesive but also mechanical fastening—dowels, screws, sometimes metal inserts. Gypsum molding cannot be installed on an unstable base: loose plaster, old crumbling layers, untreated drywall without reinforcement.
Advantages of gypsum:
-
High relief detail
-
Fire safety
-
Environmental neutrality
-
Takes paint and sands well
-
Authentic texture of classic molding
Disadvantages:
-
Heavy weight
-
Fragility during transportation and installation
-
Requires a solid base
-
Harder to cut and fit
Polystyrene: lightness and compromise
Polystyrene molding consists of lightweight stamped elements that imitate classic forms. They are easy to cut, easy to install, and practically weightless. For drywall walls and ceilings with low load-bearing capacity, this is a sensible choice.
However, polystyrene has significant limitations. It burns. More precisely, it melts and releases toxic substances. This means it is not advisable to use near fireplaces, in kitchens, or in rooms with high temperatures. It also falls short of plaster and polyurethane in terms of relief clarity and mechanical strength—it can be accidentally dented with a finger during installation.
Polyurethane: The Modern DIY Standard
Polyurethane moldings— is today's favorite for DIY installation. Polyurethane combines the lightness of polystyrene foam with much higher strength, moisture resistance, detail clarity, and fire safety (unlike polystyrene foam, it does not burn with an open flame).
Decorative elements made of polyurethane are most often recommended for a first DIY project: they are easily cut with a regular hacksaw or utility knife, adhere well to glue, and do not require pre-soaking or priming over the entire surface.
Material comparison table
| Parameter | Gypsum | Expanded polystyrene | Polyurethane |
|---|---|---|---|
| Weight | Heavy | Very light | Lightweight |
| Strength | High | Low | Medium–high |
| Detailing | Maximum | Medium | High |
| Fire safety | Yes | No | Yes |
| Installation | Complex | Simple | Simple |
| Cutting | Difficult | Easy | Easy |
| Moisture resistance | Medium | Medium | High |
| Price | Medium | Low | Medium |
Conclusion for first experience: if you are installing molding on a wall for the first time — choose polyurethane. It forgives mistakes, is convenient to work with, and delivers a quality result without unnecessary complications.
What tools and consumables will be needed
Good news: for installing ready-made molding, you don't need professional tools. A basic set is quite sufficient.
For installing ready-made elements (polyurethane, polystyrene foam)
-
Tape measure and pencil for marking
-
Spirit level (laser or bubble)
-
Utility knife or hacksaw with fine teeth for metal
-
Miter box (for precise angle cuts)
-
Molding adhesive (liquid nails or special compound)
-
Putty knife for applying adhesive
-
Painter's tape for temporary fixation during curing
-
Rag and solvent for excess removal
-
Acrylic sealant or putty for joint filling
-
Sandpaper (P120–P240) for sanding
For installing gypsum molding (additionally)
-
Container for mixing adhesive compound
-
Stiff brush for wetting the surface
-
If needed: dowels, screws, screwdriver
-
Second hands — for large elements
For self-manufacturing from plaster
-
Construction or model plaster (G-16, G-22)
-
Flexible silicone or rigid polyurethane molds
-
Vaseline or other release lubricant
-
Container, mixer or drill with attachment
-
Flexible spatula
-
Sandpaper
How to prepare a wall for molding
This is the stage that is most often ignored — and it is precisely because of it that elements later fall off, cracks appear at the joints, and the entire work is ruined.
Basic surface requirements
The wall for molding must be:
-
Dry — no residual moisture, especially after puttying
-
Even — variations exceeding 3–5 mm must be corrected before installation
-
Strong — the surface must not crumble, flake, or be "spongy"
-
Clean — free of dust, grease, oil stains, wallpaper residue
Step-by-step preparation
Step 1. Cleaning. Remove all layers that are not securely adhered: old wallpaper, peeling paint, loose plaster. Check by tapping — a dull sound indicates the layer is detaching.
Step 2. Leveling. If the wall has noticeable variations — apply leveling putty. After drying, sand with a sanding mesh or sandpaper.
Step 3. Priming. A mandatory step. Primer strengthens the surface and improves adhesive bonding. Especially important for gypsum elements: the adhesive mixture must "grip" the base, not a dusty surface.
Step 4. Marking. Mark all axes and contours of the molding before opening the adhesive. Use a level—a crooked line on the wall is noticeable even from a distance of three meters.
Step 5. Curing. After priming, allow the surface to dry completely. Minimum 4–6 hours, ideally—24 hours.
What to do with drywall
Drywall is a special case. A gypsum board sheet itself has limited load-bearing capacity, and hanging heavy gypsum elements on it without additional reinforcement is a mistake. For lightweight polyurethane decor, drywall is an excellent choice. For gypsum molding weighing more than 2–3 kg per element, it is better to provide built-in mounting points in the frame in advance—even before sheathing.
If the frame is already sheathed, but you want to install heavy decor—use toggle bolts or metal anchors of appropriate load capacity, and always combine them with adhesive bonding.
Step-by-step scenario #1: installing ready-made molding on a wall
This is the most common format for DIY work. We'll break it down step by step—so that the result is neat the first time.
Step 1. Fitting and layout
Before applying adhesive, lay out all elements on the floor in the required order. Check how they join, if there are any breaks in the pattern, if the corners match. This is especially important for moldings with an ornament—the repeating pattern must align at the joints.
Step 2. Wall marking
Mark the element positions with a pencil. Use a laser level—it's the fastest and most accurate method. Mark not only the axis but also the edges of the elements to know exactly where to apply the adhesive.
Step 3. Cutting
Moldings are cut at a 45° angle at turns and frame corners. A miter box ensures a precise cut. For polyurethane, use a hacksaw for metal; for polystyrene foam, use a utility knife or a long-bladed craft knife. Cut slowly without pressure—only then will the cut be smooth.
Step 4. Applying adhesive
Apply adhesive to the back of the element in a zigzag or dots—not a solid layer, otherwise it will squeeze out at the edges. For polyurethane elements, acrylic-based liquid nails or specialized mounting adhesive for moldings work well.
If using gypsum adhesive—mix it to the consistency of thick sour cream and apply with a spatula in a thin, even layer.
Step 5. Pressing and holding
Press the element against the wall along the markings and align it. Hold for 30–60 seconds. For polyurethane—secure with painter's tape for 1–2 hours until fully set. For gypsum—hold by hand longer, sometimes up to 5–7 minutes, until the adhesive sets.
Step 6. Removing excess
Immediately remove any squeezed-out adhesive with a damp cloth or spatula. Dried mounting adhesive is much harder to remove—and it will be noticeable on a white surface.
Step 7. Sealing the joints
After the glue has completely dried, apply a thin layer of acrylic sealant or finishing putty to the joints. Smooth it out with your finger or a flexible spatula, removing any excess immediately. After drying, carefully sand with P240 sandpaper.
Step 8. Final painting
If the molding is white and the wall is white, you can leave it as is. If you want to paint it, use water-based or acrylic paint. Apply with a brush in two thin coats: the first as a primer, the second as a finish. Use a narrow brush to paint the relief details conveniently.
Step-by-step scenario #2: how to make a plaster element yourself
If you need a unique ornament or a non-standard size, making a plaster element using a mold is quite feasible at home. It's labor-intensive but interesting.
What you'll need
-
Ready-made mold (purchased silicone or homemade from silicone for molds)
-
Modeling plaster G-16 or G-22 (stronger, sets slower)
-
Vaseline or release spray
-
Container and mixer
-
Putty knife, sandpaper
Step 1. Mold preparation
Apply a thin layer of petroleum jelly or release agent inside the mold. This is necessary for easy removal of the element after setting.
Step 2. Mixing plaster
Pour water into a container — approximately 0.5–0.7 parts water to 1 part plaster. Add plaster to the water, not the other way around — this reduces clumping. Mix quickly until uniform. Work quickly: plaster begins to set within 5–8 minutes after mixing.
Step 3. Pouring
Pour the mixture into the mold in small portions, tapping the mold on the table to remove air bubbles. Fill to the brim.
Step 4. Leveling the back side
While the plaster is still fluid — level the back side with a putty knife. This side will be against the wall, so flatness here is important.
Step 5. Curing and drying
Let the element set in the mold for 30–40 minutes, then carefully remove it. But don't rush with installation: fresh plaster is fragile. Let it dry for another 24–48 hours at room temperature.
Step 6. Finishing
After drying, sand the edges and surface with fine sandpaper. Fill any pits or defects with a small amount of fresh plaster or acrylic putty.
Step 7. Installation
Then — follow step-by-step scenario No. 1. Moisten the back side with water or a weak PVA solution before applying adhesive — this will improve adhesion.
How to install heavy plaster molding
Heavy plaster elements require a special approach. Simply 'gluing them on' is not enough.
Rules for installing heavy decor
Scoring. Make small notches or scratches on the back surface of the element — this increases the bonding area. Similar scoring is also useful on the wall (if it's concrete or brick).
Double fixation. For elements weighing from 3–5 kg: first apply adhesive (special plaster or mounting adhesive), press it, secure with temporary supports. After the adhesive sets — additionally fasten with galvanized screws and anchors through pre-drilled holes. The holes are then filled with putty.
Two people. Large elements—cornices over 1 meter long, large relief panels—are inconvenient and unsafe to install alone. One holds, the other aligns and secures.
Working time. Gypsum adhesive sets quickly—in 5–10 minutes. Everything must be prepared in advance: mix the adhesive, mark the layout, ensure quick access to fasteners.
How to choose a pattern and format of wall molding
Choosing an ornament and shape is not just about aesthetics. It's about function. Different types of molding solve different tasks in the interior.
Moldings and frames
The most universal format.Decorative Wall Moldingscreate framed panels—geometric sections that visually structure the surface. They work well in both classic and modern interiors, especially when painted the same color as the wall.
Height for frame placement: the lower row—15 to 40 cm from the floor, the upper row—with a 30–50 cm gap from the ceiling. Between frames—a distance of at least 5–8 cm. This is not a strict rule, but such a rhythm looks organic.
Molding around a mirror
A classic and striking solution. Molding forms a frame that turns an ordinary mirror into an architectural accent. Choose a molding profile proportionate to the mirror: for a small mirror 60×90 cm, a molding 3–5 cm wide is suitable; for a large one—6–10 cm.
Molding by the fireplace
Here, the choice of material requires more careful consideration. Only gypsum is allowed in the direct heating zone. At a distance of 50 cm or more, polyurethane can be considered. Polystyrene foam by the fireplace is not permissible.
Accent Wall
One of the most popular scenarios today. The entire wall or part of it is covered with a frame ornament made of moldings in the color of the finish or a shade darker. This creates a pronounced rhythm and depth without additional color accents.
What to choose for a small room
In small spaces, molding works better if:
-
Moldings are thin (up to 4 cm wide)
-
Color matches the wall color
-
Frames are vertical — they visually elongate the space
Do not overload the walls with ornament in a small room: one pattern is better than several competing ones.
How to incorporate molding into the interior
Molding is not just a decorative strip nailed to the wall. It is an architectural element that should be part of the overall logic of the space.
Molding in a classic interior
Here everything is relatively obvious: lush ornaments, gilding, a combination of several profiles in the cornice, symmetrical frame compositions. Material: plaster or polyurethane with high detail. Color: white, ivory, with subtle gilding on relief details.
Molding in Neoclassicism
A more restrained approach. Minimal ornamentation, clear geometric profiles, moldings in the color of the wall or close shades. Emphasis on form, not decorative saturation. HerePolyurethane items for interiorswork especially well—they provide the necessary clarity without excessive bulkiness.
Molded Decoration in Modern Interiors
Today, molding has long moved beyond classicism. Molding on a wall painted gray is no longer classic, but a designer detail. White frames on a dark blue wall—a bold accent. Matte molding matching the surface tone—subtle work with light and shadow.
The main rule: the more contemporary the style, the simpler the molding profile. No curls or floral motifs—straight, laconic lines.
Molding in the color of the wall
One of the most refined techniques: molding and the wall are painted the same color. The decor does not jump out but exists as a relief—noticeable only with side lighting. This solution works well in a bedroom, where a calm, cozy background is needed.
Molding a couple of shades lighter or darker
This approach provides clear visual contrast without color shock. Light gray moldings on a dark gray wall, white frames on a light beige one—all this reads as thoughtful design, not as random decoration.
Common mistakes when installing molding on a wall
Everyone makes mistakes in this work—both beginners and experienced builders. Here are the most typical ones.
Mistake 1. Unprepared surface
The most common reason for molding falling off is a dirty, dusty, or loose wall. The adhesive does not 'grip' an unprimed base, and the molding starts to detach after a few months. Always prime.
Mistake 2. Too heavy decor without reinforcement
Have you seen tiles falling from a ceiling or wall? Gypsum molding behaves exactly the same without additional fastening if the base is weak. Don't skimp on anchors and don't ignore the weight of elements.
Mistake 3. Weak marking
A crookedly glued molding is a disaster. Removing it without damaging the wall and the element is extremely difficult. Spend 20 minutes on precise marking with a level—and you'll completely avoid this problem.
Mistake 4. Attempting to tackle a complex ornament right away
Starting with a bas-relief or a complex 60 cm diameter rosette is not the best idea. First—straight moldings. Then—corners. Then—composite frames. Then—ornament.
Error 5. Poor joint trimming
A gap in the molding joint is a very noticeable defect. Cut precisely, check by test-fitting before applying glue. A small gap (up to 1–2 mm) can be masked with acrylic sealant — a large one cannot.
Error 6. Installation after finishing
Working with gypsum produces fine dust that penetrates furniture, textiles, and crevices. It's better to install molding before the final wall painting and before bringing in furniture. If you're adding decor to an already finished wall — protect everything with film and tape.
Error 7. Wrong adhesive
Each type of molding requires its own adhesive. Solvent-based liquid nails can dissolve polystyrene foam. Gypsum adhesive is not suitable for polyurethane. Always read the material compatibility information on the packaging.
When it's better to call a professional
DIY is wonderful. But there are situations where doing it yourself will result not in savings, but in additional expenses for corrections.
Large gypsum panels. If we're talking about elements weighing 10 kg or more — installation requires experience, correct load calculation, and proper fasteners. A mistake here is literally dangerous.
Complex ornaments with fine details. Floral swirls, thin leaves, multi-layered profiles — all of these are easily chipped during careless installation. A professional knows how to handle fragile elements.
Non-standard radii and arches. Bending molding for an arch is a separate art. Not all materials can be bent without cracking, and it's not always done simply by soaking.
Weak or non-standard base. An old house, cracked walls, non-standard finishes — all of this requires an individual assessment by a specialist.
Expensive interior. If the renovation cost serious money and a mistake would be very noticeable — it's better to entrust the final decor to a professional.
Wall molding: practical scenarios for different rooms
Properly chosen molding format is half the success. Let's consider several specific scenarios.
Living Room
Here, molding works most effectively. An accent wall with frame panels made of moldings, a cornice around the perimeter, decor by the fireplace — all of this creates architectural completeness of the space. In the living room, you can allow for richer ornaments and larger profiles.
Bedroom
Here, moderation is important. Frame panels above the headboard of the bed, horizontal molding as a 'chair rail', a light cornice — that's enough. Excess decor in the bedroom works against the atmosphere of tranquility.
Entryway
Limited space requires thin molding. Vertical narrow frames stretch the ceiling. A horizontal strip of molding at a height of 120–130 cm from the floor makes the space more proportionate.
Office
Here, strict geometric profiles, deep frames, shelves with molding framing work well. Ornamentation — minimal.
How to paint molding after installation
Painting is the final but very crucial step. Incorrectly applied paint 'muddies' the relief, and all the fine details of the ornament are lost.
Painting order
-
Prime the molding with acrylic primer — it will seal the pores and ensure even paint absorption
-
Allow the primer to dry completely (2–4 hours).
-
Apply the first coat of paint thinly—with a brush along the details of the relief.
-
Allow to dry (2 hours).
-
Apply the second coat—also thinly, without drips.
For relief details—use a narrow brush (10–15 mm). For flat molding surfaces—a small velour roller.
What to paint with
Water-based or acrylic paint is the optimal choice. It does not dissolve the adhesive, adheres well to polyurethane and plaster, and is easy to reapply if necessary.
It's better not to use glossy enamels in relief ornaments: they highlight all the unevenness and installation defects.
FAQ: answers to popular questions about wall molding
What's easier: making plaster moldings or buying ready-made elements?
Buying ready-made ones is much easier. Making them from plaster requires molds, mixing skills, and patient drying. Ready-made polyurethane elements can be installed in one day without special knowledge.
Can you make wall moldings without experience?
Yes, if you start with simple straight moldings and ready-made polyurethane elements. This is an accessible level for any careful person with basic construction skills.
What material is best for the first time?
Polyurethane. It's lightweight, cuts well, durable, non-flammable, moisture-resistant, and easy to install. That's whyPolyurethane moldingsit has become the standard for DIY decor.
Do you need to level the wall for moldings?
Yes. Moldings don't hide a crooked wall—they emphasize it. Especially moldings: any surface irregularity will create a gap under the strip. The wall must be level and primed.
Can you install plaster moldings on drywall?
Light gypsum elements — yes, with good adhesive and additional anchors into the frame profile. For heavy pieces, embedded supports are needed, planned during frame installation.
How to attach heavy molding?
Special gypsum adhesive combined with mechanical fasteners — galvanized screws with anchors. Adhesive alone is insufficient for elements weighing 3–5 kg or more.
How to make neat joints?
Precise angled cutting in a miter box + a thin layer of acrylic sealant at the joint + sanding after drying. The result — the seam is practically invisible.
Can molding be painted after installation?
Yes. Primer + two thin coats of acrylic paint. Polyurethane and gypsum both take paint equally well. The key is not to overload the relief with a thick layer.
What to choose for an accent wall?
Straight moldings as frame panels, in the wall color or 1–2 shades lighter/darker. This reads as thoughtful architectural decor and works well in any style.
When is it better to skip DIY and call a professional?
If elements weigh over 5 kg, have complex ornamentation, non-standard angles, arches, or if the base is questionable — it's better to invite a specialist. In an expensive interior, the cost of a mistake is too high.
About the company STAVROS
If you are looking fordecorative wall and ceiling moldingFor high-quality products for DIY installation — pay attention to STAVROS products. The company has specialized in manufacturing decorative elements from polyurethane since 2002: moldings, cornices, rosettes, ornaments, pilasters, and facade decor.
All STAVROS products are made from European polyurethane — a material that combines lightness, high detail of relief, moisture resistance, and fire safety. This means thatmolding on the wallproducts from the STAVROS range can be installed both in classic living room interiors and in wet rooms and on facades.
STAVROS moldings and cornicesare available in a wide range of profiles and sizes — from laconic modern strips to rich classic profiles. The company holds the title of 'Industry Leader of Russia' and delivers throughout the country.
Installing wall molding yourself is a quite realistic task if approached methodically: choose the right material, prepare the base, and follow a clear sequence. STAVROS provides everything necessary for this — both a well-thought-out assortment and technical support in selection.