


Article Contents:
- Preparation stage: foundation for successful installation
- Material Selection: The Foundation of Durability and Aesthetics
- Required Tools: The Master's Toolkit
- Preliminary Calculations: Mathematical Precision
- Main Installation Methods: Choosing the Optimal Solution
- Mounting with Threaded Studs: Reliability for Decades
- Mounting Through Baluster Bracket: Aesthetic and Practicality
- Mounting with Screws: A Quick Solution
- Step-by-Step Guide: From Marking to Final Finishing
- Step 1: Preparation and Marking
- Step 2: Preparing the Balusters
- Step 3: Installing Lower Mounts
- Step 4: Installing Balusters
- Step 5: Installing Upper Mounts and Handrail
- Step 6: Final Finishing
- Typical Errors and Ways to Prevent Them
- Error #1: Incorrect Marking
- Error #2: Ignoring the Staircase Incline Angle
- Error #3: Insufficient Hole Depth
- Error #4: Neglecting Pre-Drilling
- Error #5: Cutting Corners on Adhesive
- Innovative Solutions for Modern Stairs
- Hidden fastening systems
- Composite Materials
- LED Lighting
- Maintenance and Care: Preserving Beauty for Years
- Regular Maintenance
- Updating decorative finishes
- Problem Prevention
- Economic aspects: optimizing costs without compromising quality
- Material selection
- Tools and equipment
- Process Optimization
- Conclusion: create your dream staircase
Have you ever noticed how the interior of a home transforms when it features an elegant wooden staircase with graceful balusters? This architectural element can turn an ordinary functional structure into a true work of art, the central focal point of the entire space. However, the beauty of the staircase depends not only on the quality of materials but also on the craftsmanship of its execution. Baluster Installation — is that critical stage that determines whether your staircase will become a source of pride or a constant source of problems.
Imagine: you ascend the staircase, your hand glides smoothly over perfectly polished handrails, each baluster stands perfectly straight, like soldiers on parade, creating a flawless line. No creaking, wobbling, or unevenness. Such a staircase doesn’t merely connect floors—it creates an atmosphere, demonstrates status, tells a story about your attention to detail and commitment to quality.
In this article, I will reveal all the secrets of professional baluster installation that will allow you to create a museum-quality staircase by hand. We will examine every stage of the process: from material and tool selection to final finishing, from classic methods to innovative solutions. Ready to dive into the world of staircase craftsmanship? Then let’s begin our journey toward creating the perfect staircase!


Preparation stage: foundation for successful installation
As in any serious endeavor, success Baluster Installation depends 80% on proper preparation. Neglecting this stage is the most common mistake among beginners, inevitably leading to disappointment.


Material selection: the foundation of durability and aesthetics
The first thing that determines the quality of your future staircase is the materials. For balusters, wood is most commonly used, and choosing a specific species is critically important:
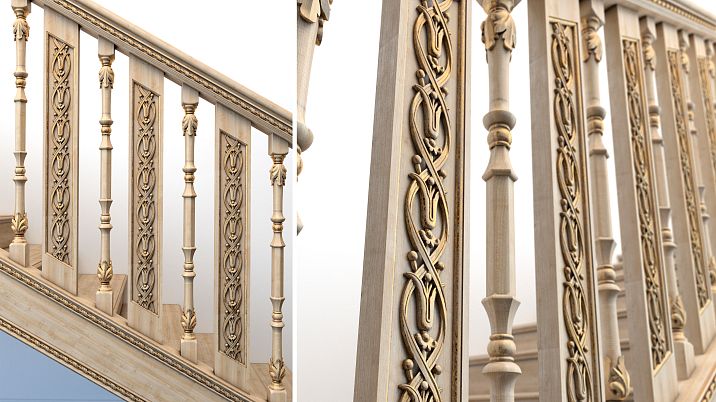
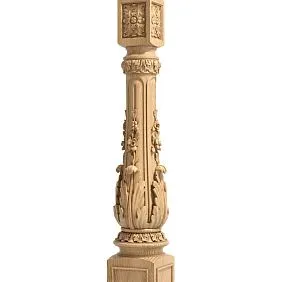
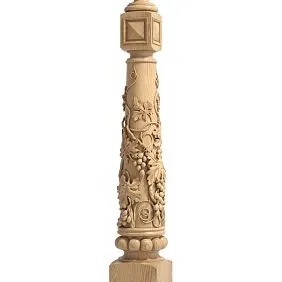
Oak - the king among wood species for staircase elements. Its exceptional strength (hardness 3.7 on the Brinell scale) ensures long-term durability even under heavy use. The noble grain with pronounced annual rings creates a unique visual effect that only improves with time. Oak balusters withstand significant loads without deformation, making them an ideal choice for families with children.
Beech - an excellent alternative to oak with hardness of 3.5-4 on the Brinell scale. Its uniform structure with fine pores provides a smooth surface and allows for creating complex decorative elements. Beech is easy to stain, offering wide design possibilities. At the same time, beech balusters cost 20-30% less than oak balusters with comparable performance characteristics.
Ash - a resilient beauty with hardness of 3.8 on the Brinell scale. It withstands significant loads, is resistant to rot, and has high elasticity. Ash’s appeal is enhanced by its variety of color tones - from light straw to rich brown with a pinkish hue.
Spruce - an affordable solution for budget projects. With proper treatment and protection, it can last for decades. However, remember that spruce has a hardness of only 1.5-2.0 on the Brinell scale, making it more susceptible to mechanical damage.
Our factory also produces:


Required tools: the master’s arsenal
For professional installation, you will need the following set of tools:
- Drill-driver with torque adjustment (recommended power from 600 W)
- Set of wood drill bits of various diameters (from 3 to 12 mm)
- Circular saw for precise cutting of baluster lengths
- Measuring tape with millimeter accuracy
- Construction level (preferably laser)
- Square for checking right angles
- Pencil for marking
- Clamps for temporary fixing of elements
- Rubber mallet for fitting parts without damage
- Sandpaper of various grits (from P80 to P220)
Investing in quality tools will pay off many times over through time and stress savings, as well as the quality of the final result.
Get Consultation
Preliminary calculations: mathematical precision
Before starting work, precise calculations must be performed:
- Determining the height of the railing - standard height is 900-1000 mm from the step level.
- Calculating the number of balusters using the formula:
N = (L - D) / (S + D) + 1,
where L – length of the handrail section, S – distance between balusters (not more than 150 mm according to safety standards), D – diameter or width of the baluster. - Calculating the angle of baluster cut depending on the slope of the staircase.
Precise calculations will help you avoid unpleasant surprises during work and ensure an aesthetically pleasing result.
Main installation methods: choosing the optimal solution
There are several proven methods Baluster InstallationEach has its own advantages and features. The choice of a specific method depends on the type of staircase, available materials, and your skills.
Mounting with threaded bolts: reliability for decades
This method is considered the most professional and ensures exceptional connection strength. Here is a step-by-step guide:
- Preparing balusters - holes are drilled at the ends of balusters to a depth of 40-50 mm and a diameter 1-2 mm smaller than the bolt diameter (for hardwoods).
- Preparing mounting locations - points for baluster installation are marked on the treads, and holes of the same depth are drilled.
- Installing bolts - bolts are screwed into the previously glued holes in the balusters so that they protrude 30-40 mm.
- Installing balusters - holes in the treads are filled with glue, and then the baluster bolts are inserted.
- Leveling - using a level, the verticality of each baluster is checked, and adjustments are made if necessary.
Advantages of this method:
- Exceptional connection strength
- No visible fastening elements
- Ability to precisely adjust the position of balusters
- Durability (service life up to 50 years with proper installation)
Mounting through a baluster support: aesthetics and practicality
This method is especially convenient for mounting on concrete steps or during reconstruction of existing staircases:
- Installing baluster support - a wooden rail with a groove is attached to the treads using dowels or anchors.
- Preparing balusters - the bottom ends of balusters are adjusted to fit the size of the groove in the baluster support.
- Installing balusters - balusters are installed into the groove of the baluster support using glue and additionally secured with screws.
- Hiding fasteners - mounting locations are covered with decorative elements or filled and painted.
Advantages:
- Ability to install on any base
- Ease of installation
- Additional structural rigidity
- Ability to conceal unevenness of steps
Mounting with screws: quick solution
The simplest and fastest method, which, however, requires care and attention to detail:
- Marking - locations for baluster installation are marked on the treads.
- Pilot drilling - guide holes are drilled in balusters and treads to prevent splitting the wood.
- Mounting - balusters are screwed to the treads at an angle of 30-45 degrees.
- Hiding - screw heads are recessed and covered with wooden plugs or filled.
Advantages:
- Minimal tool requirements
- Fast installation
- Ability to dismantle if necessary
- Material availability
Step-by-step guide: from marking to final finishing
Now that we've reviewed the basic methods, let's go through the entire process Baluster Installation step by step, using the most universal method of mounting on threaded bolts.
Step 1: Preparation and Marking
- Surface cleaning - thoroughly clean the steps of dust, dirt, and old coatings.
- Marking the installation line - measure 40-50 mm from the edge of the step and draw a line parallel to the edge. This will be the baluster installation line.
- Marking installation points - start by marking the positions of support posts (at the beginning and end of the staircase, as well as at turns). Then evenly distribute the remaining balusters, maintaining a maximum distance of 150 mm between them.
- Marking verification - stretch a string between the top and bottom points of the staircase to ensure the baluster installation line is level.
Step 2: Baluster Preparation
- Length adjustment - measure the distance from the step to the bottom of the future handrail and cut the balusters, accounting for the depth of mounting holes (usually +10 mm on each side).
- Marking centers - find the center of each end of the baluster by drawing diagonals or using a special center finder.
- Drilling holes - drill holes at the ends of the balusters to a depth of 40-50 mm. The hole diameter should be 1-2 mm smaller than the bolt diameter for hardwoods and 2-3 mm smaller for softwoods.
- Sanding - carefully sand the balusters, paying special attention to the ends and connection points.
Step 3: Installing Lower Mounts
- Drilling holes in steps - drill holes at marked points to a depth of 40-50 mm and a diameter equal to the bolt diameter.
- Preparing bolts - cut bolts to the required length (usually 80-100 mm) and degrease them.
- Installing bolts into balusters - apply adhesive to the baluster holes and screw in the bolts, leaving 30-40 mm protruding.
- Checking - ensure bolts are screwed in evenly, without misalignment.
Step 4: Installing Balusters
- Preparing adhesive - prepare the adhesive mixture according to the manufacturer's instructions.
- Filling holes - fill the holes in the steps with adhesive to about two-thirds of the volume.
- Installing balusters - insert the baluster bolts into the holes, slightly twisting to evenly distribute the adhesive.
- Leveling - use a level to check the vertical alignment of each baluster and adjust position if necessary.
- Securing - temporarily clamp or brace the balusters with clamps or supports until the adhesive fully dries.
Step 5: Installing Upper Mounts and Handrail
- Marking on handrail - mark the points for baluster mounting on the underside of the handrail.
- Drilling holes - drill holes in the handrail corresponding to the baluster positions.
- Preparing upper bolts - similarly to the lower mounts, prepare and install bolts into the upper ends of the balusters.
- Installing handrail - apply adhesive to the handrail holes and install the handrail onto the balusters.
- Leveling and securing - check the handrail's horizontal alignment and secure it until the adhesive dries.
Step 6: Final Finishing
- Sanding - after the glue has fully dried (usually 24 hours), carefully sand the entire structure, starting with coarse sandpaper (P80-P100) and gradually moving to finer grit (P180-P220).
- Primer - apply a special wood primer to ensure better adhesion to the finish and additional protection.
- Finish - depending on the desired result, apply varnish, oil, or wax in 2-3 coats, with intermediate sanding between layers.
- Polishing - to achieve an ideal result, polish the surface after the finish has fully dried.
Typical errors and ways to prevent them
Even experienced craftsmen sometimes make mistakes when installing balusters. Knowing about them in advance, you can avoid disappointments and additional costs.
Error #1: Incorrect marking
Problem: Uneven spacing between balusters creates visual imbalance and may violate safety standards.
Solution: Use a marking template — a simple board with marks for each baluster. This ensures perfectly even spacing.
Error #2: Ignoring the staircase incline angle
Problem: If the incline angle of the staircase is not taken into account, balusters will be installed at an angle, which will ruin the appearance and reduce the structural strength.
Solution: Use a protractor to determine the exact incline angle of the staircase and corresponding beveling of baluster ends.
Error #3: Insufficient hole depth
Problem: Too small holes for screws result in unreliable fastening and quick loosening of the structure.
Solution: The hole depth should be at least 40 mm to ensure secure fastening. Use a drill depth stop.
Error #4: Neglecting pre-drilling
Problem: Attempting to screw in a screw or bolt without pre-drilling often causes wood splitting, especially when working with hardwoods.
Solution: Always drill pilot holes 1-2 mm smaller in diameter than the fastener.
Error #5: Cutting corners on glue
Problem: Using insufficient amount of glue or low-quality glue leads to weakening of joints over time.
Solution: Use special water-resistant wood glues with high bond strength (at least 10 MPa) and fill holes to 2/3 of their volume.
Innovative solutions for modern staircases
Technology is not standing still, and today new solutions are available that make Baluster Installation easier, faster, and more reliable.
Hidden Fastening Systems
Modern manufacturers offer special fastening systems that are completely hidden from view but provide exceptional joint strength:
- Adjustable connectors - allow precise adjustment of baluster position after installation
- Bayonet fasteners - provide quick assembly and the option for disassembly if needed
- Compensatory systems - account for natural wood expansion and contraction due to humidity changes
Combined materials
The innovative approach involves combining traditional and modern materials:
- Wooden balusters with metal cores - combine the aesthetics of wood with the strength of metal
- Composite materials - mimic the appearance and tactile feel of wood but are more resistant to moisture and mechanical damage
- Modular systems - allow quickly assembling railings from pre-prepared elements
LED lighting
Integration of LED lighting into stair railings - a trend gaining popularity:
- Step lighting - increases safety and creates dramatic illumination
- Illuminated balusters - turn the staircase into an art object
- Smart lighting systems - activate upon motion and can change color and intensity
Maintenance and care: preserving beauty for years
Properly installed balusters will last decades if given appropriate care.
Regular Maintenance
- Dust cleaning - wipe balusters and handrails with a soft cloth weekly
- Fastening inspection - check the integrity of all connections every six months
- Protective coating renewal - renew varnish or oil on wooden elements every 3-5 years
Repairing minor damages
- Scratches - for shallow scratches, use wax pencils of matching color
- Chip repairs - fill with specialized wood putty, then sand and repaint
- Loose connections - reinforce with additional adhesive or replace fasteners
Problem prevention
- Maintaining optimal humidity - sudden humidity fluctuations may cause deformation of wooden elements
- Protection from direct sunlight - prolonged UV exposure may cause fading and cracking of wood
- Avoiding aggressive cleaning agents - use only specialized products for wooden surfaces
Economic aspects: optimizing costs without compromising quality
Quality Baluster Installation Does not necessarily have to be expensive. Here are several tips to help optimize costs:
Material Selection
- Combining wood species - use premium species (oak, beech) for visible elements, and more affordable (pine, spruce) for hidden ones
- Size optimization - calculate exact material quantities to minimize waste
- Seasonal discounts - purchase materials during sales or seasonal promotions
The quality of the result largely depends on the proper selection of tools and equipment.
- Rent instead of buy - rarely used specialized tools can be rented
- Cooperation - join with neighbors or friends for joint purchase of expensive equipment
- Multi-functionality - prefer tools that can perform multiple functions
Process optimization
- Preparation - complete as much preparatory work as possible before starting installation
- Templates and jigs - create simple templates for repetitive operations
- Phased execution - break the work into stages to avoid rushing and mistakes
Conclusion: create the staircase of your dreams
Professional Baluster Installation This is an art accessible to anyone willing to pay attention to details and follow proven methods. Properly installed balusters not only ensure safety but also become a key decorative element, transforming the entire interior.
Remember that the quality of installation determines the durability and aesthetic appeal of the entire staircase structure. Do not cut corners on materials and time—investments in a quality staircase will pay off many times over through comfort of use and admiring glances from guests.
By following the recommendations in this article, you will be able to create a staircase that becomes a true gem of your home—functional, safe, and visually appealing.
STAVROS Company offers a wide range of high-quality balusters, handrails, and other elements for creating ideal staircases. Years of experience, use of premium materials, and modern technologies allow STAVROS to produce items that combine beauty, reliability, and longevity. Entrust the creation of your dream staircase to professionals—or use their materials for DIY installation—in either case, the result will exceed your expectations!


