


Article Contents:
- What is MDF and why has it revolutionized plank production?
- Technological revolution in wood processing
- Ecological advantages of modern production
- Step-by-step project planning with MDF planks
- Stage 1: Space analysis and goal definition
- Stage 2: Choosing dimensions and proportions
- Stage 3: Material calculation and budget preparation
- Tools and materials: creating a professional toolkit
- Essential tools
- Consumables and fasteners
- Installation technology: from marking to finishing
- Preparatory work
- Marking system for perfect geometry
- Installing the frame system
- Installing planks: secrets of professional quality
- Design solutions: from concept to implementation
- Creating accent walls
- Space zoning
- Integrating lighting and utility systems
- Architectural lighting
- Hiding utilities
- Finishing and protective treatment
- Painting systems for MDF
- Protective coatings for wet areas
- Maintenance and operation: preserving original appearance
- Daily care
- Local Repair of Damage
- Economic Aspects of the Project
- Budgeting and cost planning
- Cost optimization without compromising quality
- Modern trends and innovative solutions
- Digital technologies in design
- Ecological innovations
- Conclusion
Skill is revealed in details. And when it comes to creating an interior that will be remembered for a long time, MDF planks they become the tool that transforms an ordinary space into a work of art. But what makes these seemingly simple elements so popular among professional designers and regular homeowners?
Over the past five years, the popularity of plank structures has grown exponentially. Social media is filled with photos of interiors featuring expressive plank accents, architectural magazines dedicate entire articles to this topic. But fashion is merely the visible tip of the iceberg. The key lies in functionality, practicality, and the remarkable ability of MDF planks to adapt to any design challenge.


What is MDF and why it revolutionized the production of planks
MDF material is not just an abbreviation, it is a whole philosophy of modern construction material production. Medium Density Fiberboard is the result of a high-tech process, where wood fibers are pressed under a pressure of 25-40 MPa at a temperature of 200-250°C.


Technological revolution in wood processing
Creation MDF material It began with a simple idea: how to use wood waste as efficiently as possible? Sawdust, shavings, offcuts — everything that used to be burned or sent to landfill became raw material for producing modern composites.
The defibration process breaks down wood into individual fibers of 0.1-3 mm. These fibers are evenly distributed in the forming machine, creating a homogeneous structure without knots, cracks, and other defects typical of natural wood. The result is a material with predictable properties and stable characteristics.
Our factory also produces:


Ecological advantages of modern production
Despite common misconceptions, quality MDF is an environmentally friendly material. Modern E0-grade adhesive systems ensure formaldehyde emissions at levels comparable to natural wood — less than 0.05 mg/m³. This makes MDF planks suitable even for children's rooms and bedrooms.
Moreover, using wood waste in MDF production reduces pressure on forest resources. One cubic meter of MDF replaces 2-3 cubic meters of solid wood with comparable performance characteristics.
Get Consultation
Step-by-step project planning with MDF wooden planks
Stage 1: Space analysis and goal definition
The first step of any successful project is a clear understanding of what you want to achieve. Plank structures can solve various tasks:
Visual space expansion: Vertical planks create an illusion of high ceilings, horizontal planks visually expand the room. The effect is based on human perception characteristics — the eye follows the direction of lines, creating the corresponding sensation.
Zoning without walls: In studio apartments and open floor plans, planks allow dividing space into functional zones while preserving a sense of continuity. Changing the direction, density, or color of planks creates psychological boundaries between zones.
Acoustic correction: A properly designed plank system improves the acoustic properties of a room. The distance between planks and the depth of the air gap affect sound absorption across different frequency ranges.
Stage 2: Choosing dimensions and proportions
The range of MDF wooden plank sizes is impressive in variety, but each size has its optimal application areas:
Thin planks (10-20 mm): Create a delicate texture, suitable for small rooms and modern minimalist interiors. Ideal for accent walls and decorative inserts.
Medium planks (25-40 mm): A universal choice for most projects. Provide a good balance between visual impact and cost-effectiveness. Suitable for both residential and commercial interiors.
Wide planks (50-80 mm): Create a pronounced architectural effect, suitable for large rooms with high ceilings. Often used in public buildings and prestigious interiors.
Stage 3: Material calculation and budget preparation
Accurate calculation of material quantities is key to project success. The calculation method depends on the chosen installation method:
For full coverage: Wall area is multiplied by a coefficient of 1.1-1.15 (accounting for trimming waste). Additional allowance is made for fasteners at 4-6 mounting points per linear meter.
For sparse installation: The number of planks is calculated based on their width and chosen spacing between them. Formula: (Wall length / (Plank width + Spacing between planks)) × Room height.
Tools and materials: creating a professional toolkit
Basic tools
A quality result is impossible without the right tools. A professional approach requires:
Measuring tools: A laser level ensures accurate marking on large areas. A measuring tape of at least 5 meters, a 300 mm square, and a chalk line for creating guide lines.
Cutting tool: A dado saw with a 80-100 tooth wood blade ensures a clean cut without chipping. For small volumes, a jigsaw with fine-toothed wood blades is suitable.
Fastening tool: A drill with torque adjustment, a set of wood drill bits, and countersink bits for concealed fastening. When using clip systems — special bits for installing clips.
Consumables and fasteners
Fastener selection depends on the type of base and mounting method:
For wooden structures: 3.5×35 mm concealed-head screws. Screw length should be 2.5–3 times the thickness of the rail.
For concrete and brick walls: 6×40 mm or 8×60 mm anchors depending on load. Pre-drilling is mandatory to prevent MDF cracking.
For gypsum board structures: Special "butterfly" anchors or Molly anchors, ensuring secure fastening in hollow constructions.
Installation technology: from marking to finish
Preparatory Work
The quality of surface preparation determines the outcome of the entire project. The surface must be cleaned of dust, grease stains, and remnants of old coatings. Irregularities exceeding 5 mm require leveling with putty or plaster.
Base moisture is checked with an electronic moisture meter. The indicator must not exceed 4% for mineral bases and 12% for wooden structures. Exceeding these values may cause rail warping after installation.
Marking system for ideal geometry
Marking begins with defining the base line. For vertical rails, this is a horizontal line at 1000 mm from the floor; for horizontal rails, it is a vertical line 500 mm from the corner.
A laser level projects lines onto the opposite wall, allowing parallelism control across the entire room length. Deviation must not exceed 2 mm per 3 meters of length.
For complex geometric compositions, a full-scale cardboard template is created. This allows assessing the visual effect and making adjustments before starting installation.
Mounting the frame system
MDF Interior Strip Can be mounted directly to the wall or onto a pre-installed frame. The frame method is preferable when the base has significant irregularities or when concealed wiring installation is required.
The frame is made from 30×40 mm wooden beams or metal profiles. The spacing between frame elements is 400–600 mm depending on rail size and expected load.
Frame horizontal and vertical alignment is checked at every installation stage. Using shims and adjustable brackets allows compensating for base irregularities.
Installing rails: secrets of professional quality
Installation begins from the base line with control of each element's position. The first rail is installed particularly carefully — it sets the direction for all subsequent elements.
Concealed fastening with clips: The most aesthetic method, ensuring surface cleanliness. Clips are routed into the rail end to a depth of 8–12 mm. Routing accuracy is critical — deviation exceeding 0.5 mm will hinder installation.
Open screw fastening: A simpler method suitable for subsequent painting. Screws are driven 1–2 mm below surface level, recesses are filled with putty and sanded.
Adhesive connection: Used on perfectly flat bases. Polyurethane adhesive is applied in a zigzag pattern to the back of the rail. 15–20 minute setting time allows position adjustment.
Design solutions: from concept to implementation
Creating accent walls
Accent wall with MDF wooden rails becomes the compositional center of the interior. The selection of wall for accenting is based on the principles of the golden section and natural visual movement within the room.
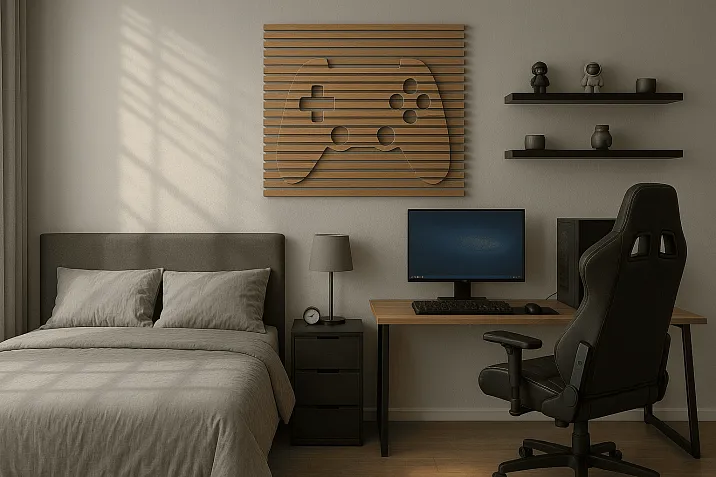
Wall behind the bed headboard: A classic solution for bedrooms. Vertical rails create a sense of height and grandeur. Integrated lighting adds intimacy and coziness.
Wall with TV: In the living room, a rail system can conceal cables and create a unified composition with the media zone. Horizontal rails visually expand the wall, making the TV part of the architectural solution.
Hallway wall: The first impression of the house is formed in the hallway. Lattice cladding creates a sense of depth in a narrow space and can integrate storage systems.
Space zoning
In open-plan rooms, lattices become a tool for subtle zoning. By changing the direction, density, or color of the lattices, psychological boundaries can be created between functional zones.
Kitchen-living room: Transitioning from vertical lattices in the kitchen zone to horizontal lattices in the living room creates the feeling of different spaces while maintaining visual continuity.
Work area in the bedroom: Lattices can separate a desk from the sleeping zone, creating the feeling of an office without installing partitions.
Children's zone in an open space: Bright lattices highlight the play area, creating for the child the feeling of their own space.
Integration of lighting and engineering systems
Architectural lighting
Combining lattices with lighting systems opens up limitless possibilities for creating unique lighting scenarios. MDF planks Ideal for integrating various types of light fixtures.
Linear LED lighting: LED strips installed between lattices create even ambient lighting. Power of 14-18 W/m ensures comfortable lighting levels for most tasks.
Spotlights: Built-in spotlights integrated into lattices create accent lighting. A 24-36° beam angle is optimal for highlighting decorative objects.
Colored lighting: RGB strips allow creating dynamic lighting scenarios. Control via smartphone or "smart home" systems adds functionality.
Hiding utilities
The space behind the lattice structure is ideally suited for housing various engineering systems. This allows maintaining interior aesthetics while ensuring functionality.
Electrical networks: Cables are laid in corrugated pipes behind the lattices. Removable elements at outlets and switches provide access for maintenance.
Low-voltage systems: Internet cables, TV antennas, and surveillance systems are placed in separate channels to prevent mutual interference.
Climate systems: Ventilation and air conditioning ducts are integrated into lattice structures. Special diffusers ensure even air distribution.
Finishing and protective treatment
Painting systems for MDF
The MDF surface requires special preparation before painting. The porous structure of the material may lead to uneven paint absorption without proper priming.
Priming: A deep-penetration acrylic primer is applied in two layers with an intermediate drying time of 4-6 hours. Consumption is 100-120 g/m² per layer.
Sanding: Intermediate sanding with P240-P320 grit sandpaper removes raised fibers and ensures surface smoothness. Dust is carefully removed before applying the final finish.
Final finish: Water-dispersible paints provide eco-friendliness and ease of application. Alkyd enamels offer a more durable finish with high gloss.
Protective coatings for humid areas
In rooms with high humidity Decorative MDF rails require additional protection against moisture exposure.
Hydrophobic impregnations: Applied to unprocessed MDF surfaces, they deeply penetrate the material structure. Reduce water absorption by 3-5 times.
Polyurethane varnishes: Create a waterproof film on the surface. Two-component formulations provide maximum protection and longevity.
Wax coatings: Natural waxes create a breathable protective layer that highlights the material's texture. Require periodic renewal every 2-3 years.
Maintenance and operation: preserving the original appearance
Daily care
Proper care extends the service life of slat structures and preserves their aesthetic qualities. Finishing MDF rails Does not require complex maintenance, but requires regular attention.
Dry cleaning: Weekly cleaning with a soft dry cloth or vacuum cleaner with a soft brush attachment removes surface dust. The direction of movement should match the orientation of the slats.
Wet cleaning: Monthly cleaning with slightly damp microfiber cloth using special MDF cleaning agents. Avoid excessive moisture and abrasive materials.
Local repair of damage
Minor damages can be repaired without dismantling the entire structure. This is especially important for removable clip systems.
Scratches: Minor scratches on painted surfaces are removed using matching color touch-up pencils. Deep damages require local puttying and repainting.
Chips: Small chips are filled with wood-based acrylic putty, sanded after drying, and painted to match the original finish.
Element replacement: In clip systems, damaged slats can be easily removed and replaced with new ones. This is one of the main advantages of removable structures.
Project cost considerations
Budgeting and planning expenses
The cost of the project consists of several components, each requiring careful planning.
Materials (40-50% of budget): The slats themselves make up the majority of the cost. The cost per linear meter varies from 200 to 800 rubles depending on size, finish quality, and manufacturer.
Fastening systems (15-20% of budget): Clip systems are more expensive than standard fasteners but provide better results. Saving on fasteners may lead to problems during operation.
Installation work (25-35% of budget): Installation cost depends on project complexity and region. Doing it yourself reduces costs but requires skills and tools.
Additional expenses (5-10% of budget): Delivery, tools, consumables, unforeseen costs.
Cost optimization without compromising quality
Standard sizes: Using standard sizes reduces cost compared to custom orders by 20-30%.
Bulk orders: Purchasing all materials from one supplier at once often provides discounts of 5-15%.
Seasonality: Orders placed during off-season (October–March) may be 10-20% cheaper due to reduced demand.
Modern trends and innovative solutions
Digital Technologies in Design
Modern technologies are changing the approach to designing interiors with slat structures.
3D modeling: Programs like SketchUp, ArchiCAD allow creating accurate models of future interiors. This helps avoid errors and optimize material usage.
Augmented reality: Mobile apps allow "trying on" different finishes in real interiors through smartphone camera.
Parametric design: Algorithms automatically generate slat layout options based on room dimensions and aesthetic preferences.
Ecological Innovations
Requirements for material eco-friendliness are constantly becoming stricter, stimulating the development of new technologies.
Biodegradable binders: Replacing synthetic resins with soy protein and other plant-based components makes MDF a fully eco-friendly material.
Recycled raw materials: Using paper waste and textile waste in MDF production reduces pressure on forest resources.
Carbon-neutral production: Modern factories use wood waste to generate energy, making production carbon-neutral.
Conclusion
World MDF slats opens up limitless possibilities for creative self-expression and unique interior design. This material has become a symbol of modern design approaches, where functionality harmoniously combines with aesthetics, and technological innovations serve beauty and comfort.
Practical experience shows that the success of any project using MDF wooden planks depends on three key factors: quality planning, proper material selection, and professional installation work. Each stage is important and requires careful attention.
The technological sophistication of modern MDF allows creating structures that are not only beautiful but also durable. Dimensional stability, ecological safety, and the possibility of various finishes make this material a universal solution for the broadest range of tasks.
The economic efficiency of projects using MDF planks is evident not only in the reasonable cost of the material but also in the long-term perspective of operation. Ease of maintenance, possibility of local repair, and versatility of finish updates ensure an excellent price-to-quality ratio.
The design possibilities of the material are practically limitless. From minimalist solutions to complex architectural compositions — MDF wooden planks adapt to any stylistic concept, enriching it and giving it individuality.
Innovative development directions promise even more opportunities in the future. Integration of smart technologies, eco-friendly production processes, and new decorative effects — all of this defines the prospects for industry development.
The professional community of designers and architects highly values the potential of MDF wooden planks. Predictability of properties, ease of installation, and wide creative possibilities make this material an indispensable tool in modern interior design.
The future of interior art is inseparably linked with materials capable of realizing the most daring creative ideas. MDF wooden planks already today demonstrate what this future can be — beautiful, functional, and accessible.
STAVROS Company, with its rich experience and unwavering pursuit of perfection, continues to set new quality standards in the production of MDF wooden planks. Every STAVROS product embodies the best traditions of craftsmanship, enhanced by modern technological solutions, creating materials that become the foundation for implementing outstanding design projects and architectural masterpieces capable of inspiring and delighting for many years.


