Article Contents:
- Historical development of internal trim
- Materials for internal trim
- Wood: Eternal Classic
- Polyurethane and modern materials
- Gypsum and plaster
- Types of internal trim
- Moldings: variety of forms and functions
- Cornices: Completing the Vertical
- Baseboards: foundation of composition
- Opening trim: focus on details
- Technology of manufacturing wooden elements of internal trim
- Material Selection and Preparation
- Profiling and carving
- Final Finishing and Protection
- Installation of internal trim elements
- Surface Preparation
- Mounting methods
- Joint Processing and Finishing
- Stylistic solutions for internal trim
- Classic style: Eternal elegance
- Modern Minimalism: Purity of Lines
- Eclecticism: play of styles
- Restoration of historical internal trim
- Assessment of condition and documentation
- Cleaning and conservation methods
- Restoration and recreation of elements
- Innovative approaches to internal trim
- 3D technologies in design and production
- Integration of Lighting and Technical Systems
- Ecological and sustainable solutions
- Practical recommendations for selection and care
- Choosing trim based on interior style
- Care for Different Types of Trim
- Solving typical problems
In the world of architecture and interior design, there are elements that, despite their apparent secondary nature, play a decisive role in forming the overall appearance of a room. Internal trim — one of such elements capable of transforming space, giving it completeness and a unique character. This is not merely a decorative touch, but a crucial structural component connecting different planes and materials, concealing technical joints and highlighting architectural features of the interior.
Diving into the topic internal trimof internal trim, we uncover the multi-century history of the development of this art, the diversity of materials and techniques, as well as endless opportunities for creative self-expression. From classical wooden moldings to modern polyurethane profiles — each trim element has its unique role in creating a harmonious space.


Historical development of internal trim
History internal trim It goes back to deep antiquity. Already in ancient architecture of ancient Greece and Rome, we find the first examples of using decorative elements for decorating openings, joints, and transitions between different surfaces. Columns, pilasters, cornices, and friezes — all these elements served not only constructive purposes but also created visual harmony of space.
The Renaissance era of art internal trim achieved new heights. Italian masters created complex compositions of carved wood and stucco, adorning palaces and temples with exquisite details. Canons of proportions and stylistic rules emerged, defining the character of framing depending on the purpose of the room and the overall architectural style of the building.
Baroque and Rococo brought to art internal trim luxury and theatricality. Framings of this period are characterized by complex curved forms, abundance of decorative elements, and gilding. Every door or window opening became a true work of art, framed by ornate patterns and sculptural compositions.
Neoclassicism returned to interior framing strictness and symmetry of ancient models. Profiles became more restrained, but no less elegant. Special attention was paid to proportions and rhythmic composition. During this period, classical types of moldings and cornices were formed, which are still used in traditional interiors.
Modernism at the turn of the 19th-20th centuries brought a new vision internal trim. Rejecting historical styles, architects and designers created organic, natural forms inspired by plant motifs. Framings of this period are characterized by smooth lines, asymmetry, and original decorative solutions.
The modern era is characterized by diversity in approaches to to interior framing. From minimalist solutions in high-tech style to neo-classical interpretations of historical styles — today designers have a wide arsenal of tools to create unique interiors.


Materials for interior framing
Our factory also produces:


Wood: eternal classic
Wood remains one of the most popular materials for internal trim. Its natural beauty, eco-friendliness, and plasticity make it an ideal choice for creating elegant profiles and decorative elements. Each wood species has unique characteristics that determine its application in various types of framing.
Oak — a traditional choice for manufacturing strong and durable elements internal trim. Its dense structure allows creating clear profiles with fine details. Oak moldings and cornices acquire a noble patina over time, which only enhances their attractiveness.
Spruce and pine — more affordable options for internal trim. These softwoods are easy to process, allowing to create complex profiles with minimal effort. However, they require more careful protection from moisture and mechanical damage.
Larch is distinguished by exceptional resistance to moisture and rot, making it an ideal choice for internal trim in rooms with high humidity. Over time, larch acquires a deep amber tone, which gives the interior warmth and coziness.
Exotic wood species, such as redwood, rosewood, or teak, are used to create exclusive elements internal trim in luxurious interiors. Their unusual texture and color become a standalone decorative element, attracting attention and creating a special atmosphere.
Get Consultation
Polyurethane and modern materials
In the last decades on the market internal trim innovative materials have appeared, offering an alternative to traditional wood. Polyurethane has become one of the most popular options due to its unique properties.
Polyurethane elements internal trim differ in lightness, moisture resistance, and resistance to deformation. They do not rot, do not attract insects, and do not crack with changes in temperature and humidity. Modern technologies allow creating polyurethane profiles that are practically indistinguishable from wooden or gypsum analogs.
A special category comprises flexible polyurethane elements for internal trim arched openings and curved surfaces. They allow creating smooth curves without the need for complex fitting of individual segments, significantly simplifying installation and improving the appearance of the finished structure.
Polystyrene represents another modern material for internal trimHigh-density extruded polystyrene (Duropolymer) has impact resistance, moisture resistance, and heat resistance, making it ideal for creating sharp lines and accurately reproducing details. The lighter medium-density polystyrene (Durofoam) is suitable for decorative elements that do not bear mechanical loads.
Gypsum and plaster
Gypsum has traditionally been used to create refined elements internal trim in palace interiors. Its plasticity allows reproducing the most complex ornaments and reliefs with incredible precision. Modern gypsum mixes have increased strength and moisture resistance, expanding their application possibilities.
Plaster profiles represent a special type internal trimcreated directly on-site using special templates. This method allows creating unique profiles of any complexity, perfectly adapted to a specific space. Plaster cornices and moldings are especially suitable for historical interiors, where exact reproduction of original elements is required.
Types of interior trim
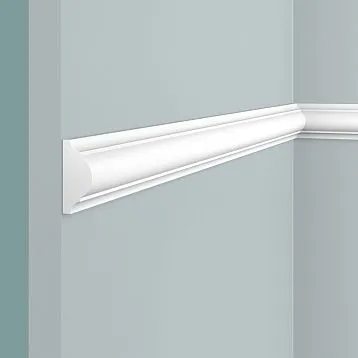
Moldings: variety of forms and functions
Moldings are the main element internal trim and are decorative profiled strips of various cross-sections. They are used to finish joints between different surfaces, create decorative wall panels, and frame door and window openings.
Basic moldings have a simple profile and are used to conceal technical joints or create simple geometric compositions on walls. They are often used in modern interiors, where minimalism and clean lines are valued.
Profiled moldings have a more complex cross-section with multiple relief levels. They create expressive play of light and shadow, adding depth and volume to the interior. Such moldings are often used in classical and neoclassical interiors.
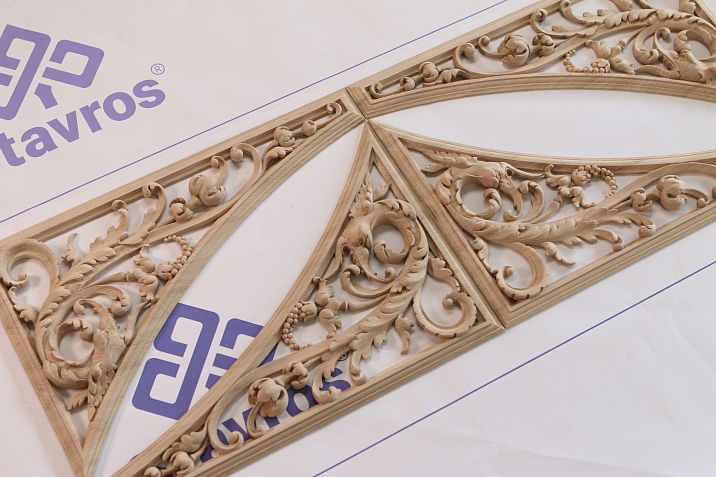
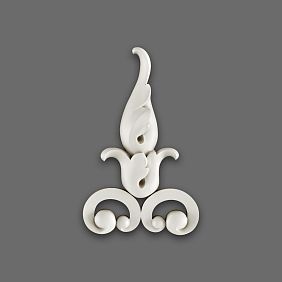
Ornamental moldings are adorned with carved or molded decoration — floral motifs, geometric patterns, classical ornaments. They become a striking accent in the interior, drawing attention and creating a special atmosphere of luxury and refinement.
Cornices: finishing the vertical
Ceiling cornices represent a special type internal trimused at the junction of wall and ceiling. They not only conceal the technical joint but also create a smooth visual transition between vertical and horizontal planes.
Simple cornices have a minimalist profile and are suitable for modern interiors with clean lines. They create a clear architectural finish to the wall without overloading the space with decorative elements.
Complex multi-level cornices are characteristic of classical interiors. They may include several profiles of different shapes, creating rich play of light and shadow. Such cornices are often complemented by decorative elements — modillions, brackets, rosettes.
Flexible cornices are used to finish curved walls and ceilings. They allow creating smooth curves without the need for complex fitting of individual segments, significantly simplifying installation and improving the appearance of the finished structure.
Baseboards: foundation of composition
Baseboards are elements internal trimplaced at the junction of wall and floor. They serve both practical purposes — protecting walls from damage and concealing the technical gap between flooring and wall — and decorative purposes, completing the interior composition.
Classic wooden baseboards are made from solid wood of various species and can have either a simple or complex profile. They pair perfectly with parquet and laminate, creating a unified flooring ensemble.
Polyurethane baseboards are moisture-resistant and easy to install. They are often used in high-humidity areas — bathrooms, kitchens, pools. Modern technologies allow creating polyurethane baseboards that mimic various materials — wood, stone, metal.
Metal baseboards represent a modern solution for high-tech or loft-style interiors. They are made from aluminum, stainless steel, or brass and can have various finishes — polished, brushed, patinated.
Opening trim: focus on details
Finishing door and window openings is one of the most important tasks internal trimCorrectly chosen door casings, portals, and arches not only protect the edges of openings from damage but also become a striking accent in the interior.
Classic trim pieces are profiled strips that frame door or window openings around the perimeter. They may vary in width and profile depending on interior style and room proportions.
Doorways are more complex structures that include not only trim but also additional decorative elements — pilasters, columns, gables, cornices. They create a grand framing for entry into a room, emphasizing its importance.
Arched structures are used to decorate curved openings. They can be simple, with minimal decoration, or richly adorned with carving, stucco, or painting. Modern materials allow for flexible arched elements that easily adapt to any curvature radius.
Technology for manufacturing wooden elements of interior framing
Material selection and preparation
The process of creating quality wooden internal trim begins with careful material selection. The wood must be well-dried (moisture content no more than 8-12%), free of visible defects — knots, cracks, signs of rot or insect damage.
Material preparation includes several stages:
- Primary processing — sawing logs into boards of required thickness.
- Drying — natural (over several months) or kiln-dried (faster and more controlled process).
- Calibration — leveling board thickness using a jointer machine.
- Planing — creating a smooth surface using planers or hand tools.
Profiling and carving
. The key stage in manufacturing elements internal trimTraditionally, special hand tools — chamfering chisels, molding tools, and coves — were used to carve various profiles into the wooden blank.
In modern production, profiling is done using milling machines with sets of special cutters. They allow creating complex profiles with high precision and repeatability. For small-batch production or restoration work, hand-held routers with various bits are often used.
Carving adds elements internal trim special expressiveness and individuality. It can be flat relief, where the pattern slightly protrudes from the background, or high relief, creating volumetric compositions. Carving is performed using special chisels, knives, and gouges, as well as modern electric and pneumatic tools.
Final processing and protection
— final processing, which includes sanding, staining, and applying protective coatings. internal trim Sanding is performed using abrasive materials of different grits — coarse for removing irregularities and fine for creating an ideally smooth surface. For complex profiles, special profile sandpaper or hand finishing is used.
Staining allows giving wood the desired shade, emphasizing its texture or imitating another species. For this, stains based on water, alcohol, or oil, as well as special wood dyes, are used.
Protective coatings protect wooden elements
from moisture, ultraviolet radiation, and mechanical damage. Traditionally, natural materials — wax, shellac, linseed oil — were used. Modern technologies offer a wide range of varnishes, oils, and waxes that provide reliable protection and highlight the natural beauty of wood. internal trim from moisture, ultraviolet radiation, and mechanical damage. Traditionally, natural materials such as wax, shellac, and linseed oil were used for this purpose. Modern technologies offer a wide range of varnishes, oils, and waxes that provide reliable protection and highlight the natural beauty of wood.
Installation of interior framing elements
Surface preparation
Quality installation internal trim begins with careful surface preparation. Walls and ceilings must be flat, dry, and clean. All defects — cracks, dents, unevenness — must be eliminated using putty or plaster.
To ensure secure mounting of elements internal trim it is necessary to determine the type of substrate and select the appropriate mounting method. On wooden or drywall surfaces, elements can be mounted directly to the substrate, while on concrete or brick walls, additional framing may be required.
Before beginning installation, marking must be performed to ensure correct placement of all elements internal trim. For this, laser levels, plumb bobs, squares, and other measuring tools are used.
Methods of mounting
There are several ways to mount elements internal trimThe adhesive method is the most common for mounting lightweight elements made of polyurethane or polystyrene. Special mounting adhesives are used, ensuring strong bonding with various surface types. The advantage of this method is the absence of visible fasteners, which is especially important for decorative elements.
Mechanical fastening using nails, screws, or special fasteners is used for heavy wooden or gypsum elements. This method ensures maximum fastening reliability but requires subsequent concealment of fasteners using putty, wax, or decorative plugs.
The combined method combines the advantages of adhesive and mechanical fastening. Elements
are first fixed with adhesive and then additionally secured with mechanical fasteners in locations where they will be invisible or easily concealed. internal trim They are first secured with adhesive, and then additionally fastened with mechanical fasteners in locations where they will be inconspicuous or easily masked.
Joint treatment and final finishing
After installing all elements internal trim it is necessary to perform joint treatment, which will ensure the unity and integrity of the structure.
Wooden elements are jointed using wood putty matched to the main material's tone. After the putty dries, the joints are sanded to achieve a smooth surface indistinguishable from the main material.
Polyurethane and polystyrene elements are joined using special joint adhesive, which ensures strong and invisible connections. After the adhesive dries, the joints are sanded and, if necessary, painted.
Final finishing of installed elements internal trim includes painting, varnishing, or applying decorative coatings. This not only protects elements from external influences but also creates a unified ensemble with the rest of the interior elements.
Stylistic solutions for interior framing
Classic style: eternal elegance
Classical Internal trim is characterized by symmetry, proportionality, and use of traditional architectural elements. It is based on the canons of ancient architecture and Renaissance art.
Main elements of classical internal trim:
- Profiled cornices with clear geometry and pronounced relief.
- Moldings with symmetrical profiles, often including ovals, kymatia, beads, and other classical ornaments.
- Pilasters and columns with capitals of various orders — Doric, Ionic, Corinthian.
- Friezes and sashings above door and window openings.
- Rosettes and medallions on ceilings and walls.
Color palette of classical internal trim is usually restrained — white, cream, light gray. Gold is often used to accentuate individual elements and create an atmosphere of luxury.
Modern minimalism: purity of lines
Modern Internal trim In the minimalist style, characterized by simple forms, absence of excessive decoration, and functionality. It creates a clean, orderly interior with emphasis on space and light.
Main elements of minimalist internal trim:
- Simple, geometrically clear cornices without decorative elements.
- Lacquered moldings with minimal profile, often with straight angles.
- Hidden skirting boards or skirting boards with minimal protrusion.
- Framing structures made of straight lines to create geometric compositions on walls.
Color palette of minimalist internal trim Usually monochromatic — white, black, shades of gray. Often contrasting combinations are used to create graphicness and expressiveness.
Eclecticism: Play of Styles
Eclectic Internal trim Combines elements of various styles and eras, creating a unique, personalized interior. It allows expressing the owner's individuality and creating a space with character.
Main Principles of Eclecticism internal trim:
- Mixing of various stylistic elements — classical cornices with modern moldings, traditional casings with minimalist skirting boards.
- Use of unusual materials and textures — metal, glass, mirrors combined with traditional wooden or plaster elements.
- Playing with scale — enlarging or reducing traditional elements to create unexpected effects.
- Experimenting with color — using bright, saturated shades to accentuate individual elements.
Eclectic Internal trim Requires a refined sense of style and proportions to create a harmonious ensemble from disparate elements.
Restoration of Historical Interior Framing
Assessment and Documentation
Historical restoration internal trim Begins with a careful assessment of its condition and documentation of all elements. This allows determining the scope of work, selecting restoration methods, and preserving historical authenticity.
The assessment process includes:
- Visual inspection of all elements with documentation of visible damage — cracks, chips, deformations, signs of biological damage.
- Photographic documentation with a scale ruler for creating detailed records.
- Sampling materials for laboratory analysis, which will allow determining their composition and selecting compatible materials for restoration.
- Study of historical documents, photographs, and drawings for restoring lost elements.
Cleaning and Conservation Methods
Cleaning historical internal trim from dirt, old paint coatings, and biological damage — an important stage of restoration. Cleaning methods are selected depending on the material of the elements and the nature of the contamination.
For wooden elements, the following are used:
- Mechanical cleaning using scalpels, chisels, and putty knives to remove coarse dirt and flaking coatings.
- Chemical cleaning using special solvents and removers to remove paint coatings.
- Biocidal treatment to eliminate fungi, mold, and wood-boring insects.
For plaster and gypsum elements, the following are applied:
- Dry cleaning using soft brushes and compressors to remove dust and loose dirt.
- Wet cleaning using demineralized water and neutral detergents.
- Compresses based on clay or cellulose to remove stubborn stains.
After cleaning, materials are conserved to prevent further deterioration. For wooden elements, this may involve impregnation with strengthening compounds; for plaster elements, treatment with special consolidants.
Restoration and recreation of elements
Restoration of damaged elements internal trim and recreation of lost elements — the most complex and responsible stage of restoration. It requires high craftsmanship and knowledge of historical technologies.
Methods used for restoring wooden elements:
- Prosthetics — replacement of damaged sections with new fragments made of similar wood.
- Mastication — filling small defects with special compositions based on wood flour and glue.
- Duplication — creating an exact copy of the original element followed by replacement.
Methods used for restoring plaster and gypsum elements:
- Gypsum filling — restoring lost fragments using gypsum mortar with the help of molds and templates.
- Molding — creating silicone or gypsum molds from preserved elements for casting new ones.
- Hand sculpting — recreating lost details based on historical analogs or documentation.
Recreation of completely lost elements internal trim is carried out based on historical photographs, drawings, or similar preserved elements. It is important to maintain historical accuracy in selecting materials, technologies, and stylistic features.
Innovative approaches to interior framing
3D technologies in design and production
Modern 3D technologies open up new possibilities for designing and producing elements internal trim. They allow creating complex, individual solutions with high precision and efficiency.
3D modeling allows creating virtual prototypes of elements internal trim and visualize them in the interior before production begins. This allows assessing proportions, compatibility with other elements, and making necessary adjustments during the design phase.
3D scanning is used to create accurate digital copies of historical elements internal trim. This is especially valuable in restoration, when it is necessary to recreate lost elements with maximum historical accuracy.
3D printing allows manufacturing complex decorative elements that are difficult or impossible to create using traditional methods. It is especially effective for producing prototypes, single items, or small batches.
Integration of lighting and technical systems
Modern Internal trim is increasingly integrated with lighting systems and other technical elements, creating multifunctional solutions that combine decorative and practical functions.
Crown moldings with built-in lighting create a floating ceiling effect and provide soft, diffused room illumination. They can be equipped with LED strips of various color temperatures and brightness levels, as well as control systems that allow changing the lighting character depending on the time of day or mood.
Moldings and baseboards with cable channels allow hiding electrical wiring, network cables, and other communications while preserving interior aesthetics. They are especially relevant in historic buildings where concealed wiring installation is difficult or impossible.
Intelligent control systems are integrated with elements internal trim, allowing control of lighting, climate, audio systems, and other room parameters. Touch panels embedded in wall panels or moldings provide convenient control of all systems from any point in the room.
Ecological and sustainable solutions
Modern trends in the field internal trim are increasingly oriented toward ecological and sustainable approaches. This is reflected in material selection, production technologies, and design approaches.
Eco-friendly materials for internal trim include:
- Wood from sustainably managed forests, certified to FSC or PEFC standards.
- Biodegradable composites based on natural fibers and resins.
- Recycled materials — plastic, metal, glass — that get a second life as decorative elements.
Energy-efficient solutions in internal framing include:
- Insulating moldings and baseboards that prevent cold bridges and reduce heat loss.
- Passive cooling systems integrated into cornices and moldings that ensure natural air circulation.
- Reflective surfaces that improve distribution of natural and artificial light, reducing the need for additional lighting.
A circular design approach implies creating elements internal trimthat can be easily disassembled, recycled, or reused. This reduces waste and extends the lifespan of materials.
Practical recommendations for selection and care
Choosing framing according to interior style
Choosing internal trim should match the overall interior style and architectural features of the room. Here are some recommendations for different styles:
For a classic interior:
- Choose profiled cornices with pronounced relief and traditional ornamentation.
- Use moldings to create symmetrical compositions on walls — panels, frames, pilasters.
- Enhance framing with decorative elements — rosettes, medallions, consoles.
For a modern interior:
- Prefer minimalist, geometrically clear profiles without excessive decoration.
- Use hidden or minimalist baseboards to create a 'floating' wall effect.
- Experiment with unconventional materials — metal, glass, composites.
For an eclectic interior:
- Boldly combine elements from different styles, but maintain overall compositional harmony.
- Use contrasting colors and textures to create expressive accents.
- Enhance traditional forms with modern materials or unusual finishes.
Care for different types of framing
Proper care for elements internal trim ensures their longevity and preservation of decorative qualities. Recommendations for different materials:
For wooden elements:
- Regularly remove dust using a soft brush or vacuum cleaner with a brush attachment.
- Wipe surfaces with a slightly damp, well-wrung cloth, avoiding excess moisture.
- Periodically renew protective coatings — varnish, wax, oil — according to the manufacturer's recommendations.
- Avoid placing wooden elements near heat sources and direct sunlight, which may cause deformation.
For polyurethane and polystyrene elements:
- Clean the surface with a soft cloth dampened with warm water and neutral detergent.
- Avoid using abrasive cleaning agents and stiff brushes, which may damage the surface.
- Periodically inspect adhesive joints and repair them as needed.
- Protect elements from mechanical damage, especially in areas of heavy traffic.
For plaster and gypsum elements:
- Remove dust using a soft brush or vacuum cleaner with a brush attachment.
- For removing stains, use dry cleaning with special rubber sponges or erasers.
- Avoid wet cleaning, which may damage the material and cause its destruction.
- Periodically inspect elements for cracks and delamination, promptly addressing any detected defects.
Typical Problem Solutions
During the operation of elements internal trim various problems may arise that require timely resolution:
Cracks and joint separation:
- For wooden elements, use wood putty matched to the base material.
- For polyurethane and polystyrene elements, apply special joint adhesive or acrylic sealant.
- For gypsum elements, use gypsum putty or plaster of Paris.
Detachment from the base:
- Clean the surface of old adhesive and dust.
- Apply a new layer of suitable adhesive or mounting foam.
- Secure the element until the adhesive dries completely using temporary supports or clamps.
Damage and chips:
- For wooden elements, use prosthetic or caulking techniques.
- For polyurethane elements, apply special repair compounds or acrylic putty.
- For gypsum elements, use gypsum paste or ready-made repair mixes.
Fading and color change:
- For wooden elements, perform light sanding and apply a new protective coating.
- For painted elements, touch up damaged areas and then apply protective varnish.
- For items with gold or patina, consult restoration specialists to restore the decorative finish.