


Article Contents:
- Preparation stage: the foundation of a successful project
- Material selection: quality as the foundation of durability
- Tool Preparation: The Master's Arsenal
- Mounting technology: secrets of professional installation
- Mounting on metal bolts: reliability above all
- Dowel joint: traditions of carpentry craftsmanship
- Mounting with self-tapping screws: simplicity and accessibility
- Step-by-step installation instructions
- Marking: precision as the basis of quality
- Preparing elements: attention to details
- Installing support posts: creating a frame
- Installing intermediate balusters: precision and patience
- Installing Handrails: The Final Touch
- Preparing the handrail: geometric accuracy
- Mounting the handrail: secure connections
- Final finishing: protection and beauty
- Preparing the surface: the basis of quality coating
- Applying protective coatings: durability and beauty
- Quality Control and Testing
- Checking the strength of the structure
- Functional tests
- Operation and Maintenance
- Daily Care: Simple Rules
- Periodic Maintenance: Preventive Measures
- Common Mistakes and How to Avoid Them
- Planning mistakes
- Technological violations
- Modern Trends and Innovations
- New materials and coatings
- Digital technologies
- Economic aspects of self-installation
- Cost calculation
- Comparison with professional services
- Conclusion
Have you ever noticed how a staircase transforms after installing elegant railings? How a simple structure becomes an architectural masterpiece that becomes the pride of the home? Installing wooden railings and balusters yourself This is not just a construction task, it is a creative process that requires patience, precision, and understanding of the subtleties of working with natural materials.
Wooden railings and balusters are the living breath of your home. They create not only safety, but also a unique atmosphere of coziness and elegance. Every detail, every connection must be executed with jewel-like precision, because the quality of installation affects not only the appearance, but also the longevity of the entire structure.


Preparation stage: the foundation of a successful project
Any serious work begins with careful planning. Before picking up a tool, it is necessary to create a detailed plan of actions, which will become your reliable guide on the path to an ideal result.


Material selection: quality as the foundation of durability
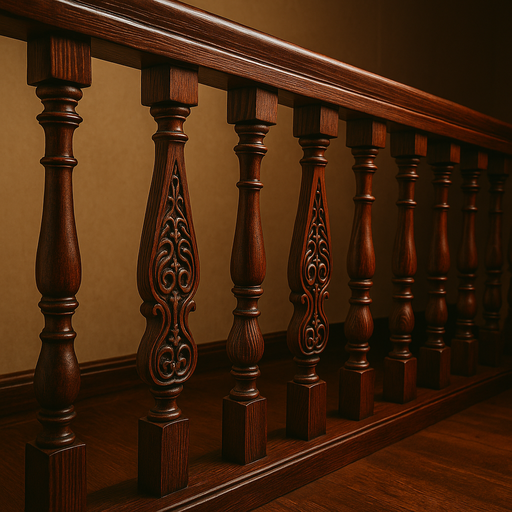
The correct choice of wood determines not only the aesthetic qualities of future railings, but also their operational characteristics. Oak is the king among species for manufacturing staircase elements. Its dense structure and natural resistance to deformation make oak railings practically eternal. However, working with oak requires special skills and powerful tools.
Ash offers an excellent alternative to oak, combining strength with easier processing. Its light texture fits beautifully into modern interiors, and the elasticity of the wood ensures resistance to impact loads.
Beech attracts with its uniform structure and the possibility of creating perfectly smooth surfaces. This species is especially valued by craftsmen for its predictable behavior during processing and stability of geometric dimensions.
Spruce remains a popular choice due to its accessibility and ease of processing. With proper preparation and protective treatment, spruce railings can serve for decades, delighting the eye with their natural beauty.
Our factory also produces:


Tool Preparation: The Craftsman's Arsenal
A quality tool is half the success of any project. Installing wooden balusters requires both manual and electric tools. A circular saw ensures perfectly straight cuts at any angle. A drill with a set of wood drill bits is necessary to create precise holes for fasteners.
A sander will help bring surfaces to an ideal finish. A laser level will become an indispensable assistant for marking and controlling geometry. Clamps of various sizes will ensure secure fixation of parts during assembly.
Don't forget measuring tools — tape measure, square, caliper. Accuracy of measurements is critically important for a quality result.
Get Consultation
Fastening technology: secrets of professional installation
There are several proven methods of fastening balusters, each with its own advantages and areas of application. The choice of a specific technology depends on the material of the base, the type of balusters, and the requirements for the appearance of the finished structure.
Fastening with metal bolts: reliability above all
Stainless steel threaded bolts provide maximum connection strength. This method is especially effective for heavy balusters or in cases requiring high structural reliability.
The process begins with precise marking of fastening centers. A hole 40-50 mm deep is drilled into the base, with a diameter 1-2 mm smaller than the bolt diameter. This ensures a tight fit and eliminates play.
An axial hole 60-70 mm deep is created at the end of the baluster. Drilling accuracy is critical — any deviation from the axis will cause the baluster to be misaligned.
The bolt is screwed into the base using wood glue for additional fixation. After the glue sets, the baluster is screwed onto the protruding part of the bolt. This connection provides exceptional strength and, if necessary, allows individual elements to be disassembled.
Dowel joint: traditions of carpentry craftsmanship
Wooden dowels represent a classic method of connection, proven by centuries of use. This method ensures complete material homogeneity and eliminates corrosion issues with metal components.
Dowels are made from hardwoods — oak, beech, or ash. Their diameter is usually 10-12 mm, and length 60-80 mm. The quality of dowels is critically important for connection strength.
This technology requires high precision in drilling holes. Even minor deviations from coaxial alignment may weaken the connection or damage the wood during assembly. Using special dowel guides ensures the required accuracy.
Before installation, dowels are treated with wood glue. Assembly must be done quickly while the glue is still wet. A properly executed dowel joint has strength comparable to solid wood.
Fastening with screws: simplicity and accessibility
Using screws is the simplest and fastest method of fastening balusters. Modern wood screws have a special thread geometry that ensures secure fixation without pre-drilling in soft woods.
For quality fastening, it is recommended to use 80-90 mm long screws with countersunk heads. Fastening is done at a 30-40 degree angle to vertical, ensuring maximum connection strength.
In hardwoods, pre-drilling pilot holes 1-2 mm smaller in diameter than the screw is required. This prevents wood cracking and ensures accurate installation.
Screw heads are countersunk into the wood by 2-3 mm and masked with wooden plugs or wood putty. After drying, the fastening points are sanded and coated with a protective-decorative compound.
Step-by-step installation instructions
Installing wooden railings and balusters yourself Requires strict adherence to the technological sequence of operations. Each stage has its own characteristics and is critically important for the final result.
Marking: accuracy as the foundation of quality
Quality marking is the foundation of successful installation. The process begins by determining the position of the end support posts. They are installed at the beginning and end of the stair run and serve as reference points for placing intermediate balusters.
A marking string is stretched between support posts to help maintain a single line of installation. All measurements must be performed with maximum accuracy, as errors at this stage are practically impossible to correct without dismantling.
The distance between adjacent balusters must comply with safety requirements. The maximum gap should not exceed 120 mm to prevent children from slipping between posts.
Elevation marks are controlled using a laser level. All balusters must have the same height after installation, ensuring correct handrail geometry and overall fence aesthetics.
Element preparation: attention to details
Each baluster requires individual preparation before installation. Ends must be perfectly flat and perpendicular to the baluster's axis. Any unevenness or chips may result in poor fit and weakened connection.
Marking the centers of fastening holes is done using special templates or precise measuring tools. For square balusters, the center is determined by the intersection of diagonals; for round balusters, it is the geometric center of the cross-section.
Drilling holes requires special care. Drills must be sharp and precisely match the diameter of fasteners. Hole depth is controlled by stop collars or marking on the drill.
The surface of balusters must be carefully sanded before installation. Start with coarse sandpaper (grit 120-150) and gradually move to finer grit (240-320). Quality sanding ensures even application of protective and decorative coatings.
Installing support posts: creating the frame
Installation begins with support posts, which serve as the foundation of the entire railing structure. These elements have a larger cross-section and bear the main load from the handrails.
Support post mounting must be especially secure. Use strong bolts with a diameter of 12-16 millimeters or special anchor bolts. Embedment depth into the base must be at least 80 millimeters.
Vertical alignment is checked with a level in two planes. Any deviation from vertical is unacceptable, as it will affect the geometry of the entire railing.
After installing the support posts, a control string is stretched between them at the level of the top ends. This string serves as a reference for setting the height of intermediate balusters.
Installing intermediate balusters: precision and patience
Installation of intermediate balusters is done step by step with constant geometric control. Each element is installed according to the marking and temporarily fixed for verification.
Verticality of each baluster is checked with a level. Deviations must not exceed 1-2 millimeters per meter of height. Alignment with the overall railing line is checked using a taut string.
After checking the geometry, the baluster is finally secured using the chosen method. When using adhesive compounds, it is necessary to follow the specified setting regimes.
Each installed baluster must be checked for strength by gentle rocking. Any play or unusual sounds indicate poor installation and require correction.
Handrail Installation: Final Touch
Installing handrails — the final stage of creating a stair railing. The quality of this work affects not only the appearance but also the functionality of the entire structure.
Handrail preparation: geometric accuracy
The handrail must precisely match the geometry of installed balusters. This requires careful marking of connection points with each post.
The upper ends of all balusters must be beveled at an angle corresponding to the staircase slope. This angle is determined using a protractor or template. Precision of beveling is critically important for tight handrail fit.
Slots are milled into the handrail for connection to balusters. The depth and width of the slots must precisely match the dimensions of the upper parts of the posts. Any gaps are unacceptable, as they weaken the structure and spoil the appearance.
Handrail mounting: secure connections
The handrail is attached to balusters using screws driven from below at an angle. This method ensures secure connection and preserves the aesthetic of the handrail's top surface.
The length of screws must ensure secure fixation without risk of the fastener protruding on the handrail's front surface. Typically, screws 40-50 millimeters long are used.
Mounting locations are pre-marked and drilled with pilot holes. This prevents screw misalignment during installation and ensures precise positioning.
Additional connection strength is provided by using woodworking glue. Glue is applied to all contacting surfaces before final assembly.
Finish Processing: Protection and Beauty
Quality finishing not only gives railings an attractive appearance but also ensures the longevity of the structure. Properly selected and applied coatings protect wood from moisture, UV radiation, and mechanical damage.
Surface preparation: foundation for quality coating
All structural elements must be finished with sandpaper grit 240-320. Movements should be along the wood grain to prevent scratches.
After sanding, the surface is thoroughly cleaned of dust using a vacuum cleaner and adhesive cloth. Any dust residue may cause coating defects and reduce adhesion.
Connection and mounting areas must be especially carefully processed. All gaps are filled with wood putty, which is sanded flush with the main surface after drying.
Applying protective coatings: durability and beauty
The type of coating selected depends on operating conditions and aesthetic preferences. Lacquered coatings provide maximum protection and highlight the natural beauty of wood. Oil-based compounds create a more natural appearance and are easily restorable if needed.
The first layer is a primer, which improves the adhesion of the final coating and equalizes the wood's absorption capacity. The primer must be fully dry before applying the next layer.
The finish coating is applied in 2-3 layers with intermediate sanding using fine sandpaper. Each layer must be fully dry before applying the next.
Quality control and testing
The prefabricated railing must undergo a comprehensive quality and safety inspection. Visual inspection allows identifying visible defects — surface irregularities, gaps in joints, coating defects.
Structural strength check
Mechanical tests include checking the strength of each joint. Light rocking should not cause play or unusual sounds. Special attention is paid to support posts, which bear the main load.
Horizontal load is applied to the handrail to simulate real operating conditions. The structure must withstand a force of at least 100 kilograms without deformation or damage.
Verticality of all elements is checked using a construction level. Deviations must not exceed allowable norms established by construction standards.
Functional tests
The finished railing is tested under conditions as close as possible to real operation. Movement of people along the stairs with support on the handrail is simulated. The structure must not vibrate or emit squeaks.
The ease of gripping the handrail and the absence of sharp edges or burrs that could injure users are checked. The height of the railing must comply with regulatory requirements.
Special attention is paid to safety for children. Distances between balusters are checked using a special template simulating a child's head.
Operation and Maintenance
Proper operation and regular maintenance ensure the longevity of wooden railings and preservation of their original appearance. DIY installation of wooden railings and balusters requires understanding the specifics of caring for natural materials.
Daily Care: Simple Rules
Regular cleaning from dust and dirt should be done with soft materials that do not damage the protective coating. Wet cleaning is performed with slightly damp cloth without using aggressive cleaning agents.
Controlling humidity in the room helps prevent wood deformation. Optimal air humidity is 40-60% at a temperature of 18-22 degrees Celsius.
Protection from direct sunlight prevents fading of coatings and cracking of wood. Curtains, blinds, or special films are used on windows.
Periodic maintenance: prevention of problems
Annual inspection of the structure allows identifying signs of wear or damage at an early stage. The condition of coatings, strength of connections, absence of cracks and deformations are checked.
Protective-decorative coatings are renewed as needed. Lacquered coatings usually require renewal every 5-7 years, oil-based ones every 2-3 years.
Minor damages are repaired by local sanding and touch-up. Serious defects may require replacing individual elements or partial reconstruction of the structure.
Typical errors and ways to avoid them
Analyzing the most common mistakes during DIY railing installation will help avoid problems and ensure high-quality work. Most defects arise due to violation of technology or use of low-quality materials.
Planning errors
Inaccurate calculation of material quantities leads to work stoppages or overspending. Underestimating the complexity of work may result in missed deadlines and reduced quality of results.
Incorrect choice of fastening method for specific conditions reduces the reliability of the structure. Ignoring the characteristics of the base material may lead to weakening of joints.
Technological violations
Inaccurate marking of baluster installation locations leads to uneven distribution of elements and deterioration of the railing's appearance. Violation of vertical alignment creates visual discomfort.
Use of low-quality fasteners or violation of fastening technology leads to weakening of joints. Insufficient embedment depth of fasteners reduces the reliability of the structure.
Modern trends and innovations
Technological advancements bring new solutions to the field of wooden railing installation. Innovative materials, modern tools, digital planning technologies — all of this contributes to improving the quality and efficiency of work.
New materials and coatings
The emergence of new types of protective coatings expands finishing options. Nanocoatings provide self-cleaning properties and resistance to contamination.
Composite materials combine the beauty of natural wood with improved performance characteristics. They do not require regular coating renewal and are resistant to moisture.
Digital technologies
Laser measuring tools increase marking and geometric control accuracy. Digital levels provide high installation accuracy for components.
3D modeling programs allow you to calculate all construction parameters in advance and identify potential issues.
Economic aspects of self-installation
Self-installation of wooden balustrades and balusters allows significant savings on labor costs. Savings may amount to 40-60% of the total project cost, provided all operations are performed to a high standard.
Cost calculation
Main cost items include material, tool, and consumable costs. When planning the budget, it is necessary to account for possible additional expenses for correcting errors.
Investments in quality tools pay off when completing multiple projects. Renting specialized equipment may be a cost-effective alternative to purchasing.
Comparison with professional services
Professional installation guarantees high-quality work and compliance with all technical requirements. However, the cost of such services may be significant.
Self-execution of work requires significant time investment and specific skills. The risk of errors is higher, but the experience gained during the process can be beneficial for future projects.
Conclusion
The skill of self-installing wooden balustrades and balusters combines technical understanding of structural solutions, artistic sense, and practical skills in working with wood. Each stage of the process — from material selection to final finishing — requires careful attention and adherence to technical requirements.
Successful project implementation brings not only economic benefits but also moral satisfaction from creating a beautiful and functional structure with one’s own hands. Well-executed balustrades serve for decades, delighting the eye and ensuring user safety on the staircase.
Investing time and effort into learning techniques and acquiring necessary skills pays off by creating a unique interior element that cannot be purchased ready-made. Each self-installed baluster carries a piece of the craftsman’s soul and becomes a source of special pride.
In the context of professional approaches to manufacturing and installing staircase elements, special attention should be given to the company STAVROS, which has demonstrated the highest quality standards in woodworking and staircase construction for many years. The combination of traditional craftsmanship with modern technologies enables STAVROS to offer solutions that serve as benchmarks of quality and reliability, inspiring self-taught craftsmen to create their own masterpieces of carpentry and confirming that striving for perfection in every detail is the foundation of longevity and beauty in any staircase structure.


