Article Contents:
- Philosophy of DIY Installation: Why It's Worth Doing Yourself
- Economic Benefits and Personal Satisfaction
- Quality control at every stage
- Master's Toolkit: What You'll Need for the Work
- Basic Tools
- Specialized fixtures
- Preparation Stage: Planning and Calculations
- Designing the Railing
- Material Calculation
- Technological Secrets of Professional Installation
- Marking — The Foundation of Quality Work
- Mounting Methods: From Simple to Complex
- Installing Support Posts
- Installing Balusters: Step-by-Step Technology
- Preparation of balusters for installation
- Installation process
- Mounting Quality Control
- Installing Handrails: The Final Touch
- Preparing the Handrail
- Ways to Mount the Handrail
- Working with different materials: key features
- Wooden Railings
- Metallic Elements
- Combined Constructions
- Common Mistakes and How to Avoid Them
- Planning mistakes
- Marking Errors
- Installation Errors
- Final Finishing and Protection
- Sanding and Surface Preparation
- Application of protective coatings
- Maintenance and Care of the Railing
- Regular Inspection
- Preventive maintenance
- Creative Solutions and Design Tips
- Decorative elements
- Railing Lighting
- Economic Aspects of DIY Installation
- Calculating Savings
- Investment in Tools
- Safety During Work
- Basic Safety Rules
- Electrical Safety
- Conclusion
Dreaming of turning an ordinary staircase into an architectural masterpiece? Want to create a railing that will be the pride of your home? installing balusters and railings by hand It is an engaging process that requires patience, precision, and knowledge of craftsmanship secrets. Each element of the railing must be installed with jewel-like accuracy, as this affects not only the beauty of the structure but also the safety of everyone using the staircase.
Imagine: you are climbing the stairs, your hand glides smoothly over the perfectly smooth handrail, and your gaze is delighted by the elegant balusters, installed with mathematical precision. This is not just a railing — it is a work of art created by your own hands. And today we will reveal all the secrets of professional installation that will help you achieve a flawless result.


Philosophy of DIY Installation: Why It's Worth Doing Yourself


Economic Benefit and Personal Satisfaction
Installing railings yourself is not only significant cost savings, but also an incredible sense of pride from the work done. Professional installation services can account for 40-60% of the cost of materials. By doing the work yourself, you not only save money, but also gain invaluable experience that will be useful in future projects.
Each installed element becomes part of your story, a manifestation of your effort and skill. When guests admire the beauty of your staircase, you can proudly say: 'This was done by my own hands.' Such satisfaction cannot be bought for any price.
Our factory also produces:


Quality control at every stage
By doing the installation yourself, you control every stage of the work. No one is more interested in the quality of the result than you are. Professional crews often work under time pressure, striving to complete as many orders as possible. You, however, can devote as much time as needed to each detail to achieve the perfect result.
Get Consultation
Master's Toolkit: What You'll Need for the Work
Basic Tools
Quality tools are half the success in any endeavor. For installing balusters and handrails, you will need:
Measuring Instruments:
- Laser level or water level at least 1 meter long
- 5-7 meter metal tape measure
- 300-500 mm carpenter's square
- 1000 mm metal ruler
- Construction pencil or marker
Cutting Tools:
- Circular saw or miter saw with hacksaw
- Electric jigsaw with a set of wood blades
- Hand hacksaw with fine teeth
- Chisels of various widths (6, 12, 20 mm)
Drilling Equipment:
- Drill or perforator with power not less than 600 W
- Set of wood drill bits with diameter 6-12 mm
- Metal drill bits for pre-drilling
- Countersink for hidden fastening
Specialized Tools
Professional carpenters use special fixtures that significantly simplify work and increase installation accuracy. A drilling guide for angled holes will help achieve hidden baluster fastening. A marking template will ensure equal spacing between railing elements.
Clamps of various sizes are indispensable for gluing parts and temporary fixing of elements. Magnetic drill holders will prevent loss of bits and ensure quick access to the required tool.
Preparation Stage: Planning and Calculations
Railing Design
Any quality work begins with careful planning. Create a detailed drawing of the future railing, indicating all dimensions and angles. Take into account the features of your staircase: step width, rise height, and slope angle of the flight.
The standard height of the railing is 900-1000 mm from the step level to the top of the handrail. The distance between balusters should not exceed 120 mm — this is a safety requirement, especially important if there are children in the house. The optimal spacing for installing balusters is 100-150 mm between the centers of the elements.
Material Calculation
Accurate material calculation will help avoid unnecessary expenses and shortages during work. The number of balusters is calculated based on the length of the stair run and the chosen spacing. Add 10-15% reserve to the obtained number to account for possible defects or work errors.
The handrail length should match the stair run length, including overhangs beyond the end support posts. Typically, the overhang is 150-200 mm on each side. Don't forget to account for the material of the rail support, if you plan to use it.
Professional Installation Techniques
Marking — Foundation of Quality Work
Correct marking is the foundation of the entire structure. Start by installing the end support posts, which will serve as reference points for all other elements. Use a laser level to establish a base line, along which all balusters will be aligned.
Create a template for marking the locations of balusters. This can be a wooden strip with marks at equal intervals or a special guide. This approach ensures equal spacing between all elements and significantly speeds up the work.
Mounting Methods: From Simple to Complex
Mounting with angled screws — the simplest method available to beginners. Screws 80-90 mm long are screwed into the base of the baluster at an angle of 30-45 degrees. Decorative caps or putty with subsequent painting are used to mask the mounting points.
Through-mounting through the treads ensures maximum connection reliability. A hole is drilled from below the tread, the screw or bolt passes through and is screwed into the end of the baluster. This mounting is fully concealed and can be tightened if necessary.
Connection with dowels — a traditional carpentry method providing strong and aesthetic connections. Wooden dowels 8-10 mm in diameter are glued into the end of the baluster and the corresponding hole in the base. The glue joint enhances the strength of the connection.
Installation of Support Posts
Support posts are the foundation of the entire railing structure. They are installed at the beginning and end of the stair run, as well as at turns and landings. Mounting support posts must be especially secure, as they bear the main loads.
For mounting to a wooden base, use strong screws 120-150 mm long or through bolts with nuts. When installing on a concrete base, use anchor bolts of the appropriate diameter. The mounting location is additionally reinforced with metal plates or angles.
Baluster Installation: Step-by-Step Technology
Preparation of balusters for installation
Before beginning installation, all balusters must be prepared: sanded, trimmed to size if necessary, and coated with a protective compound. If balusters are installed on a sloped surface (the stair stringer), their bottom ends must be trimmed at the appropriate angle.
Check the quality of processing of each baluster. The surface should be smooth, without chips or burrs. Pay special attention to the ends — they must be flat and perpendicular to the baluster axis. An uneven end will result in poor fit and weakened connection.
Installation process
installing balusters and railings by hand Start with installing the end elements. They serve as references for all other balusters and define the overall geometry of the railing. Use a plumb bob or laser level to check the verticality of installation.
After installing the end balusters, stretch a string between them at the level of the top ends. This string will help align all intermediate elements at the same height. Install each baluster strictly vertically, checking its position with a level in two planes.
Mounting Quality Control
At each stage of work, check the quality of execution. All balusters must be installed strictly vertically, at equal distances from each other, at the same height. Any deviations will be noticeable in the finished structure and spoil the overall impression.
Check the reliability of mounting each baluster. It should not wobble or bend under load. Immediately address any weak spots — in the finished structure, this will be much more difficult to fix.
Handrail Installation: Final Touch
Handrail Preparation
The handrail is not only a functional element but also an important decorative detail of the railing. Its surface should be perfectly smooth, without any defects. Carefully sand the handrail, starting with coarse sandpaper and finishing with fine grit.
If the handrail consists of several parts, the connection points must be especially carefully executed. Use special connecting elements or make a lap joint with glue. The quality of the handrail connection determines the overall impression of the entire structure.
Handrail Mounting Methods
Mounting through the rail support — the most common method. A 20×40 mm rail is mounted to the top ends of the balusters with screws. A groove is milled into the handrail to match the rail dimensions. This connection ensures strength and allows hiding the mounting points.
Direct mounting to balusters is done using screws screwed in from below the handrail at an angle. The mounting points are masked with putty or decorative caps. This method is easier to execute but less aesthetic.
Connection with tenons — a traditional carpentry method providing maximum strength and aesthetics. Tenons are cut into the ends of the balusters, and corresponding grooves are milled into the handrail. The connection is made with glue and additionally secured with hidden fasteners.
Features of Working with Different Materials
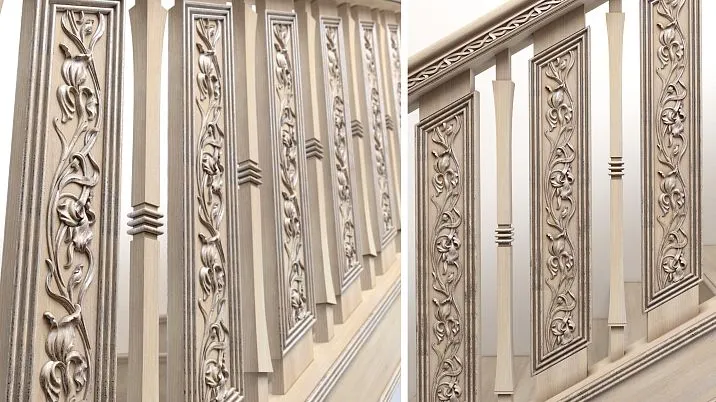
Wooden Railing
Wood is a classic material for making railings. It feels warm to the touch, is easy to work with, and allows creating items of any complexity. When working with wood, it is important to consider the direction of the grain, the moisture content of the material, and the characteristics of different species.
Coniferous species (pine, spruce) are easy to process but require protection from moisture and insects. Deciduous species (oak, beech, walnut) are stronger and more durable, but harder to process. Exotic species have unique properties but require special knowledge and tools.
Metal elements provide dimensional stability and high strength. Their geometry remains unchanged during operation, simplifying calculations and ensuring compliance with safety standards throughout the service life.
Metal balusters and handrails are characterized by high strength and durability. They can be made of steel, aluminum, stainless steel, or cast iron. Each material has its own mounting characteristics and requires appropriate tools.
Steel elements are usually attached using welding or bolted connections. Aluminum parts are connected using special fittings or mechanical fasteners. Stainless steel requires the use of special drill bits and fasteners made of the same material.
Combined constructions
Modern railings often combine different materials: wooden handrails with metal balusters, glass infill with wooden frames. Such constructions require a special approach to design and installation.
When connecting different materials, it is important to consider their different coefficients of thermal expansion, compatibility of coatings, and possibility of galvanic corrosion. Use special gaskets and sealants to ensure reliable connections.
Typical errors and ways to avoid them
Planning errors
Insufficient planning is the main cause of problems during railing installation. Lack of detailed drawings leads to errors in dimensions, incorrect material calculations, and the need to redo already completed work.
Ignoring construction codes and safety regulations may result in creating an unsafe structure. Height of the railing, spacing between balusters, strength of fasteners — all these parameters are regulated by normative documents.
Marking Errors
Inaccurate marking is the source of many problems. Uneven placement of balusters, varying distances between elements, deviations from vertical — all this results from careless marking. Use quality measuring tools and check each dimension several times.
Lack of control points leads to accumulation of errors. Install intermediate reference points, especially on long sections. Regularly check whether the completed work matches the design.
Installation errors
Weak fastening is the most dangerous error, which can lead to structural failure and injuries. Do not economize on fasteners; use screws and bolts of sufficient length and diameter. Pre-drill holes in hardwoods.
Incorrect sequence of operations complicates work and reduces the quality of the result. Always install support posts first, then balusters, and only at the end — handrails. This sequence ensures maximum accuracy and ease of work.
Final finishing and protection
Polishing and surface preparation
Quality finishing is the guarantee of longevity and beauty of the railing. Start with coarse sanding using 120-150 grit sandpaper, gradually moving to finer grits — 220-320. Pay special attention to connection points and ends of elements.
After sanding, thoroughly remove all dust from the surface. Use a vacuum cleaner and sticky cloth for final cleaning. Any remaining dust will appear under varnish as unevenness and coating defects.
Application of Protective Coatings
Choice of protective coating depends on operating conditions and aesthetic preferences. Varnishes create a strong protective film and highlight the wood texture. Oils penetrate into the wood structure, providing deep protection while preserving the natural appearance of the material.
Apply the coating in several thin layers, carefully drying each one. Between layers, lightly sand with fine sandpaper to remove raised fibers and ensure good adhesion of the next layer.
Maintenance and Care of the Railing
Regular Inspection
Installed railings require regular maintenance to keep them in ideal condition. Conduct a visual inspection of the structure at least once every six months. Pay attention to the condition of fasteners, integrity of the coating, absence of cracks and deformations.
Pay special attention to connection points and fastening joints. Problems here often arise due to natural wood shrinkage and temperature deformations. Timely detection and correction of minor defects will prevent serious damage.
Preventive Maintenance
Regular cleaning of the railing from dust and dirt extends the life of the coating. Use soft cloths and special wood care products. Avoid abrasive materials and aggressive chemicals.
Periodically check the tightness of fasteners. Natural wood shrinkage may cause loosening of connections. Tighten screws and bolts as needed, but do not over-tighten — excessive tightening may damage the wood.
Creative Solutions and Design Ideas
Decorative elements
Installing railings and balusters yourself opens up wide opportunities for creativity. Add uniqueness to your railing with decorative elements: carved inserts, metal inlays, colored glass panels. Such details will turn an ordinary railing into a work of art.
Use contrasting combinations of materials and colors. Dark balusters on a light background or vice versa create a striking visual effect. Combining different wood species allows creating a unique pattern without using stains.
Railing Lighting
Built-in lighting not only improves safety when using stairs at night, but also creates an attractive lighting effect for the railing. LED strips, embedded in the handrail or under steps, provide soft, even lighting.
Spotlights installed in support posts create dramatic lighting accents. Use lights with adjustable brightness to create different lighting scenarios depending on time of day and mood.
Economic Aspects of DIY Installation
Cost Savings Calculation
Performing the installation of balusters and handrails yourself allows significant savings. The cost of professional installers amounts to 40-60% of the material cost. With materials costing 100000 rubles, savings may amount to 40000-60000 rubles.
Additional savings are achieved through the ability to choose cost-effective materials, absence of middleman markups, and the opportunity to spread purchases over time to take advantage of discounts and promotions.
Investment in Tools
Purchasing quality tools requires certain investments, but these costs are recouped already with the first project. Good tools will serve for many years and can be used for numerous other home projects.
Consider renting expensive specialized equipment that may be needed only for one project. This will give you access to professional tools without significant expenses.
Safety During Work
Basic Safety Rules
Safety should be a priority during any construction work. Use safety goggles when drilling or cutting, a respirator when sanding, gloves when working with sharp tools. Ensure good lighting at the work site.
When working at heights, use reliable scaffolds or ladders. Never work on unstable supports or when fatigued. Keep the work area clean — scattered tools and materials can cause injuries.
Electrical safety
When using power tools, observe electrical safety rules. Check the tool's condition before starting work, do not use damaged cords or plugs. When working in wet conditions, use tools with the appropriate protection rating.
Turn off the tool from the power supply when changing accessories or cleaning. Do not leave the tool unattended while powered on. Use extension cords of sufficient gauge to prevent overheating.
Conclusion
installing balusters and railings by hand This is an exciting journey into the world of carpentry craftsmanship, requiring patience, precision, and a creative approach. Every stage of work — from planning to final finishing — is important to achieve an ideal result.
Remember: quality does not tolerate haste. It is better to spend more time on preparation and careful execution of each operation than to fix mistakes later. Your patience and effort will be rewarded with a beautiful, durable railing that will serve for many years.
Do not be afraid to experiment and realize your own ideas. It is precisely the individual approach that makes each railing unique. Use the acquired knowledge as a foundation, but do not limit yourself to conventional solutions.
DIY installation of railings is not only cost-saving, but also an opportunity to create something truly your own and unique. Each element installed by your hands carries a part of your soul and craftsmanship.
For many years, STAVROS has provided high-quality materials and components for manufacturing staircases and railings. A wide range of balusters, handrails, fastening elements, and accessories allows implementing projects of any complexity. Choosing STAVROS, you get not only quality materials but also professional support at every stage of work. Entrust your projects to a proven partner — STAVROS company.