Article Contents:
- Anatomy of the perfect joint: fundamentals of connection theory
- Physics of wooden connections
- Stresses in the connection zone
- Influence of profile on joint complexity
- Types of joints: classification of connections
- End joints: simplicity and functionality
- Corner connections: the pinnacle of craftsmanship
- Special connections
- Master's toolkit: precision as the foundation of quality
- Cutting tool: sharpness solves everything
- Measuring tool: control at every stage
- Auxiliary tool
- Technological process: step-by-step algorithm for perfect joints
- Stage one: preparation and planning
- Stage two: marking and processing
- Stage three: connecting elements
- Joint problems and methods of resolution
- Gaps in joints: causes and elimination
- Profile mismatch
- Gluing problems
- Features of joining different wood species
- Coniferous species: resinous and soft
- Broadleaf species: hardness and capriciousness
- Joining complex profiles: the highest level of skill
- Multi-level profiles
- Curved profiles
- Carved elements
- Quality control: evaluation criteria
- Visual inspection
- Mechanical control
- Long-term stability
- Joining Innovation Technologies
- Laser Cutting
- CNC Milling
- Special Connecting Elements
- Joint Repair and Restoration
- Repairing minor defects
- Full Rejoining
- Economic Aspects of Quality Joining
- Initial costs
- Operational costs
- Impact on the cost of the object
- Training in Joining Craft
- Theoretical Preparation
- Practical Skills
- Modern Control Methods
- STAVROS: Where Perfect Joining Becomes the Standard
Imagine a luxurious interior with flawless finishing — every line perfectly straight, every transition elegantly executed, every detail in its place. Now imagine the same interior with curved joints, gaps at the corners, uneven transitions. The difference is colossal, isn't it? Jointing of wooden moldings — it is the art that distinguishes the master from the amateur, professional work from self-made efforts.
Over half a century of work in interior finishing, I have seen thousands of examples of how improper joining turns expensive materials into a joke, and how proper connections turn even budget moldings into works of art. The secret lies not only in the master's hands, but also in a deep understanding of wood properties, physics of connections, characteristics of different profiles, and operating conditions.
Joining is the moment of truth for any carpenter. It is here that his true skill, knowledge of the material, and understanding of geometry are revealed. For what is a joint? It is the meeting point of two elements that must become a single whole, creating an illusion of continuity and unity. To achieve this effect, one must master the entire science of connections.


Anatomy of the Perfect Joint: Fundamentals of Connection Theory
To understand how to properly join wooden moldings, one must understand the very nature of these connections. Each joint is a compromise between aesthetics and functionality, between desired and possible.


Physics of Wooden Connections
Wood is an anisotropic material, meaning it has different properties in different directions. It is stronger along the grain and more flexible across it. This fundamental property determines all aspects of joining. wooden cornice It behaves predictably with changes in humidity: it expands and contracts most in the tangential direction, less in the radial direction, and almost unchanged along the longitudinal direction.
The linear expansion coefficient of wood varies depending on the species, but on average it is: along the grain — 0.01%, across the grain — 0.1–0.3%. This means that a meter-long molding can change its width by 1–3 mm with a 10% change in humidity. Seems small? But for a joint, this is critical.
Our factory also produces:


Stresses in the Connection Zone
At the joint, stress concentrations occur — here the material experiences maximum loads. A sharp transition from one element to another creates stress concentration points where stresses may exceed the strength of the wood. The master’s task is to minimize these stresses through proper joint geometry.
Sharp angles are enemies of longevity. Smooth transitions, rounded corners, gradual changes in cross-section — these ensure even load distribution and long-lasting connections.
Get Consultation
Influence of Profile on Joining Complexity
Simple profiles join more easily — this is an axiom of carpentry. Quarter-round wooden cornice requires only one plane of cut. A complex cove profile with multiple elements turns joining into a high-art performance, where every millimeter matters.
The more complex the profile, the more planes must align at the joint. And each misaligned plane creates a visible defect that cannot be hidden by any tricks.
Types of Joints: Classification of Connections
There are many ways to connect wooden moldings, each with its own advantages, disadvantages, and area of application.
End joints: simplicity and functionality
Straight end joint — the simplest and most common type of connection. Two elements are joined end-to-end at a right angle to the longitudinal axis. Advantages: ease of manufacturing, minimal material consumption. Disadvantages: visible joint line, tendency to form gaps under deformation.
Stepped joint is used for particularly critical connections. Elements are joined across several planes, increasing the bonding area and connection strength. Such joints are practically invisible even upon close inspection.
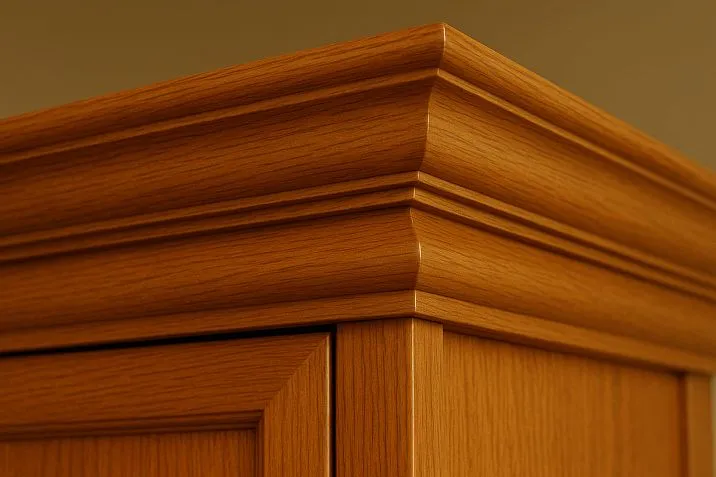
Corner joints: the pinnacle of craftsmanship
Miter joint — the classic of carpentry art. Each element is beveled at a 45° angle (for a right angle), creating a nearly invisible joint. However, such a connection requires perfect precision — even a half-degree deviation creates a noticeable gap.
Butt joint with overlay uses an additional element that covers the joint. This may be a decorative rose, corner piece, or simply a contrasting-colored strip. Such a solution not only hides possible defects but can also serve as a decorative accent.
Dovetail joint requires the highest level of craftsmanship. One element is inserted into another, creating a complex three-dimensional connection. Such joints are typical for restoration work and exclusive projects.
Insertion joints require the highest level of craftsmanship. One element is inserted into another, creating a complex three-dimensional connection. Such joints are characteristic of restoration work and exclusive projects.
Special joints
Detachable joints allow dismantling the molding without damage when necessary. Special latches, snap-fit mechanisms, or threaded connections are used. Relevant for moldings with built-in utilities or in spaces requiring periodic maintenance.
Compensating joints are designed for long moldings, where thermal deformations may be critical. The special geometry of the joint allows elements to shift relative to each other without forming visible gaps.
Master’s toolset: precision as the foundation of quality
The quality of the joint directly depends on the accuracy of processing, and accuracy — on the quality of the tool and the skill of its use.
Cutting tool: sharpness solves everything
Miter saw — the primary tool for molding joints. The blade must be perfectly sharpened, spindle runout minimal, guides precisely set. A quality saw ensures cutting deviation no more than ±0.1°.
The choice of blade is critically important. For softwoods (pine, spruce) blades with large teeth and large bevel angles are used. For hardwoods (Oak baseboard, oak) blades with small teeth and sharp bevels are required.
Miter gauge — a traditional tool for precise beveling of angles. A quality miter gauge must have precisely set guides and secure workpiece clamping. Professional miter gauges allow setting any angle with precision down to one minute.
Hand saws are still used by master craftsmen for particularly critical work. A properly sharpened and adjusted hand saw, in skilled hands, provides cutting quality no worse than mechanical tools.
Measuring tools: control at every stage
Protractor — an essential tool for angle control. Digital protractors provide accuracy down to 0.1°, which is sufficient for most tasks.
Calipers are necessary for controlling profile dimensions, especially when working with complex molding profiles. Measurement accuracy should not be worse than 0.1 mm.
Templates and patterns are indispensable when working with complex profiles. Made from stable materials (metal, plastic), they allow controlling geometry at every stage of processing.
Auxiliary tools
Clamps and vices ensure secure fixation of elements during gluing. Pressure must be evenly distributed along the entire joint length.
Guides and stops guarantee repeatability of results when processing multiple identical elements.
Technological process: step-by-step algorithm for perfect jointing
Quality jointing is not a matter of chance, but the result of strict adherence to a refined technology.
Stage one: preparation and planning
Room analysis begins with careful measurement of all angles. Practice shows that "true" right angles practically do not exist in real rooms. Deviations of 1–2° are normal, 5° and more — a serious problem requiring a special approach.
Cutting layout allows minimizing the number of joints and placing them in the least noticeable areas. Joints must not fall on corners — this is the main rule of planning.
Material preparation includes acclimating the profiles indoors for 48-72 hours. During this time, the wood will reach equilibrium moisture, preventing deformation after installation.
Stage two: marking and processing
Accurate marking is the foundation of a quality joint. Use only verified measuring tools and double-check every dimension. The rule 'measure seven times, cut once' is more relevant than ever.
End processing must ensure perfect flatness and perpendicularity. Even minor deviations will result in gaps at the joint.
Trial fitting allows identifying and eliminating defects before final installation. Elements must align perfectly across all profile planes without forcing.
Stage three: connecting elements
Adhesive selection depends on operating conditions and strength requirements of the joint. For interior work, PVA adhesives are suitable; for humid areas, polyurethane compounds are recommended.
Adhesive application must ensure even coverage of the entire joint surface with a thin layer. Excess adhesive creates unsightly drips; insufficient adhesive results in a weak joint.
Clamping and holding under pressure must continue for at least the time specified by the adhesive manufacturer. Premature removal of pressure may weaken the joint.
Joint problems and methods of resolution
Even experienced craftsmen encounter problems when joining wooden profiles. The key is to understand the causes of defects and methods to eliminate them.
Gaps at joints: causes and elimination
Inaccuracy in processing is the most common cause of gaps. Even a 0.5° deviation creates a noticeable gap on a 50 mm high profile. Solution: more precise equipment setup, use of quality tools.
Wood deformation due to moisture changes may create gaps even in initially quality joints. Solution: proper material drying, use of stable wood, compensatory gaps.
Incorrect room geometry creates problems when joining at angles. If the angle is not 90°, standard 45° beveling won't work. Solution: individual calculation of cutting angles for each specific case.
Profile mismatch
Material thickness variation may cause steps at the joint even with correct corner beveling. Modern standards allow deviations up to ±0.5 mm, which may be critical for complex profiles.
Deformations during transportation and storage alter the geometry of profiles, making precise joining impossible. Solution: proper material storage, geometry control before processing.
Gluing problems
Poor surface preparation reduces adhesive joint strength. Dust, oily contaminants, and residues of old coatings prevent adhesive adhesion.
Incorrect adhesive selection for specific operating conditions may lead to joint failure. PVA adhesives are unsuitable for humid areas, while polyurethane adhesives are excessive for dry interiors.
Characteristics of joining different wood species
Each wood species has its own characteristics that must be considered during joining.
Coniferous species: resinous and soft
Spruce and pine are easy to process but prone to chipping with improper tool settings. Resin can cause problems during gluing — resin prevents adhesive penetration into the wood.
Solution: degrease surfaces with solvent before gluing, use sharp tools with properly selected cutting parameters.
Larch is significantly denser and harder than other coniferous species. Processing requires sharp tools and slow feed rate. High resin content necessitates thorough surface preparation before gluing.
Broadleaf species: hardness and sensitivity
Oak requires special handling due to high hardness and tendency to crack. Processing must be done with sharp tools at high RPM with minimal feed rate.
Beech baseboard has a uniform structure, which facilitates processing, but high density requires powerful equipment and quality tools.
Ash has a distinctly visible grain, which can cause problems when joining — differences in density between early and late wood lead to uneven cuts.
Joining complex profiles: the highest level of skill
Working with complex molding profiles requires special craftsmanship and specific techniques.
Multi-level profiles
Complex wooden molding Profiles with multiple elements require staged joining. Each level of the profile is processed separately, then all elements are aligned into a single whole.
Templates are mandatory — only in this way can the complex geometry be accurately repeated on all elements.
Curved profiles
Moldings with curved elements require special joining techniques. Standard methods do not work here — complex three-dimensional connections must be used.
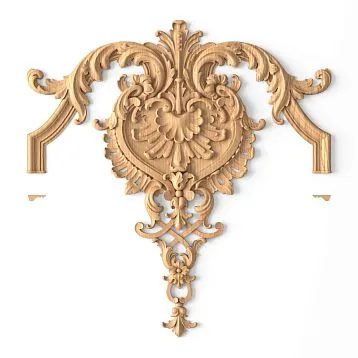
Carved elements
Joining carved moldings is no longer carpentry, but an art. Each joint must preserve the continuity of the ornament, requiring jewel-like precision.
Quality control: evaluation criteria
A quality joint must meet certain criteria that even a non-specialist can easily verify.
Visual inspection
Absence of gaps — the main quality criterion. A gap wider than 0.2 mm is visible to the naked eye and is considered defective.
Profile alignment must be absolute. Any steps or misalignments of elements are unacceptable.
Texture matching is important for moldings with pronounced wood grain. A sharp transition in texture reveals the joint and spoils the overall impression.
Mechanical inspection
Joint strength is checked by light tapping. A quality joint should not produce dull sounds or vibrate.
Absence of relative movement between elements is a mandatory requirement for any joint.
Long-term stability
A quality joint must retain its properties throughout its entire service life. Seasonal changes in humidity should not lead to the formation of gaps or destruction of the joint.
Innovative joining technologies
Modern technologies offer new solutions for traditional joining tasks.
Laser cutting
Laser systems provide ideal cutting accuracy and minimal kerf width. This is especially important when working with expensive materials, where every millimeter matters.
CNC milling
CNC machines allow creating the most complex joints with repeatable accuracy. Three-dimensional processing opens new possibilities for designers.
Special Connection Elements
Special inserts have been developed, allowing to create detachable and compensating joints of balusters without compromising the外观.
Joint Repair and Restoration
Even the highest-quality joints may require repair or renewal over time.
Minor Defects Repair
Small gaps can be filled with wood putty matched to the material's tone. After drying, the repair area is sanded and stained.
Scratches and damage are restored using restoration compounds or by inserting pieces of the same wood species.
Full Joint Reassembly
In cases of severe damage, full joint reassembly of the section may be required. This is a complex operation demanding high skill from the craftsman.
Economic Aspects of Quality Jointing
Proper jointing is not only an aesthetic issue, but also an economically sound decision.
Initial costs
Quality jointing requires significant time investment and use of expensive tools. However, these costs are offset by longevity and flawless appearance.
Operating expenses
Quality joints practically require no maintenance throughout the entire service life of balusters. Poorly made connections require periodic repair and replacement.
Impact on the cost of the object
The quality of components, including baluster joints, significantly affects the perception of overall finish quality and property value.
Training in Jointing Craftsmanship
The art of quality jointing is passed from master to apprentice, but modern training methods make this process more efficient.
Theoretical Preparation
Understanding wood properties, physics of connections, and characteristics of various profiles — the foundation of craftsmanship.
Practical Skills
Only extensive practice under the guidance of an experienced master allows developing the necessary skills and feel for the material.
Modern Control Methods
Using precise measuring tools, laser systems, and digital technologies improves training quality and results.
STAVROS: Where Jointing Excellence Becomes Standard
In the world of woodworking, there are companies that do not merely produce wooden items, but create quality benchmarks for the entire industry. STAVROS belongs to such companies — here, every joint is treated as a work of art, where compromises and half-measures are unacceptable.
What makes STAVROS's approach to wooden baluster jointing unique? Primarily — systematic and scientific methodology. The company has developed detailed technical procedures for each type of connection, taking into account the characteristics of various wood species, profile geometry, and operating conditions.
STAVROS's production facility is equipped with the most modern equipment for high-precision wood processing. CNC machines ensure cutting accuracy down to ±0.05 mm, guaranteeing perfect alignment of elements in joints. However, technology is merely a tool in the hands of true masters.
Every STAVROS specialist has undergone years of training in working with wood, studied the characteristics of various species, mastered traditional and modern connection methods. But most importantly — they understand that jointing is not merely a technical operation, but an art of creating perfection from individual elements.
STAVROS's quality control system includes multi-level inspection of each joint. Visual inspection, instrumental measurements, strength testing — every joint undergoes comprehensive evaluation before the product leaves production.
Special attention is given to staff training and development. Regular master classes, studying new technologies, exchanging experience with leading industry masters — all this ensures continuous growth in team professionalism.
STAVROS's research and development center continuously works on improving jointing technologies. New adhesive formulations are studied, innovative connection types are developed, and specialized tools and fixtures are created.
Choosing STAVROS products, you get not just high-quality wooden balusters — you get a guarantee that every joint will be executed with jewel-like precision, every connection will serve for decades, and every detail will delight the eye with flawless execution. This is an investment in beauty, quality, and prestige, which pays off over years of flawless service and admiring glances from guests.