Article Contents:
- Types of Niches for LED Lighting
- Ceiling Crown Molding with Lighting Niches
- Baseboards with LED Lighting
- Molding with Integrated Lighting
- Combined Systems
- Special Profiles for Complex Tasks
- Choosing LED Strips and Power Supplies
- Types of LED Strips
- Calculating Required Power
- Choosing a Power Supply
- Dimmers and Controllers
- Connectors and Wires
- Heat Dissipation and Safety: Critical Aspects
- Temperature Regime of LED Strips
- Organizing Heat Dissipation in Phytopolymer Profiles
- Ventilation and Air Gaps
- Electrical Safety
- Fire safety
- Moisture Protection in Humid Areas
- Lighting and Angles: Creating the Right Lighting Effect
- Distance from Strip to Illuminated Surface
- Light Direction Angle
- Uniformity of Illumination and Bright Spots
- Color Rendering and CRI Index
- Brightness Control for Different Scenarios
- Wiring Concealment: Aesthetics and Functionality
- Wiring Within Profiles
- Wiring to Switches
- Power Supply Placement
- Connecting Strip Segments
- Marking and Documentation
- Painting Profiles with LED Lighting
- Painting Before or After Installing the Strip
- Choosing Paint and Application Technique
- Color of Internal Surfaces of the Niche
- Protecting Painted Surfaces
- Servicing Hidden Lighting Systems
- Regular Cleaning
- Checking Connections
- Replacing Faulty Components
- System Upgrades
- Resolving Typical Issues
- FAQ: Frequently Asked Questions about Hidden LED Lighting
- Benefits of Partnering with STAVROS and Hi Wood
- Conclusion

Lighting is no longer just a functional necessity—it is now a powerful tool for creating atmosphere and visually transforming space. Hidden LED lighting integrated into architectural elements allows achieving effects impossible with conventional fixtures: floating ceilings, glowing room outlines, soft diffused illumination that visually increases room height and volume.
Crown Molding from Phytopolymer for LEDFrom STAVROS partner - Hi Wood manufacturer - this is not just a decorative profile, but a technological system specifically designed for placing LED strips. The construction of such crown moldings takes into account all nuances: from the angle of light direction to heat dissipation, from ease of strip installation to wiring concealment.
In this article, we will thoroughly examine all aspects of working with hidden LED lighting: types of niches in various profiles, rules for choosing LED strips and power supplies, questions of heat dissipation and electrical safety, lighting calculations, and practical installation techniques. Residents of Moscow, the Moscow region, St. Petersburg, and Leningrad region can receive professional consultations from STAVROS specialists for designing a hidden lighting system for their interior.


Types of Niches for LED Lighting
Different decorative profiles have different niche constructions for placing LED strips. Understanding these structural features is critically important for selecting the right profile for a specific task.


Ceiling Crown Molding with Lighting Niches
Crown Molding from Phytopolymer for LEDHas a special shelf or groove at the top, onto which the LED strip is placed. There are several structural variants.
First type - crown molding with a horizontal shelf. The shelf is positioned parallel to the ceiling at a distance of 50-100 mm from it. The LED strip is placed on the shelf and directs light upward toward the ceiling. The light reflects off the ceiling surface and diffuses throughout the room, creating a floating ceiling effect. This construction is optimal for creating primary decorative lighting.
Second type - crown molding with a sloped shelf. The shelf is positioned at an angle of 30-45 degrees to the ceiling, allowing the light beam to be directed not strictly upward, but at an angle. This creates a wider illuminated zone on the ceiling and enhances the effect. The sloped shelf also better conceals the LED strip from view below.
Third type - crown molding with a lip-reflector. In addition to the shelf for the strip, the crown molding has a vertical lip that completely hides the strip from direct view and directs all light toward the ceiling. This is the most effective construction for creating uniform lighting without visible LED points.
Hi Wood produces crown moldings of all three types with widths ranging from 80 to 180 mm. The width of the crown molding determines the distance from the strip to the ceiling, which affects the uniformity of illumination. For standard white ceilings, an optimal width is 100-120 mm, and for dark ceilings, 120-150 mm.
Our factory also produces:


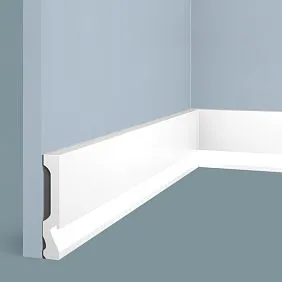
Baseboards with LED Lighting
Phytopolymer baseboard with lightingCreates an effect of glowing contour at the lower part of the room. Structurally, two main types are distinguished.
First - baseboard with a groove on the top edge. The LED strip is installed in the groove and directs light upward toward the wall. This creates soft illumination that highlights the lower part of the wall and visually separates it from the floor. This lighting is especially effective on walls with textured finishes - decorative plaster, brickwork.
Second type - baseboard with a front groove. The strip is installed on the front part of the baseboard, directing light downward onto the floor. This creates a floating wall effect - the floor is illuminated, and the junction between the wall and floor is hidden in shadow. This technique is especially effective when combined with a dark floor.
The height of baseboards with lighting is usually 100-140 mm - this allows placing the strip at a sufficient height to create a striking lighting effect. Lower baseboards produce too narrow a light band, while higher ones may appear bulky.
Get Consultation
Molding with Integrated Lighting
Phytopolymer molding with lightingUsed for creating lighting accents on walls. Structurally, these are profiles with grooves located either on the top edge (light directed upward) or on the bottom (light directed downward).
Moldings with lighting are used for horizontal zoning of walls - installed at 2/3 the height of the wall, such molding with upward-directed light illuminates the upper zone, creating a smooth transition to the ceiling. Molding with downward-directed light emphasizes the texture of the lower wall finish.
Moldings with lighting are also used to frame panels, mirrors, and televisions. A rectangular frame made of LED-lit moldings creates the effect of a glowing portal, highlighting the object from the surrounding space.
The width of moldings for lighting is usually 40-80 mm - sufficient for placing the strip, but not creating excessive bulk on the wall.
Combined systems
Professional solutions often involve combining several types of lighting. A ceiling cornice with upward lighting combined with a floor skirting that emits light downward creates a floating space effect — the ceiling and floor are visually separated from the walls by light contours.
Adding a horizontal molding with lighting at a level of 150-180 cm creates a three-level lighting system that structures the space and allows flexible control of lighting scenes.
Special profiles for complex tasks
Hi Wood produces special profiles for non-standard situations. Flexible cornices with grooves for LED allow creating lighting for curved elements — arches, columns, bay windows. Corner elements with integrated niches ensure continuous lighting lines at turns.
Profiles for multi-level ceilings are produced with multiple shelves for placing strips at different levels, creating complex lighting compositions with intensity transitions.
Choosing LED strips and power supplies
Correct selection of system components is the key to reliable operation and achieving the desired lighting effect.
Types of LED strips
LED strips differ by several key parameters. The first is the voltage. 12V strips — the most common variant, suitable for most household applications. They are safe and have a wide range of power supplies. 24V strips are used for long lengths (over 5 meters on one power supply), as they have lower voltage losses.
The second parameter — power per meter. Strips range from 4.8 W/m (low brightness) to 28.8 W/m and more (high brightness). For decorative lighting through a cornice, strips of 9.6–14.4 W/m are sufficient. More powerful strips will provide excessive brightness and require enhanced heat dissipation.
The third parameter — LED density. Strips come in densities of 60, 120, or 240 LEDs per meter. For hidden lighting, high density is critical — at least 120 LEDs/meter. This ensures even illumination without visible spots. Strips with 60 LEDs/meter create a dotted light line with dark gaps.
The fourth parameter — color temperature. Warm white light (2700–3000K) creates a cozy atmosphere, suitable for bedrooms and living rooms. Neutral white (4000K) is universal and suitable for any room. Cool white (5500–6500K) creates a modern, technological look. RGB strips allow color changes, but are not suitable for classic interiors.
The fifth parameter — IP protection rating. For dry rooms, IP20 (no protection) is sufficient. For kitchens and bathrooms, IP65 (splash protection) is required. Important note: silicone coating on high-IP strips reduces heat dissipation and makes the strip thicker, which may cause issues when installed in narrow grooves.
Calculating required power
To calculate, you need to know the total length of the strip and its power per meter. For example, for a room with a 20-meter perimeter and a 12 W/m strip, the total power is 20 × 12 = 240 W. Add a 20–30% reserve to ensure the power supply operates reliably without overload. The required power supply must be at least 290–310 W.
Important: do not use a power supply at the exact calculated power. Operating at the limit shortens the lifespan and creates a risk of overheating. A 20–30% reserve is mandatory.
Choosing a power supply
LED strip power supplies come in two main types. Sealed (IP67) — in a metal housing, protected from moisture, but larger in size and require good ventilation for cooling. Used in humid rooms or when installed in areas with limited ventilation.
Non-sealed (IP20) — open boards in a perforated housing. More compact, better cooled, but require placement in a dry, protected location. Optimal for hidden installation in niches, behind furniture, or in technical zones.
Placement of the power supply — an important issue. It must be accessible for maintenance but hidden from view. Typical locations: behind a cabinet, in a niche under the ceiling (for cornices), in a technical box. Do not place the power supply in fully enclosed spaces without ventilation — it will overheat.
Dimmers and controllers
Dimmers are used to adjust brightness. Simple ones — rotary or button-type — are installed in the circuit break between the power supply and the strip. More advanced ones — with remote control — allow adjusting brightness without getting up from the sofa.
RGB strips require controllers to manage color. They allow selecting shades, creating dynamic effects (smooth color transitions, blinking, etc.). Premium solutions — integration into a "smart home" system with smartphone control.
When choosing a dimmer or controller, ensure its power matches the strip’s power. A 96 W dimmer cannot handle a 240 W strip — a 300–350 W device is required.
Connectors and wires
Connectors — special clips — are used to join strip segments, ensuring reliable electrical contact without soldering. However, professionals recommend soldering — it is more reliable and provides lower resistance.
Wires connecting the strip to the power supply must have sufficient cross-section. For strips with total power up to 100 W, 0.75 mm² wires are sufficient. For 100–200 W, 1.5 mm² is needed. For power above 200 W — 2.5 mm². Using wires with insufficient cross-section causes voltage drop, overheating, and risk of fire.
Heat dissipation and safety: critical aspects
Although LED strips emit significantly less heat than traditional lamps, heat dissipation cannot be ignored. Overheating shortens LED lifespan and may cause system failure.
LED strip temperature regime
LED strips heat up to 40-60°C depending on power. Strips up to 10 W/m heat up slightly (40-45°C) and do not require special heat dissipation. Strips of 12-18 W/m heat up to 50-55°C - they require mounting on heat-conductive surfaces. Strips with power over 20 W/m heat up to 60°C and above - mandatory mounting on an aluminum profile for heat dissipation.
LED overheating leads to crystal degradation. Every 10°C above operating temperature halves the lifespan. LEDs rated for 50,000 hours at normal temperature will last only 25,000 or even 12,500 hours under constant overheating.
Heat dissipation organization in fitoplastic profiles
Fitoplastic has low thermal conductivity (0.2 W/m·K), meaning it poorly dissipates heat. For low- and medium-power strips (up to 12 W/m), this is not critical - heat dissipates naturally into the surrounding air via convection.
For more powerful strips, it is recommended to install an aluminum profile inside the niche of the fitoplastic cornice or baseboard. Aluminum has a thermal conductivity of 200 W/m·K - 1000 times higher than fitoplastic. It effectively dissipates heat from the strip, distributing it along the entire profile length and transferring it to the surrounding environment.
The aluminum profile is a U-shaped or angular profile into which the LED strip is inserted. The profile is then installed into the niche of the fitoplastic cornice. This construction ensures the longevity of the system and stability of the light output.
Ventilation and air gaps
Important point - ensure air circulation around the LED strip. Do not fully seal the niche with the strip - this will lead to heat accumulation. The niche must have an open side for natural convection.
When installing a cornice on a stretch ceiling, a gap of at least 5-10 mm must remain between the cornice and the ceiling fabric. This prevents the ceiling fabric from heating up due to the strip and ensures air circulation. Contact between a hot strip and the stretch ceiling may cause deformation and darkening of the fabric.
Electrical safety
LED strips operating at 12V and 24V are low-voltage equipment and are safe when properly installed. However, 220V voltage runs between the power supply and the socket, requiring adherence to electrical safety rules.
All 220V connections must be carefully insulated. The power supply must have grounding. Do not run 220V wires alongside low-voltage strip wires - they must run on separate routes.
Use only certified power supplies. Cheap Chinese counterfeits often have poor insulation and can be dangerous. Power supplies with CE, RoHS certifications are safe and reliable.
Fire safety
With proper installation, the risk of fire is minimal. However, it is important to follow several rules. Do not exceed the maximum power of the power supply - overload leads to overheating. Use wires of sufficient cross-section - thin wires heat up under load.
Do not place the strip near flammable materials - curtains, untreated wooden elements. Fitoplastic from Hi Wood does not support combustion, but it melts upon contact with open flame.
Ensure the possibility of quick system disconnection - switch or circuit breaker in the electrical panel. This will allow immediate power cutoff to the lighting in case of problems.
Moisture protection in humid rooms
In bathrooms and kitchens, use strips with at least IP65 protection (splash protection). The power supply should also have appropriate protection or be placed outside the humid zone.
All wire connections must be protected by heat-shrink tubing or waterproof connectors. Moisture entering the connection point causes contact oxidation and loss of conductivity.
Lighting and angles: creating the right lighting effect
Correct placement of the LED strip determines the character and uniformity of the lighting. Understanding lighting principles helps achieve the desired effect.
Distance from the strip to the illuminated surface
For ceiling cornices, the distance from the LED strip to the ceiling is critically important. At too small a distance (less than 50 mm), light does not have time to diffuse - bright spots opposite the LEDs and dark gaps are visible on the ceiling. At too great a distance (more than 150 mm), the light beam diffuses so much that the backlighting effect weakens.
Optimal distance for white ceilings - 70-100 mm. For dark ceilings, which reflect light poorly, a greater distance is required - 100-120 mm, so that the light has time to diffuse and create uniform illumination.
For baseboards with wall backlighting, the distance from the strip to the wall should be 30-50 mm. This creates a sufficiently wide band of light on the wall. At a smaller distance, a narrow light line is obtained; at a greater distance, the light spills onto the floor.
Light direction angle
The angle at which light hits the surface determines the nature of the illumination. An LED strip placed horizontally and directed strictly upward produces a narrow cone of light with maximum brightness at the center and rapid falloff at the edges.
A strip placed at an angle of 30-45 degrees to the ceiling provides a broader and more uniform illumination. Therefore, cornices with a sloped mounting shelf for the strip are preferable to those with a horizontal shelf.
For backlighting textured walls (brick, decorative plaster), use grazing lighting - the strip is placed so that light skims the surface at a sharp angle (10-20 degrees). This maximally emphasizes the relief, creating a dramatic interplay of light and shadow.
Uniformity of illumination and bright spots
Professional lighting is characterized by uniformity - there are no visible bright spots or stripes. This is achieved in several ways. The first is using high-density strips (120-240 LEDs/meter). The closer the LEDs are to each other, the more continuous the light line appears.
The second method is using diffusers. These are semi-transparent overlays on the aluminum profile with the strip, which blur the light from individual LEDs, creating a uniform light band. Diffusers reduce light output by 10-15%, but significantly improve light quality.
The third method is the correct distance from the strip to the illuminated surface. At sufficient distance, light from neighboring LEDs overlaps, blending into a continuous illumination.
Color rendering and CRI index
The color rendering index (CRI) shows how accurately LEDs reproduce the colors of illuminated objects. Cheap strips have a CRI of 70-75 - colors under their light appear dull and distorted. Quality strips have a CRI of 80-90 and higher - colors appear natural and vivid.
For decorative lighting, which is not the main light source, CRI is less critical. However, if the lighting is used for functional illumination (e.g., in the kitchen), CRI should be at least 80.
The lighting system should include brightness adjustment. Full brightness is rarely used - usually, 50-70% power is sufficient for decorative effects. Dimming capability allows adapting lighting to different situations: bright light for work, dim light for relaxation, minimal light for nighttime navigation.
Professional systems include several lighting zones with independent control. For example, ceiling lighting can operate separately from floor lighting, offering numerous lighting scenarios.
Professional systems include several lighting zones with independent control. For example, ceiling lighting can operate separately from floor lighting, offering numerous lighting scenarios.
Wiring concealment: aesthetics and functionality
Hidden lighting must be truly hidden - visible wires ruin the visual effect and reveal the technical aspect of the solution.
Wiring laid within profiles
Many Hi Wood polycarbonate profiles have internal channels for wiring.Wiring concealed in baseboardsStandard solution: low-voltage strip wires and power wires run inside the baseboard, exiting at required locations.
Wires are laid before installing the profile or, if the structure allows, threaded through the channel after installation. It is important to leave extra wire length at corners - this will facilitate installation and possible repairs.
Wiring to switches
Lighting switches are placed in convenient locations - usually near main lighting switches. Wires to them can run openly in a cable channel (if renovation is already done) or concealed in grooves (during new renovation).
Alternative - wireless switches operating via radio channel. They do not require wiring, can be installed anywhere convenient using double-sided tape or screws. The receiver is connected between the power supply and the strip.
Alternative - wireless switches operating via radio channel. They require no wiring, can be installed anywhere convenient using double-sided tape or screws. The receiver connects between the power supply and the strip.
Placement of power supplies
The power supply is the largest component of the system and must be placed somewhere. Typical solutions: behind a tall cabinet (if it is placed against a wall with lighting), in a ceiling niche (for cove lighting), in a technical box or behind a false panel.
It is important to ensure access to the power supply for maintenance - replacing faulty devices, switching modes (if available). Installing the power supply in an inaccessible location will create problems in the future.
220V wires to the power supply must run in conduit or cable channel - this is an electrical safety requirement. They must not cross or run parallel to low-voltage strip wires.
Connecting strip segments
LED strips are supplied on 5-meter reels. For illuminating rooms with large perimeters, multiple segments must be connected. Connection is done in parallel - each segment is connected to the power supply via separate wires. Series connection (one segment to another) is not allowed - voltage drop will occur, and distant segments will glow dimly.
Connection points are placed at room corners, where they are least noticeable. Wires from all segments converge to the power supply - forming a 'star' configuration. This is the optimal scheme, ensuring uniform brightness along the entire perimeter.
Marking and documentation
When installing the lighting system, take photos of all concealed wiring sections - where wires run, where connections are located. This will save significant time during possible future repairs or system upgrades.
Create a simple connection diagram indicating power ratings, component types, and their placement locations. Place the diagram and equipment checklists in the apartment’s document folder — they will be needed if the system requires maintenance.
Painting profiles with LED backlighting
Painting photopolymer profiles with integrated backlighting has its own characteristics, related to the need to protect electrical components.
Painting before or after installing the strip
Optimal sequence: first install the profiles, then paint, then install the LED strip. This allows thorough painting of the profiles without risking damage to the electronics and ensures strip cleanliness.
If the strip is installed before painting (which is sometimes necessary to check lighting effects), it must be carefully protected with painter’s tape and polyethylene film. Paint splashing onto the LEDs will reduce light output and may cause uneven illumination.
Paint selection and application technology
Water-based acrylic and latex paints are suitable for photopolymer profiles. They do not contain aggressive solvents that could damage the material, dry quickly, and have no strong odor.
Painting is done in two to three layers. The first layer is primer, which equalizes absorption. The second layer is base paint, creating the main color. The third layer (optional) is the finish coat, ensuring tone uniformity and additional protection.
For profiles with LED niches, it is important to thoroughly paint the inner surfaces of the niches — they will be visible under reflected strip light. Unpainted areas may produce dark stripes on the illuminated surface.
Color of the inner surfaces of the niche
The color of the inner surface of the niche where the strip is placed affects the backlighting efficiency. A white surface maximally reflects light, increasing light output by 10–15%. A dark surface absorbs light, reducing efficiency.
For maximum backlighting efficiency, the inner surfaces of the niches are painted white or light tones. However, if a softer, more subdued light is desired, gray or beige tones can be used inside the niche.
Protection of painted surfaces
After the paint has fully dried (usually 24–48 hours), the profiles are ready for installing the LED strip. It is important to work carefully, avoiding scratches on the freshly painted surface with tools.
If regular cleaning of the profiles is expected (e.g., in the kitchen), the painted surface can be additionally protected with a matte acrylic lacquer. It will create a more durable coating resistant to abrasion and washing.
Maintenance of hidden backlighting system
Proper maintenance ensures the system’s longevity and stable lighting characteristics.
Regular cleaning
Dust settling on the LED strip and inner surfaces of the niche reduces light output and impairs heat dissipation. It is recommended to clean every 3–6 months using a dry soft brush or compressed air.
To clean the strip, use a compressed air canister (available in computer stores). Directed airflow blows dust out of hard-to-reach areas. Do not use wet cleaning — moisture on the strip without IP65 protection may cause failure.
Checking connections
Check the reliability of electrical connections once a year. Soldered joints or connectors may oxidize, leading to reduced conductivity and flickering light.
Signs of contact problems: sections of the strip glow dimmer than others, flickering, or complete absence of illumination on certain sections. If problems are detected, re-clean and reconnect the wires.
Replacing failed components
The average lifespan of quality LED strips is 30,000–50,000 hours. With daily use of 3–4 hours, this equals 20–30 years. However, power supplies, dimmers, and connectors may fail earlier.
Replacing components is usually not complicated. The power supply is disconnected and replaced with one of similar power and voltage. A failed strip section is cut out and replaced with a new segment.
When replacing the strip, it is important to choose a model with the same characteristics — power, density, color temperature. Otherwise, the new section will glow brighter or have a different hue.
System modernization
Over time, there may be a desire to enhance lighting, change color, or add control. The modular structure of LED systems allows for modernization without full replacement.
To increase brightness, replace the strip with a more powerful one (if the power supply and heat dissipation allow). To change color — install an RGB strip instead of a single-color one. To improve control — add a dimmer or smart home controller.
Flickering light - usually caused by a low-quality power supply or dimmer. Solution: replace with high-quality components. Uneven brightness along the length - voltage drop in wires. Solution: use thicker wires and connect segments in parallel.
Overheating of the strip - insufficient heat dissipation. Solution: install an aluminum profile and reduce the strip's power. Rapid LED burnout - poor-quality strip or overheating. Solution: replace with a quality strip and improve heat dissipation.
Strip overheating - insufficient heat dissipation. Solution: install an aluminum profile, reduce strip power. Rapid LED burnout - poor-quality strip or overheating. Solution: replace with a quality strip, improve heat dissipation.
FAQ: Frequently Asked Questions about Hidden LED Lighting
What power LED strip is optimal for crown molding lighting?
For decorative ceiling lighting, a strip of 9.6-12 W/m with a density of 120 LEDs/m is sufficient. More powerful strips will provide excessive brightness and require enhanced heat dissipation. For functional supplementary lighting, strips up to 14.4-18 W/m can be used.
Is an aluminum profile needed inside a Hi Wood polymer crown molding?
For strips up to 10-12 W/m, an aluminum profile is not required - heat dissipation is ensured by natural convection. For more powerful strips (14.4 W/m and above), an aluminum profile is recommended for effective heat dissipation and extended lifespan.
Can one 15-meter LED strip be powered by a single power supply?
No, this is incorrect. The maximum recommended length for a single 12V strip is 5 meters, and for 24V - 10 meters. At longer lengths, voltage drop occurs, and the far end of the strip will glow dimmer. Use parallel connection of multiple segments.
What distance should be between the LED strip and the ceiling?
Minimum 50-70 mm for strips with power 9.6-12 W/m. This ensures sufficient clearance for heat dissipation and prevents heating of the ceiling fabric. Optimal 80-100 mm - at this distance, light is evenly distributed across the ceiling.
How to choose the color temperature of the strip?
For bedrooms and living rooms, warm white light 2700-3000K is optimal - it creates a cozy atmosphere. For kitchens and bathrooms, neutral white 4000K is suitable. Cool white 5500-6500K is used less frequently, mainly in modern, tech-oriented interiors. Avoid mixing different color temperatures in one room.
How long does LED lighting last?
Quality LED strips last 30,000-50,000 hours. With daily use of 3-4 hours, this equals 20-30 years. Power supplies typically last 5-10 years. Dimmers and controllers - 7-12 years. Hi Wood polymer profiles are practically permanent with proper use.
Can any LED strip be dimmed?
Most modern strips support dimming, but a special LED dimmer is required. Standard incandescent dimmers are not suitable - they cause flickering. Ensure the dimmer's power matches the strip's power with a 20-30% safety margin.
What to do if the strip flickers?
Flickering is usually caused by a low-quality power supply or incompatible dimmer. Replace the power supply with a high-quality unit with low ripple. Use a dimmer specifically designed for LED. Check the reliability of all electrical connections.
Is it safe to leave LED lighting on overnight?
Yes, 12V/24V LED strips are safe for continuous operation when properly installed. They do not heat up to dangerous temperatures and consume minimal energy. However, for energy savings and extended lifespan, it is recommended to turn off the lighting when not needed.
How to calculate the required power supply?
Multiply the strip's length (in meters) by its power (W/m). Add a 20-30% safety margin. For example: 20 m strip × 12 W/m = 240 W. With 30% margin: 240 × 1.3 = 312 W. Need a power supply of at least 300-350 W.
Advantages of cooperation with STAVROS and Hi Wood
STAVROS, as an official Hi Wood partner in Moscow, the Moscow region, St. Petersburg, and Leningrad region, offers comprehensive solutions for hidden LED lighting systems.
Professional lighting system design. STAVROS specialists will help calculate the required strip power, select optimal profiles, and design the connection scheme taking into account the room's specific features.
Full range of profiles for lighting. Available are Hi Wood crown moldings, baseboards, and moldings with integrated LED niches of all sizes and styles. Profile construction is optimized for strip placement and proper lighting effect.
Recommendations for components. STAVROS will help select high-quality LED strips, power supplies, dimmers, and controllers compatible with chosen profiles. Only tested brands with quality guarantees.
Installation consultations. Detailed instructions, connection diagrams, advice on wiring and component placement. Specialists will answer any questions that arise during installation.
Calculation of required materials. Accurate calculation of profile length, strip meterage, and power supply unit capacity minimizes overpayment for excess materials and prevents material shortages.
Technical support after installation. Assistance with system setup, resolution of arising issues, recommendations for maintenance and modernization.
Conclusion
Hidden LED lighting in polymeric profiles — a modern solution combining aesthetics and functionality.Crown Molding from Phytopolymer for LED, Phytopolymer baseboard with lightingandPhytopolymer molding with lightingFrom the manufacturer Hi Wood, these are technologically advanced systems developed in accordance with all requirements for placing LED strips.
Correct selection of components, professional installation considering heat dissipation and electrical safety, neat concealment of wiring, and high-quality painting — all these elements determine the success of the project. With a professional approach, a hidden lighting system can serve for decades, creating unique lighting effects and transforming the perception of space.
Wiring concealed in baseboardsThoughtful connection scheme, use of quality components — the guarantee of reliable and safe system operation. The ability to flexibly control brightness and create various lighting scenes transforms the lighting into a full-fledged tool for managing room ambiance.
By choosing Hi Wood products through the official STAVROS partner, residents of Moscow, the Moscow region, Saint Petersburg, and Leningrad region receive not only high-quality profiles optimized for LED lighting, but also professional support at every stage — from design to commissioning. Create impressive lighting solutions with materials and support from trusted professionals.