Article Contents:
- Cornice as the 'crown' of the wall
- Cornice profiles and sensitive radii
- Junction with casings and rosettes
- Wood species and finishing
- Fastening and wall shrinkage
- Conclusion: the crown, completing the composition
- Frequently Asked Questions

A ceiling cornice in Russian tradition is not so much a practical element as a symbolic completion of space. Like how the crown of a log house closes the walls and holds the roof,wooden corniceit completes the vertical interior, creating a transition from living space to the heavenly vault of the ceiling. In old peasant houses and palaces, this boundary was especially significant — it separated the world of people from the world of spirits, marking the limit of inhabited, protected space.
A modern interior in Russian style requires the same attention to the upper line. A bare boundary between wall and ceiling appears unfinished, chopped off, lacking natural completion. A cornice gives the room architectural completeness. It gathers all vertical lines — casings, pilasters, panels — and brings them to a common denominator, creating a harmonious composition conclusion.
Choosing a cornice for a Russian-style interior is no less important a task than choosing baseboards or doors. The profile, size, wood species, and finishing method of the cornice determine the character of the entire space. A massive carved oak cornice creates the atmosphere of boyar chambers. A light pine cornice with a simple molding evokes northern peasant houses. A white-painted cornice with classical forms refers to 19th-century estate culture.
Why wood? Because in Russian architecture, wood was the primary building material for centuries. Even when stone buildings appeared, wooden traditions continued to influence the architectural language. Carved cornices of stone churches replicated forms of wooden prototypes. Estate houses were built of stone but finished with wood.Wooden ceiling cornice— this is a direct link to this tradition, a way to bring back into modern space the warmth and vitality that natural material provides.


Cornice as the 'crown' of the wall
The term 'crown' in Russian wooden architecture has a precise meaning — it is a single row of logs forming the log structure. The upper crown, completing the wall, was especially important: it had to withstand the weight of the roof, protect the walls from rain, and create an expressive silhouette of the building. In interior design, the cornice performs a similar role — it completes the wall, protects its upper part, and creates an architectural image.
Architectural logic of completion. In traditional Russian dwellings, everything was arranged according to the laws of constructive logic. Logs lay horizontally, forming walls. Rafters rested on the upper crown, forming the roof frame. Each element performed its function, and this function was visible and understandable. The cornice in this system was the connecting link between the wall and the roof.
In modern interiors, we do not deal with real structures — walls are usually plastered, ceilings are suspended or tensioned. But architectural logic remains important at the level of perception. The human eye seeks completion, boundaries, frames. A wall cut off at the ceiling level without any transition is perceived as unfinished. The cornice creates this transition, giving the wall a visual completion.
Symbolism of the upper boundary. In traditional culture, the upper part of the house had a sacred significance. It was a zone close to the sky, to divine forces. That is why upper elements — the roof ridge, eaves, cornices — were so richly decorated. They carried not only decorative but also protective functions, guarding the house from evil spirits.
In interior design, the upper boundary was also significant. In the red corner under the ceiling, icons hung — the holiest place in the house. Ceiling beams were decorated with carving or painting. The cornice, separating the wall from the ceiling, marked this important zone, highlighted it, made it noticeable. Today we do not attribute mystical meaning to this, but at the level of cultural subconscious, this symbolism continues to function.
Functions of protection. The practical function of the cornice is to protect the upper part of the wall. In old houses, walls were whitewashed or painted, and the upper part often got dirty — from stove soot, roof leaks, condensation. The cornice, protruding several centimeters, created a barrier that took on the main load of contamination.
In modern conditions, this function is less relevant, but it has not disappeared entirely. The cornice protects the junction between wall and ceiling, where cracks often form due to building shrinkage. It conceals possible ceiling irregularities, gaps, and installation marks. A wide cornice can serve as a niche for hidden lighting — an LED strip hidden behind the cornice creates soft, diffused light that visually lifts the ceiling.
Rhythm and scale. The cornice sets a horizontal rhythm that organizes the perception of space. If a room has many vertical elements — tall doors, narrow windows, vertical panels — the cornice calms this verticality, creating a counterbalance. The eye, moving upward along the wall, finds a point of rest and completion at the cornice.
The scale of the cornice should correspond to the scale of the room. In a room with 2.5-meter ceilings, a massive 20-cm-wide cornice would be inappropriate — it would feel heavy and visually lower the height. For such rooms, a cornice 8-12 cm wide is sufficient. In high halls with 3.5-4-meter ceilings, a small cornice would disappear. Here, wide, expressive profiles 15-25 cm wide are needed, which will be visible from a distance.
Cornice and lighting. An interesting trick — use the cornice as part of the lighting system. An LED strip is mounted behind the protruding part of the cornice, directing light upward onto the ceiling. The ceiling becomes illuminated, the space visually expands, and the feeling of a heavy ceiling disappears.
In Russian style, this can be especially dramatically emphasized. If the ceiling is painted with traditional ornaments or imitates a wooden ceiling with beams, the lighting highlights this texture, making it three-dimensional and alive. This creates an effect similar to how candlelight glided across painted vaults in old churches, creating a sense of shimmering, living surface.
Correspondence with the lower molding. The cornice works in tandem with the baseboard. Both are horizontal elements framing the wall from top and bottom. It is important that there is a visual connection between them. This does not mean they must be identical — on the contrary, the baseboard is usually heavier and darker than the cornice, creating the impression of a stable, heavy base and a light upper part.
But the connection must exist. If the baseboard is made of oak, the cornice should also be made of oak. If the baseboard is painted with white enamel, the cornice should be in the same color range. This unity creates a frame within which the entire wall composition unfolds. Between the baseboard and cornice, there can be casings, panels, wallpaper, or painting — anything, but the frame holds everything together, preventing it from falling apart into separate elements.


Crown profiles and sensitive radii
The cornice profile is not an arbitrary designer's whim, but the result of centuries of evolution, during which the most expressive and harmonious proportions were selected. The cornice profile determines how light will play on its surface, how its mass will be perceived, and how it will fit into the overall interior composition. In Russian style, profiles associated with the tradition of wooden architecture and classical architecture are especially important.
Simple rounded profile (gallet). This is the most elementary cornice form — a quarter circle that smoothly connects the wall and ceiling. The gallet creates a soft transition without sharp edges, visually smoothing the corner. In Russian tradition, such cornices were used in simple peasant houses, where functionality was important rather than decoration.
The gallet radius can vary — from 3-4 cm to 10-12 cm. A small radius creates a thin, almost imperceptible line that simply marks the boundary. A large radius creates an expressive volume, making the cornice a standalone element. For Russian style, medium and large radii — 6-10 cm — are characteristic, creating a sense of solidity and lived-in comfort.
The gallet is excellent for its versatility. It combines well with smooth painted walls, wallpaper, and wooden panels. It does not clash with other decorative elements, does not draw unnecessary attention, yet performs its function — finishing the wall and creating a smooth transition to the ceiling.
Stepped profile. A more complex form consisting of several horizontal protrusions at different heights. The stepped profile creates a play of light and shadow, adding architectural character and weight to the cornice. In Russian classical architecture, such profiles were used in buildings of high status — palaces, estates, churches.
Each step has its own significance. The lower step, adjacent to the wall, marks the beginning of the cornice. The middle step creates the main volume. The upper step, at the ceiling level, provides the finish. The width of the steps and the distance between them follow certain proportions — usually in the ratio 1:1.5:2 or according to the golden section.
The stepped profile is more demanding of its surroundings. It works well in rooms with high ceilings, classical furniture, and a thoughtfully designed vertical element system. In a small room with a low ceiling, it will appear bulky. However, in a spacious living room or dining room, it creates the very atmosphere of grandeur characteristic of Russian estate culture.
Profile with a concave and a shelf. The concave is the inward curve of the profile, opposite to the gallet. The shelf is a horizontal protrusion. The combination of concave and shelf creates a very expressive profile that plays with light richly. The concave gathers shadow, the shelf casts it downward — resulting in a clear graphic pattern.
Such profiles are characteristic of classical order architecture, which came to Russia in the 18th century and deeply rooted itself in Russian building traditions. Cornices with concaves adorned palaces in St. Petersburg, Moscow townhouses, provincial estates. Today, they return to interiors as a sign of high culture, taste, and understanding of architectural traditions.
The size of the concave and shelf should be proportional to the overall width of the cornice. Usually, the concave occupies 40-50% of the width, the shelf — 20-30%, the rest belongs to adjacent elements. Too deep a concave will create a heavy shadow, too shallow — it will disappear. Everything must be in balance.
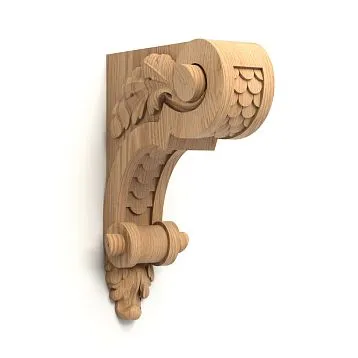
Figured profile with carving. The pinnacle of cornice art — profiles adorned with carved ornamentation. These can be geometric patterns — rows of beads, ovals, notches (denticles). Or plant motifs — grapevines, oak leaves, floral garlands. Or symbolic images — solar signs, stylized birds, figures of berdiny.
A carved cornice transforms the upper line of the interior into a true work of art. It attracts attention, becomes an accent, sets the tone for the entire space. But such a cornice requires appropriate surroundings. It works well in interiors where there areCarved wooden window casings, carved doors, decorated furniture. In a minimalist modern interior, a carved cornice will appear as an alien element.
Sensitive radii and perception. The term 'sensitive radius' denotes those sizes and proportions that the eye perceives as the most harmonious and natural. These are not rigid rules, but rather ranges within which the form 'works'.
For cornices in Russian-style interiors, sensitive radii are as follows: overall cornice width (projection from the wall) — from 8 to 25 cm depending on room height. Cornice height (vertical dimension) — from 6 to 20 cm. Radius of rounded edges — from 4 to 12 cm. Depth of concaves — from 3 to 8 cm.
These dimensions have been tested over centuries of use and correspond to the specifics of human perception. Smaller dimensions disappear, are not readable in space. Larger ones begin to dominate, suppressing other elements. The optimum lies in the middle, and the designer's task is to find it for a specific room.
Modern interpretations. Today, new profile variants appear that reinterpret tradition in a modern context. These can be simplified versions of classical forms, where minor details are removed but main proportions are preserved. Or hybrid profiles combining elements of different styles. Or completely minimalist cornices — simply a board 15-20 cm wide, installed horizontally at the junction of wall and ceiling.
Such modern interpretations work well in interiors where Russian style is not copied literally but reinterpreted and adapted to today's aesthetic requirements. The key is to preserve the principle: the cornice must finish the wall, create a transition to the ceiling, and organize space. The form can be any, as long as it fulfills this task.
Our factory also produces:


Junction with casings and rose motifs
The cornice is not an isolated element. It exists as part of a system with other decorative interior details: casings, doorways, pilasters, rose motifs, moldings. All these elements must be interconnected, forming a unified composition. Especially important are junctions where the cornice meets vertical elements — here, the issue of hierarchy, balance, and stylistic unity is resolved.
Meeting of cornice and casing. When a door or window casing rises to the level of the cornice, a junction is formed that must be properly finished. The simplest option — the cornice runs above the casing as a continuous horizontal line. The casing rests against the cornice from below, and the cornice runs above. This creates a clear hierarchy: the cornice's horizontal line is primary, unifying all verticals.
But this option works only if the casing is already or equal in width to the cornice's projection. If the casing is wider, a problem arises. One can interrupt the cornice at the casing location and decorate the break with decorative consoles or rose motifs. One can raise the casing above the cornice, turning it into a pilaster that runs from floor to ceiling. One can introduce an intermediate element — a capital (cap), which crowns the casing and serves as a transition to the cornice.
In Russian style, the last option was traditionally used. Window and door casings often had capitals — carved boards that rose above the opening. The cornice ran above these capitals, unifying them into a single line. This resulted in a rich, multi-layered composition where each element had its own place and significance.
Corner rose motifs. In room corners, where the cornice changes direction, decorative rose motifs — carved or molded elements in round or square shapes — can be installed. The rose motif masks the junction of two cornice sections cut at 45 degrees and transforms a potentially problematic spot into a decorative accent.
Rose motifs can be simple — a round or square plaque with a slight relief. Or complex — a multi-level composition with plant or geometric ornamentation. In Russian style, popular are rose motifs with solar signs (solar rose motifs), with floral images, with geometric stars.
The size of the rose motif should correspond to the width of the cornice. Usually, the diameter of the rose motif equals 1.5-2 times the cornice width. Too small a rose motif will disappear, too large will appear as a standalone object, not connected to the cornice. Everything must be proportional.
Consoles and brackets. If the cornice is massive, wide, and strongly protrudes from the wall, it needs visual (and sometimes real) support. This role is performed by consoles — vertical or inclined elements that seem to support the cornice from below. Consoles can be simple, in the form of rectangular beams, or figured, with carving and profiling.
In Russian architecture, consoles were often adorned with carving, becoming true sculptural elements. On the facades of wooden houses, consoles supported roof overhangs and were decorated with horse, bird, and anthropomorphic figures. In interiors, consoles were more restrained but still carried decorative load.
The distance between consoles depends on the cornice's width and actual weight. For light decorative cornices, consoles spaced 150-200 cm apart are sufficient. For heavy, massive cornices, the spacing reduces to 80-120 cm. Consoles can be evenly spaced around the entire perimeter or accentually — only in corners and above doorways.
Combination with moldings.Wall wood molding — horizontal arrangement that can run at the level of a chair back, window sill, or mid-wall. Molding divides walls into horizontal zones, creates rhythm, and structures space.Molding divides walls into horizontal zones, creates rhythm, and structures space.
Molding and cornice profiles can correspond. If the cornice has a rounded edge, moldings may also have rounded edges, but smaller. If the cornice is profiled or stepped, moldings repeat this logic in a simplified form. Such correspondence creates visual unity, the impression that everything is thought out and in place.
Molding and cornice profiles can correspond. If the cornice has a rounded edge, moldings may also have rounded edges, but smaller. If the cornice is profiled or stepped, moldings repeat this logic in a simplified form. Such correspondence creates visual unity, the impression that everything is thought out and in place.
Classic option for Russian style — white cornice, casings, and moldings against colored walls. White creates clear graphics, organizes space, and makes it lighter. Walls can be any color — beige, green, blue, terracotta — the white frame will hold the composition.
Alternative — natural wood. Cornice, casings, and moldings made from the same species, coated with oil that preserves the natural texture. This creates a warm, cozy atmosphere typical of traditional Russian homes. In this case, walls are better to be light — white, cream, light gray — so that wood is visible and does not blend into the background.
Alternative — natural wood. A crown, casings, moldings made from one species, coated with oil that preserves the natural texture. This creates a warm, cozy atmosphere typical of traditional Russian homes. In this case, walls are better to be light — white, cream, light gray — so that the wood stands out and does not blend into the background.
Get Consultation
Wood species and finishing
Spruce: accessibility and tradition. Spruce is the most common species in Russian wooden architecture. It was used to build peasant houses, churches, fortresses. Spruce is light, easy to work with, has a pleasant resinous aroma. Texture is expressive, with clear annual rings and contrast between early and late wood.
Oil is applied in 2-3 layers with a brush or cloth. Each layer must be well absorbed and dried before applying the next. After the final layer, the surface can be polished with a soft cloth — this will remove excess oil and give a uniform sheen.
For cornices, spruce is an excellent choice, especially if the budget is limited. It is easily milled, complex profiles can be created. It holds its shape well, does not warp with proper drying. The only drawback — softness. Spruce is easily scratched and dented by impacts. But for a cornice located under the ceiling, outside the zone of mechanical impacts, this is not critical.
Color of spruce — from light yellow to golden-brown. Over time, under the influence of light, spruce darkens, acquiring a noble amber hue. This must be considered when choosing finish: light stain or clear oil will preserve the natural color, dark stain will turn spruce into something resembling oak.
Oak: strength and status. Oak — a symbolic tree, embodiment of strength, longevity, nobility. In Russian tradition, oak was especially valued, used for important structures, furniture for wealthy homes, decorative elements of high class. Oak cornice — choice for interiors where economy is not important, but quality and status matter.
Oak is dense, heavy, very hard. Processing requires powerful equipment and sharp tools. But the result is impressive: an oak cornice will serve for decades, retaining its shape and appearance. Oak texture is expressive, especially in radial sawing, where characteristic "mirrors" — shiny strips of heartwood rays — are visible.
Color of oak depends on the method of processing. Natural oak — light brown with grayish tint. Stained oak (water-treated) — dark gray, almost black. Tinted oak can be any shade — from golden-brown to chocolate. In Russian style, natural and dark tones are good, emphasizing solidity and reliability.
Ash: alternative to oak. Ash is similar to oak in properties: hard, durable, long-lasting. But it is lighter — almost white with a slight yellow or grayish tint. Ash texture is very beautiful, with an expressive pattern of annual rings resembling butterfly wings.
Ash is an excellent choice for interiors where oak's strength is needed, but a lighter, airier atmosphere is desired. Ash cornice combines well with light walls, creating a sense of freshness and purity. Under oil, ash acquires a light sheen, becoming even more expressive.
The only nuance: ash is more sensitive to humidity. In rooms with variable microclimate, it may slightly "move" — swell when humidity increases and shrink when it decreases. Therefore, high-quality drying of the material and stable operating conditions are important.
Birch: light classic. Birch — another traditional Russian species. Light, almost white, with a slight pink or yellowish tint. Texture is fine, uniform, without pronounced pattern. Birch is medium-hard, easy to process, holds its shape well.
Birch cornice suits interiors in Scandinavian or Northern Russian style, where lightness, simplicity, and naturalness are valued. Birch stains well, so it is often used under enamel — white, cream, pastel shades. Stained birch cornice is indistinguishable from oak or ash, but costs less.
Birch is prone to warping and cracking. High-quality drying and stable conditions are required. But with proper processing, birch cornice lasts long and looks noble.
Oil and wax finishing. To preserve the natural appearance of wood, oils and waxes are used. Oil penetrates the wood structure, highlights texture, and gives a light sheen. Wax creates a protective film on the surface, providing a more pronounced sheen and silkiness.
Oil is applied in 2-3 layers with a brush or cloth. Each layer must be well absorbed and dried before applying the next. After the final layer, the surface can be polished with a soft cloth — this removes excess oil and gives an even sheen.
Result — a smooth, even surface without visible wood texture. This is ideal for classic interiors where clean lines, graphic design, and elegance are important. An oiled crown is easy to clean, resistant to moisture, and retains its fresh appearance for a long time.
Painting with enamel. White cornice — classic, suitable for almost any interior. White refreshes, expands space, creates a sense of cleanliness and festivity. For painting, water-based acrylic or alkyd enamels are used.
Result — smooth, even surface without visible wood texture. This is good for classic interiors, where clean lines, graphic quality, and grandeur are important. Painted cornice is easy to clean, does not fear moisture, and retains a fresh look for a long time.
Accounting for shrinkage in wooden houses. Wooden houses made of logs or beams undergo shrinkage — walls gradually settle as the wood dries and compacts. Shrinkage can range from 2-3 cm to 10-15 cm depending on the material’s moisture content, building height, and time elapsed since construction.
Patina and aging. To create an aged effect, patina is used — applying paint followed by partial rubbing off. Cornice is painted in a base color (usually dark), then a lighter paint is applied, which is rubbed so that it remains only in recesses of the profile and on certain areas.
Result — complex, multi-layered surface that looks as if the cornice was painted many times, with old paint layers showing through new ones. This creates a sense of history, lived-in quality, and connection to the past. Patinated cornice is suitable for interiors styled as old estates, merchant houses, or historical reconstructions.
Other aging techniques: brushing (removal of soft fibers), imitation of wormholes, artificial chips and scratches on corners. All of this should look natural, as a result of long-term use, not deliberate stylization.
Fixing and wall settlement
Installing the cornice is a critical stage requiring precision, understanding of materials and structures. Incorrect installation may result in the cornice detaching, deforming, or cracking. It is especially important to consider the specifics of wooden houses, where walls settle, and rooms with variable humidity.
Mounting methods for different substrates. If walls are concrete or brick, the cornice is mounted using anchors and self-tapping screws. Holes are drilled at 40-60 cm intervals, plastic anchors are inserted, and screws are driven through the cornice. It is important that the screw length is sufficient — it must penetrate the wall by at least 40-50 mm for secure mounting.
If walls are wooden (log, timber, frame, veneered), the cornice is mounted using self-tapping screws without anchors. Screw length 60-80 mm, diameter 4-5 mm. Screw heads are countersunk 2-3 mm below the cornice surface, and recesses are filled with matching wood putty.
If walls are covered with drywall, there is a problem. Drywall itself does not support the weight of the cornice. Either mount the cornice to the metal frame on which the drywall is supported (knowing where the profiles run), or install additional embedded supports — wooden beams placed under the drywall during installation.
Hidden mounting. For aesthetics, it is important that the mounting hardware is not visible. Screws can be driven at an angle from bottom to top, so they are concealed by the protruding part of the cornice. Special metal brackets — brackets — can be used, which are mounted to the wall, and the cornice is placed on top and secured with hidden latches or screws.
Another option — adhesive mounting. Modern mounting adhesives hold very securely, especially on flat surfaces. The cornice is coated with adhesive, pressed against the wall, and temporarily supported until the adhesive dries. This method is good for lightweight cornices and perfectly flat walls.
Accounting for shrinkage in wooden houses. Wooden houses made of timber or logs undergo shrinkage — walls gradually settle as the wood dries and compacts. Shrinkage can range from 2-3 cm to 10-15 cm depending on the material's moisture content, building height, and time elapsed since construction.
Shrinkage in wooden houses. Wooden houses made of logs or beams undergo shrinkage — walls gradually settle as the wood dries and compacts. Shrinkage can range from 2-3 cm to 10-15 cm depending on the material’s moisture content, building height, and time elapsed since construction.
If the cornice is rigidly mounted to walls in such a house, it may be bent, broken, or detached from the ceiling during shrinkage. Therefore, in wooden houses, special sliding mounts are used, which allow the cornice to move with the walls without deforming.
The simplest option — mount the cornice only to the walls, leaving a gap between the cornice and the ceiling. The gap is filled with an elastic material — expanded polyethylene, which compresses during shrinkage. Or the cornice is mounted to the ceiling via sliding brackets, allowing it to move vertically.
Corner joints. Internal and external corners — critical points. The standard method — beveling at 45 degrees from both sides. This is done using a miter saw with a rotating table. It is important that the wall angle is strictly 90 degrees; otherwise, the 45-degree bevel will not align.
If the wall angle is not right, measure the actual angle with a protractor and divide it in half. For example, for an 88-degree angle, the cornices are beveled at 44 degrees. After beveling, the joint can be reinforced with adhesive, small nails, or hidden dowels.
Alternative to beveling — corner elements. These are pre-made parts that are inserted into the corner, and the cornices fit to them from both sides with a straight end. Corner elements can be simple (repeating the cornice profile) or decorative (with molding, rosettes). This is easier to install and more reliable, but requires the availability of pre-made elements in the manufacturer's assortment.
Compensating for wall irregularities. Perfectly flat walls do not exist. There are always minor waves, deviations from vertical, local dips and protrusions. If the cornice is rigid, it will not fit tightly along its entire length, creating gaps.
To compensate for irregularities, elastic gaskets — thin strips of rubber, cork, or expanded polyethylene — are placed under the cornice where it does not fit against the wall. Or gaps are filled with sealant or acrylic putty, which is sanded and painted to match the cornice after drying.
If irregularities are significant, it is better to first level the wall — plaster or cover with drywall. Attempting to compensate for wall curvature using the cornice will result in the cornice itself forming waves and looking uneven.
Final finishing. After installing the cornice, go over all joints, corners, and mounting points. Fill in screw recesses with putty. Fill gaps in corners. Sand irregularities. Remove adhesive residue. Only after this can you apply the final finish — oil, wax, or paint.
If the cornice is installed before wall finishing, protect it from dirt — wrap it with plastic film or painter’s tape. If installed after finishing, work carefully to avoid scratching or soiling already finished walls. In any case, cornice installation requires attention and care — it is the final touch that either completes the interior or ruins it.
Conclusion: the crown, completing the composition
A cornice in Russian-style interiors is not just a board under the ceiling. It is an architectural element that unifies the entire space into a cohesive whole, completing it, giving it completeness and harmony. Like the crown of a log house that holds the entire structure together, the cornice holds the interior composition together, preventing it from falling apart into separate, disconnected elements.
A properly chosen cornice can transform a room. It raises the ceiling, expands the space, creates play of light and shadow, adds depth. It sets the tone, mood, character. A heavy carved cornice in dark oak speaks of solidity, tradition, connection to history. A light white cornice with a simple profile — of freshness, modernity, clean lines. A cornice with backlighting — of technology, skill in combining tradition and innovation.
Choosing a cornice requires understanding architectural principles, sense of proportion, knowledge of materials. You cannot simply buy a beautiful cornice and nail it to the wall. You must consider how it will fit into the overall system, how it will coordinate with door casings, baseboards, moldings, furniture. You must consider ceiling height, room size, wall finish style. You must correctly choose the wood species, finish method, mounting technique.
Working with cornices — is working with the upper boundary of space, with what crowns the interior and gives it completeness. It is responsibility and simultaneously opportunity. Responsibility — because an error will be visible to everyone entering the room. Opportunity — because a proper cornice can transform an ordinary room into a space with character, history, soul.
STAVROS has been producing solid wood products for more than twenty years, anddecor in Russian style— one of our key directions. We create cornices that not only decorate the interior but become an indispensable part of it, an element without which the space would be incomplete.
STAVROS offers a wide selection of profiles — from simple moldings to complex multi-level cornices with carving. We work with the best wood species — oak, ash, beech, pine — and offer various finishing options: natural oil, wax, toning, enamel painting, patination. Each cornice is made from carefully selected wood, dried in a kiln to 8-10% moisture, guaranteeing stable shape and absence of deformation.
We can manufacture a cornice according to an individual project — develop a unique profile, select the required size, create a carved ornament based on the client’s sketches. Our specialists will help calculate the required material amount, provide mounting recommendations, and suggest optimal mounting methods taking into account the specific features of the room.
STAVROS — this is not mass production of faceless items. This is a workshop where every detail is created with an understanding of its role in the interior, with respect for the material and tradition. We know that a cornice is not just a board, but a crown that completes the composition. And we make these crowns to last for decades, delighting the eye and soul, creating that very atmosphere that turns a house into a place you want to return to.
Frequently asked questions
What is the optimal cornice width for a room with a standard 2.7 m ceiling?
For rooms with ceilings 2.5-2.7 m high, the optimal cornice width (overhang from the wall) is 8-12 cm. A narrower cornice will disappear and fail to perform its architectural function. A wider cornice will visually lower the ceiling, creating a sense of heaviness. If you desire a more expressive cornice, choose a complex profile — stepped or with a curved top — rather than a wide one.
Which wood species is best for making a cornice in Russian style?
For Russian style, the most authentic traditional woods are oak, beech, and pine. Oak is the most prestigious and durable option, suitable for rich, representative interiors. Pine is an affordable material with a distinctive texture, ideal for simpler, more intimate spaces. Beech is the golden middle ground: as strong as oak but lighter in color, suitable for modern interpretations of Russian style.
Should the cornice match the skirting board in color and wood species?
Desirable but not mandatory. The ideal option is a cornice and skirting board made from the same wood species with identical finish. This creates a visual frame that holds the entire interior composition together. However, contrasting combinations are also possible: for example, a dark oak skirting board and a white painted cornice. The key is that this should be an intentional design choice, not a random mismatch.
How to install a cornice in a wooden house that settles?
In log or timber-frame houses, you cannot rigidly mount the cornice between the wall and ceiling — it may deform during settling. Use sliding fasteners: either mount the cornice only to the walls, leaving a gap with the ceiling (covered with an elastic material), or install it on special brackets allowing vertical movement. In houses older than 3-5 years, settling is minimal, and standard mounting is acceptable.
Can lighting be installed behind the cornice?
Yes, this is one of the most effective techniques in modern design. An LED strip is mounted behind the cornice, directing light upward onto the ceiling. The ceiling becomes illuminated, visually expanding the space. For this, you need a cornice with sufficient overhang (at least 10 cm) and a special mounting structure that leaves space for wiring and the strip.
How to join the cornice with door casings?
The simplest option is for the cornice to run continuously over the casings. The casing rests against the cornice from below. If the casing is wider than the cornice, use a decorative capital (capitel) that crowns the casing and creates a transition to the cornice. In classical interiors, corner brackets are used to cover the junction between the cornice and casing.
How much does a wooden cornice and its installation cost?
Cost depends on the wood species, profile complexity, and finish. A simple pine cornice with a gable shape costs from 400-600 rubles per linear meter. An oak ornate cornice with carving costs from 2000-3500 rubles. Installation typically accounts for 40-60% of the material cost. For a room with a 20-meter perimeter, total costs for a medium-complexity cornice, including labor, range from 25,000 to 45,000 rubles.
What is the most durable finish for a cornice?
The most durable finish is quality alkyd or acrylic enamel. It creates a strong protective film that shields the wood from moisture, dirt, and mechanical damage. Service life is 15-20 years without renewal. Oil is less durable, requiring renewal every 5-7 years, but it preserves the natural wood texture. For Russian-style interiors, oil is often chosen for authenticity, despite its shorter lifespan.
Can a cornice be installed by oneself, or is a specialist required?
A simple cornice with a straight profile on flat walls can be installed by oneself with basic skills and tools (level, drill, screwdriver, circular saw). Complex profiles, joining with carved casings, or installation in a settling wooden house require a professional. Mistakes in cornice installation are very noticeable and can ruin the entire interior.
How to care for a wooden cornice?
Clean the cornice regularly (every 1-2 months) with a dry or slightly damp soft cloth to remove dust. For cornices with oil finish, renew the oil every 5-7 years: clean the surface, lightly sand with fine-grit sandpaper, and apply a fresh layer of oil. Painted cornices require less maintenance — periodic damp cleaning and repainting in worn areas every 10-15 years.