Article Contents:
- Facade trims: weather and time resistance
- Why polyurethane is ideal for facades
- Construction of facade window framing
- Styles of facade trims
- Interior window framing: completing the interior
- Why interior trims are needed
- Materials and forms
- Installation options
- Combination with Other Interior Elements
- Polyurethane window sills: functionality and decor
- Advantages of polyurethane window sills
- Structural Variants
- Installation and Operation
- Keystones and decorative inserts: accents in framing
- What is a keystone
- Corner inserts and rosettes
- Friezes and ornamental strips
- Materials and installation of decorative elements
- Color solutions for facade decor: from tradition to experiments
- Classic White
- Contrasting solutions
- Toning to match wall color
- Material imitation
- Patination and Decorative Techniques
- Installation on various wall types: versatility of solutions
- Brick and block walls
- Plastered facades
- Wooden walls
- Insulated facades (wet facade, ventilated facade)
- Facades with siding or panels
- Protection and durability: how to extend the life of facade decor
- Priming Before Painting
- Choosing paint
- Joint sealing
- Regular inspection and maintenance
- Frequently asked questions about polyurethane window trims
- Can polyurethane trims be installed on wooden houses?
- Do facade trims differ from interior ones?
- How much do polyurethane window trims cost?
- Can trims be painted any color?
- Do old trims need to be removed before installing new ones?
- How to care for cornices?
- Do trims withstand mechanical loads?
- Can window casings be installed in winter?
- Conclusion: Windows that look with dignity

Windows are the eyes of a house. It is through them that a building looks at the world, lets in light, and demonstrates its character. And just as a beautiful frame emphasizes the expressiveness of eyes, proper window framing turns simple openings into architectural accents.Polyurethane window casings— are a modern solution that combines the traditions of classical architecture with the advantages of innovative materials. Light as foam, but strong as stone. Resistant to frost, rain, and sun, yet simple to install. Affordable in price, but looking expensive and noble.
What does framing windows with polyurethane molding provide? Visual completeness of the facade or interior. Protection of slopes from moisture and destruction. The ability to conceal defects in window block installation. The chance to turn a standard building into a unique object with a distinct architectural style. And all this without major construction work, in a few days, by two people with a minimal set of tools.


Facade casings: resistance to weather and time
The facade is the face of a building, which daily faces the aggression of the external environment. Rain, snow, frost, scorching sun, wind, temperature fluctuations — all of this tests the strength of materials. Andfacade casings made of polyurethanewithstand these trials with honor.


Why polyurethane is ideal for facades
Facade polyurethane is not the same material used for interior decor. It is a special composition of increased density (350-450 kg/m³ compared to 250-300 kg/m³ for interior molding) with the addition of UV stabilizers and frost resistance modifiers.
Waterproofness. Polyurethane does not absorb water. At all. Even with direct contact with rain, snow, condensation. The material remains stable, does not swell, deform, or crack when moisture inside freezes. Wood rots under such conditions in 3-5 years. Plaster becomes waterlogged and crumbles in 1-2 winters. Polyurethane lasts 30-50 years without deterioration.
Frost resistance. Polyurethane casings withstand freeze-thaw cycles without loss of properties. Tests show preservation of characteristics after 200+ cycles (from +20°C to -40°C and back). This means that in Russian climate conditions, the material will last for decades without cracks or deformations.
UV stability. Special additives protect polyurethane from ultraviolet light. The material does not yellow, fade, or become brittle under the influence of sunlight. A white casing remains just as white after 10 years; a painted one retains color saturation.
Bio-resistance. Mold, fungus, and moss do not grow on polyurethane. The material is inert to biological impact. Even in a humid climate, on the shaded side of a building, the casings remain clean. Wood under the same conditions turns green and black.
Lightness. A linear meter of facade casing with a width of 100 mm weighs only 400-600 grams. This is 8-10 times lighter than concrete or plaster decor. Lightness is critical for installation on insulated facades (foam, mineral wool), wooden walls, aerated concrete blocks — surfaces that cannot support heavy decor.
Our factory also produces:


Structure of facade window framing
Classical window framing consists of several elements, each performing its own function.
Side casings. Two vertical strips on the left and right sides of the window opening. They cover the joint between the window frame and the wall, mask the mounting foam, and protect the slope from moisture. The width of side casings is usually 80-150 mm, thickness 15-25 mm. The length is selected according to the window height plus overlap on the top and bottom elements.
Top casing (cornice). A horizontal strip above the window, often with a protruding canopy. The cornice serves two functions: decorative (crowning the composition, creating a finish) and protective (diverting rainwater from the window, preventing leakage into the joint between the frame and the wall). The depth of the cornice projection is 50-150 mm depending on the window size and climate. The more precipitation, the deeper the canopy should be.
Bottom casing (window sill cornice). A horizontal strip under the window. Visually creates the base of the composition, covers the bottom slope. Often combined with an external window sill or installed under it as an additional decorative element.
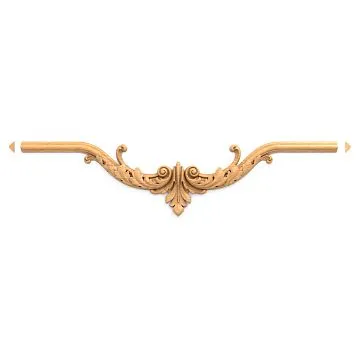
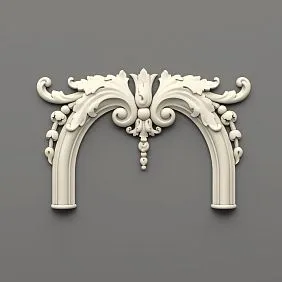
Corner elements (keystones). Decorative inserts in the corners of the framing, often in the form of protruding blocks with relief. A keystone in the center of the top casing is a classic element that draws the eye and emphasizes the axis of window symmetry.
Corbels and brackets. Additional elements under the cornice or under the window sill, imitating supporting structures. Purely decorative, but they add volume, complexity, and architectural expressiveness.
Get Consultation
Styles of facade casings
Window framing can be executed in different styles, from strict classicism to playful modern.
Classicism. Strict rectangular casings with clear profiles. Minimum decor, maximum proportions. Cornice with a small projection, supported on the sides by corbels. The keystone can be a simple rectangle or with a concise relief (meander, palmette). Color — white, light gray, beige, contrasting or toning with the walls.
Baroque. Lush casings with curved lines, rich ornamentation, many decorative elements. The cornice can have the shape of an arch, wave, ornate pediment with scrolls. The keystone is large, relief, sometimes in the form of a mask, lion's head, cartouche. Side casings are decorated with plant motifs, grapevines, acanthus leaves. Colors are bright or with gilded details.
Modern. Asymmetric framing with smooth, flowing lines. Stylized plant motifs (irises, lilies, climbing stems). The cornice can be curved, following an organic form. The keystone is often absent or replaced by a floral medallion. Colors are pastel, natural.
Russian style. Imitation of wood carving with characteristic motifs: rosettes, suns, diamonds, teeth, scrolls. Casings often widen towards the bottom (trapezoidal shape), which is characteristic of traditional wooden architecture. The cornice can have the shape of a kokoshnik. Colors — natural wood tones or bright (red, blue, green) for stylization as painted wooden mansions.
Minimalism. Simple smooth planks without ornamentation. Rectangular cross-section, clean lines, absence of protruding elements. The cornice is either minimal or absent. Color — solid, often matching the wall, creating a barely noticeable frame through the play of shadow at the border of the casing.
Interior window framing: interior completeness
Windows are framed not only from the outside but also from inside the rooms. Interior casings serve different functions and have different requirements than facade ones.
Why interior casings are needed
Aesthetics. Without casings, the window reveal looks unfinished. Especially if the window is installed in a wall with wallpaper or paint — the border between the frame and the wall is sharp, often uneven. The casing conceals this joint, creating a neat frame.
Masking defects. Window installation is rarely perfect. Uneven reveals, gaps, traces of mounting foam — all this is visible without casings. The casing covers defects, turning a problematic node into a decorative element.
Stylistic unity. Interior casings support the interior style. Classic profiled casings harmonize with stucco on ceilings and walls, withclassic furniture. Simple modern casings suit minimalist interiors.
Protection of the reveal. The casing protects the edge of the reveal from mechanical damage (impacts, chips when opening sashes, contact with furniture). Especially relevant for drywall reveals, which are easily damaged.
Materials and Forms
Interior casings are made from various materials: wood, MDF, plastic, polyurethane. Each has its advantages.
Casings made of wood and polyurethane— this is a harmony of naturalness and practicality. Wooden casings are eco-friendly, warm to the touch, paint and tint excellently, create a sense of natural authenticity. But wood is finicky in damp rooms, can warp, crack, requires regular maintenance.
Polyurethane interior casings are free from these drawbacks. They are not afraid of moisture (can be installed in bathrooms, kitchens), do not deform, do not require special care. At the same time, they reproduce any forms, from simple planks to complex carved profiles with floral ornaments.
The width of interior casings is usually 50-90 mm — less than that of facade ones, since the scale of the interior is smaller than the scale of the facade. Thickness 8-15 mm. The profile can be flat, rounded, shaped with coves and beads.
Installation options
Surface-mounted installation. The casing is installed over the reveal, overlapping its edge by 10-20 mm. The most common method, simple to implement. The casing is glued with liquid nails or nailed with thin headless nails.
Telescopic installation. The casing has a special groove that fits into a corresponding strip installed on the reveal. Connection without glue and nails, detachable. Advantage — if necessary, the casing is easily removed (e.g., for re-wallpapering). Disadvantage — requires precision in manufacturing reveals and casings.
Flush-mounted installation. The casing is installed flush with the wall, without protrusion. Requires creating a special niche (recess) in the reveal for the thickness of the casing. More complex to implement, but creates a perfectly smooth wall where the casing is perceived not as an overlay element, but as part of the wall architecture.
Combination with other interior elements
Interior window casings should harmonize with other interior elements. If the room hasmoldings on walls, casings are chosen from the same collection or with a similar profile.
Baseboards,Crown Molding, door casings — all this should form a unified system. The ideal option is to use elements from one manufacturer, one collection. Then the profiles match, joints are perfect, style is cohesive.
The color of casings is also important. The classic option — white casings combined with white baseboards, cornices, door frames. This creates clean graphics, contrast with colored walls. Alternative — casings in the color of the walls, creating monochrome, calmness, visual expansion of space.
Polyurethane windowsills: functionality and decor
A windowsill is not just a shelf under the window. It is a functional element on which flowers, books, decor are placed. It is a barrier for cold air from the window. It is the completion of the window framing from below.
Advantages of polyurethane windowsills
Traditional windowsills are made of wood, plastic, stone, composite materials.Polyurethane windowsills— a relatively new solution that is actively conquering the market thanks to unique properties.
Moisture resistance. Polyurethane is absolutely not afraid of water. Condensation on windows, spilled water from flower pots, wet cleaning — none of this affects the material. A wooden windowsill under such conditions darkens, swells, becomes moldy. A polyurethane one remains perfect for decades.
Thermal Insulation. Polyurethane is a polymer with low thermal conductivity. A polyurethane windowsill feels warm to the touch even in winter, unlike stone or plastic ones, which are icy. It is more comfortable to sit on, place a cup, or rest a hand on a warm windowsill.
Lightweight. A polyurethane windowsill weighs 3-5 times less than a stone one and 2 times less than a wooden one of similar dimensions. This simplifies installation, reduces the load on the wall, and is especially relevant for aerated concrete and drywall constructions.
Ease of Processing. Polyurethane is easy to cut and saw with ordinary tools (handsaw, jigsaw). The windowsill can be adjusted to fit a non-standard opening size directly on-site, without machines or special equipment.
Decorative Appeal. Polyurethane windowsills can have complex profiles: shaped edges, relief ornaments on the ends, carved console-supports. Such a windowsill is not just functional—it is a decorative element, an extension of the window's architecture.
Construction Variants
Smooth Windowsills. Simple rectangular boards with minimal edge processing. Suitable for modern interiors where decorative appeal is not needed, but function and clean lines are important. Thickness 20-40 mm, width determined by the depth of the reveal plus a projection into the room of 50-150 mm.
Profiled Windowsills. The edge of the windowsill has a shaped profile: rounding, teardrop overhang, multi-step cornice. This adds volume, makes the windowsill visually thinner and more elegant, although the actual thickness remains sufficient for strength.
Windowsills with Consoles. Decorative consoles—elements in the form of scrolls, acanthus leaves, carved brackets—are installed under the overhanging part of the windowsill. The consoles create the illusion that the massive windowsill rests on these elegant supports. A classic solution for interiors in Baroque, Empire, Renaissance styles.
Windowsills with Integrated Architraves. The lower element of the window trim and the windowsill are combined into a single structure. The windowsill transitions smoothly into the side architraves without visible joints. This solution creates solidity and architectural integrity.
Installation and operation
The installation of a polyurethane windowsill does not differ from that of a wooden or plastic one. The windowsill is placed on a prepared base (mortar, mounting foam, wooden blocks), leveled horizontally with a slight slope away from the window (2-3 mm per meter of length for condensation drainage), and secured.
The space under the windowsill is filled with mounting foam for thermal insulation and structural rigidity. After the foam cures, the edges are trimmed, and the joint between the windowsill and the wall is sealed with acrylic sealant.
Operation is simple. The windowsill is wiped with a damp cloth when dirty. It does not require special care, impregnation, or painting. A scratched or damaged area can be filled, sanded, and painted—polyurethane is repairable.
A polyurethane windowsill withstands significant loads. You can place heavy flower pots on it, lean on it, even sit on it (provided it is properly installed on a reliable base). The material does not sag or crack under load.
Keystones and Decorative Inserts: Accents in Framing
Window framing can be simple and laconic—four planks around the perimeter. Or it can be complex, multi-layered, filled with decorative elements. Keystones and inserts are the details that turn framing into a work of art.
What is a Keystone
A keystone (English: keystone) is the central element of an arched or straight lintel, which in stone architecture holds the structure together, closing the vault. In decorative architecture, the keystone became a purely ornamental element that crowns the upper architrave of a window or door, creating an accent that attracts the eye.
The shape of a keystone can be simple (a rectangular protruding block) or complex (a relief composition with plant motifs, mascaron masks of faces, coats of arms, cartouches with scrolls). The size depends on the scale of the window: for small windows, a stone 15-20 cm wide is sufficient; for large ones—30-50 cm or more.
The keystone is installed in the center of the upper architrave (sundrick) on the axis of symmetry of the window. It can be flush with the architrave or protrude forward by 20-50 mm, creating additional volume.
Corner Inserts and Rosettes
In addition to the central keystone, corner elements—decorative inserts at the junctions of vertical and horizontal architraves—are used in window framing.
Corner rosettes are square or round elements with a relief ornament (rosette, star, flower). They are installed at the four corners of the framing, creating rhythm, symmetry, and decorative richness.
Instead of rosettes, corner consoles can be used—elements in the form of scrolls, leaves, brackets that visually support the horizontal architraves. Consoles under the sundrick are especially effective—creating the illusion that the cornice above the window rests on these decorative supports.
Friezes and Ornamental Bands
A frieze—a horizontal band with a repeating ornament—can be placed between the upper architrave and the keystone. Classic motifs: meander (a geometric pattern in the form of a broken line), palmettes (stylized fan-shaped leaves), ovolos and darts (alternating oval and arrow-shaped elements), acanthus leaves, grapevines.
A frieze enriches the framing, making it multi-layered and complex. But it is important to observe moderation—an overly saturated ornament overloads the composition, makes it heavy, and visually reduces the window.
Materials and Installation of Decorative Elements
Keystones, rosettes, consoles, and friezes are made from the same material as the main architraves—polyurethane. This ensures unity of texture, color, and material behavior during temperature changes.
Installation of decorative elements is done with adhesive. A polyurethane keystone weighs 200-500 grams (depending on size), allowing it to be reliably glued without additional mechanical fasteners. Polymer adhesive is applied to the back of the element, the element is placed on the architrave in the desired location, pressed, and fixed with painter's tape until the adhesive sets.
Joints between decorative elements and architraves are filled with acrylic sealant, sanded, after which the entire composition is painted a uniform color. When done well, the joints are invisible, creating the impression of a monolithic carved structure.
Color Solutions for Facade Decor: From Tradition to Experimentation
The color of window framing defines the character of a facade no less than the shape of the elements. Choosing a color is a balance between tradition and individuality, between harmony and contrast.
Classic white
White is the eternal classic of facade decor. White window trims on colored walls create clear graphics, emphasize the geometry of the windows, and give the building elegance and freshness. The color white visually lightens the decor, making the facade airy and festive.
White is universal—it pairs with any wall color: brick-red, ochre, gray, blue, green, brown. It suits any style: from strict classicism to playful modern.
There are many shades of white: cold snow-white (for modern facades with gray tones), warm milky (for facades with beige-brown palette), ivory (for creating an effect of antiquity, noble patina).
Contrasting solutions
Contrast is a way to make window framing as noticeable as possible, turning windows into the main accent of the facade. Dark (black, graphite, dark gray) trims on light walls. Or vice versa—white on dark. Such contrast creates drama, graphic quality, modernity.
Contrast solutions are characteristic of Scandinavian architecture (white walls, black trims and roof), modern minimalism, industrial style. In classical facades, contrast is used less often but can be very effective, especially when combined with a contrasting roof.
Toning to match the wall color
The opposite of contrast is monochrome. Trims are painted the same color as the walls, or a very similar shade. In this case, the framing does not stand out by color but works only through relief, the play of light and shadow on the profiles.
Monochrome solutions create calmness, sophistication, elegance. They are suitable for minimalist facades, for buildings where excessive decorativeness is not needed. The windows are framed, but unobtrusively, delicately.
Material imitation
Polyurethane paints excellently to imitate other materials: wood, stone, metal.Facade window decor made of polyurethane, painted to look like oak, appears as a wooden carved trim. Painted to look like sandstone—as stone. Painted with metallic paint—as bronze or copper.
Imitation allows achieving the aesthetics of natural materials with the practicality and affordability of polyurethane. Wooden trims rot in humid climates within 5-7 years. Polyurethane trims, painted to look like wood, last 30-50 years, maintaining the appearance of fresh wood.
Patination and decorative techniques
To create an effect of antiquity, a noble patina of time, multi-layer painting techniques are used. The base layer is light (white, cream). The second layer is dark (brown, green, black), which is applied into the recesses of the relief, creating an illusion of accumulated dirt, darkening from time.
After drying, the protruding parts of the relief are lightly sanded, revealing the base light layer. The result is an effect of peeling paint, multiple repaints, centuries-old history. Such a trim looks not like a new piece but like an element of an ancient building.
Gilding and bronzing are techniques for luxurious facades. Individual elements (keystones, consoles, ornaments) are coated with gold or bronze paint, creating accents, richness, solemnity. Especially effective against dark walls.
Installation on various types of walls: versatility of solutions
Facades vary: brick, block, wooden, plastered, clad with siding or panels. And for each wall type, there are specific nuances for installing polyurethane decor.
Brick and block walls
Brick, aerated concrete and ceramic blocks are solid substrates that hold polyurethane decor excellently. Trims are attached with polymer adhesive (like CT-85, Ceresit, Tytan) or with mounting foam with additional mechanical fastening.
Surface preparation. The wall is cleaned of dust, dirt, efflorescence. If the brick is loose, porous—it is primed with a deep penetration primer. The primer strengthens the surface, improves adhesive bond.
Applying adhesive. Adhesive is applied to the back of the trim in a zigzag or dots at 10-15 cm intervals. Not a solid layer—this is excessive, adhesive will squeeze out when pressed.
Installation and fixation. The trim is placed against the wall according to markings, pressed firmly. The adhesive sets in 30-60 seconds, but full curing occurs after 24 hours. During this time, the trim is fixed to the wall with painter's tape or temporary supports.
Additional fastening. For long and heavy elements (upper trims with a cornice longer than 1.5 meters) additional mechanical fastening with dowels is recommended. A hole is drilled through the trim into the wall, a dowel is inserted, a screw is tightened. The screw head is countersunk, the hole is filled, becoming invisible after painting.
Plastered facades
Plaster is a good substrate for polyurethane decor if it is solid and not peeling. Checking strength is simple: tap the plaster. A dull sound—the plaster is holding. A ringing, hollow sound—the plaster has separated from the wall, holds poorly. Decor is not installed on such a substrate—it will fall off with the plaster.
If the plaster is solid, installation is similar to installation on brick. If questionable—it is better to use mechanical fastening with dowels, going through the plaster into the solid substrate (brick, blocks).
Wooden walls
Wood (timber, logs, frame structures with wooden cladding) is a specific substrate. Wood breathes, changes dimensions with humidity changes (swells in wet weather, shrinks in dry). This creates problems for rigidly glued decor.
Polyurethane is elastic enough to compensate for small substrate movements. But for reliability, combined fastening is recommended: adhesive plus screws. Screws are driven into the trim and the wooden wall at 40-60 cm intervals. The adhesive ensures tight fit, screws ensure reliable fixation during wood movement.
Screw heads are countersunk, filled, painted. It is important to use stainless or galvanized screws—ordinary ones rust, and rust bleeds through the paint.
Insulated facades (wet facade, ventilated facade)
Modern buildings often have insulated facades: polystyrene foam or mineral wool, covered with reinforcing mesh and a thin layer of plaster. Such a base is weak — it cannot support heavy decor.
Polyurethane decor is ideal for insulated facades due to its low weight. A linear meter of casing weighs 400-800 grams — even a weak base can withstand such a load.
Installation is done using special adhesive for polystyrene foam (e.g., Ceresit CT-83, CT-84). This adhesive is compatible with polystyrene foam and provides reliable adhesion. Additional mechanical fastening with dowels is mandatory — use plastic dowels for insulation with wide heads that pass through the insulation and are secured into the main wall.
Facades with siding or panels
If the facade is clad with siding (vinyl, metal) or facade panels, installing decor has its specifics. Siding is a ventilated system; there is a gap (battens, insulation) between the panels and the wall. Gluing decor directly onto the siding is pointless — it won't hold.
Solution: at the installation points of the decor, the siding is cut, the battens are reinforced, and a rigid base (plywood, OSB, board) is created, to which the polyurethane casing is attached. Alternatively, the casing is attached over the siding using long self-tapping screws that pass through the siding, battens, and are secured into the wall.
The second option is simpler but less reliable. The first one is more complex but ensures a quality result. The choice depends on the scale of the decor and the project budget.
Protection and durability: how to extend the life of facade decor
Polyurethane for facades— is a durable material, but proper preparation, installation, and finishing determine whether the decor will last 20 or 50 years.
Priming before painting
Polyurethane elements come pre-primed, but additional priming before painting increases durability. Primer creates an extra protective layer, improves paint adhesion, and reduces paint consumption.
Use acrylic primer for exterior work. Apply with a brush or roller in a thin layer. After drying (2-4 hours), you can paint.
Paint Selection
For facade decor, use only paints for exterior work: acrylic, silicone, silicate. They contain UV filters, biocides (against mold and fungus), and weather-resistant pigments.
Paint is applied in two coats. The first coat is the base, creating the main color. The second is the finish coat, leveling the coating and creating the final shade. Allow drying time between coats (usually 4-6 hours).
Matte paint better hides minor surface defects, reflects less sunlight, and looks more noble. Glossy paint is more resistant to dirt, easier to clean, but highlights any unevenness.
Joint sealing
All joints between decor elements, and between decor and wall, must be thoroughly sealed. Use acrylic sealant for exterior work with high elasticity and adhesion.
Sealant is applied from a gun into the gap, smoothed with a wet spatula or finger. Excess is immediately removed with a damp cloth. After drying, the sealant is painted along with the decor.
Quality sealing prevents water from seeping behind the decor, protects against freezing, and extends service life.
Regular inspection and maintenance
Once a year (in spring after the snow melts), inspect the facade decor. Check the condition of the paint, sealing of joints, and the reliability of element fastening. Repair minor damage (paint chips, cracks in sealant) immediately — this prevents the problem from worsening.
Wash dirty decor (dust, soot, bird droppings) with water from a hose or a low-pressure washer. Do not use aggressive chemicals, abrasives, or metal brushes — they will damage the paint.
By following these simple rules, polyurethane facade decor lasts 30-50 years without major repairs, preserving beauty and functionality.
Frequently asked questions about polyurethane window casings
Can polyurethane casings be installed on wooden houses?
Yes, you can and should. Polyurethane casings pair perfectly with wooden walls. They are lighter than wooden ones, not afraid of moisture, and do not require regular painting. They are attached with adhesive and self-tapping screws. Can be painted to match the wood color, creating the illusion of wood carving.
Do facade casings differ from interior ones?
Yes, facade casings have increased polyurethane density (350-450 kg/m³), contain UV stabilizers and frost-resistant additives. Interior casings (density 250-300 kg/m³) are not intended for outdoor use — they will deteriorate in 2-3 years.
How much do polyurethane window casings cost?
Price depends on width, profile complexity, and length. Simple facade casings 80-100 mm wide cost 250-450 rubles per linear meter. Complex ones with ornament — 600-1200 rubles. Keystones — 400-1500 rubles per piece. A set for a standard window (2 side pieces, top, bottom, keystone) will cost 3000-8000 rubles.
Can casings be painted any color?
Yes, polyurethane can be painted with acrylic paints in any color. You can create imitations of wood, stone, or metal. It can be patinated, gilded, and various decorative techniques can be applied.
Do I need to remove old trim before installing new ones?
If the old trim is firmly attached and not rotten, you can install polyurethane trim over them (if the wall projection allows). If the old trim is damaged or peeling, it's better to remove it, clean the surface, and then install the new ones.
How to care for trim?
Minimal care: wash with water once a year to remove dust and dirt. Inspect the condition of the paint and sealant. For damage, touch up locally and renew the sealant. No impregnation or special treatment is required.
Can the trim withstand mechanical loads?
Polyurethane is quite durable. It can withstand medium-force impacts (accidental bump with a ladder during work, falling branch). However, deliberate strong mechanical impact may leave a dent. If necessary, damage is easily repaired with putty and paint.
Can trim be installed in winter?
Installation is possible at temperatures not lower than -10°C. Use frost-resistant adhesive. At lower temperatures, the adhesive loses adhesion, making installation unreliable. It is optimal to install during warm seasons (+5...+25°C).
Conclusion: Windows that look with dignity
Windows without framing are just holes in the wall, technical openings devoid of soul. Windows with beautiful framing are the eyes of the house, looking at the world with dignity, character, and distinct individuality. And creating such framing today is easy, affordable, and quick thanks to polyurethane trim.
It doesn't matter if you're renovating an old house or building a new one. It doesn't matter if you're working on the facade or indoors. It doesn't matter if you choose strict classic or bold modern.Framing windows with polyurethaneopens limitless possibilities for creativity, for realizing the boldest architectural ideas.
The lightness of the material makes installation accessible even to non-professionals. Over a weekend, you can transform your home's facade by framing all windows with classic trim. Strength and durability ensure decades of service without repair. The variety of shapes, profiles, and decorative elements allows you to create a unique building appearance. Affordable pricing makes quality facade decor a reality for any budget.
Facade and interior in the same styleis about integrity, harmony, and thoughtfulness. When window trim outside and inside are executed in a unified manner, when they echo other decorative elements, the house gains character, becoming not just a structure, but a work of architecture.
Company STAVROS — your reliable partner in creating beautiful facades and interiors. We manufacture a full range of facade and interior polyurethane moldings of the highest quality. Material density of 350-450 kg/m³ for facade elements ensures strength and durability. Precision geometry, clear relief, quality primer — STAVROS standards that are non-negotiable.
The STAVROS range includes hundreds of trim profiles: from simple classic to complex Baroque with carving. Keystones, consoles, rosettes, friezes — everything for creating complete architectural window framing. Elements are produced in standard sizes and custom-made according to individual sketches.
We offer not just products, but a comprehensive solution. Consultations on element selection. Calculation of required material quantities. Recommendations for installation and finishing. Delivery throughout Russia. Quality guarantee on all products. Technical support at all project implementation stages.
With STAVROS, transforming a facade or interior turns from a complex construction project into an exciting creative process with a predictably beautiful result. We know everything about facade moldings — because we've been manufacturing them for many years, constantly improving technologies, expanding the range, and enhancing quality.
Start small — frame one window. See how the facade transforms. Feel how easy it is to work with polyurethane. And you'll want to continue, framing the remaining windows, adding cornices, pilasters, creating a cohesive architectural image. The image of a house that looks at the world beautifully, with dignity, and character. Your home with window framing from STAVROS.