Article Contents:
- What is a trim and why is it needed
- Types of profiles
- Wood species
- Quality of processing
- Profile size and shape
- Style Compatibility with Interior
- Surface Preparation
- Choosing fasteners and tools
- Installing trim: step-by-step guide
- Finishing with varnish, paint, or oil
- Creating contrasts and accents
- Regular inspection and cleaning
- Restoration of protective coating
- Why you should use trim:
- Looking Ahead
- Final Thoughts
Anyone who has dealt with finishing a wooden house or sauna knows how important the aesthetic and technical aspects are. Siding itself can transform the interior, bringing warmth and natural coziness. However, during installation, gaps and joints often appear, which can spoil the overall impression and disrupt the design integrity. And here comes the wooden trim for siding — a simple but incredibly important element that ensures a flawless appearance and additional protection for joints. In this article, we will thoroughly examine how to choose, install, and properly use trim to achieve maximum effect in siding finishing.


What is a trim and why is it needed
A trim is a narrow wooden strip designed to cover gaps and joints between siding boards or other finishing materials. The main purpose of a trim is to ensure airtightness, improve thermal and sound insulation, and give the surface a more neat and finished look.
In the context of working with siding, a trim serves as a 'finishing touch', which:
- Covers gaps and gaps. During siding installation, micro-gaps or unevenness may occur. A wooden trim for siding allows hiding these imperfections.
- Protects joints from moisture. In rooms with high humidity (saunas, bathrooms, steam rooms), sealing plays a decisive role in preserving wood.
- Emphasizes aesthetics. Well-finished joints give the interior a sense of completeness and cohesion.
Thus, a trim not only serves a practical function but also becomes an important decorative element. Without it, the overall appearance may seem unfinished, and under high design standards, this is completely unacceptable.
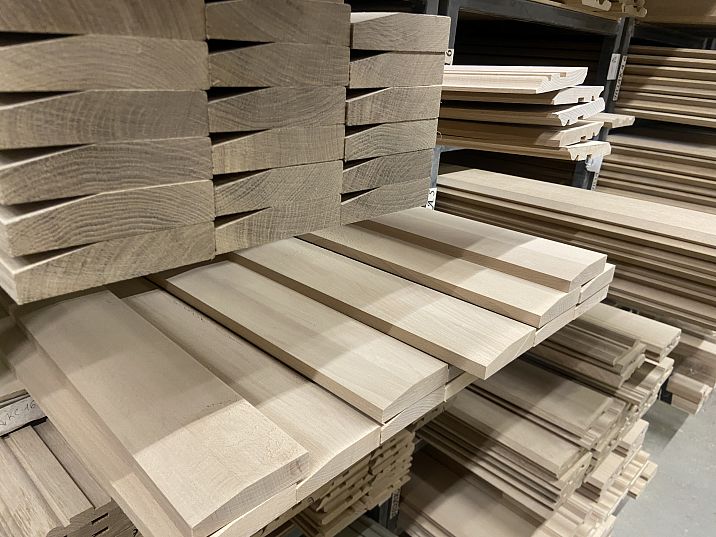
Variety of wooden trims for siding
To understand how to properly choose and use a wooden trim for siding, it is necessary to understand the existing variety of shapes, sizes, and wood species. At first glance, all trims may seem identical, but in reality, there are many nuances.


Types of profiles
- Flat profile. This is a classic option, represented by a simple flat strip. Suitable for most projects, especially when you only need to hide a gap without a pronounced decorative effect.
- Decorative profile. The edges of the strip have rounded corners, bevels, or other decorative elements. This option is chosen when you want to add a unique touch to the interior and highlight the beauty of the wood.
- Corner profile. Used for decorating internal and external corners, if you need to neatly hide the joint at the corners of the room, giving the space a finished look.
Our factory also produces:


Wood Species
Trims are made from different types of wood, each with its own characteristics:
- Spruce. The most common and affordable material. It is characterized by softness and a pleasant light color. However, it requires additional treatment with protective compounds, as spruce is prone to resin formation and is susceptible to moisture.
- Fir. Similar to spruce, but the texture may be slightly more uniform. Requires similar protection, but with proper care, it lasts long and reliably.
- Larch. Known for its strength and resistance to rot. An excellent option for humid areas such as saunas and steam rooms, where high humidity is a constant factor.
- Oak. A dense and durable wood that gives the interior a luxurious and solid look. It has a high cost, but this is offset by its longevity and elegant appearance.
- Cedar and other exotic species. Used less frequently, mainly in premium projects where the emphasis is on uniqueness and special aesthetics.
When choosing a type, it is important to consider the operating conditions (humidity, temperature fluctuations) and the style of the room, so that the trim integrates harmoniously into the overall interior.
Advantages of using trim when working with wooden siding
- Improved appearance. When installing wooden siding, gaps often remain, which can be noticeable. The trim neatly covers the joints, giving the surface a finished look.
- Additional protection for wood. Sealing gaps prevents moisture and dust from penetrating, which is especially relevant in rooms with high humidity.
- Enhanced thermal and acoustic insulation. Covered joints reduce heat loss and lower noise levels, which is especially important for living spaces.
- Ease of installation. Installing trim does not require complex equipment or professional skills: basic tools and care are sufficient.
- Decorative possibilities. Wooden trim can be painted, varnished, or oiled, creating various visual effects and emphasizing the wood grain.
Selection nuances: what to pay attention to
Get Consultation
Quality of processing
When purchasing trim, it is important to check the quality of its finish: the surface should be smooth, free of scratches, cracks, or chips. Poor finishing may lead to further issues during installation and reduce the product's lifespan.
Profile size and shape
The width of the trim is chosen based on the size of the gap that needs to be covered. If the gap is too large, a wider strip will be required. It is also important to consider the architectural features of the room: sometimes a too-wide trim may look bulky.
The profile shape plays a role in creating a certain style. A flat trim suits modern interiors, while a decorative one is suitable for classic or vintage solutions.
Matching the interior style
Wood is a universal material, but it is important that the color, texture, and shape of the trim match the rest of the finish. If the room features light-colored siding (e.g., pine), a dark oak trim can become a striking accent, whereas a light cedar will add lightness and airiness to the space.
Technology for installing wooden trim for siding
Surface preparation
Before installing the trim, ensure that the siding is properly mounted, all fasteners are securely fixed, and gaps between boards do not contain dirt or moisture. If the siding is located in a room with high humidity, it is advisable to treat the wood with antiseptics and impregnations to prevent rotting and mold growth.
Choosing fasteners and tools
For installing trim, the following are typically used:
● Small-headed nails or finish nails. They are virtually invisible after installation and do not damage the appearance.
● Wood screws. They can be driven in deeply into the trim, with the head covered by a decorative cap.
● Construction adhesive. Sometimes used for additional fixation, especially if there is a risk of material movement due to humidity and temperature changes.
Tools needed: hammer or pneumatic stapler, drill, handsaw or jigsaw for trimming the trim length, and a level for checking installation flatness.
Installing trim: step-by-step instructions
- Marking. Determine the locations for trim attachment and mark them with a pencil. It is important to consider the siding joint positions so that the trim fully covers them.
- Trim length adjustment. Measure the required length and cut off excess with a handsaw or jigsaw. Pay attention to measurement accuracy: even a small error may result in an uneven joint.
- Applying adhesive (optional). If you plan to strengthen the attachment, apply a thin layer of adhesive to the back of the trim.
- Fastening. Place the trim against the wall, ensure its correct position, then secure it with nails or screws. It is important to do this carefully to avoid damaging the decorative part of the trim.
- Final finishing. If necessary, sand the fastener areas, treat the surface with varnish, paint, or oil. If the fastener heads are visible, cover them with decorative caps or wood putty.
Decorative possibilities of trim
Varnishing, painting, or oiling
Wooden trim for siding can be left in its natural state if you wish to emphasize the natural wood texture. However, many prefer to use various finishes:
- Finish gives wood a shine and protects it from moisture and scratches. There are finishes with different gloss levels — from matte to glossy — allowing you to choose the optimal option for a specific interior.
- Paint is suitable if you want to achieve a specific color solution. Light or pastel shades are often used for Scandinavian style, while dark tones are used for contrasting accents.
- Oil gives wood a more natural appearance, highlighting the texture and grain pattern. Oil-based stains additionally protect the wood while preserving its "breathable" properties.
Creating contrasts and accents
Sometimes, a skirting board is used not only to cover gaps but also for decorative purposes. For example, if the siding has a light tone, a dark wood skirting board will become a striking accent, visually emphasizing joints. This technique allows you to add depth and expressiveness to the interior.
Maintenance and Use
Regular Inspection and Cleaning
To keep the wooden skirting board for siding visually appealing, it is recommended to regularly inspect its condition. Dust and dirt should be removed with a soft cloth or dry brush. For minor stains, a slightly damp cloth can be used, but excessive wetting of the wood should be avoided.
Restoring Protective Coating
Over time, any finish wears out. Lacquer may dull, paint may peel, and oil may absorb into the surface and stop protecting it. Therefore, it is advisable to renew the finish every few years (depending on usage intensity) to maintain the skirting board’s protective and aesthetic properties.
Common Mistakes and How to Avoid Them
- Incorrect size selection. If the skirting board is too narrow, it won’t fully cover the gap; if too wide, it may look bulky and awkward. Measure the gap width carefully before purchasing.
- Saving on quality. Cheap options made from raw or poorly dried wood will quickly lose shape and may crack. It is better to choose a higher quality, more durable material.
- Incorrect surface preparation. If joints are not cleaned of dust and moisture before installation, the skirting board may not adhere properly, and the wood may begin to deteriorate.
- Misalignment during installation. Careless installation leads to the skirting board "bending" and losing its function. Use a level and care during mounting.
- Lack of protective treatment. If the skirting board is not treated with lacquer, paint, or oil, its service life may be significantly reduced, especially in high-humidity areas.
Practical Tips and Recommendations
- Consider humidity and temperature fluctuations. In saunas and steam rooms, it is better to use wood species resistant to moisture (larch, cedar) and apply protective stains.
- Coordinate with other interior elements. The skirting board should harmonize with baseboards, door and window casings to create a cohesive interior design.
- Experiment with shades. If you want to add a unique touch, try using a contrasting skirting board or, conversely, paint it to match the siding to visually "blend" the joints.
- Purchase skirting boards with a small surplus. During installation, unexpected situations may arise: defects, cracks from cutting, or measurement errors. Spare boards will prevent the need to urgently buy additional material.
- Check quality certificates. If the skirting board is factory-made, ensure it has passed necessary inspections and meets safety standards.
Conclusion
A wooden skirting board for siding is not just a small plank — it is a crucial element capable of radically changing the appearance and functionality of wooden finishes. Its main task is to conceal gaps and gaps between siding boards, provide additional sealing, and improve the room’s aesthetics. At the same time, the skirting board offers wide opportunities for design experimentation: choosing wood species, profile shape, and finish type (lacquer, paint, oil) opens up creative possibilities.
When properly selected and installed, a skirting board can serve for many years, maintaining its original appearance and protecting joints from moisture and dirt. To achieve this, it is important not only to follow the installation technology but also to pay attention to maintenance: periodically renew protective coatings, monitor humidity levels, and conduct regular inspections.
If you aim to create an ideal interior in a wooden house, sauna, or cottage, be sure to include a skirting board in your finishing project. It will give your space a finished look, highlight the natural beauty of wood, and provide additional protection. In the end, you will get not just an attractive picture, but a cozy, warm, and reliable space where it is pleasant to be both alone and with guests.
Why use a skirting board:
● Reliable protection against moisture and dust. Moisture can penetrate into gaps, eventually leading to wood deformation or rot. A skirting board prevents these processes.
● Aesthetics and harmony. Neatly covered joints make the interior more cohesive, and additional finishing (lacquer, oil, paint) highlights the wood’s texture and color.
● Extending siding’s service life. By eliminating gaps, you prolong the life of the main finishing material, as the risk of moisture and dust penetration decreases, meaning the siding is less susceptible to damage.
● Enhancing insulation properties. Fewer gaps mean better thermal and acoustic insulation. This is especially important in living areas and relaxation spaces.
Looking to the Future
Modern technologies are not static, and perhaps in the future new materials and finishing methods will emerge that will be even more effective and convenient to install. However, natural wood combined with quality trim is a classic, time-tested, and trusted by professional builders and designers. Even if innovative polymer or composite alternatives appear on the market, wood will remain a priority for those who value eco-friendliness, natural beauty, and the unique atmosphere it creates.
Final Thoughts
When choosing trim, consider the combined factors: room characteristics, wood species of the siding, overall interior style, climate conditions, and personal design preferences. If you want to give the room lightness and airiness, opt for light-colored woods with varnish or oil. For a striking accent, choose contrasting tones or species with pronounced grain. But always remember that the key is material quality and proper installation.
Wooden trim for siding is that element often overlooked but capable of elevating the interior to a completely different level. It combines practicality and beauty, helps maintain cleanliness and order, and highlights the uniqueness of wooden finishes. Do not underestimate its importance: sometimes such 'small details' shape the overall impression and create a sense of harmony in the home.
Let your choice be thoughtful, and the result — lasting and pleasing to the eye. For wood is a living material that requires careful handling, yet it gives back warmth, comfort, and a unique energy. And if siding is the foundation of wooden interiors, then trim is its subtle yet invaluable assistant, completing the overall picture. Use it wisely, and your home will become a place you long to return to again and again.