


Article Contents:
- Preparation for Installation
- 1. Planning and design selection
- 2. Required materials and tools
- Materials
- Tools
- Step 1. Marking and surface preparation
- 1.1. Marking
- 1.2. Surface preparation
- Step 2. Pre-drilling holes
- 2.1. Importance of pre-drilling
- Step 3. Installing balusters
- 3.1. Securing with screws
- 3.2. Securing with brackets and mounting clips
- 3.3. Adhesive bonding
- Step 4. Installing additional elements
- 4.1. Installing newel posts
- 4.2. Installing handrails and balustrade tops
- Step 5. Final inspection and finishing
- Preparation and planning
- Features of installation for beginners
- Frequently Asked Questions
- Question 1: What mistakes do beginners often make when installing balusters?
- Question 2: Can balusters be installed independently without hiring professionals?
- Question 3: Which method of securing is the most reliable?
- Main Conclusions
- Call to Action
- Final Thoughts
Staircase is not just a means of moving between floors, but a central element of interior design, setting the style and atmosphere in the house. The quality of baluster installation affects both the safety and aesthetics of the entire structure. If you dream of installing balusters on a wooden staircase yourself, this detailed guide for beginners will be your roadmap. We will examine the step-by-step installation process, share tips and recommendations from professionals, and discuss the selection of proper fasteners and components. Regardless of whether you want tobuy balusters, Balusters for staircase orWooden balustersthis guide will help you complete the work with quality and minimal expenses.
In this article we:
● Discuss the main stages of installing balusters on a wooden staircase.
● Explain the required materials and tools.
● Share secrets of proper marking, surface preparation, and fastener selection.
● Provide recommendations for installation for various types of balusters.
● Consider typical mistakes and ways to prevent them.
If you are interested inBuy wooden balusters, or you needstaircase componentscontact reliable suppliers. Next, we will proceed with a step-by-step description of the installation.


Preparation for Installation


1. Planning and Design Selection
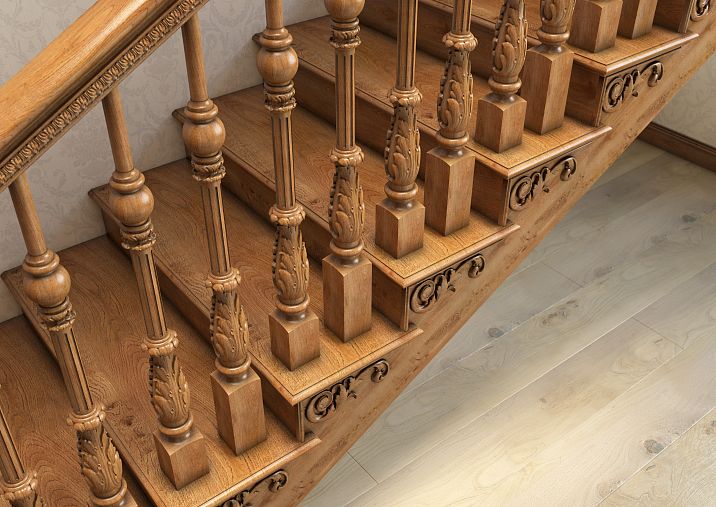
Before starting work, it is necessary to carefully plan the project. Determine the overall design of your staircase and select the type of balusters that best complements the interior of your home. Consider whether you prefer a classic option withwooden balusters for a wooden staircase, or prefer modernFlat balusters with a minimalist design.
Tip: Create a detailed sketch of the future staircase, mark dimensions, proportions, and placement of each element. This will help avoid mistakes during installation and ensure harmonious coordination of all details.
Our factory also produces:


2. Required Materials and Tools
Materials
● Wood: Use high-quality solid wood (oak, beech, ash) for manufacturingwooden balusters. When selecting wood, pay attention to the absence of knots and defects.
● Fasteners: Screws, anchors, metal brackets, construction glue. For secure connections, it is recommended to useHandrails and balusters, as well asPosts for staircase.
● Protective coatings: Lacquers, oils, and antiseptics for treating wood. If you plan tobuy wooden balusters, ensure they are treated with protective coatings.
Tools
● Circular saw or band saw for cutting wood.
● Sander and sandpaper for surface finishing.
● Drill and screwdriver for fastening work.
● Tape measure, level, and pencil for accurate marking.
● Clamps for holding elements during gluing.
● Personal protective equipment: safety glasses, gloves, helmet.
Tip: Check the condition of all tools before starting work. Use only quality equipment to avoid inaccuracies and ensure safety.
Get Consultation
Step-by-step baluster installation process
Step 1. Marking and Surface Preparation
1.1. Marking
Start with precise marking of baluster mounting locations. Use a tape measure and level to determine the ideal placement:
● Mark on each step where thebalusters for staircase to buy.
● Maintain standard spacing between balusters to ensure safety.
● Check the vertical alignment of the markings using a level.
Tip: Use a template or stencil to ensure all mounting holes are identical. This will help you achieve perfect symmetry.
1.2. Surface Preparation
Before installing balusters, the staircase surface must be flat and clean:
● If the staircase is wooden, remove old finish, sand the surface, and treat it with a preservative.
● Check for cracks or irregularities that may affect installation.
Tip: If necessary, apply primer or protective varnish to improve adhesion of fasteners.
Step 2. Pre-drilling Holes
2.1. Importance of Pre-drilling
Pre-drilling holes is a critically important step that prevents wood splitting and ensures accurate placement of fasteners:
● Drill holes at marked locations using a drill.
● Select a drill bit of appropriate diameter depending on the screws or anchors being used.
Tip: If you are installingWooden balustersensure pre-drilling to guarantee clean and even fastener connections.
Step 3. Installing Balusters
3.1. Fastening with Screws
The most common method of fastening is using screws. This method is suitable for most types of balusters, especially for wooden structures.
● Screwing in screws: Use a drill driver to secure balusters to prepared locations. Ensure that the fastening is even and without misalignment.
● Stability check: After installing each baluster, check its stability by gently rocking the item. If it wobbles, additional fastening is required.
Tip: To increase reliability, usebalusters to buy in Moscow made from quality materials and fasteners capable of withstanding significant loads.
3.2. Mounting using angle brackets and mounting clips
Metal angle brackets and clips help strengthen the connection, especially when installing on wooden staircases.
● Installing brackets: Secure metal brackets at the junctions of balusters and main structure. This provides additional support and prevents shifting.
● Using mounting brackets: Brackets can be used as an addition to screws, especially if you plan tobalusters from wood by hand.
Tip: If you choose the bracket method of attachment, make sure all fasteners are of high quality and resistant to corrosion.
3.3. Adhesive bonding
For some types of balusters, construction adhesive can be used as an additional means of attachment.
● Applying adhesive: Apply construction adhesive to the surfaces to be joined before securing with screws or brackets. The adhesive will provide additional adhesion and help evenly distribute the load.
● Drying time: Allow the adhesive to fully dry according to the manufacturer's instructions before subjecting the structure to loads.
Tip: Use adhesives specifically designed for bonding wood and metal to ensure the longevity of the joint. This is especially important forinstalling balusters and railings by hand.
Step 4. Installing additional elements
4.1. Installing stair posts
To create a harmonious structure, balusters are typically installed in conjunction with posts.
● Marking posts: Carefully mark the locations forPosts for staircase, taking into account the overall geometry of the staircase structure.
● Installing posts: Install posts using fasteners similar to those used for balusters. This ensures the unity and strength of the entire structure.
Tip: When installing posts, ensure they are positioned strictly vertically — this is important for the overall aesthetics and safety of the staircase.
4.2. Installing railings and finials
Railings and finials complete the overall composition of the staircase, creating a finished look.
● Installing railings: Secure railings using the same methods as for balusters. They must be securely fastened and harmoniously match the balusters.
● Installing finials: Finials are typically installed on the top of posts, completing the staircase structure. This is not only a decorative element but also a functional component providing additional stability.
Tip: UseNewel posts from reputable manufacturers, so they perfectly match withrailings and balusters.
Step 5. Final inspection and finishing
After completing the installation, perform a final inspection of all fastener connections.
● Stability check: Gently rock the balusters to ensure they are securely fastened and have no play.
● Finishing: If necessary, treat the installed balusters with protective finishes. This may include additional sanding, painting, or applying varnish.
Tip: Regular maintenance of the structure will help preserve its appearance and performance characteristics for many years.
Professional Tips
Preparation and Planning
Professionals agree that success in installation begins with careful planning. Here are some important recommendations:
● Careful marking: Ensure all measurements are precise. Use a laser level and templates so all mounting holes are identical.
● Choosing quality materials: Never cut corners on materials andstaircase componentsThis affects not only the appearance but also the reliability of the structure.
● Planning stages of work: Break the installation process into stages and follow them strictly. This will help avoid mistakes and save time.
Features of installation for beginners
If you are installing balusters for the first time, consider the following recommendations:
● Start simple: Try installing a few balusters on a small section of the staircase to gain initial skills and confidence.
● Use video tutorials and consultations: The internet is full of educational materials that will help understand the nuances of the process. This is especially useful forInstalling balusters and handrails on a wooden staircase.
● Don't be afraid to experiment: Experience comes with practice. Try different mounting methods, combinewooden balusters DIY with mounting angle brackets or adhesive joints.
Frequently Asked Questions
Question 1: What mistakes do beginners often make when installing balusters?
Answer: Main mistakes include inaccurate measurements, incorrect marking, lack of pre-drilling, and using inappropriate fasteners. These errors can lead to misalignment, weakened joints, and even injuries. To avoid this, always follow marking recommendations, use quality tools andstaircase components.
Question 2: Can balusters be installed independently without professional help?
Answer: Yes,installing balusters and railings by hand it is entirely possible with basic tool-handling skills and adherence to all instructions. The key is to carefully prepare the work area, perform accurate marking, and use quality fasteners.
Question 3: Which mounting method is the most reliable?
Answer: The most reliable method is a combined mounting approach, which includes pre-drilling, using screws in combination with metal angle brackets and mounting adhesive. This approach ensures maximum structural stability and prevents baluster loosening even under heavy use.
Conclusion
Main Conclusions
Installing balusters on a wooden staircase is a process requiring attention to detail, precision, and adherence to all technological stages. Proper mounting affects not only the appearance but also the safety of the structure. Key points to observe:
● Accurate marking and pre-drilling of holes.
● Using quality fasteners — screws, angle brackets, dowels, and mounting adhesive.
● Following the correct installation sequence to ensure even load distribution.
● Regular inspection and maintenance of installed balusters to extend the lifespan of the staircase structure.
Call to Action
If you want to create a safe, reliable, and stylish staircase, don't hesitate to install balusters yourself. Use only qualitybalusters for staircase to buy, Handrails and balusters, as well asPosts for staircase. Familiarize yourself with the selection ofstaircase components, to choose the optimal elements for your project. Follow our recommendations, and installing balusters will become not only a useful experience but also an engaging creative process.
Final Thoughts
Installing balusters is not just a technical process, but an art in which every detail matters. Accurate marking, proper fastener selection, and careful execution of work will allow you to create a staircase that will serve you for many years and become a true hallmark of your home. Don't be afraid to experiment and refine your skills. After all, a properly installed staircase is a guarantee of safety, comfort, and aesthetic appeal of the interior.
Invest in quality, use only provenHandrails and balusters for the staircaseYour effort will be amply rewarded with a reliable, stylish, and long-lasting structure. May your home be filled with comfort and harmony, and every %sStaircase Baluster will be a embodiment of your impeccable taste and pursuit of perfection.


