Article Contents:
- Architecture of reliability: understanding structural features
- Anatomy of stair railing
- Types of stair treads and their influence on fastening choice
- Professional fastening methods: from classics to innovations
- Threaded rods: the golden standard of reliability
- Shank system: traditional craftsmanship
- Self-tapping screws: speed and practicality
- Technological Secrets of Professional Installation
- Marking: foundation of geometric accuracy
- Drilling holes: precision and quality
- Adhesive joints: chemistry of strength
- Features of working with different stair constructions
- Stairs on stringers: maximum accessibility
- Stairs on treads: traditional elegance
- Combined constructions: modern solutions
- Quality control and final finishing
- Geometric control of installation
- Preparation for final finishing
- Typical Errors and Ways to Prevent Them
- Planning and marking errors
- Technological violations
- Aesthetic flaws
- Modern Trends and Innovations
- New materials and technologies
- Automation and precision
- Economic aspects of professional installation
- Cost of different fastening methods
- Long-Term Economic Efficiency
- Conclusion

A staircase without elegant balusters resembles an unfinished symphony — technically functional, but lacking soul and safety. Mounting balusters to steps of a wooden staircase It is an art where every detail matters, and every connection affects the longevity of the entire structure.
Why do some stair railings serve for decades, retaining their original strength, while others begin to loosen within just a few years of use? The secret lies in a professional approach to installation, correct selection of fasteners, and flawless adherence to technological processes.


Architecture of reliability: understanding structural features


Anatomy of stair railing
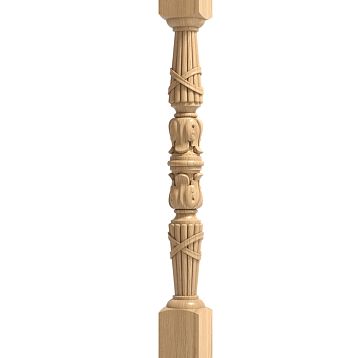
Each baluster is a complex engineering element consisting of three functional zones: base, central part, and top. The base is the foundation of the entire structure, where the strength of the connection to the tread is formed. The central part ensures rigidity and aesthetic appeal, while the top serves as support for the handrail.
Understanding this three-part structure is critically important for choosing the optimal fastening method. Square-section wooden balusters of 50x50 millimeters require a different approach than precisely machined cylindrical elements with a 40-millimeter diameter. Each geometric shape dictates its own rules for load distribution and selection of fasteners.
The material used also plays a decisive role in the installation technology. Hardwood species — oak, beech, ash — have high density and require pre-drilling holes for fasteners. Softwood species — pine, spruce — allow self-tapping screws to be screwed in without prior preparation, but require special attention to the depth of fastener embedment.
Our factory also produces:


Typology of steps and their influence on fastener selection
The constructive features of the treads determine the possible mounting options for balusters. Solid treads, 40-50 millimeters thick, made from solid wood, provide maximum opportunities for secure mounting. Glued treads require consideration of the grain direction and adhesive joint placement when selecting mounting points.
Treads on a metal frame with wooden cladding create additional complexities — it is necessary to ensure mounting not only to the wooden surface but also to the metal base. This requires the use of combined fastening systems and special installation techniques.
The shape of the tread also affects the placement of mounting points. Straight treads allow balusters to be placed at any point on the tread, while projecting treads limit the choice of installation location due to changing width. Open treads without nosings require special attention to the aesthetics of mounting, as the lower part of the connection remains visible.
Get Consultation
Professional mounting methods: from classic to innovations
Threaded rods: the golden standard of reliability
Mounting with threaded rods is considered the benchmark of strength and durability in staircase construction. This method ensures maximum load-bearing capacity of the connection and allows for adjustment during operation. The technology requires high precision in execution, but the result justifies the effort invested.
The process begins with careful marking of mounting centers on the treads. The accuracy of marking determines the geometry of the entire structure — a deviation of several millimeters may result in visible distortions of the railing line. Professional craftsmen use laser levels and special templates to ensure ideal accuracy.
Drilling holes for rods requires special tools and skills. The hole diameter should be 1-2 millimeters smaller than the rod diameter to ensure a tight fit. The drilling depth in the tread is 50-60 millimeters, in the baluster — 60-70 millimeters. This depth distribution ensures optimal connection strength.
Rod installation is performed using high-quality woodworking glue. The glue not only secures the fastening element but also seals the connection, preventing moisture penetration. After installing the rod into the tread, it is necessary to wait for the glue to fully dry — usually 24 hours under normal conditions.
Shank system: traditional craftsmanship
Wooden shanks represent a classic woodworking method of connection, proven by centuries of practical use. This method is especially attractive for those who aim for a fully natural construction without using metal elements.
Manufacturing shanks requires special attention to the selection of wood. Hardwoods — oak, beech, ash — are considered optimal. The grain of the shank must be oriented along its axis to ensure maximum strength against bending. The shank diameter is usually 10-12 millimeters, with a length of 80-100 millimeters.
The shank installation technology requires extremely precise drilling. Even the slightest deviation from verticality will cause the baluster to be misaligned and disrupt the railing geometry. Professional craftsmen use special guides and alignment fixtures to ensure strictly vertical drilling.
The adhesive connection when using shanks plays a critically important role. High-quality PVA woodworking glue creates a bond whose strength exceeds the strength of the wood itself. It is important to ensure even distribution of glue over the entire surface of the shank and the walls of the hole.
Self-tapping screws: speed and practicality
Mounting with self-tapping screws is attractive for its simplicity and material accessibility. However, the apparent simplicity of this method is deceptive — achieving a professional result requires a deep understanding of the characteristics of working with different types of screws and wood species.
The selection of self-tapping screws is determined by the material of the treads and balusters. For hardwoods, screws with sharp threads and special coatings preventing corrosion are required. The screw length should be at least 80 millimeters to ensure secure mounting in treads 40-50 millimeters thick.
The self-tapping screw mounting technology involves installing them at a 30-45 degree angle through the side surfaces of the baluster. This positioning ensures maximum connection strength and minimizes the risk of wood cracking. Each baluster is secured with four screws, evenly distributed around the base perimeter.
Masking screw heads requires special skill. Professional installers use special plugs made from the same wood species or apply the technique of recessing the heads followed by filling with wood dust mixed with glue.
Professional Installation Techniques
Marking: the foundation of geometric accuracy
Quality marking is the foundation of successful installation of the staircase railing. The process begins with determining the baluster installation line, which must be parallel to the edge of the treads and located 50-70 millimeters from the front edge of the tread.
The first and last balusters are installed with special care — they define the geometry of the entire structure. Between them, a construction string is stretched, serving as the baseline for marking intermediate elements. The distance between balusters should not exceed 150 millimeters according to safety requirements.
Each installation point is marked with a center punch or a thin drill bit to prevent displacement during the main drilling. Accuracy of the marking is checked by measuring distances between adjacent points — deviations must not exceed 2-3 millimeters.
Special attention is given to marking on projecting treads, where the changing tread width requires an individual approach to each mounting point. Professional craftsmen use special templates and mathematical calculations to ensure visual uniformity of baluster placement.
Drilling holes: precision and quality
The quality of drilling holes determines the strength and durability of the entire connection. The process requires using sharp drills of the appropriate diameter and observing optimal rotational speed. Too high a speed may cause overheating and burning of the wood, too low — chipping and unevenness.
Drilling treads made of hardwood requires special care. Preliminary marking of the hole center with a center punch prevents the drill bit from slipping. Drilling is performed in several stages — first, a pilot hole with a thin drill, then expanding to the required diameter.
Verticality of drilling is controlled using special guiding fixtures or laser levels. A deviation from verticality exceeding 2-3 degrees may result in visible misalignment of the baluster and disruption of the railing's aesthetics.
Cleaning holes of shavings and dust is a mandatory step before installing fastening elements. Residual wood dust may prevent full penetration of glue and weaken the connection. Professional craftsmen use compressed air or special brushes for thorough cleaning.
Adhesive connections: chemistry of strength
Modern woodworking adhesives provide connections whose strength exceeds the strength of the wood itself. However, achieving maximum strength requires strict adherence to application technology and consideration of the characteristics of different types of adhesives.
Acrylic glue (PVA) remains the most popular choice for attaching balusters due to its optimal combination of strength, ease of application, and environmental safety. High-quality PVA provides joint strength up to 10-12 MPa when applied correctly.
Surface preparation for gluing includes cleaning from dust, grease, and old coatings. The wood moisture content should be 8-12% to ensure optimal adhesive bond. Too dry wood may excessively absorb glue, weakening the joint.
Glue is applied in an even layer to both surfaces to be joined. The glue layer thickness should be 0.1-0.2 millimeters — thicker layers reduce joint strength. The open time of the glue is 3-5 minutes, during which the joint assembly must be completed.
Features of working with different staircase constructions
Staircases on stringers: maximum accessibility
Stringer staircases provide the greatest opportunities for quality baluster mounting due to their open construction and accessibility of all elements. Mounting balusters to steps of a wooden staircase On stringers, any of the described methods can be used with maximum efficiency.
The width of the stringer determines the possibilities for placing balusters. With a stringer width of 200-250 millimeters, balusters can be installed directly onto it, providing additional structural rigidity. Narrow stringers require installing balusters on treads with additional elements for attachment to the stringer.
The open construction of stringer staircases allows using bolt-through fastening with decorative caps at the bottom. This method ensures maximum joint strength and allows for tightening the fasteners during operation.
Aesthetic possibilities of stringer staircases include creating visually light constructions with minimal visible fastening elements. Professional designers use hidden mounting methods to achieve the effect of "floating" balusters.
Staircases on stringers: traditional elegance
Stringer staircases require a special approach to baluster mounting due to the enclosed construction of side elements. Traditionally, balusters are mounted to the top edge of the stringer, requiring them to be beveled at the staircase’s incline angle.
Beveling balusters to the stringer’s incline angle is a responsible operation requiring high precision. The bevel angle must exactly match the staircase’s incline angle to ensure vertical baluster positioning. Even the slightest error will cause visual misalignment of the entire railing.
Mounting to the stringer can be done via a sub-baluster board — a special element mounted to the stringer and serving as a base for baluster installation. This method allows pre-assembling a railing section and installing it onto the staircase as a single unit.
An alternative method involves individually mounting each baluster to the stringer using dowels or self-tapping screws. This method requires more precise marking but provides a more rigid connection.
Combined constructions: modern solutions
Modern staircase constructions often combine different materials and technologies, requiring a comprehensive approach to baluster mounting. Metal frames with wooden treads, glass inserts, combined railings — each solution dictates its own installation rules.
Mounting wooden balusters to metal elements requires using special transition fittings and fastening systems. Direct contact between wood and metal may lead to corrosion and weakening of the joint, so insulating washers must be used.
Glass elements in staircase railings require special care during installation. Mounting must ensure secure fixation with minimal mechanical stress on the glass. Special clamps and washers, distributing load over a large area, are used.
Combined railings with elements of different materials require accounting for different coefficients of thermal expansion. Rigid connections may lead to destruction under temperature changes, so compensating elements and movable joints are used.
Quality control and finishing
Geometric control of installation
After completing the installation of all balusters, a comprehensive check of the construction’s geometric accuracy must be performed. The verticality of each baluster is checked with a plumb bob or laser level — deviations must not exceed 2-3 millimeters at a height of 900 millimeters.
Uniformity of distances between balusters is checked by measuring gaps between axes of adjacent elements. Visual assessment is performed from various viewing points to detect possible rhythm violations in installation. Even minor deviations may be noticeable under certain lighting conditions.
Horizontal alignment of the top cuts of balusters is controlled with a taut string or laser level. All balusters must be beveled at the same angle to ensure correct handrail positioning. Height deviations exceeding 3-5 millimeters require correction.
Joint strength is checked by gently rocking each baluster. The structure must be absolutely rigid without any play or movement. Weak joints are either additionally secured or completely reinstalled.
Preparation for final finishing
Proper surface preparation determines the durability and appearance of the protective-decorative coating. All structural elements must be carefully sanded with abrasive materials, gradually reducing grit size from 120 to 240 units.
Special attention is paid to processing joint areas where unevenness and burrs may form. All sharp edges are chamfered with a 2-3 millimeter radius for safety and improved appearance. Fastener installation locations are carefully cleaned and sanded as needed.
Surface cleaning from dust and contaminants is performed using a vacuum cleaner and adhesive cloth. Cleaning quality is critically important for the adhesion of coatings. Even microscopic dust particles may cause coating defects and reduce its durability.
Wood priming with special compounds ensures better adhesion of the final coating and protection against moisture. Primer selection depends on the wood species and type of finish. Proper priming can extend the coating’s service life by 2-3 times.
Typical errors and ways to prevent them
Planning and marking errors
Inaccurate marking is the most common error leading to disruption of the entire structure’s geometry. Accumulation of small errors during marking each subsequent baluster may result in significant deviations at the end of the staircase run.
Ignoring safety requirements when determining the spacing between balusters creates potential danger for children. Gaps exceeding 150 millimeters between balusters are not permitted according to building codes. Conversely, overly frequent baluster installation creates visual heaviness in the structure.
Failure to account for the specific characteristics of the staircase structure when selecting the mounting method may result in weakened connections or inability to achieve quality installation. Each type of staircase construction requires an individual approach to selecting the mounting technology.
Lack of preliminary planning for the placement of engineering utilities may cause issues when drilling holes. It is necessary to determine in advance the location of electrical cables, heating pipes, and other utilities in the baluster installation zone.
Technological violations
Use of substandard or inappropriate fasteners is a common cause of premature failure of stair railings. Saving money on fasteners may lead to significant expenses for repairs and reinstallation of the structure.
Violation of drilling technology leads to weakened connections and reduced structural strength. Use of dull drill bits, incorrect rotational speed, deviation from vertical alignment — all these factors negatively affect connection quality.
Neglecting requirements for wood moisture content may result in deformation and cracking of elements after installation. Wood with moisture content exceeding 15% should not be used for manufacturing staircase elements without prior drying.
Incorrect application of adhesive compositions — violation of mixing ratios, use of expired materials, failure to observe temperature conditions — leads to weakened adhesive joints and reduced structural reliability.
Aesthetic Defects
Visible traces of fasteners spoil the appearance of the stair railing and indicate a non-professional approach to installation. All fasteners must be concealed or masked with decorative caps.
Uneven surface treatment of balusters creates visual defects, especially noticeable under certain lighting. All elements must be treated with equal quality and uniformly coated with protective-decorative compositions.
Violation of stylistic unity of the structure — using balusters of different shapes and sizes without a thought-out concept — creates visual chaos and reduces the aesthetic value of the staircase.
Ignoring the lighting characteristics of the staircase space when selecting finishes may lead to unexpected visual effects. Glossy finishes may create glare, while matte finishes may obscure the beauty of wood grain.
Modern trends and innovations
New materials and technologies
Advancements in wood processing technologies have brought new possibilities into the world of staircase construction. Modern adhesive compositions provide joint strength exceeding the strength of the wood itself, while maintaining ecological safety and ease of application.
Innovative fastening systems allow creating disassemblable joints with the ability for multiple assembly-disassembly cycles without loss of strength. This is especially important for staircases in homes where periodic reconstruction or layout changes are planned.
Composite materials based on wood fibers combine the advantages of natural wood with enhanced dimensional stability and resistance to moisture. Such materials are especially relevant for staircases in rooms with variable humidity.
Nanotechnology in protective coatings allows creating ultra-thin films that provide reliable wood protection while preserving its natural texture and tactile properties.
Automation and Precision
Modern CNC-controlled equipment ensures precision in processing parts down to fractions of a millimeter. This enables creating joints with minimal gaps and maximum strength.
Laser marking and geometric control technologies eliminate human error in performing the most critical operations. Laser levels and distance meters provide accuracy unattainable with traditional methods.
Computer modeling of staircase structures allows calculating all loads in advance and optimizing the placement of fasteners. This is especially important for complex structures with non-standard geometry.
Robotic assembly systems are beginning to find application in the production of staircase elements, ensuring consistent quality and high productivity.
Economic aspects of professional installation
Cost of Various Fastening Methods
Installation of Balusters on Steps Different methods have significant differences in material and labor costs. Screw fastening is the most economical option, but requires additional expenses for concealing fasteners.
Using threaded rods increases material cost by 30-40%, but ensures maximum joint reliability and allows for adjustment during operation. The long-term economic efficiency of this method is significantly higher.
Shank fastening requires minimal material costs, but increases labor costs due to the need for precise manufacturing of connecting elements. This method is optimal for small-scale projects with skilled craftsmen.
Combined fastening methods allow optimizing the cost-to-quality ratio for each specific project. Using different technologies for support and intermediate balusters can provide significant savings while maintaining high quality.
Long-term economic efficiency
Quality baluster fastening is an investment in the long-term durability of the entire staircase structure. Saving on materials and installation technologies may lead to significant repair and reinstallation costs in the future.
Professional installation using quality materials ensures a 25-30 year service life of the stair railing without requiring major repairs. Amateur installation with violations of technology may require intervention as early as 3-5 years after installation.
The cost of dismantling and reinstalling poorly fastened balusters often exceeds the initial cost of professional installation. This is due to the need to restore damaged staircase elements and additional work to address the consequences of poor installation.
The impact of the quality of the stair railing on property value may amount to 5-10% of the total property cost. Professionally installed staircases become interior decor and increase the property's attractiveness to potential buyers.
Conclusion
Mastercraft Baluster attachments to wooden staircase treads Combines engineering precision, carpentry traditions, and modern technologies. Each connection, every installation detail affects the safety, durability, and aesthetics of the entire structure.
Professional approach to baluster mounting requires deep understanding of material properties, characteristics of various technologies, and strict adherence to technological processes. Only a comprehensive approach, taking into account all aspects of construction and operation, allows creating a stair railing that will serve for decades, preserving its original strength and beauty.
Investments in quality materials and professional installation pay off multiple times due to the structure's longevity, minimal maintenance costs, and increased property value. A staircase with properly installed balusters becomes not just a functional element, but a home decoration, demonstrating the owners' taste and appreciation for quality.
In the world of high-quality staircase constructions, STAVROS occupies a special place, offering not only superior materials but also deep knowledge of their application technologies. Decades of experience, continuous technological refinement, and commitment to flawless quality make STAVROS a reliable partner for all who value professionalism and longevity in creating staircase masterpieces.