Article Contents:
- Profiles and radii: geometry of the upper line
- Classic profiles for walls
- Complex profiles with backlighting shelf
- Radius sections and external angles
- Installation height and proportions
- Backlighting shelves: light as architecture
- Shelf geometry and lighting angle
- Shelf material and reflectivity
- Types of LED strips and power
- Strip and wire placement
- Protection against overheating and dust
- Socket junction: classic decor and technology
- Types of sockets and their placement
- Socket materials and style
- Ornaments and motifs
- Mounting sockets to the crown molding
- Painting and finishing
- Installation: technology and precision
- Foundation Preparation and Layout
- Choosing fasteners depending on the wall
- Sequence of installing sections
- Sealing Joints and Final Finishing
- Installing backlighting after crown molding installation
- Finishes: protection and aesthetics of wood
- Oils: natural protection and texture depth
- Waxes: soft sheen and tactile surface
- Lacquers: durable protection and variable sheen
- Paints: color as a compositional element
- Combined finishes: patina and aging effects
- Questions and Answers
- Conclusion

The upper edge of the wall is not merely a technical junction of planes. It is the architectural culmination of space, a line that either gracefully completes the interior composition or leaves a sense of incompleteness.Wooden corniceServes as a crown - it caps the wall, creates an expressive transition to the ceiling, and becomes a functional base for lighting design.
Modern approaches to decorating the upper part of the wall combine aesthetics and technology. The cornice becomes a multifunctional element: it conceals material joints, masks irregularities, serves as a base for hidden lighting, and creates spatial depth. In Russian architectural tradition, the cornice has always been a symbol of completion - from wooden terem houses to palace reception halls.


Profiles and Radii: Geometry of the Upper Line
The choice of cornice profile determines the character of the entire interior. A flat cornice 80-100 mm wide creates a restrained horizontal line, suitable for minimalist spaces. Profiled cornices with protrusions, grooves, and bevels add volume and play of light and shadow.


Classic Wall Profiles
Cornice profile K-80 - a basic solution for rooms 2.7-3.0 meters high. A width of 80 mm ensures a balance between the element's visibility and wall proportionality. The projection from the wall plane is 40-50 mm, sufficient to create a light shadow and visual separation of the ceiling zone.
Profile K-100 is used in rooms 3.0 meters high and above. A width of 100 mm allows for more complex surface detailing - grooves, rounded corners, small consoles. The projection increases to 60-70 mm, creating an expressive boundary between the wall and ceiling.
Cornice K-120 - a solution for high, formal rooms. A width of 120 mm allows placing several architectural elements: a lower shelf, a central rounded corner, an upper groove. The projection reaches 80-100 mm, forming a strong plastic accent.
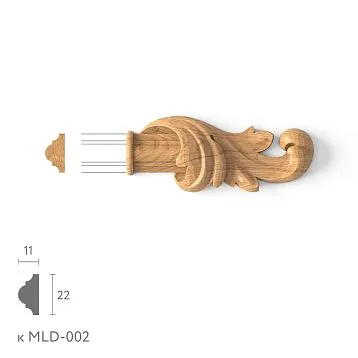
Our factory also produces:


Complex Profiles with a Shelf for Lighting
A cornice with an integrated shelf is a technically thought-out construction. The lower horizontal plane, 30-50 mm wide, is located 60-80 mm from the ceiling. An LED strip is mounted on this shelf, directed upward. Light reflects off the ceiling, creating soft, even illumination around the room perimeter.
Profiles with an integrated shelf are manufactured as solid pieces - from oak or beech wood - or as assembled pieces from MDF. Solid wood profiles are stronger and last longer, but require larger stock cross-sections and cost more. Assembled MDF profiles allow creating complex geometry at lower cost, but require quality jointing of parts and structural reinforcement.
Get Consultation
Radius Sections and External Corners
Straight cornice sections are joined at internal angles using a standard method - at a 45-degree angle with profile fitting. External angles and curved wall sections are more complex.
An external cornice angle can be formed in two ways. The first is a 45-degree cut with precise end fitting - suitable for simple profiles without complex detailing. The second method uses corner elements, where the joint is concealed by a decorative rose or overlay angle. This solution is more reliable for profiled cornices with protrusions and recesses.
Radius sections require flexible profiles or assembled elements. An MDF cornice can be bent to a radius of 2000 mm by pre-wetting the back side and fixing it to a template until dry. Wooden cornices bend less well - a radius of 3000 mm is required, and steam treatment is needed. An alternative is assembling a radius section from short straight segments 150-200 mm long, followed by joint spackling.
Installation Height and Proportions
The cornice is mounted 50-150 mm from the ceiling. A smaller setback creates the impression of a single plane - the wall smoothly transitions into the ceiling. A larger setback emphasizes the cornice as a separate element, separating vertical and horizontal surfaces.
ForCeiling SolutionsAt a height of 2.7 meters, an optimal setback is 80-100 mm. At a height of 3.0-3.5 meters, the setback increases to 120-150 mm. In rooms higher than 3.5 meters, the cornice can be placed up to 200 mm from the ceiling, especially if bright contour lighting is planned.
Cornice proportions depend on wall area. On a wall 4-5 meters long and 2.7 meters high, an 80 mm wide profile looks balanced. If the wall length exceeds 6 meters, the profile width should be increased to 100-120 mm to prevent the cornice from appearing as a thin strip.
Shelves for Lighting: Light as Architecture
Hidden lighting behind the cornice transforms the interior. Soft light reflected from the ceiling creates a sense of height, expands the space, and forms an intimate atmosphere. Lighting technology requires precise calculation of shelf dimensions, selection of light source, and thoughtful installation.
Shelf Geometry and Illumination Angle
The shelf for LED strip is placed horizontally at the lower part of the cornice. Shelf width - 30-50 mm, sufficient for mounting an 8-12 mm wide strip and allowing space for wiring. Distance from the shelf to the ceiling determines the illumination angle and light intensity.
At a distance of 60 mm, the light beam is directed at an angle of 70-75 degrees to the ceiling. This angle ensures even illumination of a 400-500 mm wide strip from the cornice edge. The light is soft, without sharp edges, suitable for primary perimeter lighting.
At a distance of 80-100 mm, the angle becomes 60-65 degrees. The illuminated strip expands to 600-800 mm, the light becomes more diffused and delicate. This solution is suitable for high ceilings and rooms where lighting complements primary illumination.
At a distance over 100 mm, the angle decreases to 50-55 degrees, and light reaches the center of the ceiling, creating an effect of general illumination. However, too great a distance requires a more powerful strip - 14 W/m instead of standard 9-10 W/m.
Shelf Material and Reflectivity
The shelf is made from the same material as the cornice - wood or MDF. The lower surface of the shelf, facing the room, can be painted to match the wall or cornice color. The upper surface, where the strip is mounted, is painted matte white to increase reflectivity.
A matte white surface reflects up to 80% of the light flux, directing it toward the ceiling. A dark surface absorbs light, reducing lighting efficiency by 30-40%. A glossy surface creates glare and uneven illumination, so it is not recommended.
Types of LED strips and power
For under-crown lighting, use LED strips with power of 9-14 W per meter. A strip with power of 9-10 W is suitable for decorative lighting — it creates soft illumination around the perimeter without replacing main lighting. A strip with power of 12-14 W provides sufficient brightness for use as an additional light source.
Color temperature is selected depending on the room's purpose. Warm white light (2700-3000 K) creates a cozy atmosphere and is suitable for living rooms, bedrooms, dining rooms. Neutral white (4000-4500 K) is used in work areas, offices, kitchens. Cool white (5000-6000 K) is rarely used in residential interiors — it creates an office-like atmosphere.
LED strips can be single-color (monochrome) or RGB (multi-color). Monochrome strips are cheaper, easier to connect, and more reliable. RGB strips allow changing the lighting color and creating lighting scenes, but require a controller and cost 2-3 times more.
LED strips can be single-color (monochrome) or RGB (multi-color). Monochrome strips are cheaper, simpler to connect, and more reliable. RGB strips allow changing the backlight color and creating lighting scenes, but require a controller and cost 2-3 times more.
Strip placement and wiring
LED strip is mounted on the upper surface of the shelf, 20-30 mm from the edge facing the ceiling. This placement ensures maximum lighting angle and even light distribution. Strips with adhesive backing are fixed after cleaning the surface with alcohol.
Power cables are laid along the back of the crown, closer to the wall, where they are less noticeable. The power supply unit is placed in a hidden niche or behind furniture — its dimensions of 150x50x30 mm require careful placement. For strips longer than 5 meters, two power supplies are used in parallel to avoid brightness drop on distant sections.
Every 3-4 meters of strip is connected by soldering or special connectors. Soldering is more reliable but requires skill. Connectors are easier to install but create points of higher resistance, where contact may weaken over time.
Protection against overheating and dust
LED strip heats up to 50-60 degrees during prolonged operation. The aluminum profile under the strip dissipates heat, extending LED lifespan from 30,000 to 50,000 hours. A 12-16 mm wide profile is mounted on the shelf before installing the strip.
Dust on the strip reduces brightness by 10-15% over a year of operation. A profile with a transparent diffuser protects the strip from dust and creates more even illumination, eliminating the pinpoint effect of LEDs. Diffusers can be matte (for soft light) or transparent (for maximum brightness).
Socket junction: classic decor and technology
Decorative sockets are round or square surface-mounted elements that decorate the junction between the crown and ceiling, mask connections at corners, and highlight key perimeter points. In classical architecture, sockets were placed at chandelier mounting points, emphasizing the room's symmetry axes.
Types of sockets and their placement
A ceiling socket with diameter 300-500 mm is installed at the center of the room, where the crown intersects with the chandelier axis. The socket visually completes the composition, linking the upper wall line with the central lighting element.
Corner sockets with diameter 150-250 mm are placed at internal and external corners of the room, where crown sections meet. The socket masks the junction, simplifies installation, and adds a decorative accent. Instead of precisely fitting profiles at a 45-degree angle, a surface-mounted socket hides gaps up to 3-5 mm.
Intermediate sockets with diameter 100-150 mm are installed on straight crown sections at intervals of 2-3 meters. They rhythmically organize space, create a repeating ornament, and visually divide a long wall into segments.
Materials and style of sockets
Sockets are made from wood, MDF, polyurethane, or plaster. Wooden sockets from oak or beech are suitable for solid wood crowns — texture and color match. Carving is done manually or on a CNC machine, with relief depth reaching 15-20 mm.
MDF sockets are manufactured on milling machines, primed, and painted in any color. They are lighter than wooden ones, cheaper, and suitable for painted crowns. MDF thickness of 18-22 mm provides sufficient strength to create relief depth of 8-12 mm.
Polyurethane sockets are lightweight, strong, and moisture-resistant. They imitate plaster molding and are suitable for classical interiors with white crowns. Cost is lower than wooden sockets, and installation is easier due to their low weight.
Ornaments and motifs
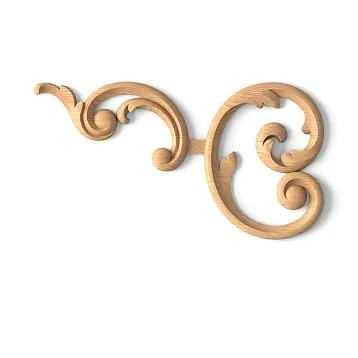
Collection "Russian"Includes sockets with traditional motifs: plant scrolls, geometric rosettes, stylized flowers. Plant ornament — acanthus leaves, grapevines, oak branches — creates a connection with nature, characteristic of Russian wooden architecture.
Geometric rosettes are based on circular and radial compositions: concentric circles, radial sectors, line interweavings. Such ornaments are universal, suitable for strict classical interiors and modern spaces with a focus on form.
Motif sockets depict solar symbols, stylized flowers, star patterns. They serve not only decorative but also symbolic functions, referring to archetypes of folk art.
Socket mounting to the crown
Socket is mounted to the crown and ceiling using PVA wood glue or polyurethane-based mounting glue. Wooden sockets are additionally secured with 35-40 mm self-tapping screws, with screw heads recessed 2-3 mm and subsequently filled with putty.
Before installation, the crown section and socket are cleaned with alcohol. Glue is applied in a zigzag pattern to the back of the socket, and the element is pressed into place for 20-30 seconds. Excess glue is wiped away with a damp cloth before drying.
Heavy outlets made of solid wood with a diameter over 400 mm require reinforced mounting — three screws around the circumference spaced at 120-degree intervals. Mounting points are located in ornament recesses, where holes are not noticeable.
Painting and finishing
MDF and wooden outlets are primed with acrylic primer in two layers with intermediate sanding. Primer fills pores, levels the surface, and improves paint adhesion. Painting is done with acrylic enamel in 2-3 layers, finished with matte or semi-gloss lacquer.
The outlet color can match the cornice color, creating a unified composition, or contrast — a white outlet on a dark cornice or a gilded outlet on a white background. Gilding is done with gold leaf (gold imitation) or with adhesive-based gold leaf.
Patina — a technique of artificial aging, where dark paint is applied into ornament recesses to simulate dust and time patina. Patina emphasizes relief, creates depth, and links the new element with historical style.
Installation: Technology and Precision
Cornice installation requires precise marking, quality fasteners, and understanding of wall construction. The cornice supports its own weight, the weight of lighting, and withstands material thermal deformation. Installation errors lead to cracks at joints, sagging sections, and detachment from the base.
Foundation preparation and marking
The wall under the cornice must be flat, without plaster bulges and depressions deeper than 2 mm per meter of length. Irregularities are compensated with veneer spacers 0.5–1.5 mm thick, placed behind the cornice at mounting points.
Marking begins with determining the horizontal installation line. A laser level projects a line around the room at a specified height from the ceiling — usually 80–120 mm. Deviation from horizontal is unacceptable — even a 5 mm drop over a 5-meter wall is visually noticeable.
Mounting points are marked on the marked line at 400–500 mm intervals for wooden cornices and 500–600 mm for MDF. The spacing reduces to 300 mm on sections with a shelf for lighting, where additional weight from the strip and wires creates load.
Choosing fasteners depending on the wall
Brick or concrete wall — use plastic anchors 6–8 mm in diameter and 40–50 mm long with 4x40 mm self-tapping screws. Drill holes with a 6 mm drill bit to 50 mm depth using a hammer drill, then drive anchors in with a hammer until flush.
Wall made of gas concrete or foam concrete — use special anchors for porous materials with an enlarged spreader section. Diameter 8–10 mm, length 60–80 mm, screws 5x50 mm. Mounting spacing reduces to 300–400 mm due to lower load-bearing capacity of the base.
Gypsum board wall — use metal "molly" anchors or "butterfly" anchors with expanding petals. Each anchor withstands up to 15 kg, sufficient for cornices. Mandatory condition — presence of 50x50 mm embedded beams behind gypsum board at mounting points for heavy sections.
Wooden wall — cornice is mounted directly with 4x50 mm self-tapping screws without anchors. Screws are driven at 15–20 degrees to the wall for better grip. Pre-drilling with a 2.5–3 mm drill bit prevents wood cracking.
Sequence of installing sections
Installation begins with the longest straight cornice section, which sets the base line. The section is placed against the wall according to marking, checked for levelness with a bubble level, and mounting holes are marked through the back wall of the profile.
After drilling and installing anchors, the cornice is mounted with screws starting from the center of the section to the edges. The central point is fixed first, then the end points, then intermediate points. This sequence prevents profile warping.
The next section is cut at a 45-degree angle at the interior corner of the room. The end is coated with PVA wood glue, the section is pressed against the wall and joined to the first section. Profile alignment by height and pattern is visually checked. The joint gap must not exceed 0.5 mm.
External corners are formed similarly but require more precise fitting — any gap is noticeable. Alternative — use of overlay corner elements or outlets that mask the joint and simplify installation.
Joint sealing and final finishing
Joints between cornice sections are filled with acrylic sealant or wood putty. Sealant is applied in a thin layer, excess is wiped off with a damp sponge. After drying, the joint is sanded with fine-grit sandpaper P180-P220.
Screw heads are recessed 2–3 mm below the cornice surface, holes are filled with wood-colored putty or paintable putty. Putty is applied generously, then sanded flush with the surface after drying.
Cornice to be painted is primed with acrylic primer, sanded, painted in 2–3 layers with intermediate sanding. Final finish — matte or semi-gloss lacquer, protecting paint from abrasion and dirt.
Cornice made of natural wood is coated with oil, wax, or lacquer that highlights the texture. Oil is rubbed into the surface, excess is wiped off after 15–20 minutes; the process is repeated 2–3 times with 24-hour intervals. Lacquer is applied with a brush or spray in 2–3 layers.
Installing lighting after cornice installation
LED strip is mounted on the shelf after full cornice installation and finishing. Shelf surface is degreased with alcohol, strip is applied evenly along the edge, 20–30 mm from the ceiling.
Power supply is placed in a concealed location — behind furniture, in a niche, on a shelf. Wires are run in a cable channel or behind the cornice, where they are invisible. Connections are soldered or made with connectors, insulated with heat-shrink tubing.
Lighting operation is checked before final securing of all elements. Power is turned on, uniformity of illumination, absence of dark spots, and correct color temperature are assessed. Strip position is adjusted if necessary.
Finishes: Protection and Aesthetics of Wood
The choice of finish determines the appearance of the cornice, its resistance to dirt, moisture, and mechanical damage. Wood is a living material that reacts to temperature and humidity by changing its geometry. The finish stabilizes the wood, protects it from environmental exposure, and highlights the natural beauty of the grain.
Oils: natural protection and depth of texture
Oil penetrates into the wood structure to a depth of 2-5 mm, fills the pores, and creates a hydrophobic barrier. Unlike film finishes, oil does not form a surface layer, allowing the wood to "breathe" — allowing water vapor to pass through and regulating humidity.
Oils can be natural (linseed, tung) or compounded with waxes and resins. Natural linseed oil dries in 48-72 hours, provides a rich color, and highlights the texture. Compounded oils with drying accelerators dry in 12-24 hours and form a more durable finish.
Oil is applied with a brush or cloth along the grain, rubbed in with circular motions, and excess is wiped off after 15-20 minutes. The first layer absorbs intensely, leaving a matte surface. The second layer is applied after the first has fully dried (24 hours). The third layer enhances color depth and protective properties.
Advantages of oil: highlights texture, eco-friendliness, possibility of local repair, ease of application. Disadvantages: lower resistance to moisture and dirt compared to varnish, requires renewal every 2-3 years.
Waxes: soft sheen and tactile surface
Wax creates a semi-matte surface with a soft silk-like sheen. Unlike oil, wax remains on the surface as a thin layer, filling micro-irregularities and creating smoothness. Wax can be solid (carnauba, beeswax) or liquid (with added oils and solvents).
Solid wax is heated to plasticity, applied with a cloth using rubbing motions, and polished with a soft cloth after it has set. A wax layer of 0.05-0.1 mm fills pores, creates a smooth surface, and repels water and dust.
Liquid wax is applied with a brush or sponge, evenly distributed over the surface, and rubbed in with circular motions. After 20-30 minutes, excess is wiped off, and the surface is polished to a soft sheen.
Advantages of wax: pleasant tactile surface, naturalness, ease of renewal, highlights texture. Disadvantages: low resistance to abrasion, requires regular renewal, low moisture resistance.
Varnishes: strong protection and variable sheen
Varnish forms a surface film 40-120 microns thick, protecting wood from moisture, dirt, UV radiation, and mechanical damage. Varnishes can be acrylic (water-based), alkyd (solvent-based), or polyurethane (two-component).
Acrylic varnish — eco-friendly, odorless, fast-drying (2-3 hours between coats). Forms an elastic film, does not yellow over time, suitable for light wood species. Applied with a brush or spray gun in 2-3 coats with intermediate P220 sanding.
Alkyd varnish — more durable, deeply penetrates wood structure, creates a hard finish. Has solvent odor, dries in 8-12 hours, requires ventilation. Yellowing over time, suitable for dark woods — oak, walnut, wenge.
Polyurethane varnish — maximum durability, resistant to abrasion, moisture, and chemical exposure. Composed of two components — base and hardener — mixed before application. Used for cornices in high-traffic areas — kitchens, hallways, children’s rooms.
Varnish sheen varies from glossy (90% light reflection) to matte (10% reflection). Glossy varnish highlights color and texture but reveals imperfections and scratches. Matte varnish creates a noble surface, conceals minor defects, suitable for classic interiors.
Paints: color as a compositional element
MDF cornices are primed and painted in any color from the RAL catalog. Water-based acrylic enamel has no odor, dries quickly, and forms a durable finish. Applied with a spray gun, roller, or brush in 2-3 coats with intermediate sanding.
White color (RAL 9003, RAL 9010) — classic solution for cornices in light interiors. A white cornice visually increases room height, creates a clear boundary between wall and ceiling, and complements any wall color.
Gray color (RAL 7035, RAL 7040) — neutral solution for modern interiors. A gray cornice does not draw attention, creates a calm background, suitable for minimalism and Scandinavian style.
Wall color — cornice painted to match wall color, creating a monolithic surface. The boundary between wall and ceiling remains, but is expressed by shape rather than color. Suitable for low rooms, where a contrasting cornice visually lowers the ceiling.
Contrasting color — dark cornice on light walls or vice versa. Contrast emphasizes architectural lines, creates graphic effect, and accentuates perimeter. Used in classic interiors with clear composition.
Combined finishes: patina and aging effects
Patina — technique imitating natural wood aging. A light-colored base coat is covered with a darker second coat, which partially wears off in raised areas. Dark paint remains in recesses, creating an effect of accumulated dust and aged patina.
Brushing — mechanical surface treatment of wood with a metal brush, removing soft fibers and revealing texture. After brushing, wood acquires a textured surface, which is accentuated by contrasting oil or wax.
Toning — changing wood color with stain or pigmented oil while preserving texture. Light woods (pine, birch) are toned to resemble oak, walnut, or wenge. Dark woods are lightened with whitewash oil or paint, creating a bleached wood effect.
Questions and answers
What profile should be chosen for a room 2.7 meters high?
Optimal profile width 80-100 mm with projection 50-60 mm. Such a cornice creates a noticeable boundary between wall and ceiling without weighing down the space. For a more pronounced effect, choose a profile with grooves or rounded edges.
Can lighting be installed in the cornice without a special shelf?
Yes, LED strip can be mounted directly on the upper part of the cornice if the distance to the ceiling is 60-100 mm. However, a separate shelf provides more precise light direction and simplifies strip installation.
How to connect a cornice at an external corner without gaps?
Ends of sections are cut at a 45-degree angle using a miter saw with a fine-toothed blade. Before joining, ends are coated with PVA glue, sections are pressed tightly together. Remaining micro-gaps are filled with acrylic sealant.
How long does cornice installation take in a 20 sq.m. room?
With a prepared base, installation takes 4-6 hours for a simple cornice and 8-10 hours for a cornice with a shelf for backlighting, including strip installation and wiring. Time increases with complex room geometry.
Do you need to renew the oil finish on the cornice?
Yes, oil is renewed every 2-3 years depending on usage conditions. Surface is cleaned of dust, lightly sanded with P320 grit paper, and a new layer of oil is applied. Renewal takes 1-2 hours.
What power LED strip is needed for main lighting?
For decorative backlighting, 9-10 W/m is sufficient. For supplemental lighting partially replacing main light, 12-14 W/m is required. For full perimeter lighting, use a 18-20 W/m strip or double-sided strip.
Can a wooden cornice be bent to a radius?
Yes, solid wood can be bent to a radius of 3000 mm after steaming or soaking. The cornice is fixed to a template until dry. Alternatively, use a radius formed by short straight segments 150-200 mm long.
What finish to choose for a cornice in the kitchen?
For kitchens, polyurethane varnish or acrylic enamel is recommended — they are resistant to moisture, grease, and cleaning agents. Oil and wax require more frequent renewal and are less practical in high-humidity conditions.
How often to clean LED strip from dust?
Cleaning is recommended every 6-12 months using a damp microfiber cloth while power is off. Strips in aluminum profiles with diffusers are dust-resistant and require less frequent cleaning — once every 1-2 years.
Will an MDF cornice withstand heavy drapes?
An MDF cornice 18-22 mm thick with mounting every 400-500 mm can support up to 30 kg per linear meter, sufficient for heavy drapes. For increased load, use additional mounting points or solid wood cornice.
Conclusion
A cornice is not merely a decorative strip at the junction of wall and ceiling. It is an architectural element crowning the vertical plane, completing the composition, and shaping the interior lighting scenario. The right profile, thoughtfully designed backlight shelf, precise installation, and quality finish transform the cornice into a functional work of art.
STAVROS createsWooden beamsfrom select oak and beech, MDF cornices for painting, and handcrafted decorative outlets. Each element is crafted considering architectural traditions and modern technologies. Choosing STAVROS means you get not just material, but a ready-made solution for creating interiors where every detail is thought out to the millimeter and quality is proven by time.