


Article Contents:
- Anatomy of the Ideal Installation: Understanding the Basics
- Materials Science as the Foundation of Mastery
- Fastening Systems: Choice of a Professional
- Tool Preparation: The Master's Arsenal
- Measurement Accuracy — the Foundation of Quality
- High-Class Cutting Tools
- Technological Secrets of Installation
- Marking: precision from the first step
- Preparing Holes: Jewel-like Precision
- Installation Procedure: Step-by-Step Algorithm
- Specifics of Various Fastening Methods
- Shank Connections: The Classic of Carpentry
- Threaded connections: strength of metal
- Modern Fastening Systems
- Working with Different Bases
- Wooden Structures: Natural Harmony
- Concrete Bases: Working with Stone
- Metallic Structures: Combination of Materials
- Quality control and defect elimination
- Early Problem Diagnosis
- Defect Correction Methods
- Final Finishing and Protection
- Surface Preparation for Coating
- Protective Coatings: Choice of a Professional
- Modern Trends and Innovations
- Smart mounting systems
- Composite Materials in Staircase Construction
- Economic Aspects and Planning
- Project budgeting
- Comparison of Different Methods
- Safety Techniques in Work
- Master’s Personal Protection
- Electrical Safety on Site
- Conclusion
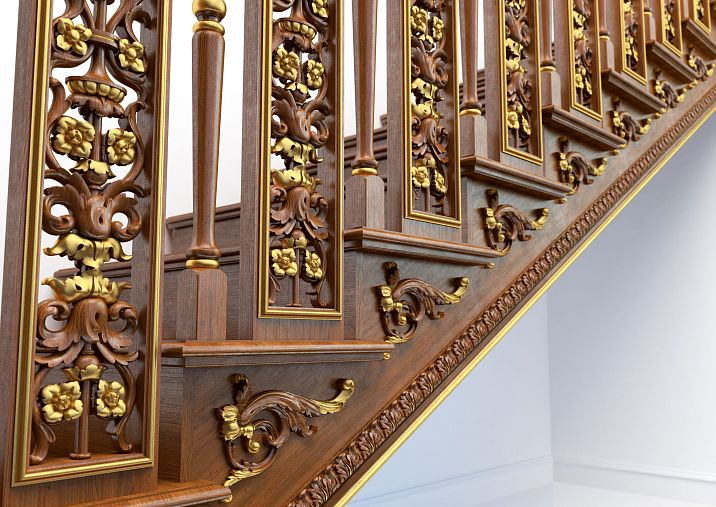
A staircase without balusters is like a house without windows. It lacks soul, character, and, most importantly, safety. Over fifty years of work in woodworking, I have installed thousands of balusters, and each one tells a story of craftsmanship. How to Install Balusters correct — a question that determines not only the aesthetics of the staircase structure, but also the safety of everyone who will use it.
Many consider installing balusters a simple task. "Drill a hole, insert the post, secure — and done!" But true mastery lies in the details that an inexperienced eye misses. Proper choice of fasteners, precision marking, understanding wood properties, accounting for loads — all of this transforms a routine installation into an art of creating a reliable and beautiful structure.
In this material, I will share knowledge accumulated over decades of work. I will not only discuss technical aspects but also the philosophy of approaching work with wood. After all, balusters are not just functional elements — they are part of an architectural composition that should delight the eye and serve generations.


Anatomy of the Ideal Installation: Understanding the Basics


Materials Science as the Foundation of Mastery
The tree lives its own life even after becoming part of a staircase. It breathes, expands, contracts, and reacts to changes in humidity and temperature. Over the years of my work, I have learned to feel the wood, understand its character, and predict its behavior under various conditions.
Oak is the king among species for staircase structures. Its density of 700 kg/m³ provides exceptional strength, and its high tannin content makes the material resistant to moisture and biological damage. When installing oak balusters, it is important to note that the material requires pre-drilling all holes — attempting to screw in a self-tapping screw without preparation may lead to cracking.
Ash surprises with its flexibility despite high strength. This species is ideal for creating curved elements and withstands significant dynamic loads. The light-colored ash wood with its expressive grain combines beautifully with modern interior solutions.
Spruce remains the most accessible material, but requires a special approach during installation. The soft structure of the wood allows screws to be driven in without pre-drilling, but the resulting connections are less reliable. The resinous nature of spruce can cause problems when gluing — surfaces must be degreased.
Our factory also produces:


Fastening systems: choice of a professional
The quality of fasteners determines the longevity of the entire structure. Cheap self-tapping screws made of soft steel last one or two years, then begin to corrode and weaken. Professional fasteners made of stainless steel or with quality coating last for decades.
The diameter of fasteners must correspond to the dimensions of the balusters and anticipated loads. For standard balusters with a 50×50 mm cross-section, optimal self-tapping screws have a diameter of 6–8 mm or bolts M8–M10. Thinner fasteners will not provide the required strength, while thicker ones may split the wood.
The length of the fastening element is calculated based on the thickness of the connected parts. For a secure connection, the fastener must penetrate the base to a depth of at least 40–50 mm. When fastening to a concrete base, the anchoring depth increases to 60–80 mm.
Get Consultation
Tool Preparation: The Craftsman's Arsenal
Accuracy of measurements — the foundation of quality
A good tool is an extension of the master’s hands. Over the years of my work, I have collected a collection of tools, each chosen deliberately. The accuracy of measurements determines the quality of the entire work — an error of one millimeter during marking becomes a noticeable defect in the finished structure.
The laser level has become an indispensable assistant in modern work. It ensures the precision of constructing horizontal and vertical lines, unattainable by traditional methods. When installing long rows of balusters, the laser beam allows controlling their alignment along the entire length of the staircase.
A digital caliper is necessary for precise measurement of hole and fastener diameters. A gap of half a millimeter between the fastener and the hole may become the cause of connection loosening after several years of use.
A protractor is critically important when working with inclined staircases. The angle of trimming the balusters must exactly match the angle of the stair incline. An error of even one degree will be noticeable to the naked eye and spoil the entire appearance of the structure.
High-quality cutting tools
The quality of wood processing directly depends on the condition of the cutting tool. Dull drill bits do not cut but tear fibers, creating loose holes. Fasteners in such holes fit loosely, reducing connection strength.
Wood drill bits must be made of high-quality steel and properly sharpened. The cutting angle depends on the material being processed: 118° for softwoods, 135° for hardwoods. Spiral grooves must be polished for easy chip removal.
A saw with carbide-tipped teeth provides clean cuts without chipping. The disc diameter is chosen depending on the size of the parts being processed. For balusters, a 250–300 mm disc is sufficient, but it is important to monitor the sharpness of the teeth.
Technological secrets of installation
Marking: Precision from the First Step
Quality marking is half the success of the entire work. Errors at this stage can only be corrected by complete rework, so I always give marking the utmost attention. Each mark is checked twice, and every dimension is independently verified.
I start by determining the total number of balusters. Building codes require that the distance between vertical elements does not exceed 150 mm center-to-center. However, for a better appearance, I recommend spacing them 100–120 mm center-to-center.
The step calculation is performed mathematically accurately. I measure the total length of the installation area, subtract the distances to the outer support posts, and divide the resulting value by the number of gaps between balusters. If the result is not divisible by the desired step, I adjust the number of balusters upward.
I perform marking using a tape measure and pencil, checking each mark with a laser level. Between the outer points, I stretch a string, which serves as the baseline for all intermediate marks. Accuracy in marking is the guarantee of a beautiful and even row of balusters.
Preparing holes: jewel-like precision
Drilling holes for fasteners requires maximum concentration and precision. Each hole must be strictly perpendicular to the surface and have a precisely specified diameter. Deviations are unacceptable — they will weaken the connection or make assembly impossible.
A drill guide is a device that many consider unnecessary. But it is precisely this device that guarantees the perpendicularity of the hole to the surface of the part. A homemade drill guide can be made from a piece of hard wood with bushings of the required diameter.
Drill depth is controlled by a drill stop or a special bushing. For dowel connections, the hole depth should be half the dowel length plus 2-3 mm for glue. For threaded connections — 5-10 mm deeper than the length of the threaded portion.
I visually and tactilely inspect the quality of the holes. The walls must be smooth, without scratches or chips. Rough edges indicate a dull drill bit or incorrect processing mode. Such holes must be re-drilled to a larger diameter.
Installation procedure: step-by-step algorithm
Installing balusters It begins with installing the outer support posts. These elements serve as references for all other balusters and must be installed with maximum precision. Any deviation of the outer posts will cause the entire row to be misaligned.
I control verticality using a laser level in two mutually perpendicular planes. A deviation of more than 1 mm per meter of height is unacceptable. Upon detecting deviations, I immediately adjust the position of the post.
I install intermediate balusters based on the cord stretched between the outer posts. Each baluster is checked for vertical alignment and conformity to the marking. The distance between adjacent elements should be equal with an accuracy of 2-3 mm.
When using adhesive joints, it is important to follow the technology. The adhesive is applied both into the hole and onto the surface of the dowel. The open time is 3-5 minutes, after which the parts must be connected and secured until the adhesive fully cures.
Specifics of various fastening methods
Dowel Joints: The Classic of Carpentry
Wooden dowels are a time-tested technology for joining wooden parts. A properly executed dowel joint can last for centuries without losing strength. The secret lies in precise manufacturing and material quality.
The dowel diameter is selected depending on the dimensions of the connected parts. For balusters with a 50×50 mm cross-section, optimal dowels are 12-16 mm in diameter. The dowel length must ensure a 25-30 mm embedment into each part.
The quality of the dowel wood is critically important. The best dowels are made from hardwoods — beech, oak, ash. The wood moisture content must not exceed 8%, otherwise, upon drying, the dowel will shrink and weaken the joint.
Drilling holes for dowels requires meticulous precision. Even the slightest deviation from coaxial alignment will result in an impossible assembly or weakened joint. I use special drill guides that ensure perfect coaxial alignment of holes in the joined parts.
Threaded Connections: The Strength of Metal
Metal screws provide maximum strength for fastening balusters. Threaded connections can be tightened if loosened, which is especially important for structures under high loads. A properly executed threaded connection withstands loads many times exceeding operational limits.
The choice of bolt diameter depends on the baluster dimensions and expected load. For standard balusters, an M8 or M10 bolt is sufficient. Thicker bolts may split the wood, especially when installed into end surfaces.
The thread must be metric with a fine pitch. Coarse thread cuts faster but provides less joint strength. Fine thread creates more threads per unit length, increasing contact area and strength.
The bolt material must match the operating conditions. Galvanized steel is suitable for indoor use, while stainless steel is required for humid conditions. Brass bolts are aesthetically pleasing but less strong.
Modern mounting systems
The industry offers specialized baluster fastening systems that combine ease of installation with high reliability. These systems are designed with wooden structures in mind and ensure optimal load distribution.
Insert systems consist of metal sleeves with internal threads that are glued into the base. Balusters are equipped with corresponding threaded elements, ensuring quick and reliable connection. Such a system allows disassembling elements without damaging the structure.
Adjustable fasteners compensate for minor dimensional inaccuracies and allow adjusting baluster positions after installation. This is especially important when working with non-ideal surfaces or when precise alignment of elements is required.
Working with different bases
Wooden structures: natural combination
Fastening balusters to wooden treads is the most favorable case for a craftsman. Wood to wood fastens naturally and reliably, ensuring structural monolithism. The key is to correctly choose the fastening method depending on the staircase construction and operating conditions.
Through-fastening through the tread provides maximum joint reliability. A long bolt or bolt passes through the entire tread thickness and is secured with a nut from the underside. The bolt head is embedded into the wood and covered with a wooden plug matching the main material color.
Fastening to the end of the tread is used when access to the underside is impossible. In this case, I use anchor bolts or deep bolts at least 60 mm long. I pre-drill a guide hole 2 mm smaller in diameter than the fastener.
When fastening to the stringer, balusters must be cut at an angle corresponding to the staircase slope. The angle is determined using a protractor or template. Precision in cutting is critically important — even a small deviation will be noticeable after installation.
Concrete bases: working with stone
Concrete treads require a special approach and tools. The material is hard but brittle — incorrect drilling may cause chips and cracks. I use only high-quality carbide drills and a drill in drilling mode without impact.
Chemical anchors are the best choice for critical connections in concrete. A special compound fills the hole and creates a monolithic connection with the base. The strength of such fastening is comparable to the strength of the concrete itself.
The anchor depth in concrete must be at least 8 times the fastener diameter. For an M10 bolt, this means a depth of at least 80 mm. Less depth will not provide the required strength, especially under dynamic loads.
The hole in concrete must be carefully cleaned of dust and debris. I use a construction vacuum cleaner and compressed air blowing. Dust residues reduce the adhesion strength of the anchor compound to the base.
Metal structures: material combination
Fastening wooden balusters to metal staircases requires consideration of differences in material thermal expansion coefficients. Metal and wood react differently to temperature changes, which may lead to stresses in the joints.
Compensatory elements help solve this problem. Elastic gaskets or sleeves allow materials to expand independently of each other. The thickness of the compensating layer is selected depending on the structure size and expected temperature fluctuations.
Welding provides the strongest connection with metal, but requires special skills and equipment. Bolted connections are easier to execute and allow disassembly of the structure if necessary.
Quality control and defect elimination
Diagnosing problems at an early stage
Even when all technologies are followed, problems may arise. It is important to be able to recognize and eliminate them early, before they lead to serious consequences. Over years of practice, I have developed a control system that allows identifying defects at the earliest stage.
Looseness in joints is the most common problem, manifesting as baluster movement under slight rocking. Causes may vary: inaccurate hole manufacturing, wood shrinkage, loosened fasteners, poor adhesive.
Visual defects also require attention. Gaps in joints, uneven gaps between balusters, deviations from vertical — all of this not only spoils the appearance but may also indicate more serious structural problems.
Acoustic diagnostics help reveal hidden defects. Tapping the baluster with a hammer should produce a clear sound. A dull sound indicates the presence of voids or weakened joints that require immediate intervention.
Methods for Removing Defects
Minor looseness can be corrected by tightening fasteners or adding adhesive to the joint. For threaded connections, tightening the nut by a quarter turn is sufficient. For adhesive connections, additional adhesive can be introduced through a small drill bit.
Serious defects require partial or complete reworking. Cracked balusters must be replaced—repair attempts are usually ineffective and unsafe. When designing, I always plan for the possibility of replacing individual elements without dismantling the entire structure.
I fill gaps in joints with wooden inserts or special wood putty. The filler color must exactly match the base material. After drying, I carefully sand the repair area and apply a protective finish.
Final finishing and protection
Surface Preparation for Coating
Quality finishing begins with thorough surface preparation. All elements must be sanded to perfect smoothness. I use abrasives sequentially: starting with 120 grit and finishing with 320-400 grit.
The direction of sanding must align with the grain of the wood. Sanding across the grain leaves scratches that will be visible after applying a transparent finish. I pay special attention to end surfaces—they are most susceptible to moisture penetration.
Dust removal after sanding is critically important for finish quality. I use an industrial vacuum, then a sticky cloth, and only then proceed to apply primer or finish. Even the smallest dust particles will create finish defects.
Priming equalizes the wood’s absorption and ensures better adhesion of the finish. The choice of primer depends on the wood species and type of finish. Resinous woods require special isolating primers.
Protective Coatings: Choice of a Professional
Choosing a protective coating is a compromise between beauty, durability, and ease of maintenance. Lacquers provide maximum protection against mechanical damage and moisture, but require professional application and create a film on the wood surface.
Oil-based finishes penetrate deeply into the wood structure, enhancing its natural beauty. They do not form a film on the surface, preserving the tactile sensation of touching wood. Oils are easily repairable for localized damage but require more frequent reapplication.
Wax finishes give surfaces a silky sheen and a pleasant tactile texture. Wax protects against moisture and dirt while allowing the wood to "breathe". Such finishes are especially popular in eco-oriented interiors.
Combined systems combine the advantages of different types of finishes. For example, an oil soak followed by wax application provides deep protection and an attractive appearance. Such systems require more time to apply but deliver excellent results.
Modern trends and innovations
Smart Mounting Systems
Technological progress has not bypassed the field of baluster mounting. Modern manufacturers offer innovative solutions that simplify installation and increase connection reliability. Some of these technologies may seem like science fiction, but they are already finding practical use.
Self-regulating fasteners automatically compensate for wood size changes due to humidity fluctuations. Special spring mechanisms maintain constant clamping force, preventing loosening of connections. Such systems are especially relevant in regions with drastic climate changes.
Fasteners with built-in diagnostics allow real-time monitoring of connection condition. Load and vibration sensors transmit information to the owner’s smartphone, warning of the need for maintenance. While such systems are currently expensive, they represent the future.
Composite Materials in Staircase Construction
Wood-polymer composites open new possibilities for creating durable and beautiful balusters. They combine the aesthetics of natural wood with the practicality of modern materials. Installation of Composite Balusters has its own characteristics that must be considered.
WPC materials are resistant to rot, do not require protective treatment, and are dimensionally stable. They do not shrink or crack, which simplifies fastening and increases connection longevity. However, composites require special fasteners and pre-drilling of all holes.
Carbon fiber balusters have exceptional strength at minimal weight. They are resistant to corrosion and do not react to humidity changes. Installing such balusters requires specialized knowledge and tools, but the result exceeds all expectations.
Economic Aspects and Planning
Project budgeting
Quality baluster installation requires investment, but cutting corners at this stage is unacceptable. The cost of redoing work always exceeds the cost of proper execution from the start. When planning the budget, it is necessary to consider not only material costs, but also tools and consumables.
Fasteners constitute a relatively small portion of the overall budget, but their quality is critically important. Cheap fasteners made of soft steel corrode quickly and lose strength. High-quality stainless steel fasteners cost 3-4 times more but last decades without maintenance.
Tools are a long-term investment. A quality drill, laser level, and precise measuring instruments pay for themselves on the second or third project. Cheap tools deliver inferior results and quickly break down, ultimately costing more.
Time is money. Proper work organization, quality preparation, and using appropriate tools significantly reduce project completion time. Rushing and trying to save on preparation lead to errors and rework.
Comparison of Different Methods
|
Mounting method |
Cost |
Complexity |
Reliability |
Durability |
Repairability |
|
Shanks + glue |
Low |
High |
MDF with film |
50+ years |
Difficult |
|
Threaded rods |
Medium |
Medium |
High |
30+ years |
Good |
|
Self-tapping screws |
Very low |
Low |
Medium |
10–15 years |
Good |
|
Special systems |
High |
Low |
High |
25+ years |
Excellent |
The choice of the optimal method depends on budget, requirements for durability, installer’s qualifications, and operating conditions. For critical applications, I recommend threaded connections or special fastening systems.
Safety Procedures for Work
Personal protection of the master
Working with wood and power tools requires adherence to safety rules. Over the years of practice, I have seen many injuries that could have been avoided by following basic precautions. Safety is not a restriction, but a condition for productive work.
Safety glasses are mandatory when drilling, grinding, and cutting. Wood dust and shavings can seriously damage the eyes. I use glasses with side protection — they are more reliable than ordinary ones and do not fog up during intensive work.
A respirator protects the lungs from dust, which is especially dangerous when working with hardwoods or composite materials. Some types of wood dust may cause allergic reactions and even oncological diseases with prolonged exposure.
Work gloves protect hands from splinters and cuts, but when working with rotating tools, it's better to remove them — there is a risk of getting caught in the mechanism. For hand protection during assembly, I use thin nitrile gloves.
Electrical safety on site
Working on a ladder often occurs in cramped conditions where it is easy to damage an electrical cable. I use only tools with double insulation and always check the integrity of the wires before starting work. A damaged cable is a direct path to electric injury.
Extension cords must be rated for the power of the tool with a reserve of at least 20%. Thin wires overheat and can become a cause of fire. I arrange cables so that no one steps on them and no tool catches them.
When working in wet conditions, I use tools with water protection class IPX4 or work from batteries. Water and electricity — a deadly combination that must be avoided at all costs.
Conclusion
Mastercraft balusters installation comes with experience, but basics can be mastered by following proven methods and not cutting corners on material quality. After half a century of work, I realized the main thing: each baluster is not just a functional element, but part of an architectural composition that should delight the eye and ensure safety for decades.
Technologies evolve, new materials and fastening methods appear, but the core principles remain unchanged: precision, quality, attention to detail. These principles I pass on to young masters, who will pass them on further, preserving the tradition of quality woodwork.
Do not cut corners on safety and quality. It is better to spend more time and money on proper installation than regret the consequences of rushing or saving money later. Quality work is an investment in the future, in the safety of loved ones, in the master's reputation.
Remember: a staircase is not built for one year or ten years. It must serve generations. And every baluster, every fastening — this is your personal contribution to this enduring structure. Make it worthy of your name and craftsmanship.
STAVROS Company understands the importance of proper installation of stair elements and offers not only excellent solid wood products but also professional advice on their installation. STAVROS's long experience in woodworking guarantees that every recommendation is based on a deep understanding of wood properties and requirements for stair structures. Choosing STAVROS means choosing quality proven by time.


