


Article Contents:
- Anatomy of a Stringer Staircase: Understanding Structural Features
- Geometry of the Stringer
- Materials for Stringer Construction
- Professional Toolset: What is Required for the Work
- Measuring Tools
- Cutting Tools
- Drilling Equipment
- Preparation Stage: Planning and Marking
- Calculating Quantity and Placement of Balusters
- Creating a Template for Marking
- Determining the Miter Angle
- Fastening Technologies: From Classic to Innovative
- Fastening with Threaded Rods
- Joining with Wooden Dowels
- Fastening with Countersunk Screws
- Using a Baluster Bracket: Professional Solution
- Construction and Purpose of a Baluster Bracket
- Installation Technology with a Baluster Bracket
- Ensuring Verticality: Key to Professional Results
- Methods for Checking Verticality
- Adjusting Baluster Position
- Final Finishing and Decorative Treatment
- Sealing Fastening Points
- Sanding and Preparing for Finishing
- Protective and Decorative Finishing
- Quality Control and Work Acceptance
- Connection Strength Testing
- Geometric Inspection
- Visual Appearance Assessment
- Operation and maintenance
- Regular maintenance
- Periodic Coating Renewal
- Fastener Condition Inspection
A staircase in a house is not just a functional structure, but an architectural element that forms the first impression of the dwelling. And if you asked yourself, how to install balusters to the stringer, then you understand the importance of every detail in creating a flawless interior. Proper installation of balusters onto the stringer is an art that requires not only technical knowledge but also an understanding of aesthetic principles.
A stringer staircase is a special type of construction where steps are embedded into the side load-bearing elements — the stringers. It is precisely to these elements that balusters are attached, creating a secure and attractive railing. The installation process has its nuances, which fundamentally distinguish it from installing balusters on stringer staircases or directly onto the steps.
Why it is so important to know, how to properly install balusters? It's not only about safety, although this is undoubtedly a priority. Properly installed balusters ensure the longevity of the entire structure, prevent loosening and deformation, and also create a harmonious appearance of the staircase.


Anatomy of a Stringer Staircase: Understanding Structural Features
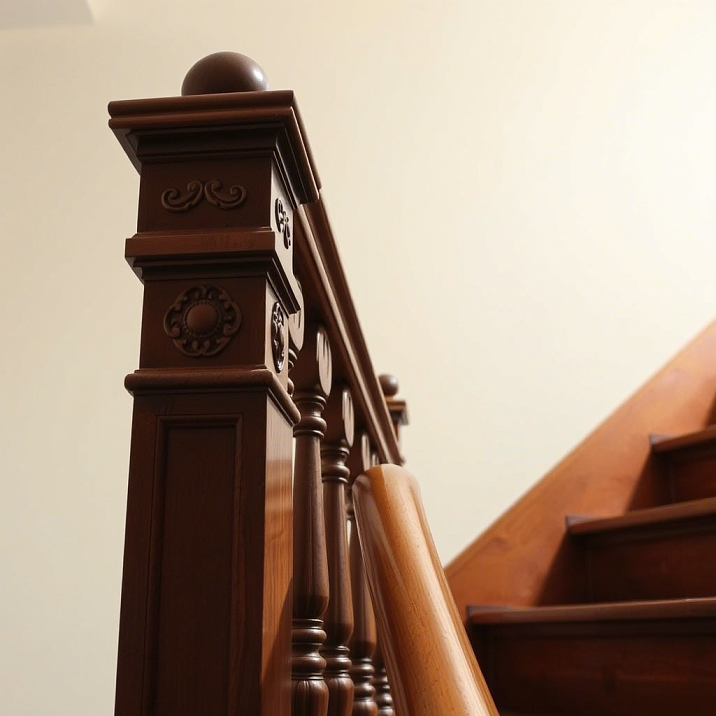
Before beginning installation, it is necessary to deeply understand the structure of a stringer staircase. The stringer is an inclined beam into which steps are embedded, forming grooves of a certain depth. Such a construction ensures high strength and allows creating staircases with closed sides.


Geometry of the Stringer
The stringer has a complex geometry that determines the specific method of baluster attachment. Its upper surface is inclined at an angle to the horizontal, corresponding to the staircase's incline angle. This angle is typically between 30 and 45 degrees, which creates certain difficulties when installing vertical elements.
The thickness of the stringer varies from 40 to 80 millimeters depending on the load and architectural requirements. The width can reach 300-400 millimeters, providing sufficient area for secure baluster attachment.
Our factory also produces:


Materials for Stringer Construction
Stringers are manufactured from various materials, each of which imposes its own requirements for baluster attachment:
Solid wood — a classic option, providing maximum strength for attachment. Wood holds screws and rods well, allowing the use of adhesive joints.
Glued timber — a modern solution with increased dimensional stability. The layered structure requires a special approach to selecting fasteners.
Metal frame with wooden cladding — a hybrid construction, where attachment can be done either to the wooden part or to the metal base.
Get Consultation
Professional Toolset: What is Required for the Work
Professional installation is impossible without proper tools. A professional approach requires using specialized equipment that ensures precision and reliability of connections.
Measuring Tools
Laser level — an indispensable assistant for ensuring baluster verticality. Modern models allow projecting lines onto any surface, significantly simplifying marking.
Digital protractor — necessary for accurately determining the stringer's incline angle. An error of several degrees may lead to incorrect baluster installation.
Tape measure and metal ruler — for precise measurements of distances between balusters and size control.
Cutting Tools
Circular saw — provides perfectly flat cuts at the required angle. The quality of the cut directly affects the tightness of the baluster's fit to the stringer.
Electric jigsaw — for making decorative cuts and fitting complex joints.
Hand saw with fine teeth — for final fitting and precise trimming.
Drilling Equipment
Drill with speed adjustment — primary tool for drilling holes for fasteners. The ability to adjust speed is important when working with different wood species.
Wood drill bits of various diameters — from 3 to 12 millimeters for different types of fasteners.
Spade bits — for drilling large-diameter holes for countersunk bolt heads.
Drill guide — ensures strictly perpendicular drilling of holes.
Preparation Stage: Planning and Marking
Success of any construction project depends 70% on the quality of preparation. Installing balusters is no exception — careful preparation and accurate marking determine the final result.
Calculating Quantity and Placement of Balusters
The first step is determining the optimal number of balusters. Building codes regulate the maximum distance between vertical railing elements — no more than 150 millimeters on center. This requirement ensures safety, especially for children.
When calculating, the length of the stair run, number of steps, and architectural features are taken into account. The optimal distance between baluster axes is 120-140 millimeters, ensuring visual harmony and compliance with safety standards.
Creating a marking template
A professional approach involves making a template that ensures uniform positioning of all balusters. The template is a board marked with lines corresponding to the baluster axes.
The template length should match the stringer length, and marks are applied taking into account the baluster thickness and required spacing. Using a template eliminates accumulated marking errors and ensures perfect railing geometry.
Determining the cut angle
The key step in preparation is accurately determining the angle at which the lower ends of the balusters must be cut. This angle must match the stringer's slope to ensure tight fitting and vertical baluster installation.
The angle is measured with a digital protractor at several points along the stringer, as minor deviations may occur. The average value is taken as the working angle for cutting all balusters.
Fastening technologies: from classic to innovative
There are several proven methods for attaching balusters to the stringer, each with its own advantages and applications. The choice of specific technology depends on the baluster material, stringer type, and requirements for joint strength.
Mounting with threaded rods
This method is considered the most reliable and is widely used in professional construction. A threaded rod with a diameter of 8-12 millimeters provides a strong connection capable of withstanding significant loads.
Execution technology:
The process begins with marking the center points of holes on the stringer. Using a template, the installation points for each baluster are marked. It is important to ensure strict perpendicularity of the holes to the stringer surface.
A hole with a diameter matching the rod's diameter is drilled into the stringer to a depth of 40-50 millimeters. The depth must ensure secure fixation without full penetration.
In the lower end of the baluster, previously cut at the required angle, a central hole is drilled to a depth of 60-80 millimeters. The hole diameter must exactly match the rod's diameter.
The rod is screwed into the baluster to a depth of 50-60 millimeters, leaving a free end of 30-40 millimeters for attachment to the stringer. The joint is reinforced with wood glue, which is poured into the hole before installing the rod.
Connection using wooden dowels
An eco-friendly method using wooden cylindrical pegs — dowels. This method is especially popular when working with valuable wood species, where preserving the material's naturalness is important.
Technology features:
Dowels are made from the same wood species as the balusters, or from harder species for increased strength. The dowel diameter is usually 12-16 millimeters, and the length is 80-100 millimeters.
Holes for dowels are drilled with high precision, as any deviation will result in a loose connection. Special guides are used to ensure strict coaxial alignment of the holes.
Dowels are pre-treated with wood glue and installed into the stringer holes. After partial drying of the glue, the baluster is placed over the protruding part of the dowel. Final polymerization occurs over 24 hours.
Fastening with concealed-head screws
A fast and economical method suitable for temporary structures or when the joint's aesthetics are not critical. Screws with a diameter of 6-8 millimeters and a length of 80-120 millimeters provide sufficient strength for most applications.
Execution methodology:
A guiding hole with a diameter of 4-5 millimeters is drilled into the baluster at an angle of 30-45 degrees to the axis. This angle ensures secure fixation and reduces the risk of wood cracking.
The screw is driven through the baluster into the stringer, with the head recessed into the wood to a depth of 3-5 millimeters. The hole from the head is filled with a wooden plug or putty matching the wood color.
Using a baluster spacer: a professional solution
A baluster spacer is a special board installed between the stringer and balusters. This solution ensures perfect railing geometry and simplifies installation, especially when working with a large number of balusters.
Construction and purpose of the baluster spacer
The baluster spacer is a wooden board with a cross-section of 20×50 or 30×60 millimeters, with a length corresponding to the stair run. A groove is cut in the lower part of the board, precisely matching the profile of the top surface of the stringer.
Grooves for balusters are made in the upper part of the baluster spacer. These grooves can be round for turned balusters or square for rectangular-section balusters. The groove depth is 15-20 millimeters.
Installation technology with a baluster spacer
The process begins with precise fitting of the baluster spacer to the stringer. The groove in the lower part of the board must fit tightly against the top surface of the stringer along its entire length. If necessary, adjustments are made using a plane or sander.
Nose holes for balusters are marked using a template. The distances between the centers of the holes must strictly match the project dimensions. Holes are cut using a router or chisel, ensuring precise baluster fit.
Balusters are installed into the baluster support and secured with glue or screws driven from below the plank. This method ensures a clean appearance — the fasteners are completely concealed.
The finished structure is mounted onto the stringer and secured with glue and screws. The junctions between the baluster support and the stringer may be additionally covered with decorative planks.
Ensuring verticality: the key to a professional result
One of the main challenges when attaching balusters to a sloped stringer is ensuring their strict verticality. Even minor deviations from vertical are visually noticeable and spoil the overall impression of the staircase.
Methods for checking verticality
Using a plumb bob — a classic, time-tested method. The plumb bob is hung next to the baluster, and its position is adjusted until it aligns with the vertical line.
Laser level — a modern tool providing high precision. A vertical laser line is projected onto the baluster, allowing its position to be monitored during installation.
Bubble level — a simple and reliable tool for checking verticality. The level is placed against the baluster in two mutually perpendicular planes.
Adjusting baluster position
If deviations from vertical are detected, adjustment must be made. If the baluster is mounted on a dowel or spike, the lower end can be slightly trimmed to change the installation angle.
When using screws, adjustment is performed by changing the screwing angle or installing additional shims. It is important to remember that any adjustments must be made before finalizing the joint fixation.
Final finishing and decorative treatment
After installing all balusters, the joints must be finished and decorated. These tasks largely determine the final appearance of the staircase.
Filling mounting locations
Locations where screws or other visible fasteners are installed must be neatly filled. Wooden plugs made from the same wood species as the balusters are used for this purpose.
The plugs are glued into the holes and trimmed flush with the surface after the glue dries. Then, sanding is performed to achieve a smooth surface.
Sanding and preparation for finishing
All balusters and joint areas are carefully sanded. Start with coarse grit (P120), gradually moving to finer grits (P220-P320).
Special attention is given to the areas where balusters connect to the stringer. Any irregularities or gaps must be filled with wood putty followed by sanding.
Protective-decorative finishing
The final step — applying protective and decorative finish. The type of finish selected depends on the wood species, usage conditions, and design requirements.
Transparent varnishes highlight the natural beauty of the wood and provide reliable protection against moisture and mechanical damage. Modern polyurethane varnishes offer high durability and longevity.
Oil-based finishes create a more natural appearance and allow the wood to "breathe". They require periodic reapplication but are easy to restore.
Waxes provide a soft matte sheen and a pleasant tactile surface. Wax finishes are environmentally safe and create a unique atmosphere of coziness.
Quality control and acceptance of work
Professional installation implies careful quality control at every stage of work. Final acceptance must confirm that the completed work meets technical requirements and aesthetic standards.
Checking connection strength
Each baluster undergoes a load test. A horizontal load of 50-70 kilograms is applied to the top of the baluster. A quality joint should not exhibit noticeable deformation or play.
The reliability of the connection to the stringer is checked by applying a vertical load. The baluster should not rotate around its axis or shift vertically.
The straightness of the balusters is checked using a taut string or laser level. All balusters must be located in one plane with deviation not exceeding ±2 mm. Significant deviations may require reinstallation of individual elements.
The verticality of all balusters is checked using a laser level or plumb bob. The allowable deviation from verticality should not exceed 2 millimeters per meter of height.
Distances between balusters are checked with a tape measure. Deviations from the project dimensions should not exceed ±3 millimeters.
Visual inspection
Visual inspection includes checking the quality of surface treatment, absence of visible defects, and uniformity of coating. All joints must be neat, without gaps or unevenness.
The color palette of the balusters should be uniform, without abrupt transitions between shades. The wood texture should harmonize on all elements.
Operation and Maintenance
Properly installed balusters require minimal maintenance, but adherence to simple usage rules significantly extends their service life.
Regular Maintenance
Wooden balusters require regular cleaning from dust and dirt. Use a soft cloth slightly dampened with water or specialized wood care products.
Do not use aggressive cleaning agents, abrasive materials, or excessive amounts of water. This may damage the protective coating or cause wood deformation.
Periodic coating renewal
Depending on the intensity of use and the type of coating, renewal may be required. Lacquer coatings are renewed every 5-7 years, oil-based coatings every 2-3 years.
Before applying a new coating, the surface is lightly sanded with fine abrasive to improve adhesion. Damaged areas are repaired with wood putty.
Fastener condition monitoring
It is recommended to check the strength of baluster fasteners once a year. If connections are found to be weakened, fasteners are tightened or additional fixation with adhesive is performed.
Special attention is paid to areas of maximum load — upper parts of balusters where handrails are attached. These connections experience the highest loads during operation.
The skill of installing balusters on the stringer comes with experience, but knowledge of basic principles and techniques allows even a beginner craftsman to achieve a professional result. The key is not to rush, carefully execute each stage of work, and not compromise on the quality of materials and tools.
Remember: a staircase is built to last decades, and the quality of its construction will delight or disappoint you every day. Investments in professional installation pay off through longevity, safety, and aesthetic perfection of the finished structure.
Properly installed balusters not only ensure safe movement along the staircase but also create a unique atmosphere in the home. They become the interior’s signature feature, showcasing the owner’s taste and status.
For many years, STAVROS has specialized in creating exclusive staircase structures and their components. Our craftsmen possess deep knowledge of traditional woodworking techniques and actively apply modern innovative solutions. We understand that every detail of the staircase must be executed flawlessly, as it is precisely the accumulation of small details that creates the overall impression of perfection. By choosing STAVROS, you receive not just quality products, but works of art that will serve as decoration for your home for many years.


