Article Contents:
- Required materials and tools
- Materials
- Tools
- Design and dimensions definition
- Material preparation
- Step 1. Marking and cutting wood
- Step 2. Sanding and surface treatment
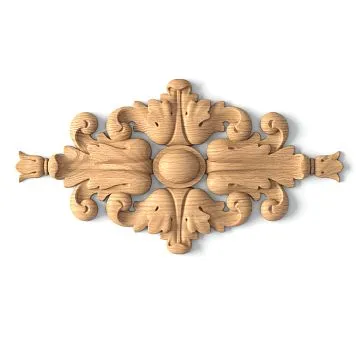
- Step 3. Making decorative inserts
- Step 4. Assembling composite balusters
- Step 5. Installing finished balusters
- Planning and design
- Material selection
- Processing technologies
- Safety and quality of installation
- Practice and patience
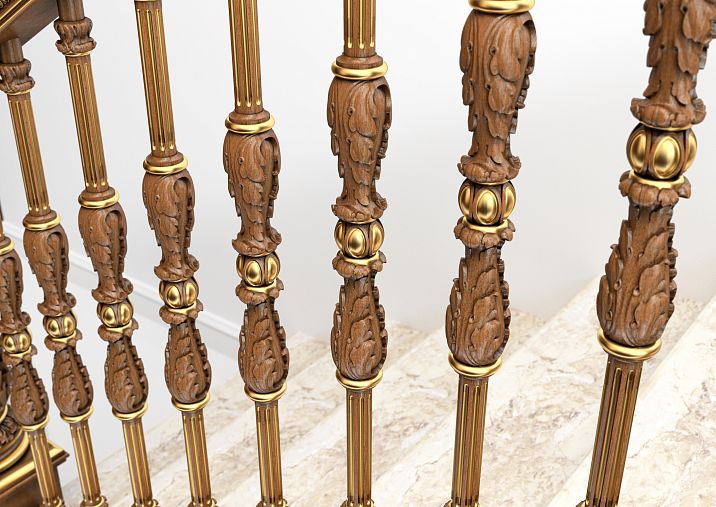
- Project 1: Classic carved balusters
- Project 2: Modern minimalist balusters
- Project 3: Eclectic mix of materials
- Conclusion and key takeaways
- Final Thoughts
Stairs are not just a means of moving between floors, but a true work of art that sets the tone for the entire interior. An eye-catching staircase can transform a space, adding coziness and individuality, and properly made balusters play a key role in this. If you want to try the DIY approach and make balusters yourself, this detailed guide is exactly for you. In this article, we will discuss the necessary materials, tools, stages of work, and installation nuances, as well as share useful tips that will help you achieve a professional result. For inspiration and component selection, we recommend visiting the section %sbuy balusters.


Required materials and tools
Before starting to make balusters by yourself, you need to gather all the necessary materials and tools. Proper preparation is the key to a successful result, so pay attention to component selection and tool choice.


Materials
- Wood
Choose high-quality material: solid oak, beech, or ash. Natural wood not only looks stylish and elegant, but also has high strength.
○ If you want %sBuy wooden balusters, choose items with minimal knots and defects.
- Metal
Metal elements, which can be used for decorative inserts or fasteners, will give balusters a modern look and additional structural rigidity.
○ When selecting metal, pay attention to %sHandrails and balusters, if you plan to use them as decorative elements.
- Concrete
Concrete inserts or decorative elements will give the item an industrial character, adding strictness and originality.
○ To create an industrial style, you can use %sNewel posts, which will naturally complement the overall structure.
- Fasteners and components
For secure mounting, you will need self-tapping screws, angle brackets, wood and metal glue, as well as protective compounds for surface treatment.
○ If you needstaircase components, you can always find them on a specialized website.
Our factory also produces:


Tools
● Circular or band saw for cutting wood.
● Hand sander or sander for surface finishing.
● Drill with a set of drill bits for fastening.
● Tape measure, level, and pencil for marking.
● Clamps for holding parts during gluing.
● Safety glasses, gloves, and personal protective equipment.
Get Consultation
Preparation and Planning
Design and Dimensions Definition
Before starting work, determine the design of the future balusters. Decide whether you want to make classic carved balusters, modern flat pieces, or combined balusters where multiple materials are combined in one element. In this guide, we will examine a step-by-step process for making balusters yourself, which can be adapted to any style.
- Draw a sketch
Draw a rough plan of the balusters, indicate dimensions, shape, and placement of decorative elements.
○ If you need a sample, pay attention tobalusters for staircase to buy, to get an idea of modern trends.
- Size Calculation
Determine the height, width, and thickness of the balusters based on the overall dimensions of the staircase and safety requirements. Norms for spacing between balusters also play an important role—they must be convenient and safe to use. - Material Combination Selection
Decide which materials will be used in your product. For example, the base could be solid wood, while decorative elements could be metal or concrete inserts. This approach will allow you to achieve a unique design and strengthen the structure.
○ If you plan to manufacturewooden balusters for staircases, ensure that the selected wood meets all quality requirements.
Material Preparation
- Wood Processing
Before starting work, check that the wood is dried and treated with antiseptic agents. This will prevent mold and rot.
○ For treatment, you can use special compounds, then sand the surface to achieve a smooth finish.
- Preparation of Metal Elements
If the project includes metal inserts, ensure the metal is free of rust and has an anti-corrosion coating. If necessary, sand and polish it. - Preparation of Concrete Inserts
Concrete elements must be sanded to achieve a smooth surface. You can use sanders and sandpaper to achieve the ideal result.
Step-by-step guide to making balusters yourself
Step 1. Marking and Cutting Wood
The first stage is marking and cutting wood according to your sketches and calculations.
- Mark the parts
Using a tape measure and pencil, accurately mark the future balusters on the stock. Ensure the dimensions match your calculations and safety standards.
○ Example: If you plan to manufacturebuy wooden balusters for the staircase, mark each stockpiece taking into account the gaps between elements.
- Cutting
Carefully cut the parts along the markings using a circular saw. Pay attention to the cut surface quality — it should be smooth and free of chips.
○ Use safety goggles and gloves for safety.
Step 2. Sanding and Surface Treatment
After cutting, sand the wood to achieve a smooth surface.
- Sanding
Use a sander or sand by hand all parts. Pay special attention to edges and corners to ensure they are smooth and free of burrs.
○ It is recommended to use medium-grit sandpaper, then switch to finer grit for final finishing.
- Treatment with Protective Compounds
Apply wood preservative and varnish to the surface to protect against moisture and mechanical damage. Allow each coat to dry according to the manufacturer's instructions.
○ If you want %sbuy wooden balusters, pay attention to the quality of the materials used.
Step 3. Making Decorative Inserts
To create combined balusters, it is important to plan how the materials will be combined. At this stage, you will make metal and concrete inserts.
- Metal Inserts
If your design includes metal elements, cut and process them using appropriate tools.
○ Use polishing machines to achieve a smooth and shiny surface.
○ Provide holes for attaching metal parts, which can later be secured using screws or adhesive.
- Concrete Inserts
Concrete elements can be cast into pre-prepared molds. Prepare the concrete mix, pour it into the mold, and allow it to dry completely. After drying, remove the item and sand the surface until it is perfectly smooth.
○ Concrete inserts can be used as decorative elements at the bottom or side of balusters to create an interesting visual contrast.
Step 4. Assembling Combined Balusters
After preparing all individual components, proceed to assemble the balusters.
- Gluing and Joining Wooden Parts
Use high-quality wood glue to join the main baluster parts. Ensure the joints are tight and even.
○ Use clamps to secure parts so they do not shift while the glue dries.
- Installing Metal and Concrete Inserts
After assembling the main parts, carefully install the prepared metal and concrete elements. They can be secured using special fasteners or adhesive suitable for mixed materials.
○ It is important to maintain symmetry and even distribution of decorative inserts to ensure the final product looks harmonious.
- Quality Control
Check each joint, ensure there are no gaps or unevenness. If necessary, perform additional sanding or finishing.
○ If you plan tomake balusters by hand○ Pay attention to small details – the final result depends on them.
Step 5. Installing Ready Balusters
After the balusters are made and fully dried, proceed with their installation on the staircase.
- Staircase Preparation
Before installation, ensure the staircase surface is flat and clean. Mark the baluster mounting locations according to the pre-prepared plan.
○ If you have ready-madeHandrails and balustersthey will help you visually plan the installation.
- Mounting balusters
Use a drill, screwdriver, and appropriate fasteners for secure baluster installation. When mounting, ensure balusters are positioned strictly vertically and at the same level.
○ For installation, it is recommended to usePosts for staircaseif installing balusters as part of a comprehensive railing system.
- Final finishing
After installation, check the stability and reliability of the mounting. If minor unevenness or gaps are detected, fix them using mounting adhesive or additional fasteners.
○ Proper installation ensures the safety of staircase use and extends the lifespan of the product.
Expert Tips and Recommendations
Planning and design
Before starting work, carefully plan the design of future balusters. Prepare a detailed plan, taking into account dimensions, interior style, and functional requirements.
● If you wantbalusters for staircase to buybe sure to study modern trends and choose a style that will harmonize with the overall interior.
Material selection
The quality of raw materials directly affects the durability of the finished product. Prefer proven suppliers and high-quality wood, metal, and concrete.
● If you plan to manufacturewooden balusters for staircaseschoose wood without knots or defects so the product is not only beautiful but also strong.
Processing technologies
Modern technologies such as laser cutting and digital modeling allow achieving an ideal material combination. If you do not have access to high-tech equipment, you can consult professionals to perform certain stages of the work.
● For example, manufacturingmake balusters by hand can even be done at home if all work stages are properly prepared.
Safety and Quality of Installation
Never cut corners on safety! Proper baluster mounting is the key to a reliable and long-lasting staircase.
● Use high-qualityHandrails and balustersto ensure maximum structural stability.
● Pay attention toNewel postswhich complement the overall railing ensemble.
Practice and patience
Making balusters by hand requires patience and care. Do not be afraid to experiment, try different techniques and methods of material processing.
● It is important to remember thatbuy balusters can always be done, but making an item by hand is an opportunity to realize your ideas and obtain a unique result that will delight you for many years.
Examples of successful DIY projects
Project 1: Classic carved balusters
In one of the private home projects, the owner decided to make classic carved balusters by hand. The main material — solid oak — was processed to perfect smoothness, after which decorative carvings were made using hand tools. Additional mounting elements were made from metal angles, ensuring high structural strength. The final result was not only beautiful but also functional — the staircase became the centerpiece of the interior, attracting guests' attention.
● For inspiration, you can look at howwooden balusters DIY transform spaces.
Project 2: Modern minimalist balusters
the structure was based onFlat balusters made from birch solid wood, polished to a matte finish. The metal elements were produced using laser cutting, allowing for clean and precise lines. Concrete inserts added a sense of rigidity and industrial character. The result was a stylish and functional staircase that perfectly fits into a modern urban interior.
Project 3: Eclectic mix of materials
The third project is an example of bold design, where traditional and modern materials are combined into one element. The main body of the balusters is made from solid natural wood, while decorative inserts are crafted from forged metal and processed concrete. This combination allowed for the creation of a unique item reflecting the owner’s individuality. The handmade balusters became a striking interior accent, highlighting originality and creative approach.
● If you wanthow to make balusters from wood by hand● This project will be an excellent example to emulate.
Conclusion
Conclusions and key takeaways
Making balusters by hand is a creative and engaging process that allows you to realize your design ideas, create a unique interior, and enjoy the satisfaction of self-made work. In this guide, we considered:
● Required materials and tools: from high-quality wood to modern metal and concrete processing technologies.
● Work stages: from marking and cutting to sanding, applying protective coatings, and assembling the finished product.
● Tips for selection and installation: the importance of careful planning, proper material selection, and quality installation to ensure safety and longevity of the structure.
● Examples of successful projects: real cases demonstrating how a DIY approach can transform interiors and serve as inspiration.
If you dream of creating a unique interior where every detail reflects your individuality, try making balusters by hand. This not only allows you to save money but also gives you the opportunity to realize your boldest design ideas. Do not be afraid to experiment with different materials and technologies — the result will exceed all expectations!
For obtaining quality components and materials, pay attention to the sectionstaircase components. Here you will find everything necessary to create your masterpieces: fromPosts for staircase toHandrails and balusters andNewel posts.
Final Thoughts
regardless of whether you are an experienced craftsman or a beginner in the world of DIY, following the step-by-step guide will help you create a quality and reliable product that will become a source of pride for your home. May everyStaircase Baluster reflect your impeccable taste and pursuit of perfection!
Invest time in your own creativity, experiment, refine your skills, and create a unique interior that will delight you and your loved ones for many years. Remember: quality begins with details, and every detail, whether it bebuy wooden balusters, wooden balusters DIYorinstallation of balusters and handrails, plays a crucial role in the overall result.