


Article Contents:
- What Are Balusters and Why Are They Important in Architecture
- Functional Significance of Balusters
- Aesthetic Role in Interior and Exterior Design
- Materials for Making Balusters: Choosing the Optimal Option
- Wooden balusters: classicism and natural beauty
- Metallic balusters: strength and modern style
- Stone Balusters: Monumentality and Luxury
- Modern Alternatives: Glass, Polymers, and Composite Materials
- Technical Parameters and Regulations for Installing Balusters
- Height of Balusters and Railing
- Distance between balusters
- Dimensions and Proportions of Balusters
- Preparing to Install Balusters: Tools and Materials
- Required tools
- Fasteners and Materials
- Preparation of Balusters
- Ways to Install Balusters on Stairs: Choosing the Optimal Method
- Attaching Balusters to Steps
- Installation Using Self-Tapping Screws
- Installation Using Dowels
- Mounting Balusters to the Stringer
- Installation Using Dowels or Self-Tapping Screws
- Mounting on a Baluster Base
- Installing Balusters Between the Step and the Railing
- Step-by-Step Guide to Installing Balusters Yourself
- Preparatory work
- Installation process
- Option 1: Installing Balusters on the Step with Dowel Mounting
- Option 2: Installing Balusters on the Stringer Using a Baluster Base
- Finishing
- Features of Installing Balusters Made from Different Materials
- Installing wooden balusters
- Installing metal balusters
- Installing Stone Balusters
- Features of Installing Glass and Composite Balusters
- Common Mistakes When Installing Balusters and How to Avoid Them
- Incorrect Marking and Uneven Spacing
- Insufficiently Reliable Mounting
- Ignoring the Staircase's Angle of Inclination
- Incorrect Preliminary Treatment
- Failure to Obey Safety Regulations
- Care and Maintenance of Balusters: Extending Service Life
- Care for Wooden Balusters
- Metal Balusters Maintenance
- Care for Stone and Concrete Balusters
- Conclusion: Creating Safe and Beautiful Railing Systems
Balusters occupy a special place in the world of architectural elements. These elegant vertical posts not only perform an important functional role in staircases and railings, but are also a key decorative element capable of transforming the interior or exterior of any building. Proper Installing balusters is an art form requiring attention to detail, precision, and specific skills.
Why should you pay special attention to this element? Balusters are not just decorative details—they ensure safety, preventing falls from stairs and elevated areas. Moreover, properly selected and installed balusters can become a true highlight of your home, emphasizing its style and status.
In this article, we will delve into the world of balusters: we will examine their types, materials, technical specifications, and, of course, thoroughly discuss the installation process. Whether you plan to renovate an existing staircase or create a new structure from scratch—this information will be invaluable to you.


What are balusters and why are they important in architecture
Balusters are vertical support elements located between the base and handrails of staircases, balconies, or terraces. Their name has an interesting origin—it comes from an ancient Greek word meaning 'pomegranate flower,' which is explained by the similarity of the classic baluster shape to an open bud of this plant.


Functional role of balusters
First and foremost, balusters perform a crucial protective function. They prevent falls from height, creating a reliable barrier. This is especially important in homes with children or elderly residents. Properly installed balusters must withstand significant lateral loads, ensuring the safety of all household occupants.
The second function is structural. Balusters serve as supports for handrails, distributing loads and ensuring the stability of the entire railing structure. The quality of their installation directly affects the durability and reliability of the entire railing.
Our factory also produces:


Aesthetic role in interior and exterior design
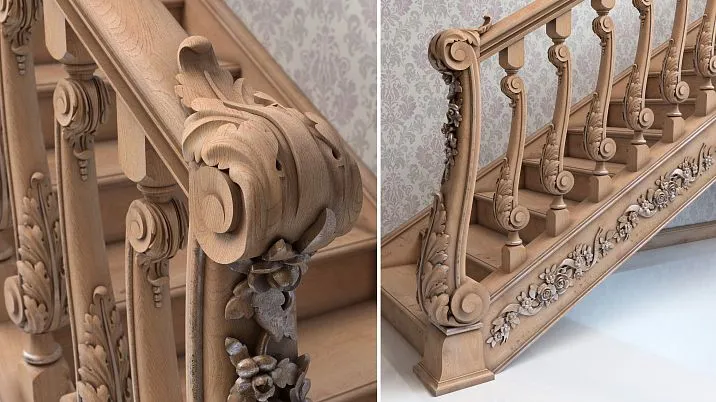
In addition to practical functions, balusters play a significant role in shaping the appearance of a room or building facade. They can become a true decoration of the interior, setting the tone for the entire design. Elegant carved wooden balusters will create an atmosphere of classic elegance, metal structures will emphasize a modern style, and stone balusters will add monumentality and luxury.
Interestingly, balusters have been used in architecture since ancient times. Their origin is considered to be Assyria, where they were used to frame window openings in palaces. They gained widespread popularity during the Renaissance, when architects actively used them in decorating villas and palaces of the nobility.
Get Consultation
Materials for manufacturing balusters: choosing the optimal option
The modern market offers balusters made from the most diverse materials, each with its own unique characteristics, advantages, and features installation.
Wooden balusters: classic and natural beauty
Wood is a traditional and, perhaps, the most popular material for manufacturing balusters. Its main advantages:
- Ecological and natural properties
- Attractive appearance with unique texture
- Relative ease of processing and installation
- Ability to create complex decorative forms
- Good compatibility with other materials in interior design
Various types of wood are used to manufacture wooden balusters, each with its own characteristics:
Spruce is a lightweight and affordable material, resistant to temperature fluctuations. It is ideal for outdoor railings due to its resistance to atmospheric effects. Spruce balusters are distinguished by their affordable price, making them a popular choice for many homeowners.
Larch is one of the most sought-after species for manufacturing balusters. Its wood has a light tone, easily accepts staining and coloring. The main advantage of larch is its natural antiseptic properties, which prevent it from rotting. In addition, this material has high fire resistance and, unlike spruce, does not release resin when heated.
Oak is an elite wood species characterized by beautiful texture, exceptional strength, and longevity. Oak balusters can serve for centuries, retaining their original appearance. They withstand high humidity and temperature fluctuations well. The only drawback is their high cost, but it is fully justified by the quality and longevity of the products.
Beech and ash are also frequently used to manufacture high-quality balusters, possessing good operational characteristics and attractive appearance.
Metallic balusters: strength and modern style
Metal balusters are becoming increasingly popular due to their unique qualities:
- Exceptional strength and durability
- Resistance to Mechanical Damage
- Ability to create complex ornamental structures
- Modern appearance
Stainless steel balusters stand out particularly, offering several additional advantages:
- Resistance to corrosion
- Ability to use both indoors and outdoors
- Resistance to temperature fluctuations and atmospheric precipitation
- Easy maintenance - cleaning requires only a regular cloth and cleaning agents
Metallic balusters blend beautifully into modern interiors in high-tech, loft, or minimalist styles, creating a sense of lightness and airiness in the structure.
Stone balusters: monumentality and luxury
Balusters made of natural stone are a choice for those who value luxury and durability. Marble and granite are most commonly used. Stone balusters have the following advantages:
- Exceptional strength and durability (service life up to 50 years or more)
- Luxurious appearance
- Resistance to atmospheric effects
- Ability to create complex sculptural forms
It is important to note that stone balusters have significant weight, therefore requiring especially strong foundations capable of supporting heavy loads. Before installation careful calculations must be performed, taking into account the expected load.
Modern alternatives: glass, polymers, and composite materials
In addition to traditional materials, modern technologies offer innovative solutions:
Glass balusters create an effect of lightness and airiness. They are made of tempered glass, which does not shatter into sharp fragments upon impact but only develops a network of cracks. They look especially impressive with backlighting.
Polymer and composite balusters combine ease of installation, affordable pricing, and good operational characteristics. Modern technologies allow creating products that imitate natural materials but are more resistant to moisture and temperature fluctuations.
Technical specifications and installation norms for balusters
Before proceeding to installing balustersit is necessary to familiarize oneself with the main technical requirements and norms that ensure the safety and functionality of the structure.
Height of balusters and railings
The height of balusters directly depends on the height of railings. According to building codes (SNiP), the standard railing height should be 90 cm from the level of the step or floor. However, in private homes, this parameter may vary from 90 to 110 cm.
Special requirements apply to railings in childcare facilities or homes where children reside. In such cases, railing height may reach 120 cm, and additional handrails at a lower level are recommended for infants.
Distance between balusters
This parameter is critically important for ensuring safety. According to regulations, the distance between balusters must prevent injury. A safe distance is one through which a spherical object with a diameter of 107 mm cannot pass.
In residential and public buildings, the standard distance between balusters is 10–12 cm. In childcare facilities, this value must be smaller to prevent the risk of a child getting stuck between balusters — no more than 10 cm.
Dimensions and proportions of balusters
The width of balusters may vary from 3 to 12 cm, and thickness from 2 to 5 cm, depending on the material and design. When selecting dimensions, it is important to maintain proportions so that balusters harmoniously fit into the overall structure of the staircase or railing.
For wooden balusters, a cross-section of 5×5 cm or 6×6 cm is often used, providing an optimal balance of strength and aesthetics. Metal balusters can be thinner due to the high strength of the material.
Preparation for installing balusters: tools and materials
Success balusters installation It largely depends on proper preparation. Let's consider what tools and materials you will need to perform this task.
Required tools
For quality baluster installation, you will need the following tools:
- Tape measure and construction level for accurate measurements
- Pencil or marker for marking
- Drill with drill bits of various diameters
- Power drill or screwdriver
- Saw (for wooden balusters)
- Chisel (for fitting wooden elements)
- Sandpaper of various grits
- Hammer
- Clamps for securing parts
- Square for checking right angles
Fasteners and materials
Depending on the chosen installation method and baluster material, you may need:
- Flat-head screws (diameter not less than 8 mm)
- Wooden dowels
- PVA glue (for wooden structures)
- Special adhesive for stone or metal
- Baluster supports (auxiliary strips)
- Decorative caps for concealing fasteners
- Finish lacquer or paint for final coating
Preparation of balusters
Before installation wooden balusters are recommended to be treated with protective compounds:
- Carefully sand the surface with sandpaper, starting with coarse grit and gradually moving to finer grit.
- Treat the wood with antiseptic to protect against rot, mold, and insects.
- Apply primer to ensure better adhesion of the final coating.
- Apply lacquer or paint in several layers, carefully drying each layer.
Metal balusters also require preliminary treatment: cleaning from contaminants, degreasing, and, if necessary, applying anti-corrosion coating.
Ways to install balusters on stairs: choosing the optimal method
There are several main ways balusters installation to install balusters on stairs, each of which has its own features, advantages, and implementation difficulties.
Attaching balusters to steps
Installation with screws
This is one of the simplest and most common ways to mount balusters:
- Mark the locations for baluster installation on the steps, maintaining equal spacing between them.
- Drill holes in the steps for screws.
- Install the baluster at the marked location and secure it with flat-head screws.
- Cover the screw heads with decorative plugs or spackle.
The advantage of this method is simplicity and speed of installation. The disadvantage is visible mounting points that require masking.
Installation on dowels
This method provides a more secure and aesthetically pleasing mounting:
- Mark the locations for baluster installation.
- Drill holes in the steps for dowels (about 20-25 mm deep).
- Drill corresponding holes in the lower part of the balusters.
- Apply PVA glue into the holes and onto the dowels.
- Insert the dowels into the holes in the steps and install the balusters.
Advantage: no visible fasteners. Disadvantage: requires more precise work and additional drying time for the glue.
Mounting balusters to the stringer
When mounting balusters to the stringer (the side rafter of the staircase), you must consider the staircase's incline. Before installation, the bottom ends of the balusters should be cut at the same angle as the staircase's slope to ensure their vertical position.
Mounting on dowels or screws
The process is similar to mounting to steps, but taking into account the angle of the cut:
- Mark the locations for baluster installation on the stringer.
- Drill holes in the stringer for dowels or screws.
- Prepare the balusters by cutting their bottom ends at the angle of the staircase's incline.
- Drill holes in the ends of the balusters (it is recommended to do this before cutting for more accurate centering).
- Assemble the parts using dowels and glue or screws.
Mounting on a baluster support
This method involves using a helper board — a baluster support:
- Prepare a planed board with a cross-section of approximately 20×50 mm.
- Mark the positions of the balusters on the board at equal distances from each other.
- Cut the ends of the balusters at an angle according to the stringer's slope.
- Apply PVA glue to the sanded ends of the balusters and attach them to the board with screws.
- Install the assembled structure onto the stringer, securing it with glue and screws.
The advantage of this method is the ability to pre-assemble railing sections and install them on the stairs later.
Installing balusters between the steps and the handrails
This method involves attaching balusters both to the steps from below and to the handrails from above:
- Mark the locations for installing balusters on the steps and the corresponding points on the handrails.
- Prepare balusters of the required length, trimming them if necessary.
- Secure the balusters to the steps using one of the methods described above.
- Install the handrails by securing them to the top ends of the balusters using screws, dowels, or special fasteners.
This method provides the greatest rigidity and reliability of the structure, but requires high precision in marking and fitting the elements.
Step-by-step instruction for installing balusters yourself
Now that we have reviewed various mounting methods, here is a detailed step-by-step instruction for installing balusters installing balusters on a wooden staircase yourself.
Preparation Work
- Measuring and Planning: Carefully measure the staircase and determine the required number of balusters, taking into account the standard distance between them (10-12 cm).
- Surface Preparation: Ensure that the steps and stringers are clean, dry, and smooth. Sand the surfaces if necessary and remove any defects.
- Marking: Mark the locations for installing balusters on the steps or stringers using a tape measure, pencil, and square. Check that the distance between marks is uniform.
- Baluster Preparation: Treat the balusters with protective compounds and finishes as described earlier. If necessary, trim them to the required length and angle.
Installation process
Option 1: Installing balusters on steps with dowel mounting
- Drill holes in the steps according to the marking. The depth of the holes should be about 20-25 mm, and the diameter should match the diameter of the dowels used.
- Drill corresponding holes in the lower part of the balusters. Use a drill with a depth stop to avoid drilling through the balusters.
- Apply PVA glue to the holes in the steps and insert the dowels.
- Apply glue to the holes in the balusters and install them on the dowels. Check the verticality of each baluster using a level.
- Leave the structure until the glue is fully dry (usually at least 24 hours).
Option 2: Installing balusters on the stringer using a baluster seat
- Prepare the baluster seat — a planed board with a cross-section of 20×50 mm or similar.
- Mark the positions of the balusters on the baluster seat, maintaining equal spacing between them.
- Trim the lower ends of the balusters at an angle corresponding to the slope of the stringer.
- Apply PVA glue to the sanded ends of the balusters and attach them to the baluster seat using screws.
- Secure the assembled structure to the stringer using glue and screws.
- Install the handrails by securing them to the top ends of the balusters.
Final finishing
- After the glue has fully dried and all elements are finally secured, check the reliability of the structure.
- Mask visible fastener elements with decorative plugs or putty.
- If necessary, perform final sanding and apply an additional layer of protective coating (varnish or paint).
- Remove adhesive residues and other contaminants that arose during installation.
Features of installing balusters made of different materials
Process balusters installation Differ significantly depending on the material they are made of. Let's consider the installation features of balusters made from different materials.
Installation of Wooden Balusters
Wooden balusters are the easiest to install due to the ease of processing the material:
- Wooden dowels, self-tapping screws, and PVA glue are used to connect elements.
- It is recommended to treat all wooden elements with protective compounds before installation.
- Balusters can easily be cut to the required length and angle if necessary.
- After installation, visible fasteners can be masked with wooden plugs of the same color.
Installation of Metal Balusters
Metal balusters require a different approach:
- Special metal fasteners, welding, or threaded connections are used for mounting.
- To cut metal balusters, use a grinder with a metal-cutting disc.
- Connection points may require additional treatment to prevent corrosion.
- Self-tapping screws or special fastening systems are used to attach to wooden elements of the staircase.
Installation of stone balusters
Installing balusters made of natural stone is the most complex process due to the material's heavy weight and brittleness:
- Before starting work, ensure the foundation is strong enough to support the significant weight of the structure.
- Special stone adhesives and metal dowels are used for mounting.
- Installing each baluster requires special care due to the material's brittleness.
- Installation is performed on a level monolithic foundation checked with a level.
- After installation, remove adhesive residues and apply a protective varnish to the stone surface if necessary.
Features of installing glass and composite balusters
Modern materials have their own specific installation requirements:
- Glass balusters are mounted using special clamps or into grooves of metal profiles.
- When working with glass, special care must be taken and protective gloves must be used.
- Composite balusters are installed similarly to wooden ones, but may require special adhesives compatible with the material.
Typical errors when installing balusters and how to avoid them
When installing by yourself installing balusters Beginners often make a number of mistakes that can lead to problems with the safety and aesthetics of the structure. Let's consider the most common ones and ways to prevent them.
Incorrect marking and uneven spacing
Error: Inaccurate marking leads to uneven placement of balusters, which looks unattractive and may violate safety requirements.
Solution: Use precise measuring tools (tape measure, square) and make preliminary markings. Check the distance between marks several times before drilling holes.
Insufficiently secure fastening
Error: Using insufficient number of fasteners or selecting them incorrectly may lead to structural loosening.
Solution: Use high-quality fasteners of appropriate size. For wooden balusters, it is recommended to combine dowels with glue for maximum strength.
Ignoring the staircase incline angle
Error: When installing balusters on the stringer, it is often forgotten to account for the staircase incline, causing balusters to stand not vertically.
Solution: Always measure the staircase incline angle and cut the lower ends of balusters at the corresponding angle. Check the verticality of each installed baluster using a level.
Incorrect preliminary treatment
Error: Skipping the preliminary treatment of wooden balusters (sanding, priming, protective coatings) shortens their service life.
Solution: Carefully treat all wooden elements before installation. This not only extends their service life but also improves their appearance.
Non-compliance with safety regulations
Error: Installing balusters at too large a distance from each other or using railings of insufficient height creates a safety hazard.
Solution: Strictly adhere to regulations: distance between balusters no more than 10-12 cm, railing height no less than 90 cm.
Baluster maintenance: extending service life
Proper care of balusters will help maintain their attractive appearance and functionality for many years.
Care for wooden balusters
- Regular cleaning: Remove dust with a soft cloth or vacuum cleaner with a soft attachment. For more thorough cleaning, use a slightly damp cloth soaked in mild detergent.
- Periodic renewal of protective coating: Every 2-3 years, renew the lacquer or paint layer on wooden balusters. Before applying a new coating, lightly sand the surface with fine-grit sandpaper.
- Inspection for damage: Regularly inspect balusters for cracks, chips, or signs of rot. Address any damage promptly.
Maintenance of metal balusters
- Cleaning from dirt: Use a soft cloth and non-abrasive cleaning agents to remove dust and dirt.
- Protection against corrosion: Periodically inspect metal elements for signs of rust. Treat affected areas with anti-corrosion compound upon detecting initial signs of corrosion.
- Inspection of fasteners: Regularly check the reliability of all connections and tighten fasteners as needed.
Maintenance of stone and concrete balusters
- Cleaning: Remove dust and dirt with a soft brush or cloth. For deeper cleaning, use specialized stone cleaning agents.
- Protection from moisture: Every 1-2 years, apply special protective coatings to the stone surface to prevent moisture penetration and staining.
- Inspection for cracks: Regularly inspect stone balusters for cracks or chips. Consult stone restoration specialists if damage is detected.
Conclusion: creating safe and beautiful railings
Correct Installing balusters This is a combination of technical skill and artistic taste. Following the recommendations in this article, you will be able to create a reliable, safe, and aesthetically pleasing railing for your staircase, balcony, or terrace.
Remember that the quality of materials and careful installation directly affect the longevity and safety of the structure. Do not cut corners on fasteners and protective coatings — these are investments in the longevity of your railing.
If you are unsure of your abilities or the project is too complex, you can always consult professionals. STAVROS specializes in manufacturing and installing balusters and railings from various materials. STAVROS’s long experience, professional equipment, and highly skilled specialists guarantee impeccable work quality and long-lasting structures.
Regardless of whether you choose classic wooden balusters, modern metal constructions, or luxurious stone elements — proper installation will turn them into a true decoration of your home, delighting you and your guests for many years.


