


Article Contents:
- Balusters: More Than Just Supports for Handrails
- Functional Significance of Balusters
- Types of Balusters by Material and Shape
- Preparation for Installation: Tools and Materials
- Required Tools
- Fastening Elements: What to Choose?
- Preliminary Marking: The Key to Success
- Main Methods of Attaching Balusters to Treads
- Fastening with Dowels: Traditional Method
- Installation on Metal Screws: Maximum Reliability
- Through Fastening: For Maximum Loads
- "Swallow's Tail" Connection: For Enthusiasts of Tradition
- Attaching Balusters to the Stringer: Features and Nuances
- Preparing Balusters for Attachment to the Stringer
- Using Screws for Attachment to the Stringer
- Installation on Baluster Nails: For Complex Structures
- Connecting Balusters to Handrails: Final Step
- Fastening Using a Handrail Support Board
- Direct Connection of Balusters to Handrails
- Hidden Fastening: Aesthetic Without Compromise
- Innovative Solutions for Baluster Fastening
- Specialized Fastening Systems
- Combined Materials and Technologies
- Common Mistakes When Installing Balusters and How to Avoid Them
- Insufficient Fastening Strength
- Incorrect Geometry
- Ignoring Wood Shrinkage
- Saving on Glue
- Final Processing and Protection of Wooden Elements
- Sanding and Surface Preparation
- Protective coatings: varnish, oil, wax
- Regular maintenance and checking of fasteners
- Practical examples of baluster installation for different types of staircases
- Straight stair with stringers
- Staircase on Treads
- Helical Staircase
- Economic aspects: optimizing costs without compromising quality
- Material selection considering budget
- DIY installation or hiring professionals
- Long-term savings: quality vs. price
- Legal requirements and regulations
- Requirements for strength and safety
- Installation specifics in public buildings
- Conclusion: the art of creating the perfect staircase
Stairs in a house are not just a structure for moving between floors. They are an architectural centerpiece, the interior’s calling card, reflecting your taste and status. That’s why the question of how to install balusters, on the staircase, deserves special attention. Because the quality of installation affects not only aesthetics but also the safety of the structure, which will serve you for decades. In this article, I will reveal professional secrets of baluster installation, accumulated over half a century of working with wood. You will learn about nuances of fastener selection, installation details, and innovative solutions that will turn your staircase into a work of art. Ready to dive into the world of exquisite wooden structures? Then let’s begin!
In this article, I will reveal professional secrets of installing balusters, accumulated over half a century of working with wood. You will learn about nuances of choosing fasteners, subtleties of installation, and innovative solutions that will turn your staircase into a work of art. Ready to dive into the world of refined wooden structures? Then let's begin!


Balusters: more than just supports for handrails
Before discussing how to install balusters, on the staircase, deserves special attention. Because the quality of installation affects not only aesthetics but also the safety of the structure, which will serve you for decades.let’s understand their true role in staircase architecture. These vertical elements are not just functional supports. They create rhythm, set the tone for the entire space, and form the visual image of your home.


Functional role of balusters
Balusters perform three key functions:
- Safety - prevent falls from the stairs, especially important for families with children and elderly people
- Structural rigidity - ensure handrail stability, distribute load
- Aesthetics - form the architectural appearance of the staircase, highlight interior style
According to building codes, stair railings in residential buildings must withstand a horizontal load of at least 100 kg per meter of length. This is a serious requirement that underscores the importance of proper baluster installation.
Our factory also produces:


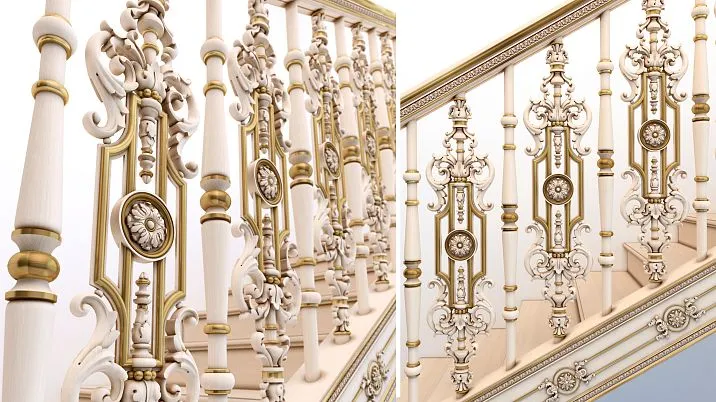
Types of balusters by material and shape
Choosing balusters is impressive in its variety. From classic turned to modern minimalist styles - each type requires its own approach to installation:
- Turned wooden - traditional, with characteristic widening in the central part
- Rectangular - minimalist, suitable for modern interiors
- Carved - with decorative carving, for classic and vintage interiors
- Combined - combination of wood with metal or glass
- Metallic - forged or welded, for loft and industrial styles
The material of the balusters also affects the choice of mounting method:
- Oak - dense, strong wood, requires pre-drilling
- Ash - elastic and strong, holds fasteners well
- Larch - resistant to moisture, ideal for outdoor staircases
- Spruce - soft wood, easy to work with, but requires more frequent maintenance
Get Consultation
Preparation for installation: tools and materials
Before installing balusters, you need to prepare everything. A professional approach starts with the correct selection of tools and materials.
Required tools
For quality installation, you will need:
- Drill or screwdriver - for drilling holes and tightening fasteners
- Set of wood drill bits - various diameters (6-12 mm)
- Circular saw - for trimming balusters to the required angle
- Laser level or plumb bob - for setting balusters strictly vertically
- Tape measure and pencil - for marking
- Clamps - for temporary fixation of elements
- Chisel and hammer - for fitting joints
- Sandpaper - for final surface finishing
- Protective gear - gloves, safety glasses, respirator
Fasteners: what to choose?
Choosing fasteners - one of the key factors determining the durability and reliability of the structure:
- Dowel pins - wooden nails with diameter 10-15 mm, length 50-60 mm
- Metal bolts - with M8-M10 thread, length 80-120 mm
- Wood screws - length 80-90 mm for quick assembly
- Threaded bushings - for creating disassemblable joints
- Wood glue - to strengthen joints and prevent loosening
For support posts, I recommend using stronger fasteners - bolts or screws with diameter not less than 10 mm, as they bear the main load.
Pre-marking: the key to success
Accurate marking - this is 50% of the success in installing balusters. Here is the step-by-step algorithm:
- Install support posts at the beginning and end of the staircase run
- Stretch a string between them along the top line of future balusters
- Mark the locations for intermediate balusters, taking into account the regulatory spacing between them (no more than 15 cm)
- At each mark, draw a square the size of the baluster's cross-section
- Draw diagonals in the square—their intersection point will be the center for drilling
Remember: the distance between balusters should be such that a child cannot fit their head between them. This is a safety requirement that must not be ignored.
Main methods of attaching balusters to steps
There are several proven methods on the staircase, deserves special attention. Because the quality of installation affects not only aesthetics but also the safety of the structure, which will serve you for decades. to steps. Each has its own advantages and application specifics.
Mounting with wooden dowels: traditional method
Shanks are wooden cylindrical pegs that create a strong connection without compromising the aesthetic of the wooden staircase.
Advantages of the method:
- Ecological - only wood
- No visible fastening elements
- Ability to compensate for thermal expansion
Step-by-step instructions:
- Drill a hole in the center of the baluster's end, 1 mm smaller in diameter than the shank and 25-30 mm deep
- Drill a similar hole in the step at the location of the baluster installation
- Apply wood glue to both holes
- Insert the shank into the baluster hole, leaving 25-30 mm protruding
- Install the baluster on the step, aligning the shank with the hole
- Check the vertical alignment with a level
- Leave until the glue fully dries (usually 24 hours)
For increased reliability, I recommend using two shanks per baluster, especially if it has a rectangular cross-section.
Mounting on metal bolts: maximum reliability
Metal bolts provide exceptional connection strength, which is especially important for staircases with heavy usage.
Advantages of the method:
- High-strength connection
- Ability to tighten as needed
- Resistance to vibrations and loads
Step-by-step instructions:
- Drill a hole in the center of the baluster's end, matching the bolt's diameter
- Screw the bolt into the baluster, leaving 5-7 cm protruding
- Secure the bolt with wood glue
- Mark the installation location on the step and drill a hole 3-4 cm deep
- Fill the hole with glue and install the baluster with the bolt
- Align the baluster vertically and allow the glue to dry
For support posts, I recommend using through fastening with a back nut on the opposite side of the step, ensuring maximum reliability.
Through fastening: for maximum loads
This method is especially effective for attaching support posts and balusters on open staircases.
Advantages of the method:
- Exceptional strength
- Ability to adjust tension
- Suitable for heavy elements
Step-by-step instructions:
- Drill a through hole in the tread with a 10-12 mm diameter
- Drill a hole for the bolt in the lower part of the baluster
- Insert the bolt from the bottom of the tread
- Place the baluster onto the protruding bolt
- Secure the connection with a nut and washer
- For aesthetics, you can countersink the top nut into the wood and cover it with a wooden plug
Mortise joint: for lovers of tradition
This is a classic woodworking joint that does not require metal fasteners and looks especially elegant.
Advantages of the method:
- Exceptional aesthetics
- Fully wooden connection
- High strength when properly executed
Features of execution:
- A tenon in the shape of a trapezoid (widening toward the end) is formed on the end of the baluster
- A corresponding groove is selected in the tread
- The joint is strengthened with woodworking glue
- The parts are joined and secured until the glue dries
This method requires high skill and special tools, but the result is worth the effort — the joint looks flawless and lasts for decades.
Baluster mounting to the stringer: features and nuances
Mounting balusters to the stringer has its own specifics, related to the inclined position of this staircase element.
Baluster preparation for mounting to the stringer
Key point — correctly trimming the bottom end of the baluster at the angle of the stringer:
- Measure the stringer's angle using a protractor
- Mark this angle on the end of the baluster
- Carefully trim the end along the marked line
- Sand the cut to a perfectly smooth surface
Only with proper trimming will the baluster stand perfectly vertical, which is critically important for both the aesthetics and safety of the staircase.
Using bolts for mounting to the stringer
This method is similar to mounting to treads, but taking into account the stringer's incline:
- Drill a hole 3-4 cm deep at the center of the baluster's cut end
- Screw in the bolt, leaving the protruding part 5-7 cm
- Mark the installation position on the rail and drill a hole at an angle corresponding to the newel post's position
- Fill the hole with glue and install the newel post
Important: the hole in the rail must be strictly perpendicular to its surface, not vertical relative to the floor.
Installation on a newel post support: for complex structures
A newel post support is an auxiliary strip that significantly simplifies installing newel posts on the rail:
- Prepare a wooden strip with a cross-section of 20x50 mm
- Mark the position of the newel posts on it
- Attach the newel posts to the strip with screws
- Install the assembled structure onto the rail
This method is especially convenient for installing newel posts of complex shapes or during restoration of old staircases.
Connecting newel posts to handrails: final stage
The top part of the newel posts must be securely connected to the handrail, forming a single strong structure.
Connection using a handrail support board
A handrail support board (handrail support) is an intermediate element between newel posts and handrails:
- Secure the top ends of the newel posts at the same level
- Install the handrail support board on the ends of the newel posts
- Attach the board to each newel post with two screws
- Install the handrail onto the handrail support board, securing it from below with screws
The advantage of this method is the ability to pre-assemble fence sections before installing them on the staircase.
Direct connection of newel posts to handrails
For a more minimalist design, you can use direct connection:
- Drill holes at the top of the newel posts for dowels or bolts
- Make corresponding holes at the bottom of the handrail
- Connect the elements using glue
- For reinforcement, you can additionally secure the connection with screws at an angle
With this method, it is important to accurately calculate the height of the newel posts so that the handrail is positioned at the optimal height (90-100 cm from the step level).
Hidden mounting: aesthetics without compromise
To achieve a flawless appearance, you can use hidden mounting:
- Screw in bolts or dowels into the top of the newel posts
- Drill holes at a 45-degree angle into the handrail
- Install the handrail onto the prepared newels
- Secure the handrail through the drilled holes using screws
- Cover the holes with wooden plugs or filler
This method requires high precision, but the result justifies the effort—the joints are practically invisible.
Innovative solutions for newel mounting
Modern technologies offer new solutions that simplify the installation process and increase the structural reliability.
Specialized fastening systems
Comprehensive systems for newel installation have appeared on the market:
- Bayonet fasteners—allow quick installation and, if necessary, removal of newels without damaging the structure
- Adjustable studs—compensate for surface irregularities and ensure perfect vertical alignment
- Hidden fastening plates—create an invisible yet strong connection
These systems significantly simplify the process on the staircase, deserves special attention. Because the quality of installation affects not only aesthetics but also the safety of the structure, which will serve you for decades. even for non-professionals.
Combined materials and technologies
Modern staircases often combine different materials, requiring special approaches to installation:
- Wood and glass—use special clamps and holders
- Wood and metal—use welded connections with wooden inserts
- Modular systems—pre-assembled sections that are installed on-site
These solutions allow creating unique designer staircases with minimal installation time.
Typical mistakes when installing newels and how to avoid them
Over half a century of working with wooden staircases, I have observed numerous mistakes that can easily be prevented.
Insufficient fastening strength
Problem: Using too thin dowels or short screws, insufficient number of fasteners.
Solution: For standard newels, use dowels with a diameter of at least 10 mm or screws 80–90 mm long. For support posts, use M10–M12 studs or through-fastening.
Incorrect geometry
Problem: Newels are installed not vertically or with uneven spacing.
Solution: Use a laser level to check vertical alignment. For even spacing, stretch a string between the outermost points and mark accordingly.
Ignoring wood shrinkage
Problem: Over time, wood shrinks, causing connections to weaken.
Solution: Use well-dried wood (moisture content 8-12%). When installing on metal fasteners, leave a small gap to compensate for shrinkage. Periodically check and tighten fasteners.
Savings on adhesive
Problem: Insufficient amount of glue or use of inappropriate adhesive.
Solution: Use high-quality PVA wood glue for wooden joints. For metal fasteners, use specialized anaerobic adhesives or epoxy resin.
Final finishing and protection of wooden elements
After successful installation of balusters, it is necessary to ensure the longevity and aesthetic appeal of the structure.
Sanding and Surface Preparation
- Carefully sand all wooden elements, starting with coarse sandpaper (P80-P120) and finishing with fine (P180-P240).
- Wipe away dust with a damp cloth and allow the surface to dry.
- If necessary, fill minor defects with wood putty.
- Re-sand the filled areas.
Protective coatings: varnish, oil, wax
The choice of finish depends on the desired result:
- Varnish - creates a durable protective film, highlighting the wood's texture. I recommend polyurethane varnishes for staircases with high traffic.
- Oil - penetrates into the wood structure, protecting it from within. Creates a matte or semi-matte surface, pleasant to the touch.
- Wax - traditional finish, creating a silky surface. Requires periodic renewal, but easily restorable.
For maximum protection, combine coatings: apply oil first, then wax or varnish.
Regular maintenance and inspection of fasteners
Even perfectly installed balusters require periodic maintenance:
- Check the reliability of all fasteners every six months.
- Tighten weakened connections as needed.
- Renew protective coatings as they wear (typically every 3-5 years).
- In case of squeaks, use specialized wood construction compounds.
Practical examples of baluster installation for different types of staircases
Each type of staircase has its own baluster installation characteristics. Let's consider the most common options.
Stringer staircase
This is a classic staircase type, where balusters are attached directly to the treads:
- Install support posts on the first and last treads.
- Mark the positions of intermediate balusters (usually 3-4 per tread).
- Secure balusters using the chosen method (dowels, bolts).
- Install the handrail support board and handrail.
Pay special attention to the first baluster - it bears the main load when using the handrail.
Staircase with stringers
In this case, balusters are attached to the side load-bearing elements - stringers:
- Trim the bottom ends of the balusters at the stringer's slope angle
- Mark the installation positions on the stringer
- Use bolts or dowels for fastening
- Align the top ends of the balusters along the rope
- Install the handrail
The advantage of this type is the possibility of pre-assembling railing sections before installation on the staircase.
Helical staircase
Installing balusters on a spiral staircase - the most complex case due to the constantly changing slope angle:
- Each baluster must be individually trimmed, taking into account the slope angle at a specific point
- Use a template to mark the cutting angles
- Fastening is better performed using adjustable metal bolts
- The handrail is made to custom dimensions, often from bent-laminated blanks
For spiral staircases, modular systems with ready-made elements are often used, significantly simplifying installation.
Economic aspects: optimizing costs without compromising quality
Baluster installation can be performed within various budgets, but cost savings should not compromise safety.
Material selection based on budget
- Premium segment: oak, beech, exotic wood species, combinations with metal or glass
- Mid-range segment: ash, spruce, maple
- Economical option: pine, birch
With a limited budget, a combined approach can be used: solid wood posts, and intermediate balusters from more affordable materials.
DIY installation or hiring professionals
the decision to on the staircase, deserves special attention. Because the quality of installation affects not only aesthetics but also the safety of the structure, which will serve you for decades. DIY or hire professionals, depending on:
- Your experience working with wood
- Availability of necessary tools
- Complexity of the staircase construction
- Project budget
For standard staircases with simple balusters, it is entirely feasible to perform installation yourself, following detailed instructions. For complex design solutions, it is better to hire professionals.
Long-term savings: quality vs. price
Investments in quality materials and fasteners pay off in the long run:
- Quality wood does not require frequent replacement
- Reliable fastening prevents structural loosening
- Professional installation minimizes the risk of accidents
Remember: cutting corners on safety may cost far more than initial investments in quality materials and installation.
Legislative requirements and regulations
When installing balusters, it is necessary to consider construction norms and rules ensuring the safety of the structure.
Requirements for strength and safety
According to SNiP, stair railings must:
- Withstand a horizontal load of at least 100 kg per meter of length
- Have a height of at least 90 cm from the step level
- Have a distance between balusters not exceeding 15 cm (to prevent children from falling)
These requirements must be considered when selecting materials and methods of baluster attachment.
Features of installation in public buildings
In public buildings, requirements for stair railings are even stricter:
- Increased strength (load up to 150 kg per meter)
- No sharp corners or protruding elements
- Special requirements for fire safety of materials
- Additional handrails at different heights (for children and adults)
When installing balusters in public buildings, it is recommended to use certified mounting systems with appropriate documentation.
Conclusion: the art of creating the ideal staircase
The question of on the staircase, deserves special attention. Because the quality of installation affects not only aesthetics but also the safety of the structure, which will serve you for decades.It goes far beyond a simple technical task. It is the art of creating a structure that will delight the eye, ensure safety, and serve for decades.
When choosing a mounting method, consider not only aesthetic preferences but also practical aspects: type of staircase, baluster material, usage intensity. Remember, quality installation is an investment in the safety and longevity of your staircase.
Regardless of the chosen method, follow these basic principles:
- Thorough preparation and marking
- Use of quality materials and fasteners
- Control of geometry at all stages of installation
- Secure fixation of all connections
- Final Processing and Protection of Wooden Elements
By following these recommendations, you will create a staircase that will become a true decoration of your home and serve for many years.
STAVROS Company specializes in manufacturing high-quality wooden staircases and components, including balusters, posts, and handrails. Years of experience, modern equipment, and the craftsmanship of STAVROS specialists guarantee exceptional quality of every product. Choosing STAVROS products means acquiring not just staircase elements, but true works of art that will transform your interior and last for decades.


