Article Contents:
- Can wooden panels be used in the bathroom
- Wet zone and damp zone: what's the difference
- What else is important to understand about humidity
- Which wooden panels are suitable for the bathroom
- Panels made of solid wood
- MDF panels with wood finish and moisture-resistant MDF
- Veneered panels
- Paint-ready panels
- What is better to choose for the bathroom: natural wood or wood-look panels
- Slatted panels in the bathroom: when this is the best option
- Why the slatted format is ideal for the bathroom
- Where to use slats in the bathroom
- Where to install wooden panels in the bathroom
- Wall near the sink area
- Mirror area
- Niches and decorative inserts
- Installation box
- Bath screen
- Accent wall outside the shower area
- Where not to use wooden panels
- How to choose panels for the bathroom
- By material
- By format
- By color
- By room size
- By interior style
- By operating conditions
- How to combine wooden panels with tiles and other materials
- Tiles and wooden panels
- Porcelain stoneware with stone and wood effect
- Panels and glass shower
- Panels and hidden lighting
- Panels and mirror
- Installing wooden panels in the bathroom: what you need to know
- Foundation Preparation
- Choosing the fastening method
- Sealing
- Ventilation gaps
- Caring for wooden panels in the bathroom
- Common mistakes when choosing and installing wooden panels in the bathroom
- Conclusion: algorithm for choosing wooden panels for the bathroom
- Frequently asked questions about wooden panels in the bathroom
- About the Company STAVROS
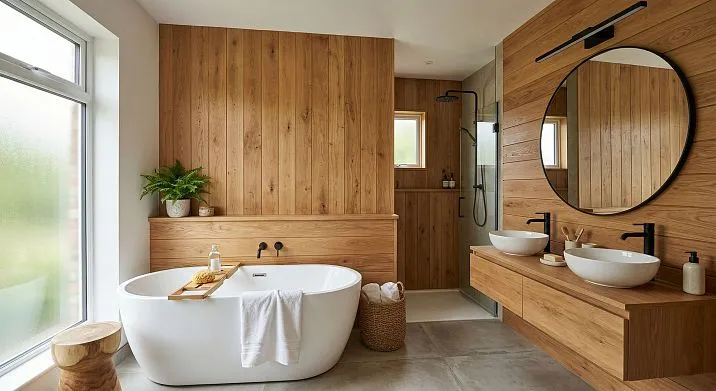
Cold tiles, white walls, glossy tiles — the bathroom remained the most sterile and impersonal room in the apartment for many years. Today, everything has changed. More and more people want to see not a functional box in the bathroom, but a real space for relaxation — warm, alive, with natural texture and character. And it is preciselywooden wall panelsthat become the element that turns an ordinary bathroom into a spa interior.
But a logical question immediately arises — and it is the main one: is it even possible to use wooden panels in the bathroom? Will they not swell, darken, or become covered with mold? This is exactly where what this article is written for begins: to honestly understand, without unnecessary promises and enthusiasm — where wooden panels in the bathroom work flawlessly, where — with limitations, and where they simply cannot be installed.


Is it possible to use wooden panels in the bathroom
The short answer is yes, it is possible. But with the understanding that the bathroom is not uniform in terms of humidity level, and it is this understanding that determines all further choices.


Wet zone and damp zone: what's the difference
Any bathroom has two fundamentally different zones. The wet zone is the place where water gets on the surface directly and constantly: shower walls, the area above the bathtub in the shower area, surfaces with direct contact with water. Here, wooden wall panels should not be used even with protective coating: constant saturation with moisture will sooner or later lead to swelling, warping, or mold.
The wet zone is all the remaining space in the bathroom: the wall behind the sink, the mirror area, the accent wall opposite the shower, niches, boxes, decorative inserts. Here, humidity is higher compared to living spaces, but there is no constant direct contact with water. It is in this zonewooden panels for the bathroomwork excellently — with the right choice of material and proper installation.
Our factory also produces:


What else is important to understand about humidity
The durability of wooden panels in the bathroom largely depends not on the material itself, but on the quality of the room's ventilation. A bathroom with good exhaust and regular ventilation is completely different operating conditions than a closed, damp toilet. Before choosing panels, make sure: the ventilation in your bathroom is working properly. This is a fundamental condition for any wooden finish.
Get Consultation
Which wooden panels are suitable for the bathroom
Material selection is the first and most important decision. Not all wooden panels are equally suitable for high humidity conditions. Let's honestly examine each option.
Solid wood panels
Solid Wood Items— solid natural wood — possess natural beauty that no other material can replace. Oak, larch, teak, cedar — species with high natural density and resistance to moisture. Larch and teak have historically been used in shipbuilding and baths precisely for their moisture-resistant properties.
For the bathroom, solid wood species with high natural oil and resin content are best suited: larch, teak, oak. After thorough treatment with special oils and varnishes for wet rooms, such panels last a long time and retain their natural appearance.
When to choose: for a prestigious spa interior, for a country house with a high-comfort bathroom, for an accent wall in a wet (but not wet) zone. Solid wood in the bathroom is an investment that requires proper preparation and regular maintenance of the finish.
Limitations: not for direct contact with water, requires high-quality treatment, regular renewal of the protective layer.
Wood-look MDF panels and moisture-resistant MDF
Regular MDF is not suitable for bathrooms: when wet, it swells and loses its shape. But moisture-resistant MDF (HDF, green in cross-section) is a completely different story. It is produced with the addition of special water-repellent components and provides significantly better stability in high humidity conditions.
MDF Plank PanelsPaintable on a moisture-resistant base is one of the best choices for a bathroom in terms of the balance of appearance, stability, and cost. When painted with enamel in neutral or natural tones, such panels provide a visual effect of light decorative volume without the risk of deformation.
When to choose: for slatted accent solutions, for decorative niches, for the sink area — anywhere where precise geometry and any color to match the bathroom style are needed.
Veneered panels
Veneered wall panels are a thin slice of natural wood on an MDF base. For ordinary living spaces, this is the ideal balance between aesthetics and price. For bathrooms — with caveats. On a moisture-resistant MDF base and with high-quality surface treatment, veneered panels are acceptable in dry zones of the bathroom: an accent wall opposite the shower, a decorative insert, the mirror area.
Limitation: the joints and edges of the veneered panel must be carefully sealed. An exposed edge in conditions of constant humidity is a weak point through which moisture penetrates into the base.
Panels for painting
MDF panels for painting in a version for wet rooms offer maximum color flexibility. Coated with waterproof enamel, they are easy to clean, do not absorb moisture, and last a long time. Paired with enamel in natural shades, such panels provide a visual effect of 'wood-look' — especially the slatted format, where the linear rhythm resembles wood even without a natural texture.
What is better to choose for a bathroom: natural wood or wood-look panels
This is not an idle question. Many people get confused when choosing: they want natural beauty but are worried about durability. Let's break it down honestly.
| Parameter | Natural wood (solid wood, veneer) | Wood-look panels (MDF + coating) |
|---|---|---|
| Appearance | Natural, living, unique | Imitation; good coating — convincing |
| Stability in humidity | Medium, depends on wood species and treatment | High with moisture-resistant base |
| Tactile | Maximum naturalness | Smooth, neutral |
| Care | Requires coating renewal every 3–5 years | Minimal, just wipe |
| Restoration | Grinding and reprocessing possible | Local touch-up |
| Cost | Higher | Below |
| Where appropriate | Accent in mirror area, wet area, spa | Any area without direct contact with water |
The conclusion is simple: if authenticity and natural character are important — choose solid wood or veneer with proper treatment and in the right zone. If practicality, predictability, and budget optimization are important — moisture-resistant MDF for painting or with wood-like finish.
The best solution for most bathrooms — a combination: a natural wooden element as an accent (oak solid wood slats, wooden niche, shelf) + practical main surfaces in a neutral color.
Slatted panels in the bathroom: when it's the best option
If there's one format of wooden panels that looks especially convincing in the bathroom — it's Rafter panelsAnd here's why.
Why slatted format is ideal for bathrooms
A bathroom is a space where not only the beauty of the surface matters, but also its interaction with light. Slats create something that neither smooth tiles nor uniform paint can achieve: play of light and shadow. With side or directional lighting, each slat casts a soft shadow—a flat wall transforms into a sculptural object that changes character throughout the day along with the changing light.
The vertical rhythm of slatted panels in the bathroom solves another problem: it visually stretches the space upward. For most urban bathrooms with 2.5 m ceilings—this is a critically important technique. After installing vertical slatted panels, the same room appears noticeably taller and more spacious.
Where to use slats in the bathroom
-
Behind the mirror—a classic and foolproof solution. A slatted wall behind the mirror creates depth, makes the sink area expressive and visually wider.
-
On an accent wall opposite the shower—a safe zone, maximum visual effect.
-
In a niche—wooden slats in a niche create a 'framed' natural accent.
-
Behind the sink cabinet—a lower band of slatted panels creates completeness for the zone.
-
On the installation box—practical and decorative at the same time.
Where in the bathroom can wooden panels be installed?
Map of safe and risky zones — the most practical thing to know before starting renovation.
Wall by the sink area
This is one of the best zones for wooden wall panels in the bathroom. Moderate splashes, no constant direct contact with water.Wooden or slatted panelsbehind the sink, properly treated and with sealed joints, work excellently here.
Important: the lower edge of the panel should not come into contact with water on the countertop or in the sink. Minimum clearance from horizontal surfaces is 5–10 cm. This prevents moisture absorption from below.
Mirror zone
The wall behind the mirror is perhaps the safest for wooden panels in the bathroom. Splashes hardly reach it, and the decorative effect is maximal.Wooden slat panelsbehind the mirror + warm sconce lighting on the sides — one of the most expressive and practical techniques for a modern bathroom.
Niches and decorative inserts
Niches in the bathroom are the perfect place for a wooden accent. A niche's back wall made of wooden panels creates depth, making the niche 'alive' and expressive. Important: niches for storing items near the sink and niches next to the shower are different conditions. In niches near the shower, it's better to avoid wooden materials.
Installation box
The screen and side walls of the installation box are a safe and frequently used area for wooden panels. The box does not come into direct contact with water. Slatted or smooth panels on the box turn a technical object into a decorative element in the bathroom.
Bathtub screen
Wooden panels on a bathtub screen are a popular technique in spa interiors. The bathtub screen is not in the zone of direct water contact if the bathtub is used without an active side shower. Solid larch panels or moisture-resistant MDF with good treatment work here for years.
Accent wall outside the shower area
The wall opposite the shower or bathtub is the most spacious and expressive place for wooden panels. No material restrictions, complete freedom in choosing the format, height, and width. It is here that wooden wall panels reveal their full potential.
Where not to use wooden panels
An honest conversation is impossible without this section. There are zones and conditions in which wooden panels in the bathroom are a mistake, and it's important to acknowledge this.
Shower without a glass partition. If the shower area is not separated by glass or a screen, the walls inside it receive direct streams of water with each use. No coating will make a wooden panel suitable for such conditions.
Areas of constant contact with water. Wall sections that regularly get wet, are splashed, and remain damp are not for wood. Tile or porcelain stoneware are indispensable here.
Bathroom without proper ventilation. If the exhaust fan is not working or ventilation in the bathroom is weak, any wooden panels, even the highest quality ones, will be in conditions of constant humidity without the ability to dry out. This is a direct path to mold.
Damp and freezing walls. Corner apartments with freezing walls are not a place for wooden panels. Installation on such a base without first solving insulation problems will lead to material damage.
How to choose panels for a bathroom
Once the zones are defined, the choice becomes specific. Several practical parameters:
By material
-
Accent wall in a wet zone → solid larch, teak, or oak with an oil finish
-
Slatted finish near the mirror and on the box → moisture-resistant MDF for painting with enamel
-
Decorative insert in a niche → veneer on a moisture-resistant base with sealed edges
By format
-
Vertical slatted panels — for visually increasing height, best light and shadow effect
-
Smooth panels — for a calm neutral background
-
Textured — only as a focal accent in areas with minimal moisture contact
Regarding color
-
Light tones (bleached oak, ash, light pine) — for small bathrooms, they visually expand the space
-
Warm natural shades (honey oak, walnut, cherry) — for a spa atmosphere in medium and large bathrooms
-
Dark tones (wenge, smoky oak, graphite) — only on one accent wall in a well-lit bathroom
By room size
In a small bathroom, wooden panels should be light, and the wooden wall — just one. In a room of 4–5 m², dark cladding on three walls will create a feeling of confinement. Vertical slats in a light tone on one wall — that's exactly what a small bathroom needs to become more interesting.
By interior style
-
Minimalism and modern style — slatted panels in light oak tone, narrow slats with moderate spacing, no texture
-
Japandi — natural ash or oak with matte oil, vertical rhythm, only natural tones
-
Spa interior — warm oak or teak, horizontal or vertical slats, hidden LED lighting
-
Neoclassical — MDF with enamel-like moldings in white or cream, structured wall system
Based on operating conditions
Answer three questions:
-
Is there direct contact with water in this area? — If yes, wooden panels are not suitable
-
Is ventilation working? — If not, address this first
-
Is regular maintenance possible? — If not, choose moisture-resistant MDF panels under enamel
How to combine wooden panels with tiles and other materials
Wooden panels in the bathroom rarely exist in isolation. Most often, they are adjacent to tiles, porcelain stoneware, or glass. And it is this combination that defines the final character of the interior.
Tiles and wooden panels
A classic and fail-safe combination. Tiles or porcelain stoneware — in the wet area (shower, bathtub). Wooden panels — on an accent wall, near the mirror, on a box. The materials emphasize the difference between zones and create an expressive rhythm in the interior.
Combination rule: one material should be a neutral background. If the tile is active (pattern, color), wooden panels should be calm. If the tile is neutral (white, gray), wooden panels can be more expressive in texture.
Porcelain stoneware under stone and wood
Stone texture + natural wood texture — a stable, expressive duo. Porcelain stoneware under marble or travertine creates natural luxury, and wooden panels add warmth and coziness. Cold stone and warm wood — a working pair.
Panels and Glass Shower
A glass partition visually separates the wet zone from the damp area. Behind the glass is tile or a painted wall. Wooden panels are outside the shower. This is an honest and practical technique that gives the bathroom two different characters: transparent and warm.
Panels and Hidden Lighting
An LED strip under slatted panels or between the slats is an effect that transforms the bathroom at night. Warm light at the base of a wooden wall creates the atmosphere of a high-end spa without significant expense. This technique works especially well with vertical slats: the lighting 'flows' between them, creating a soft, diffused glow.
Panels and Mirror
A full-length mirror against a wooden slatted wall is one of the best techniques for a small bathroom. The mirror reflects the wood texture, visually doubling the space and depth. At the same time, the slatted wall looks even more expressive in the reflection.
Installing Wooden Panels in the Bathroom: What's Important to Know
Installing wooden panels in the bathroom differs from installation in living spaces in several key rules. Neglecting them negates all the quality of the chosen material.
Foundation Preparation
The wall under wooden panels in the bathroom must be absolutely dry—especially if the bathroom has just been handed over after renovation. New plaster can 'release' moisture for several weeks. Installing wooden panels on an undried base means creating conditions for mold inside the structure.
The base must be clean, level, and primed. For serious unevenness, install on a metal frame. The frame solves two problems simultaneously: it levels the plane and creates an air gap for ventilation of the space behind the panels.
Mounting selection
Mounting adhesive for wet rooms + finishing nails — standard solution for rigid panels on a flat base. On a frame — self-tapping screws through the underlay. For flexible slatted panels — only mounting adhesive according to the working instructions.
Sealing
This is a critically important stage for the bathroom. All joints of panels with tiles, glass, and plumbing are sealed with silicone sealant for wet rooms with fungicidal additives. Panel ends — coated with moisture-resistant impregnation or enamel before installation. An unprotected MDF end in the bathroom is a weak point that will 'pull' water at any opportunity.
Ventilation gaps
When mounting on a frame, an air gap remains between the wall and the panels — this is not a drawback, but an advantage. Air circulates, the structure dries out after humidity increases. The lower and upper ends of the panels should not be tightly sealed — a small gap at the base and near the ceiling maintains air exchange.
Care for wooden panels in the bathroom
Wooden panels in the bathroom require a bit more attention than panels in living spaces. But 'a bit more' is not difficult.
Regular cleaning: soft dry or slightly damp cloth. For painted MDF panels — neutral cleaning agents without abrasives. For solid wood panels with oil coating — special wood care products.
What to avoid: do not wipe wooden panels with a wet cloth, do not use aggressive cleaning agents, do not allow water accumulation at the base of the panels.
Coating renewal: solid wood panels with oil or wax coating are renewed every 3–5 years — this is a standard cycle. A sign that it's time to renew: water stops 'rolling off', the surface absorbs moisture. Oil renewal is a simple procedure done without dismantling.
Ventilation after water procedures: an open window or running exhaust fan after showering and bathing is the best prevention for wooden panels in the bathroom. Rapid reduction of humidity is the main condition for the long service life of any wooden material in a damp room.
Common mistakes when choosing and installing wooden panels in the bathroom
These mistakes occur regularly—and each one is costly, because they are only discovered after the renovation is complete.
-
Installation in the direct shower zone. The most expensive mistake. No material with a wood base can withstand constant direct wetting.
-
Regular MDF instead of moisture-resistant. They look the same. But in bathroom conditions, regular MDF swells and delaminates. Always clarify: moisture-resistant base or not.
-
Unsealed edges. An open MDF edge is a 'straw' through which water penetrates into the base. Edges are treated before installation.
-
Poor room ventilation. Before installing wooden panels, ensure the exhaust fan is working. Otherwise—mold in the structure.
-
Installation on a non-dried base. Especially relevant after fresh renovation. Walls must be completely dry.
-
Too dark panels in a small bathroom. The visual effect is predictable: the room shrinks. Dark tones—only one accent wall.
-
Choosing only from photos without a sample. Wood looks different under different lighting. Check the sample under the actual lighting of your bathroom.
-
Ignoring coordination with tiles and plumbing. Wooden panels in the bathroom do not exist in isolation. They must be tonally coordinated with the floor, tiles, vanity, and hardware.
-
Saving on installation materials. Using regular adhesive and regular sealant instead of special formulations for wet areas is a common cause of rapid finish deterioration.
-
Lack of an air gap behind the panels. Blind installation without ventilation risks mold in the hidden space. A frame or gaps at the ends are mandatory.
Conclusion: algorithm for selecting wooden panels for the bathroom
Wooden panels in the bathroom work—and work brilliantly—if you follow a few simple rules. Here is a concise algorithm:
-
Assess the zone—wet (shower, bathtub in the direct splash zone) or damp (sink, mirror, accent wall). Wooden panels are only for the damp zone.
-
Check ventilation—if the exhaust fan is not working, address this first.
-
Choose the material—solid wood or veneer for an accent with natural texture; moisture-resistant MDF under enamel for a practical solution in any color.
-
Determine the format—slatted for a modern interior, smooth for a calm background, textured for a focal accent.
-
Select the shade—light for a small bathroom, warm natural for a spa atmosphere, dark only on one wall.
-
Coordinate with tiles and plumbing — a unified tonal system, not a set of unrelated materials.
-
Ensure quality installation — moisture-resistant adhesive, sealed edges, ventilation gap.
-
Maintain the finish — regular care and timely renewal of the protective layer.
Frequently Asked Questions about Wood Panels in the Bathroom
Can wood panels be used in the bathroom?
Yes — in the wet zone (by the sink, mirror, on an accent wall) with proper material selection, treatment, and sealing of joints. In the splash zone (direct shower) — no.
Which panels are better for the bathroom: solid wood, MDF, or veneer?
For accent zones — solid larch, teak, or oak with an oil finish. For a practical solution — moisture-resistant MDF for painting with enamel. Veneer — on a moisture-resistant base with treated edges.
Can panels be installed next to the sink?
Yes. The wall behind the sink and washbasin is one of the best zones for wood panels. Important: the bottom edge should not contact water, edges must be sealed.
Are slatted panels suitable for the bathroom?
Yes.Rafter panels— one of the best formats for the bathroom. They create a play of light and shadow, visually elongate the space, and look organic in a modern interior.
Can wooden panels be used in the shower area?
Only if the shower is enclosed by a glass partition and the panels are located outside this zone. Inside an open shower—no.
How to protect panels from moisture?
Oils and waxes for wet areas—for solid wood. Water-resistant enamel—for MDF. Silicone sealant with fungicide—for joints and abutments.
How to combine panels with tiles and porcelain stoneware?
Tiles—in the wet zone, wooden panels—in the dry and damp zones. Coordinate the color temperature: warm wood + warm tiles, neutral oak + gray porcelain stoneware.
Are panels suitable for a small bathroom?
Yes, if the rules are followed: light shade, one accent wall, vertical slats.
What color panels are best for a bathroom?
Light bleached oak, ash, natural oak — universal options. Dark tones — only as an accent with good lighting.
How to care for wooden panels in the bathroom?
Soft dry cloth for daily cleaning, renewing oil finish every 3–5 years for solid wood, ventilation after water procedures.
About the company STAVROS
For those ready to move from selection to ordering: contact STAVROS.
STAVROS is a Russian manufacturer of wooden and MDF products for interiors. The assortment includesslatted panels made of MDF and solid oak, smooth and veneered wall panels, classical boiserie wall systems, moldings, cornices, baseboards, and decorative overlays.
Production works with custom sizes and non-standard tasks. Wide selection of species: oak, ash, beech, walnut, larch — including naturally moisture-resistant species for use in bathrooms. Full cycle: consultation, solution selection, production, delivery, and installation. Showrooms in Moscow and St. Petersburg, material samples for in-person evaluation before ordering.
STAVROS works with private clients, designers, and architects — in any interior style, from modern minimalism to classic boiserie.