


Article Contents:
- Choosing Wood: The Foundation of Durability and Beauty
- Exquisite Hardwoods
- Coniferous species: accessibility and practicality
- Technological Aspects of Material Preparation
- Wood Drying and Stabilization
- Decorative Possibilities and Finishing Technologies
- Fastening Systems: Reliability and Aesthetics
- Traditional Shank Joints
- Metallic fastening systems
- Step-by-step installation technology
- Preparation work and marking
- Drilling Technology and Hole Preparation
- Installation and Alignment Process
- Working with Different Substrates
- Fastening to Wooden Treads
- Installation on Concrete Foundations
- Installation on Metal Structures
- Final finishing and protective coatings
- Preparing the surface for finishing
- Protective coating systems
- Coating application technology
- Quality control and defect elimination
- Problem diagnosis
- Defect Correction Methods
- Modern Trends and Innovations
- Digital technologies in production
- Ecological innovations
- Economic Aspects of the Project
- Budget Planning
- Comparing Different Solutions
- Return on investment
- Conclusion
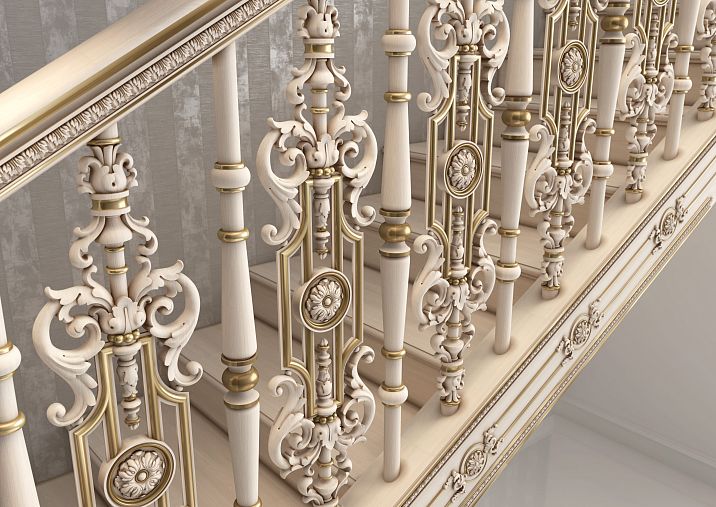
Imagine a staircase without elegant vertical balusters supporting the handrail. This is not merely an architectural oversight — it is a potential safety hazard for anyone ascending the steps. Installing Wooden Balusters It is an art where technical skill merges with aesthetic perfection, creating not only functional but also visually appealing interior elements.
Wooden balusters are the soul of any staircase structure. They transform an ordinary flight into an architectural masterpiece, where every line and curve tells a story of craftsmanship and attention to detail. Proper installation of these elements requires not only technical knowledge but also an understanding of wood properties, characteristics of different species, and nuances of fastening systems.
In modern construction, wooden balusters remain an unmatched choice for those who value natural beauty, ecological safety, and longevity. Each wood species possesses unique characteristics that influence processing methods, fastening techniques, and final results. From material selection to the final finishing touch — every stage demands a professional approach and deep understanding of the process.


Choosing Wood: The Foundation of Durability and Beauty


Noble hardwoods
Oak stands out among materials for baluster production. Its density reaches 700 kg/m³, providing exceptional strength and resistance to mechanical impacts. Tannins present in oak wood offer natural protection against moisture and biological damage. The color range varies from light golden to dark brown, allowing the creation of interiors in various stylistic directions.
Ash attracts builders with its exceptional toughness and elasticity. With a density of 650-700 kg/m³, this species can withstand significant dynamic loads without cracking. Light ash tones with contrasting texture harmonize beautifully with modern interior solutions, creating a sense of spaciousness and airiness.
Beech is characterized by uniform structure and beautiful pinkish hue. Its density is 680 kg/m³, comparable to oak. Beech wood is easy to process and holds its shape well after drying. A distinctive feature of beech is its ability to be evenly stained, allowing the creation of products in any color scheme.
Walnut is an elite material with a unique texture and noble chocolate tone. Walnut wood density reaches 650 kg/m³, and its workability allows creating delicate decorative elements. Natural oils in the wood composition provide additional protection against external influences.
Our factory also produces:


Coniferous species: accessibility and practicality
Spruce remains the most popular material due to its optimal price-to-quality ratio. With a density of 500-550 kg/m³, spruce wood possesses sufficient strength for most applications. Natural resins in the composition provide protection against moisture and pests, while the light tone creates a sense of cleanliness and freshness.
Larch stands out among coniferous species for its unique properties. Density reaches 665 kg/m³, comparable to hardwoods. High content of resin and tannins makes larch practically immune to moisture and biological damage. The golden-amber tone becomes even more noble over time.
Fir attracts attention with its uniform structure and minimal number of resin pockets. With a density of 450-500 kg/m³, fir wood is easy to process and holds fasteners well. The light, almost white color of fir is ideal for Scandinavian interior style.
Get Consultation
Technological Aspects of Material Preparation
Wood drying and stabilization
Proper wood drying is the foundation of longevity for any wooden structure. Moisture content for indoor work should not exceed 8-12%, and for outdoor use — 15-18%. Kiln drying allows achieving uniform moisture throughout the entire volume of the material and relieving internal stresses.
Drying hardwoods requires special attention to temperature regime. Oak and beech are dried at 45-55°C, gradually increasing to 70°C. Too rapid drying may lead to cracking and deformation. Coniferous species are less demanding regarding drying regime, but also require gradual moisture removal.
Stress stabilization is achieved through intermediate steam treatment. This process allows relieving internal stresses that may manifest as deformations in finished products. Properly dried and stabilized wood practically does not change dimensions with fluctuations in air humidity.
Drying quality control includes measuring moisture at various points of the material. Uneven drying may lead to warping and cracking. Modern moisture meters allow controlling the process with precision up to 0.1%, ensuring ideal material preparation.
Mechanical processing and profiling
Turning balusters requires high skill from the craftsman and precisely calibrated equipment. Modern CNC turning machines allow creating complex profiles with perfect repeatability. Spindle speed is selected depending on the wood species: for hardwoods — 800-1200 rpm, for softwoods — 1500-2000 rpm.
Milling decorative elements opens up wide possibilities for creating unique designs. Modern milling machines allow executing spiral grooves, relief ornaments, and complex geometric shapes. Milling quality depends on tool sharpness and correctly selected processing modes.
Sanding is the final stage of mechanical processing, determining surface quality. The process is carried out in stages, starting with coarse abrasives of 80-120 grit and ending with fine ones — 320-400 grit. Sanding direction must align with the direction of wood fibers.
Quality control of processing includes visual inspection and tactile examination of the surface. Any defects — chips, scratches, unevenness — must be removed before assembly begins. A properly processed surface has a uniform texture without visible tool marks.
Fastening Systems: Reliability and Aesthetics
Traditional Dowel Joints
Wooden dowels represent a classic method of joining wooden parts. A properly executed dowel joint can last for centuries without losing strength. The dowel diameter should be 1/3 of the thickness of the joined parts, and the length should ensure penetration into each part by 25–30 mm.
The quality of the dowel wood is critically important for the strength of the joint. The best dowels are made from hardwoods — beech, oak, ash. The moisture content of the dowel wood must not exceed 8%; otherwise, upon drying, they will shrink and weaken the joint.
Dowel installation technology requires meticulous precision. Holes are drilled precisely coaxially using special drill guides. The hole diameter must exactly match the dowel diameter — even a deviation of 0.1 mm can reduce the strength of the joint.
Adhesive bonding enhances dowel fastening. Modern PVA wood adhesives provide strength exceeding the strength of the wood itself. Adhesive is applied both into the hole and onto the dowel surface. Setting time is 15–20 minutes, full curing takes 24 hours.
Modern metal fastening systems offer high reliability and the possibility of concealed installation. Threaded rods with a diameter of 8-10 mm provide exceptional joint strength and allow for disassembly of elements without damaging the main structure. Installing balusters on stairs using metal fasteners requires precise adherence to drilling and installation technology.
Stainless steel threaded rods provide maximum joint strength. The rod diameter is selected based on the baluster size: for sections up to 50×50 mm, M8 is sufficient; for heavier elements, M10 or M12 is required. Length is calculated considering the depth of insertion into the baluster and the base.
Installation technology begins with precise drilling of holes. In the baluster, a blind hole is drilled 1 mm smaller in diameter than the rod to ensure secure thread engagement. In the base, a through hole is drilled 1–2 mm larger to allow free passage of the fastener.
Chemical anchors represent a modern solution for attaching to concrete and stone bases. A special compound fills the hole and creates a monolithic bond with the base. The strength of such fastening is comparable to the strength of the base material.
Combined systems combine mechanical fastening with adhesive bonding. This approach ensures maximum reliability and longevity. The adhesive fills micro-irregularities, while mechanical fastening provides the primary load-bearing capacity.
Step-by-step installation technology
Preparation and marking
Quality installation begins with careful preparation of the work area and materials. All tools must be checked and calibrated, materials must be acclimatized to room conditions. Wood moisture is controlled with a moisture meter and must not differ from base moisture by more than 2%.
Marking is performed with mathematical precision. The distance between balusters is determined by construction standards — no more than 150 mm center-to-center between vertical elements. For better appearance, a spacing of 100–120 mm between baluster centers is recommended.
The number of balusters is calculated by dividing the total length of the section by the installation spacing. If a fractional number is obtained, the spacing is adjusted downward. The end balusters should be positioned 50–70 mm from the support posts.
Marking control is performed using a laser level and tape measure. Each mark is checked twice, as errors at this stage can only be corrected by completely redoing the work. Accuracy of marking is the guarantee of a beautiful and uniform baluster row.
Drilling technology and hole preparation
Drilling holes for fasteners requires the use of quality tools and adherence to technology. Wood drill bits must be sharp and properly ground. A dull drill bit does not cut but tears fibers, creating a loose hole with uneven edges.
The hole diameter depends on the type of fastener. For dowels, the diameter must exactly match the dowel size. For threaded connections, in the baluster a hole is drilled 1–2 mm smaller than the thread diameter, and in the base 1–2 mm larger.
Drilling depth is controlled by a drill stop or a special bushing. For dowel joints, depth is half the dowel length plus 2–3 mm for adhesive. For threaded joints, depth is 5–10 mm deeper than the threaded portion length.
Hole quality is checked visually and by touch. Walls must be smooth, without scratches or chips. Entry and exit edges must be even and undamaged. Rough edges indicate the need to replace the drill bit or adjust the processing parameters.
Installation and Alignment Process
installing wooden balusters Installation begins with mounting the end support posts. These elements serve as reference points for all other balusters and must be installed with maximum precision. Verticality is checked in two mutually perpendicular planes.
Intermediate balusters are installed using a guide string stretched between the end posts. Each baluster is checked for verticality and alignment with the marking. Deviations exceeding 2 mm are unacceptable and require correction.
Installation sequence depends on the chosen fastening method. When using adhesive joints, all elements must be installed within the adhesive’s working time — typically 15–20 minutes. Mechanical fasteners allow balusters to be installed sequentially.
Quality control of installation includes checking the verticality of each baluster, uniformity of distances between them, absence of play in joints. All defects must be corrected before proceeding to the next stage of work.
Working with Different Bases
Fastening to wooden treads
Wooden treads represent the most favorable base for installing balusters. Uniformity of the material ensures reliable fastener adhesion and even load distribution. The tread thickness must be at least 40 mm to ensure sufficient anchor depth.
Through fastening through the tread provides maximum joint reliability. A bolt or rod passes through the entire tread thickness and is secured with a nut from the underside. The bolt head is embedded into the wood and covered with a wooden plug.
End-to-end fastening of the tread is used when through mounting is not possible. Anchor bolts or deep rods of at least 60 mm length are used. A pilot hole is drilled first, 2 mm smaller in diameter than the fastener.
Adhesive reinforcement of the joint increases its reliability and longevity. Special wood adhesives create additional bonding between materials, compensating for possible dimensional inaccuracies and filling surface micro-irregularities.
Mounting on concrete bases
Concrete treads require a special approach and tools. Drilling is performed using carbide-tipped bits with a drill in drilling mode (without hammering). Hammering mode may cause cracks and chips.
Chemical anchors are the optimal solution for attaching to concrete. The special compound fills the hole and creates a monolithic connection. The anchoring depth should be at least 8 times the fastener diameter to ensure the required strength.
Mechanical anchors are suitable for less critical connections. Expansion anchors provide secure fixation in dense concrete. The hole diameter must exactly match the anchor size to eliminate play.
Sealing the attachment points prevents moisture from penetrating the joints. Special sealants are applied around fasteners, creating a reliable barrier against water and condensation.
Installation on metal structures
Metal staircases require consideration of differences in material thermal expansion coefficients. Compensatory elements allow materials to expand independently of each other, preventing stress in joints.
Welding provides the strongest connection to metal, but requires specialized skills and equipment. Weld seams must be cleaned and protected from corrosion with special coatings.
Bolted connections are easier to install and allow for disassembly if needed. Holes are drilled with high precision to ensure tight bolt fit. Using washers distributes load over a larger area.
Anti-corrosion protection is critical for the longevity of connections. All metal elements must be treated with primer and protective coatings. Contact surfaces are isolated with special gaskets.
Finishing and protective coatings
Surface Preparation for Finishing
Sanding is a mandatory step in preparing wooden balusters for final finishing. The process is done in stages, starting with 120-grit abrasive and ending with 400-grit. Each subsequent grit removes the marks left by the previous one.
The direction of sanding should align with the direction of wood grain. Sanding across the grain leaves scratches that will be visible after applying a clear finish. Special attention is given to end surfaces and joint areas.
Dust removal after each sanding stage is critical for finish quality. Dust is removed with an industrial vacuum cleaner, then with a sticky cloth. The surface must be completely clean before applying the next layer.
Quality control of preparation includes visual inspection and tactile testing. The surface should be uniformly matte, without shiny spots or visible defects. Any defects are corrected with additional sanding.
Protective coating systems
The choice of protective coating depends on operating conditions and aesthetic preferences. Lacquers provide maximum protection against mechanical damage and moisture, forming a durable film on the wood surface.
Oil-based finishes penetrate deeply into the wood structure, highlighting its natural beauty. They do not form a film on the surface, preserving the tactile feel of wood. Oils are easily repairable in case of local damage.
Wax-based finishes provide a silky sheen and pleasant texture. Wax protects against moisture and dirt, allowing wood to "breathe". Such finishes are especially popular in eco-oriented interiors.
Combined systems combine the advantages of different types of finishes. Oil penetration followed by wax application provides deep protection and an attractive appearance. Primer-lacquer-lacquer creates the most durable finish.
Coating Application Technology
Priming equalizes the wood's absorption capacity and ensures better adhesion of the final finish. Primer is applied in a thin, even layer along the grain. After drying, the surface is lightly sanded with 320-400 grit abrasive.
Main layers are applied in 2-3 passes with intermediate drying. Each layer should be thinner than the previous one. Thick layers may cause runs and uneven finish.
Inter-layer treatment includes light sanding with fine abrasive to remove raised fibers and create a rougher surface for better adhesion of the next layer. Dust is carefully removed before applying the finish.
The final layer determines the appearance and tactile properties of the surface. It is applied particularly carefully, without runs or pooling. If needed, the surface is polished with special compounds to a mirror finish.
Quality control and defect elimination
Problem diagnosis
Visual inspection reveals obvious defects: gaps in joints, surface irregularities, deviations from vertical. Each baluster is inspected from all sides under good lighting. Defects are marked for subsequent correction.
Mechanical tests check the strength of connections. Light rocking of each baluster should not reveal play or movement. A horizontal load of 30 kg should not cause visible deformation.
Measurement control includes checking vertical alignment, uniformity of spacing, and compliance with project dimensions. Deviations are recorded and analyzed to determine causes and methods of correction.
Acoustic diagnostics help identify hidden defects. Tapping on a baluster should produce a clear sound. A dull sound indicates the presence of voids or weakened joints requiring intervention.
Methods for Removing Defects
Small gaps in joints are filled with wood-colored putty. The compound is applied with slight excess, then sanded flush with the surface after drying. The repaired area is covered with a protective compound.
Weakened joints are tightened or reinforced with additional fasteners. For threaded joints, simply tightening the nut is sufficient. Adhesive joints may require partial disassembly and re-gluing.
Replacing defective elements is a last resort used for serious damage. During design, provision is made for replacing individual balusters without dismantling the entire structure. New elements must exactly match existing ones in size and finish.
Preventive measures prevent defects from appearing. Regular inspection of the structure, monitoring indoor humidity, and timely renewal of protective coatings extend the service life of balusters.
Modern trends and innovations
Digital technologies in production
CNC machines have revolutionized the production of wooden balusters. Programmable turning and milling centers ensure perfect repeatability of complex profiles with accuracy down to hundredths of a millimeter.
3D modeling allows visualizing the future structure and optimizing the design before production begins. Virtual tests reveal potential problems and allow them to be resolved during the design phase.
Laser processing opens new possibilities for creating decorative elements. Laser engraving allows applying delicate ornaments and inscriptions with photographic precision. Laser cutting creates intricate elements of complex shapes.
Automated quality control systems ensure stability of parameters of finished products. Machine vision detects defects invisible to the human eye, guaranteeing the highest product quality.
Ecological Innovations
Using certified wood from sustainably managed forests has become a standard of responsible production. FSC and PEFC certificates guarantee that the material is obtained without harm to the environment.
Safe adhesives and formaldehyde-free coatings ensure a healthy microclimate in rooms. Water-soluble formulations based on natural resins do not emit harmful substances and are suitable for children's rooms.
Waste recycling minimizes environmental impact. Sawdust is used to produce pellets, shavings for particleboard, and trimmings for small details.
Energy-efficient technologies reduce the carbon footprint of production. Using renewable energy sources, optimizing processes, and heat recovery — all these measures contribute to creating an environmentally clean production.
Economic aspects of the project
Budget planning
Cost Wooden baluster installations Comprises several components: materials, fasteners, tools, labor. Proper planning allows optimizing costs without compromising quality.
The choice of wood species significantly affects the overall project cost. Coniferous species are 2-3 times cheaper than hardwoods but less durable and prestigious. Exotic species may cost 5-10 times more than common ones.
Processing complexity determines labor costs and manufacturing price. Simple turned balusters are significantly cheaper than carved or milled ones. However, investments in decorative processing pay off through increased interior aesthetic value.
Order volume affects the unit cost of items. Large batches allow optimizing production processes and obtaining supplier discounts. Ordering a complete set of stair elements can save 15-20%.
Comparison of different solutions
|
Parameter |
Coniferous species |
Broadleaf species |
Exotic species |
|
Material cost |
Low |
Medium |
High |
|
Longevity |
15-20 years |
30-50 years |
50+ years |
|
Processability |
Excellent |
Good |
Different |
|
Dimensional stability |
Medium |
High |
MDF with film |
|
Prestige |
Low |
High |
MDF with film |
The choice of the optimal solution depends on the project budget, requirements for durability, and aesthetic qualities. For budget projects, coniferous species are suitable; for prestigious projects — hardwoods and exotics.
Return on investment
High-quality wooden balusters significantly increase property value. A beautiful staircase becomes a home’s hallmark, creating a positive impression on guests and potential buyers.
Durability of quality materials ensures long-term savings. Balusters from hardwoods last 30-50 years without major repairs, while cheap alternatives require replacement every 10-15 years.
Energy efficiency of wooden structures contributes to reduced heating costs. Wood has low thermal conductivity, providing additional thermal insulation for stair areas.
Ease of maintenance of quality balusters minimizes operational costs. Properly treated wood requires only periodic cleaning and renewal of protective coating every 5-7 years.
Conclusion
Art Wooden baluster installations Represents a harmonious blend of technical skill, aesthetic sense, and deep understanding of natural materials' properties. Each stage of the process — from wood selection to final finishing — requires a professional approach and attention to the finest details.
Modern technologies have significantly expanded the possibilities for craftsmen, but the fundamentals of craftsmanship remain unchanged. Understanding the properties of different wood species, knowledge of processing and joining methods, and skill in using precision tools — these skills still define the quality of the finished work.
Investments in quality materials and professional execution pay off through durability and beauty of the finished structure. Properly installed wooden balusters serve for decades, maintaining their functionality and aesthetic appeal.
Environmental considerations are becoming increasingly important when selecting materials and technologies. Responsible use of natural resources, application of health-safe materials, minimization of waste — these principles must be considered at all stages of design and construction.
The future of the industry is linked to further development of digital technologies, emergence of new eco-friendly materials, and refinement of processing methods. Integration of traditional craftsmanship with modern innovations will enable creating even more sophisticated and durable structures.
Company STAVROS, with its rich experience in woodworking, continues to set the highest quality standards in the industry. The combination of centuries-old craftsmanship traditions with advanced technologies allows creating items that become true works of art. Every STAVROS project is a manifestation of perfection in every detail, the result of meticulous work by skilled masters and a pursuit of absolute quality.


