Article Contents:
- Architectural Philosophy of Stair Railing
- Aesthetic Principles of Design
- Functional Requirements for Construction
- Material Science Foundations of Quality Installation
- Hardwood Species: Standard of Strength
- Coniferous species: accessibility and practicality
- Technical requirements for the material
- Workshop Tooling
- High-precision measuring instruments
- Professional-Grade Cutting Tools
- Drilling Equipment
- Technological Methods of Joining Elements
- Spindle connections: benchmark of reliability
- Dowel Connections: Traditional Elegance
- Self-tapping screws: the balance of simplicity and efficiency
- Step-by-step installation technology
- Preparation Stage: Creating a Foundation of Precision
- Marking: mathematical precision in carpentry
- Processing balusters: preparation for installation
- Specifics of Mounting to Different Types of Stairs
- Stairs on Stringers: Direct Mounting
- Stairs on Rails: Using Baluster Supports
- Spiral Stairs: Geometric Features
- Installing handrails: final stage
- Preparing handrails for installation
- Technology of mounting handrails
- Quality Control and Testing
- Visual inspection
- Functional tests
- Final Finishing and Protection
- Surface Preparation
- Selection of Protective and Decorative Coatings
- Operation and maintenance
- Regular maintenance
- Repair and Restoration
- Conclusion
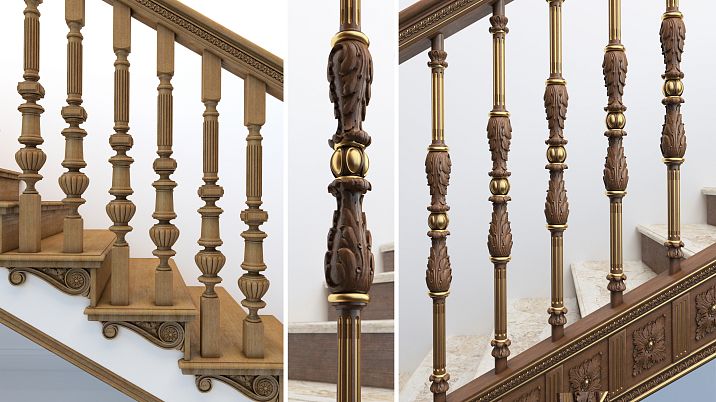
What distinguishes a regular staircase from an architectural masterpiece? Why do some railings serve for decades without losing their original beauty, while others become unstable within a few years of use? The answer lies in a professional approach to installation — installing balusters for stair railings requires not only technical knowledge but also an understanding of the subtleties of woodworking, passed down from generation to generation by master carpenters.
Each detail of the stair railing plays its role in creating a harmonious structure. Balusters are not just vertical posts — they are the foundation of safety and aesthetics of the entire staircase. Their proper installation determines the durability, reliability, and visual appeal of the railing. When we talk about quality installation, we are referring to millimeter precision, accurately set angles, and flawless joints.


Architectural Philosophy of Stair Railing
The stair railing is a complex engineering system, where each element interacts with others, creating a unified whole. Understanding this interrelation is critically important for successful installation. Balusters receive horizontal loads from the handrail and transfer them to the load-bearing structures of the staircase. Simultaneously, they provide rigidity to the entire railing system.


Aesthetic Principles of Design
The beauty of the stair railing arises from correct proportions and rhythm. The distance between balusters creates a visual rhythm that must harmonize with the overall architecture of the room. Classical proportions suggest installing balusters with a spacing of 120-150 millimeters, which creates an optimal balance between safety and aesthetics.
The height of balusters is determined not only by regulatory requirements but also by ergonomic considerations. A standard handrail height of 900-950 millimeters ensures comfortable support for people of average height. At the same time, it is important to consider that balusters should create a sense of security without becoming a visual barrier.
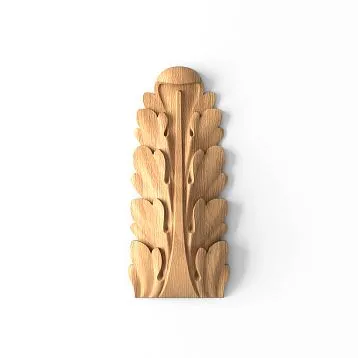
Our factory also produces:


Functional Requirements for Construction
Modern building codes establish strict requirements for the strength of stair railings. The structure must withstand a horizontal load of at least 100 kilograms per linear meter. This means that an adult can lean on the railing with force without fearing its destruction.
Child safety is a special aspect of railing design. The distance between balusters should not exceed 150 millimeters in clear span, preventing a child’s head from getting stuck. In households with young children, it is recommended to reduce this dimension to 100-120 millimeters.
Get Consultation
Material Science Foundations of Quality Installation
Choosing wood for balusters is the first step toward creating a durable railing. Different wood species have unique properties that affect processing technology and methods of fastening.
Hardwood Species: Standard of Strength
Oak remains the unrivaled material for manufacturing stair components. Its density of 650-800 kg/m³ ensures exceptional strength and longevity. Oak balusters can withstand significant loads without deformation. However, the high hardness of the wood requires a special approach to processing — all holes for fasteners must be pre-drilled.
Ash matches oak in mechanical properties but has a lighter tone and less pronounced grain. This species is ideal for modern interiors where understated elegance is valued. Ash is easily stained, allowing for any desired shade.
Beech has a uniform structure and a pleasant pinkish hue. It is easier to process than oak, but requires mandatory protection from moisture. Beech balusters are often used in children’s rooms due to the warm, cozy color of the wood.
Coniferous species: accessibility and practicality
Spruce is the most accessible material for manufacturing balusters. Its soft wood is easy to process, making it attractive for novice craftsmen. However, the resin in spruce can cause problems during finishing — resin seeps through the paint coating, forming dark spots.
Larch combines the accessibility of coniferous species with increased strength and resistance to decay. Its density is 500-600 kg/m³, significantly higher than that of pine. Larch balusters do not require special moisture protection and can be used even in unheated rooms.
Technical Requirements for the Material
Wood moisture is a critical parameter determining the stability of finished products. For indoor staircases, moisture should not exceed 12%, and for outdoor ones — 15-18%. More humid material will deform after installation, leading to weakened joints and gaps.
The absence of wood defects is especially important for load-bearing elements. Knots larger than 10 millimeters weaken the structure and may fall out over time. Cracks, even small ones, tend to grow under load. Deflections exceeding 2 millimeters per meter of length make proper baluster installation impossible.
Workshop tooling
Proper installation of staircase balusters is impossible without appropriate tooling. Each tool performs a specific function and affects the accuracy and quality of work.
High-Precision Measuring Instruments
A laser level is an indispensable assistant for marking baluster positions. It allows creating a perfectly level line at any distance, which is critically important for ensuring the verticality of all railing elements. Modern models provide accuracy up to 1 millimeter per 10 meters.
A digital protractor is necessary for accurately measuring the staircase's incline angle and trimming baluster ends. Measurement accuracy should be no less than 0.1 degrees, ensuring perfect element alignment.
A caliper is used for precise measurement of fastener element diameters and corresponding holes. Measurement accuracy of 0.1 millimeter ensures tight connections.
Professional-grade cutting tools
A laser-guided circular saw provides perfectly flat cuts at any angle. A fine-toothed blade (80-100 teeth) eliminates chipping and scratches on end surfaces. Precise angle adjustment is critically important for fitting balusters.
A router is necessary for making grooves, tenons, and decorative elements. A set of router bits with different profiles allows creating complex joints and decorative elements. A parallel fence ensures processing accuracy.
A belt sander is used for final surface finishing. The ability to adjust belt rotation speed allows working with various wood species without risk of burning.
Drilling Equipment
A drill press transforms a regular drill into a machine-like tool, ensuring strict perpendicularity of holes. This is especially important when drilling holes for bolts and dowels, where even slight deviation leads to misaligned joints.
Countersink bits with diameters from 6 to 20 millimeters provide clean holes in wood without chipping at the exit. A centering pin allows precise positioning of the bit at the marked point.
A countersink is used to create recesses for screw heads. Adjustable countersink depth allows precise control of fastener embedment depth.
Technological methods of joining elements
There are many ways to join balusters with staircase load-bearing elements. The choice of a specific method depends on the stair tread material, strength requirements, aesthetic preferences, and project budget.
Screw connections: the standard of reliability
Threaded bolts with diameters of 6-8 millimeters provide the strongest and most durable connection. This method is especially effective for heavy oak or beech balusters, which exert significant load on fastening elements.
The process begins with precise marking of hole centers. On the baluster end and at the point of installation on the tread, points are marked that must perfectly align after installation. Even slight misalignment will cause baluster skewing and compromise the verticality of the entire row.
Drilling holes requires special care. In the baluster, holes are drilled to a depth of 50-70 millimeters, ensuring secure bolt fixation. The hole diameter must precisely match the bolt’s threaded section — clearance is unacceptable, as it will cause joint play.
Dowel Connections: Traditional Elegance
Wooden dowels with diameters of 8-12 millimeters represent a classic carpentry solution valued for its ecological and aesthetic qualities. This method is especially popular when creating staircases in traditional styles.
Dowel making is a separate art. The wood for them must be absolutely dry, with moisture not exceeding 8-10 percent. The dowel’s fibers must be aligned strictly along its axis — this ensures maximum strength in shear and bending.
Dowel length is calculated so that it extends into the baluster by 30-40 millimeters and into the tread by 20-30 millimeters. A too-long dowel may cause wood cracking, while a too-short one will not ensure a secure connection.
Adhesive bonding plays a key role in the longevity of dowel connections. Modern polyurethane adhesives create water-resistant joints that do not degrade with changes in wood moisture. Adhesive setting time is 15-20 minutes, allowing adjustment of element positions.
Self-tapping screws: a balance of simplicity and efficiency
Construction screws with diameters of 6-8 millimeters allow creating a sufficiently strong connection with minimal labor. This method is especially popular among beginner craftsmen due to its simplicity and accessibility of fastening elements.
The key point is selecting the correct screw length. For attaching a baluster to a 40-millimeter-thick tread, a 80-90-millimeter screw is required. It is important not to allow the screw tip to protrude to the opposite side of the tread, as this may cause cracking.
Pre-drilling is necessary for hardwoods. The hole diameter should be 1-2 millimeters smaller than the screw diameter, ensuring tight fit without risk of wood cracking.
Step-by-step installation technology
Professional installation of staircase balusters is a sequence of precisely calibrated operations, each affecting the quality of the final result.
Preparation stage: creating a foundation of precision
Preparation begins with careful checking of the staircase’s geometry. Distances between treads are measured, tread horizontal alignment is checked, and stringer or rafter parallelism is verified. Detected deviations are taken into account during baluster position marking.
Creating a work area requires special attention to lighting. Installing balusters involves working with small details and precise measurements, so illumination should be at least 500 lux. Additional lights are installed to eliminate shadows in the work zone.
Organizing storage of materials and tools saves time and prevents damage. Balusters are laid on soft padding to avoid dents and scratches. Fasteners are sorted by size and type into separate containers.
Marking: mathematical precision in carpentry
Marking begins with installing support posts — main balusters that define the entire railing’s geometry. These elements are installed at the start and end of the staircase run, as well as at turning points.
A control string is stretched between support posts, serving as the baseline for marking intermediate balusters. The string height must correspond to the handrail installation height, accounting for its thickness.
Dividing the distance between support posts into equal parts is done using a proportional compass or mathematical calculation. It is important to achieve equal spacing with precision to 1 millimeter.
Marking is transferred to the steps using a plumb bob or laser level. Each baluster installation point is marked with a center punch or awl to prevent drill bit displacement during drilling.
Baluster Processing: Preparation for Installation
Baluster trimming is performed on a miter saw with a fine-toothed disc. The cut quality must be perfect — without chips, scratches, or deviations from perpendicularity. A square with accuracy of at least 0.1 millimeter is used for inspection.
Trimming ends at an angle matching the staircase slope requires special precision. The angle is measured with a digital protractor and transferred to the miter saw fence. All balusters on the same flight must have the same trimming angle.
Drilling holes for fasteners is done on a drill press or using guide fixtures. Drill depth is controlled by a stop or marking on the drill. Holes must be strictly perpendicular to the end surface.
Baluster sanding is performed in several stages with gradually decreasing abrasive grit. Initial processing is done with 120-150 grit paper, and final sanding with 220-320 grit.
Specifics of mounting to different types of staircases
Different staircase constructions require specific approaches to baluster installation. Understanding these features is critically important for achieving a quality result.
Stringer staircases: direct mounting
Stringer staircases offer the greatest opportunities for baluster mounting due to open access to the underside of treads. Balusters can be mounted directly to treads using through-bolt connections.
A feature of such fastening is the possibility of concealed installation — fastening elements are located on the underside of treads and do not affect the staircase's aesthetics. To access fastening locations in treads, holes are drilled, which are later sealed with decorative plugs after installation.
Connection strength is ensured by using bolts with a diameter of 8-10 millimeters and wide washers. Torque should be sufficient to eliminate play, but not excessive to avoid damaging the wood.
Staircases on stringers: use of baluster supports
Stringer staircases require a special approach to baluster mounting. The inclined surface of the stringer does not allow balusters to be mounted directly onto it — intermediate elements are required.
A baluster support is a wooden plank with a cross-section of 40×60 or 50×70 millimeters, mounted to the stringer and serving as a base for baluster installation. The upper part of the baluster support is milled with grooves for baluster mounting, and the lower part is profiled to match the stringer’s shape.
Mounting the baluster support to the stringer is done using 60-80 millimeter screws driven at an angle. Additionally, the connection is reinforced with carpenter’s glue, ensuring structural monolithism.
Helical staircases: geometric features
Helical staircases present special difficulty in installing balusters due to variable curvature radius and different tread rotation angles. Each baluster has individual dimensions and miter angles.
Marking baluster positions on helical staircases is done using special templates or computer modeling. It is important to ensure even distribution of balusters around the circumference while maintaining standard spacing between them.
Manufacturing curved handrails for helical staircases requires special equipment and high craftsmanship. An alternative solution is using composite handrails made of short straight sections joined at calculated angles.
Installing handrails: final stage
Installing handrails is the final stage of creating a staircase railing, requiring special skill and attention to detail. The quality of this work determines not only the appearance of the structure but also its usability.
Handrail Preparation for Installation
Handrails are supplied as straight blanks that must be fitted to the specific staircase. Length is measured from the top ends of installed balusters, accounting for overhangs beyond the end supports.
Handrail trimming is performed at angles ensuring tight fit against support posts or walls. For spiral staircases, complex angled joints such as "birdsmouth" or tenon joints may be required.
Milling the groove for the handrail support — a critical operation requiring precision and care. The groove depth should be 8-12 millimeters, and width should match the plank thickness with a 0.5 millimeter clearance.
Handrail Mounting Technology
The handrail support serves as an intermediate element between balusters and the handrail. It is made from the same wood species as the main components and has a thickness of 8-10 millimeters.
Mounting the plank to balusters is done using 25-30 millimeter screws driven into the ends of balusters. Screw heads are countersunk 2-3 millimeters and covered with wooden plugs made from the same wood species.
Installing the handrail onto the handrail support is done using carpenter’s glue and screws driven from below the support. This connection is concealed and provides high strength while allowing for disassembly for repair.
Quality control and testing
Completion of installation does not mean the end of work. Careful quality control allows identifying and eliminating possible defects before the staircase begins operation.
Visual inspection
All railing elements are inspected under good lighting using magnifying glass to detect minor defects. Inspection includes checking for chips, scratches, stains, and uneven coating.
Geometric control includes checking baluster verticality, handrail horizontal alignment, uniform spacing between elements. Levels, squares, and high-precision measuring rulers are used.
Connection quality is assessed by absence of gaps, play, or squeaks under load. All fasteners must be securely tightened but not over-tightened to avoid damaging the wood.
Functional tests
Load tests are conducted by applying a horizontal force of 100 kilograms per linear meter to the handrail. The structure must not exhibit residual deformation after load removal.
Vibration tests are performed by rhythmic impact on various railing elements. Absence of resonant vibrations indicates correct installation and sufficient structural rigidity.
Usability check includes evaluating handrail height, profile, absence of sharp edges or burrs. The handrail must be comfortably graspable by an adult of any height.
Final finishing and protection
Proper finishing of the staircase railing not only highlights the beauty of the wood but also protects it from moisture, ultraviolet exposure, and mechanical damage.
Surface preparation
All railing elements are sanded in several stages with gradually decreasing abrasive grit. Initial sanding removes tool marks and levels the surface. Intermediate sanding eliminates minor defects. Final sanding creates a perfectly smooth surface.
Dust removal after sanding is a critically important operation. Residual abrasive dust can cause coating defects and reduce adhesion. A vacuum cleaner with a soft brush and sticky cloths is used.
Wood priming ensures even absorption of the final coating and improves its adhesion. For coniferous species, isolating primers are mandatory to prevent resin bleed-through.
Selection of protective-decorative coatings
Varnish coatings provide maximum wood protection while preserving its natural beauty. Polyurethane varnishes offer high wear resistance and are suitable for heavily used staircases.
Oil finishes create a more natural appearance, highlighting the wood's texture. They are easy to refresh but require more frequent maintenance. Oils with hard wax combine the advantages of both types of finishes.
Application techniques require adherence to temperature and humidity conditions. The optimal temperature is 18-22°C with air humidity at 50-60%. Each layer must be fully dry before applying the next.
Operation and Maintenance
Proper care of the stair railing extends its service life and preserves its original appearance. Installing balusters for stair railings involves ongoing maintenance of the structure.
Regular Maintenance
Daily cleaning includes removing dust with a dry, soft cloth or special wood wipes. Wet cleaning is performed with a well-wrung cloth using specialized wood care products.
Weekly treatment with polishing compounds maintains the finish's gloss and creates an additional protective layer. Polishes are applied in a thin layer and rubbed in until fully absorbed.
Seasonal maintenance includes inspecting all joints, tightening loose fasteners, and renewing protective coatings in areas of heavy wear.
Repair and restoration
Minor coating damage is repaired by local sanding and applying a repair compound. It is important to precisely match the color and texture of the coating to ensure the repair is not noticeable.
Replacement of individual components may be required for severe damage. Due to the thoughtful design of the mounting system, balusters can be replaced individually without dismantling the entire railing.
Complete coating renewal is performed every 5-7 years depending on usage intensity. The old coating is removed by sanding, after which a new coating is applied in full volume.
Conclusion
The skill of installing stair rail balusters represents a synthesis of traditional carpentry techniques and modern technological solutions. Each stage of work, from material selection to final finishing, requires deep knowledge, precision, and a creative approach.
A well-executed staircase railing serves not only as a functional element ensuring safe movement, but also as an important interior component that creates an atmosphere of comfort and elegance. Properly installed balusters and handrails will delight the eye and serve faithfully for decades.
Modern technologies and materials open up boundless opportunities for creativity in staircase design. However, the fundamentals of craftsmanship remain unchanged — a deep understanding of wood properties, mastery of traditional joinery techniques, attention to detail, and a pursuit of perfection.
For those who wish to master all the intricacies of the process, we recommend studying detailed information about installing balusters on stair railings, where time-tested methods and modern technological solutions are presented.
For many years, the company STAVROS has been recognized as a leader in creating exclusive wooden staircases. Our masters possess unique experience and are ready to share professional secrets with those who strive to create truly high-quality and beautiful staircase structures.