Article Contents:
- Trim: Definition, Functions, Classification
- Wood as Trim Material: Species and Characteristics
- Types of Wooden Trim and Their Applications
- Carved Wooden Trim: When Function Becomes Art
- Polyurethane Trim: Technology, Advantages, Applications
- Comparing Wood and Polyurethane: How to Choose the Optimal Material
- Combined Solutions: The Best of Both Worlds
- Selection, Purchase, Installation: Practical Path to Results
- Care and maintenance: Preserving beauty for years
- Common Mistakes When Choosing and Installing Trim
- Trends and Modern Solutions in Trim Usage
- Trim as an Investment in Interior Value
- Conclusion: Conscious Choice for the Ideal Result
The interior achieves completeness not when walls are painted or covered with wallpaper, but when lines, frames, transitions appear — when the floor meets the wall through an elegant skirting board, when a door opening becomes an architectural portal thanks to door casings, when a flat wall is structured into classical panels by moldings. These roles are performed by trim elements — linear components measured in linear meters that form the architectural framework of space. The choice of trim material — wood or polyurethane — affects not only visual aesthetics but also practical characteristics: durability, resistance to moisture and temperature fluctuations, installation complexity, repairability, project cost. The modern market offers a vast variety of solutions, and understanding the specifics of each material is critically important for creating an interior that will delight for decades.
When it comes to where tobuy wooden trimWhen considering where to buy wooden trim or polyurethane decorative items, it is not enough to simply find a store with low prices — it is essential to understand what is needed for your project, which characteristics are critical, which compromises are acceptable, and which will lead to disappointment. Wood is tradition, natural beauty, tactile warmth, the ability to create unique carved elements, but also demands for operating conditions, requires protection and maintenance. Polyurethane is a modern technology that allows achieving complex reliefs with minimal weight, absolute moisture resistance, ease of installation, but also has a specific material character, different from live wood. Combining both materials in one project often yields the optimal result — wood where tactile and natural qualities are important, polyurethane where complex shapes and moisture resistance are needed.


Trim: Definition, Functions, Classification
Trim refers to items whose primary dimensional characteristic is length, measured in linear meters, with relatively small and stable cross-sections. These are boards, strips, moldings, casings, skirting boards, cornices, angles, strips, wainscoting, cassettes — everything that has a linear extended form and is used for framing, connecting, and dividing surfaces and interior elements.
The functions of trim items are diverse and critically important for the quality of finishing. The constructive function — trim covers technological gaps between different materials and structures that are inevitable during construction and finishing. Compensatory joints between wall and floor, wall and ceiling, between panel coverings, around door and window blocks — all these technological necessities become aesthetic solutions thanks to trim. The protective function — trim protects vulnerable edges and corners from mechanical damage. Skirting boards protect the lower part of the wall from vacuum cleaner impacts and furniture legs. Door casings protect the end of the wall in the door opening. Corner elements protect exterior corners from chipping.
The decorative function — trim creates an architectural pattern in the interior, structures space, sets the style. Moldings on walls transform a flat painted surface into classical panels. Carved cornices under the ceiling add luxury. Wooden strips create a modern rhythmic texture. The visually corrective function — properly selected trim can alter the perception of room proportions. Vertical elements visually increase ceiling height. Horizontal bands visually expand narrow spaces. A dark skirting board on light walls creates graphic clarity.
Trim items are classified by several parameters. By material — solid wood from various species, MDF items with veneer or film coating, polyurethane, gypsum, polystyrene, plastic. By purpose — floor skirting boards, ceiling cornices and moldings, wall moldings and wainscoting, door and window casings, corner elements, decorative beams, cassettes. By profile — simple flat strips, profiled with classic moldings and beads, carved with ornaments and reliefs, flexible for curved surfaces. By installation method — adhesive, mechanical fastening (nails, screws), hidden fastening (clips, strips).


Wood as Trim Material: Species and Characteristics
Wood has remained one of the primary materials for interior finishing for millennia due to its unique combination of properties — natural beauty, workability, eco-friendliness, tactile comfort.Wooden trimIt is made from various species, each of which has specific characteristics determining its application area.
Coniferous species — the most common and accessible category for trim. Pine — soft, easy to process, resinous, with a characteristic pattern of knots and annual rings. Density around 500 kg/m³. Affordable price makes pine trim popular for budget projects. Resin provides natural protection against rot, but may cause problems when painting — resin seeps through paint as spots. Pine trim is suitable for all areas except humid ones, requires treatment with antiseptics and finish coatings.
Spruce — similar to pine, but less resinous, lighter, with less pronounced pattern. Density 450 kg/m³. Easy to process, holds fasteners well, but less moisture-resistant than pine. Spruce trim is used where a light, uniform texture is important and planning to paint in light tones or apply lacquer while preserving natural color.
Larch — a unique coniferous species with density 650-700 kg/m³, exceeding many hardwoods in hardness. High resin content and specific chemical composition make larch practically rot-resistant even without treatment. Color ranges from yellowish to reddish-brown. Larch trim — optimal choice for humid areas (bathrooms, saunas, steam rooms), terraces, balconies. More expensive than pine by 2-3 times, but longevity justifies the cost.
Hardwood species with medium hardness are used where a more noble texture and better performance characteristics are needed. Oak — the king of wooden trim, density 700-750 kg/m³, expressive texture with bright annual ring and medullary ray patterns. Color ranges from light yellow (young oak) to dark brown (oak with dark stain). Exceptional hardness, wear resistance, dimensional stability. Oak trim — choice for prestigious interiors where longevity and status matter. Holds carving and complex profile milling well. Price is high, but justified by centuries of service.
Ash — similar to oak in density (700 kg/m³) and hardness, but has a lighter, yellowish-white color and less contrasting, softer texture. Easily bends after steaming, which is useful for flexible elements. Ash trim — alternative to oak for lighter interiors, Scandinavian and modern styles.
Oak — density 650-680 kg/m³, even pinkish texture without prominent grain. Hard, durable, easy to work with. After steaming, it takes on a richer pink-brown hue. Oak skirting is popular in Europe, used in classic interiors where a noble but non-contrasting texture is needed.
Softwood species are used for decorative carved skirting and situations where ease of processing is important. Lime — density only 450-500 kg/m³, soft, uniform, cream-white. Ideal for carving — easily cut, holds fine details, does not splinter. Lime skirting is primarily used for carved elements — door casings, cornices, decorative appliqués. Requires protection, as it is susceptible to biological damage.
Birch — density 630 kg/m³, light yellowish-white wood with fine, uniform texture. Hard, flexible, easy to process and paint. Birch skirting is a good choice for painted interiors, where the wood grain is hidden under paint, and mechanical properties and stability are important.
Willow — density 500-550 kg/m³, color ranging from light pink to reddish-brown. Soft, easy to process, stains well to match premium species. Willow skirting — an economical alternative to more expensive hardwoods, used under staining or painting.
Exotic species are used in exclusive projects where budget is not limited. Teak, wenge, merbau, iroko, palisander — species with unique colors, textures, and oily properties providing natural protection. Exotic skirting — a custom product for elite interiors, yachts, luxury hotels.
Our factory also produces:


Types of wooden skirting and their applications
The variety of wooden skirting products allows solving all interior finishing tasks — from utilitarian sealing of gaps to creating complex decorative compositions.
Baseboard skirting — the most common type of skirting, installed along the perimeter of the room at the junction of wall and floor. Wooden baseboards serve several functions: they cover the expansion gap between floor covering and wall (necessary for temperature expansion of parquet, laminate), protect the lower part of the wall from mechanical damage during cleaning and furniture rearrangement, serve as cable channels for concealed wiring, create visual wall closure and floor framing.
The height of wooden baseboards varies from modest 40-60 millimeters for modern minimalist interiors to monumental 120-200 millimeters for classical interiors with high ceilings. The profile may be simple rectangular with rounded top, classic profiled with molding and beads, or complex multi-tiered for luxurious interiors. Wide, tall baseboards made of oak or beech — a characteristic element of classic English and French interiors, where baseboard is a full architectural element, not merely a technical detail.
Veneered baseboards — a compromise between solid wood and MDF. A stable coniferous wood or MDF core is covered with a thin layer of premium veneer (oak, beech, walnut). This provides visual match to premium species at a lower price and greater dimensional stability.
Baseboards with cable channels have a cavity on the back or a removable strip under which wires are laid. This is convenient for modern interiors with many electronics and communications.
Flexible wooden baseboards — special items made of thin laminates connected by a flexible base, allowing them to wrap around curved walls, bay windows, columns. Alternative — steaming regular wooden baseboards and shaping them to the required curve, followed by fixation.
Door casings — framing the door opening, covering the joint between door frame and wall, concealing mounting foam and unevenness of the jamb. Wooden casings — classic, ensuring visual and material unity with wooden doors. Casing width is usually 60-100 millimeters, profile ranging from simple flat to complex carved.
Telescopic casings have a special profile with a groove into which a filler — a filler board — is inserted, increasing the frame width for thick walls. This allows adjusting the installation depth without trimming.
Carved casings — decorative elements with ornaments, plant motifs, geometric patterns. Characteristic of classical, ethnic, and artisanal styles. Carved casing transforms a utilitarian door opening into an architectural portal, compositional accent.
Casing capitals — horizontal top plank, often wider and more decorative than side stiles, sometimes projecting forward, creating visual weight and completion of the portal.
Window casings perform the same functions as door casings — framing the opening, covering joints, adding decoration. For windows, characteristic are surface-mounted casings (installed over the jamb) and telescopic (inserted into the groove under the window sill and jamb).
Wall moldings — decorative strips installed on walls to create architectural divisions, panels, frames. Wooden moldings — choice for interiors where natural texture, tactile contact, and unity with wooden furniture and floors are important. Molding width from 30 to 150 millimeters, profile from simple strip to complex multi-tiered with carved elements.
Horizontal moldings at 70-100 centimeters from the floor create a classic division of wall into panel and field, visually reducing high walls, protecting against damage at chair back height. Vertical moldings imitate pilasters, creating rhythmic vertical accents, zoning long walls. Framing moldings form rectangular or square panels, within which contrasting finishes — wallpaper, paint of another color, fabric, leather — are placed.
Ceiling moldings — strips at the junction of wall and ceiling, creating transition and framing. Wooden ceiling moldings are less common than polyurethane or plaster ones due to weight and installation complexity, but used in interiors where material unity with wooden walls, ceilings, and furniture is important. Profile from simple rounded to complex classic.
Gables — a type of molding, usually smaller in size, with a concave profile creating a smooth transition from vertical to horizontal. Wooden gables are characteristic of wooden houses, saunas, rooms with wooden wall and ceiling cladding.
Mullions and stiles — thin strips for dividing and framing. Mullions are used to create panels on smooth doors, divide glass panes into segments (false mullions), frame mirrors and panels. Stiles — narrow strips for securing glass in frames, fixing panels in grooves. Section usually 10-20 millimeters.
Angles and cappings — elements for closing joints at angles. External angles protect protruding corners of walls, columns from damage. Internal angles cover gaps between panels of cladding. Cappings — strips for closing gaps between vertical elements of paneling, panels.
Decorative beams — imitations of load-bearing wooden beams for creating country, chalet, loft styles. Solid beams from solid timber are expensive and heavy, so often false beams — hollow boxes made of boards — are used, creating the visual effect of beams at lower weight and cost.
Coffers — a system of intersecting beams and frames on the ceiling, creating recessed panels. Wooden coffers — a traditional element of classical libraries, offices, grand halls. Labor-intensive to manufacture and install, require high ceilings (from 3 meters), but create an exceptional visual effect of monumentality and luxury.
Planks and battens — simple rectangular or square elements for creating modern plank walls, lattices, frames. Planks 20-40 millimeters thick and 40-100 millimeters wide, installed vertically with 30-50 millimeter gaps, create a popular modern decor — rhythmic texture, play of light and shadow, visual depth.
Get Consultation
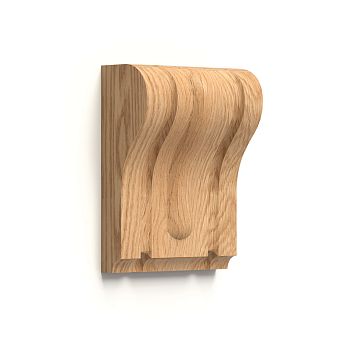
Carved wooden skirting: when function becomes art
Wood carving transforms utilitarian skirting into a piece of decorative-applied art.Carved wooden skirting— choice for interiors where handcrafted beauty, artisanal craftsmanship, and individuality are important.
Types of carving determine the character of the items. Geometric carving — the simplest type, based on the combination of geometric figures: triangles, rhombuses, circles, lines. Executed with a knife or chisels, it creates graphic patterns. Characteristic of folk and ethnic styles.
Contour carving — the pattern is formed by recessed lines-grooves cut into the wood surface. Lines may be straight or curved, forming plant ornaments, inscriptions, narrative images. The background remains flat.
Flat relief carving — the ornament protrudes slightly above the background (5-10 mm). The background may be recessed (ornament at original surface level, background removed) or the ornament protrudes (background at original level, ornament added by overlay or carved around). This is the most common type of carving for trim — casings, cornices, moldings.
Deep relief carving — high relief (20-50 mm) with detailed work, three-dimensional forms, but without through cuts. Creates expressive, sculptural ornaments. Characteristic of rich cornices, capitals, decorative overlays.
Openwork (lattice) carving — the ornament is completely cut through, with no background. Creates lace-like, openwork elements. Characteristic of applied decorative panels, friezes, which are mounted on contrasting backgrounds.
Sculptural carving — three-dimensional volumetric forms, figures, elements. Used for brackets, consoles, corner elements, where trim transitions into sculpture.
Carved trim ornaments vary by motif. Plant ornaments — the most common: grapevines and clusters, oak leaves and acorns, laurel wreaths, acanthus leaves, roses, tulips, ivy. Plant motifs are universal and suitable for most styles, from classic to modern.
Geometric ornaments — meanders, braids, rhombuses, zigzags, scales, honeycombs. Characteristic of classical, ethnic, art deco styles.
Figurative ornaments include stylized images of animals, birds, fish, mythological creatures. Lion heads and paws, eagles, dolphins, dragons, griffins — characteristic of classical, imperial, Gothic styles.
Anthropomorphic ornaments — stylized human figures, faces, masks, cherubs, atlantes, caryatids. Used in classical, baroque interiors of high status.
Symbolic ornaments include coats of arms, monograms, religious symbols, Masonic signs. Used for personalizing interiors, emphasizing ownership or status.
Wood species for carved trim are selected based on workability and visual qualities. Lime — ideal for fine detailed carving due to softness, uniformity, and absence of splinters. Used for complex ornaments with small elements. Requires protection and is often painted or lacquered.
Oak — hard, difficult to carve, requires professional skill and sharp tools. But holds large carving perfectly, does not splinter, creates monumental durable elements. Oak’s expressive texture is beautiful in carving, emphasizing volume. Used for large elements — cornices, beams, doorways.
Walnut — the golden middle ground between lime and oak. Sufficiently hard for durability, yet malleable for medium-complexity carving. Beautiful dark color with texture makes walnut carving noble. Used for prestigious medium-sized elements.
Beech — dense, harder to cut than lime, but easier than oak. Uniform pinkish texture without prominent grain allows the ornament to stand out without competing with the background. Beech carving is popular in Europe for classical interiors.
Pear, apple — fruit woods with dense fine-grained texture, easy to cut, hold fine detail. Used for small carved elements — overlays, medallions. Beautiful pinkish-brown color.
Carved trim transforms interiors, adding handcrafted luxury. Carved casings turn doors into grand portals. Carved cornices under ceilings create palace-like atmospheres. Carved moldings on walls form rich panels. Carved brackets under shelves become sculptural accents. It is important to maintain moderation — excessive carving creates clutter and visual noise. One or two carved accents against restrained finishes work better than total carving on all elements.
Polyurethane trim: technology, advantages, application
Polyurethane — synthetic polymer obtained by reaction of polyols with isocyanates, used for decorative items in the form of high-density rigid polyurethane foam with density 300-500 kg/m³.polyurethane productsProduced by molding into molds, allowing elements with exceptional relief detail, precise repetition of complex ornaments, and identical items in a series.
Advantages of polyurethane trim make it popular in modern construction. Lightness — key advantage. Polyurethane is 3-4 times lighter than wood and 5-6 times lighter than plaster at comparable dimensions. A 2-meter-long cornice made of polyurethane weighs 3-5 kg versus 12-15 kg for wood and 20-25 kg for plaster. This is critical for installation: lightweight elements do not impose load on walls and ceilings, do not require heavy fasteners, can be installed even on gypsum board structures without reinforcement, primarily mounted using adhesive without screws. Physically, installation is accessible to one person without helpers.
Water resistance — polyurethane does not absorb water, does not swell, does not deform, does not lose strength upon prolonged contact with moisture or direct water exposure. Polyurethane trim can be installed in bathrooms, showers, saunas (up to 80°C), kitchens, pools — anywhere where wood requires special treatment or is outright unsuitable. Elements can be washed with any cleaning agents without damage.
Impact resistance and elasticity — polyurethane absorbs impacts, does not splinter, does not crack under mechanical stress that would shatter plaster or wood. A random impact from a vacuum cleaner, furniture leg, or child’s toy will leave at worst a small dent, which often self-repairs due to the material’s elasticity.
Dimensional stability — polyurethane does not react to changes in humidity and temperature within normal room operating ranges (from -20 to +80°C). Elements do not shrink, swell, or warp. Joints made during installation remain invisible for years, do not separate. This is especially important in new constructions, where buildings undergo shrinkage in the first years — polyurethane trim will easily withstand these processes.
Ease of processing — polyurethane elements are easily cut with a fine-toothed hacksaw, circular saw, or jigsaw. No special tools required. Cuts are clean, even, and do not chip. Elements can be trimmed to fit the location, cutting the required length, forming joints at any angle for complex room configurations.
Paintability and decoration — polyurethane holds any water-based or acrylic paint excellently. Acrylic, latex, and silicone paints lay evenly without special priming (though priming improves results). Can be painted in any color, creating patina (artificial aging), gilding, silvering, wood, stone, or metal imitation. Surface is smooth and ready for painting, does not require puttying. This provides unlimited color and decorative solutions.
The longevity of quality polyurethane trim is measured in decades. The material does not chemically age, does not yellow (except under direct sunlight on unprotected surfaces), does not lose mechanical properties. The only thing that may be required — repainting every 10-15 years. The polyurethane itself remains as new.
Economic efficiency — at comparable visual quality, polyurethane elements cost 2-3 times less than handcrafted plaster analogs and are often cheaper or comparable in price to quality wooden trim from premium woods. Mass production by molding allows obtaining identical elements at affordable prices. Savings are also achieved during installation — lightness and simplicity of installation reduce labor and work costs.
Types of polyurethane trim cover all decoration needs. Ceiling cornices — from simple 30-50 mm high moldings to monumental 200-300 mm cornices with rich classical ornamentation. Special cornices with a shelf for hidden LED lighting — a popular modern solution creating a floating ceiling effect.
Wall moldings — from minimalist 20-30 mm strips to complex profiled 100-150 mm moldings for creating classical panels. Flexible moldings for curved surfaces — arches, bay windows, columns.
Baseboards — from modern, sleek 50-70 millimeters to classic high 120-200 millimeters. Baseboards with cable channels for wiring. Flexible baseboards for curved walls.
Decorative elements — rose brackets for chandeliers and lamps, pilasters and half-columns for vertical accents, decorative appliqués with ornaments for panel and door decoration, brackets and consoles for shelves and cornices, corner elements for joining cornices and moldings.
Opening trim — sets for decorating doors and windows, imitating classical wooden portals or creating modern minimalist frames.
3D panels — volumetric wall elements with relief patterns for creating textured accent walls.
Polyurethane molding is optimal in situations where wood is unsuitable or excessively expensive. Wet areas — bathrooms, showers, kitchens, pools, where wood requires special treatment and still risks damage. Rooms with variable humidity and temperature — hallways, vestibules, glazed balconies and loggias. Commercial spaces with high traffic — restaurants, cafes, offices, hotels, where durability and ease of maintenance are required. New constructions in the first years of operation, where building settlement may deform wood, while polyurethane withstands without problems. Projects with limited budgets, where an attractive appearance is needed at an affordable price. Complex shapes and reliefs, which would require hand carving and corresponding cost in wood, but become serial and affordable in polyurethane.
Comparison of wood and polyurethane: how to choose the optimal material
Choosing between wooden and polyurethane molding — it's not a question of 'which is better', but 'which suits a specific situation'. Both materials have their strengths and optimal application areas.
Aesthetics and tactile quality — the main advantage of wood. Natural wood grain pattern, color play, tactile warmth, pleasant surface feel, living aging with noble patina — this cannot be fully reproduced in polymer. Wood breathes, smells, lives. If the interior is built around natural materials, if an eco-approach is important, if craftsmanship and naturalness are valued — wood is unbeatable. Polyurethane provides a stable, predictable, identical appearance for all elements, which is good for classical compositions requiring precise ornament repetition, but lacks the individuality that each piece of wood provides.
Profile and ornament complexity — here polyurethane has an advantage in mass production. By molding, any, however complex, relief with the finest details can be obtained, and each element will be identical to the previous one. A rose with dozens of acanthus leaves, cherubim, garlands — in polyurethane this is a serial product at an affordable price. In wood, such complexity requires hours of hand carving by a skilled craftsman and corresponding cost. But carved wood has its own value — craftsmanship, uniqueness, status. This is a matter of priorities and budget.
Weight and installation — clear advantage of polyurethane. Lightness simplifies transportation, storage, installation. One person can install a cornice throughout a room in a day. Adhesive mounting does not require drilling, filling holes from screws. Wooden molding is heavier, requires mechanical fastening (nails, screws, sometimes hidden systems), more careful fitting. Installation is more complex, often requires two people for long elements. But this process is familiar to carpenters, perfected over centuries, and with a professional approach, the result is flawless.
Water resistance — absolute advantage of polyurethane. Complete immunity to water makes it universal. Wood requires protection, and even moisture-resistant species like larch or teak are better additionally treated. For bathrooms, kitchens, other wet zones, polyurethane — logical choice. In dry living spaces, wood feels comfortable provided normal ventilation is maintained.
Dimensional stability — polyurethane is stable under any fluctuations in humidity and temperature within the household range. Wood is a living material, reacting to climate — it expands with increased humidity, shrinks with decreased humidity. Well-dried wood is stable for most of the year, but seasonal fluctuations are possible. This is critical for joints — polyurethane joints remain invisible, while wooden ones may slightly separate in winter under dry air from heating. The problem is solved by proper installation accounting for seasonal movement, but polyurethane is inherently free of these issues.
Durability — both materials, with proper use, serve for decades. Quality wood with good protection (oil, lacquer, wax) will outlive more than one generation — there are wooden interiors dating back a century or more. Polyurethane has not yet had such a long history (the material spread in the last 30-40 years), but research and practice show a service life of 50+ years without degradation. Wood requires periodic reapplication of finish (every 5-10 years depending on conditions). Polyurethane requires only repainting if the color becomes unattractive or faded.
Repairability — wood is easier to locally restore. Scratches can be sanded and repainted. Chips can be filled with a special wood filler and touched up. Faded surfaces can be sanded to reveal fresh wood layer and re-coated. Polyurethane, upon damage, is usually repainted entirely or the damaged element is replaced. Local restoration is more difficult, as the structure is homogeneous, without layers.
Ecological safety — wood is a natural material, provided eco-friendly coatings (natural oil, wax, acrylic lacquers) are used, it is absolutely safe, and even beneficial for microclimate, regulating humidity, and may emit pleasant aromas (coniferous species). Polyurethane — synthetic polymer. Quality polyurethane, after full polymerization, is inert, does not emit harmful substances, has safety certificates for residential use. But it is not a natural material, which is important for eco-approach advocates.
Price — a complex parameter depending on many factors. Simple pine molding is cheaper than its polyurethane equivalent. Oak or beech molding is more expensive than polyurethane. Carved wooden molding is significantly more expensive than polyurethane with similar relief. On average, for comparable visual results, polyurethane is more economical, especially for complex profiles. However, installation cost should be considered — polyurethane is easier and faster to install, reducing labor costs.
Combined solutions: the best of both worlds
In practice, the optimal solution is often not 'either-or', but a thoughtfully combined use of wooden and polyurethane molding in one project, where each material is used where its advantages are maximized.
Functional division strategy: wood for contact elements, polyurethane for decorative. Baseboards and casing — wood, as they are often touched, tactile quality and wear resistance are important. Ceiling cornices and moldings — polyurethane, as they are not touched, easy installation and complex relief are important. Result — tactile comfort at the bottom, visual luxury at the top, optimal cost.
Humidity zoning strategy: wood in dry zones, polyurethane in wet zones. Living rooms (bedrooms, living rooms, offices) — wooden molding for natural aesthetics and eco-friendliness. Bathrooms, kitchens, hallways — polyurethane for moisture resistance and ease of maintenance. Result — beauty and naturalness where it is comfortable, practicality where it is necessary.
Visual unity strategy with different materials: choose polyurethane elements painted to match wood color, or wooden elements painted to match polyurethane. Wooden baseboards from oak, stained with oil. Polyurethane moldings and cornice, painted with acrylic paint in the same oak shade. From afar, the difference is not noticeable, creating the impression of a fully wooden interior. Up close, the difference is visible, but overall harmony is preserved.
Accent strategy: simple main molding (wood or polyurethane), accent elements carved wood. Walls decorated with simple polyurethane moldings creating panels. Door framed with hand-carved wooden casing — accent portal. Result — overall restraint with bright handmade accents, budget savings while preserving luxurious details.
Stylistic mix strategy: modern elements from polyurethane + classic from wood. Walls covered with modern wooden planks with gaps — clean geometry, natural wood. Ceiling decorated with polyurethane cornice with classic ornament. Result — eclectic modern interior, where natural materials combine with classic decor.
Selection, purchase, installation: practical path to result
The process from deciding to use molding to final result includes several stages, each affecting the quality and cost-effectiveness of the project.
Design stage begins with assessing the room and determining needs. Measure the room perimeter to calculate baseboards and cornices. Measure height and width of door and window openings for casing. Determine zones where wall moldings are planned — draw schematics, make sketches. Consider room specifics — humidity (bathrooms require moisture-resistant materials), load (hallways with heavy traffic require strong baseboards), style (classic interiors require appropriate profiled molding, minimalist — simple).
Style selection is critically important, as the molding profile sets the interior's style. Classic requires profiled elements with coves, beads, possibly ornaments. Minimalism — simple rectangular or rounded sections without decoration. Loft — rough wooden planks, beams, possibly with preserved texture. Provence — light wood with delicate carving or patinated polyurethane. Neoclassicism — restrained profiles with hints of classical elements without flamboyance.
Material selection is based on project priorities. If natural aesthetics, tactile quality, eco-friendliness, and maintenance readiness are critical — wood. If moisture resistance, easy installation, stability, and complex relief at affordable cost are critical — polyurethane. If budget is limited — polyurethane or simple pine molding. If budget allows — oak, beech, carved elements.
Calculating quantity requires attention. For baseboards and cornices — measure perimeter, subtract door opening width, add 10% allowance for trimming. For casing — calculate perimeter of each opening (typically 5-6 meters for standard door), multiply by number of openings, add 10% allowance. For moldings — calculate length of all strips from sketches, add 15% allowance, as trimming for angles produces more waste. Buy with allowance — purchasing an exact same molding from the same batch a month later may be impossible.
Buying from a reliable supplier — key to quality. Look for companies with full assortment, where you canbuy wooden trimBuy molding and polyurethane items in one place. Check for quality certificates and warranties. It is advisable to see samples in person before ordering — photos do not always convey the real scale and texture. Clarify delivery conditions — long elements require special transport. Check quality upon receipt — flatness, absence of defects, accuracy of dimensions.
Preparation for installation includes acclimatizing the material (especially wood). Bring the molding into the room where it will be installed and let it sit for 2-3 days to equalize humidity with the room. This is critical for wood, preventing subsequent deformation. Polyurethane is less sensitive, but it is also advisable to let it acclimatize for one day.
Prepare tools: a miter saw or miter box with a saw for cutting at an angle, a tape measure and level for marking, adhesive (for polyurethane — polyurethane type liquid nails, for wood — carpentry or construction adhesive), fasteners for wood (finishing nails, screws, possibly an air nail gun), spackle for filling joints and holes, sandpaper for sanding joints, paint or varnish for final finish.
Prepare surfaces — walls, ceilings, floors must be clean, dry, and strong. Remove peeling finishes. Significant unevenness (more than 5 millimeters) should be leveled with spackle — molding replicates wall relief, unevenness will be noticeable. Prime surfaces to improve adhesive bond of the glue.
Installation of baseboards begins at the corner, most noticeable upon entry. Cut the first strip and try it on. If it's an inside corner — both strips are cut at 45 degrees and joined at the corner. Polyurethane baseboard is glued using adhesive applied in a zigzag pattern to the back, pressed against the wall and floor for a minute. Heavy elements can be temporarily secured with painter's tape or supports until the glue sets. Wooden baseboard is nailed or screwed into the wall (not into the floor — the floor must move). Nail heads are countersunk, holes are spackled. Joints between baseboards must be tight, without gaps.
Installation of casing begins with vertical stiles, then the top strip. Standard scheme — vertical strips rest on the floor, the top strip is laid on them. Alternative — all three strips are cut at 45 degrees and joined at the corners (more complex, but neater for decorative profiles). Polyurethane casings are glued. Wooden casings are nailed with finishing nails every 30-40 centimeters.
Installation of cornices and moldings requires precise horizontal or installation line marking. Use a laser or water level to mark the line around the entire perimeter. Cornices are cut at 45 degrees in corners. Polyurethane is glued using special adhesive, pressed for a minute. Long heavy cornices can be temporarily supported or secured with painter's tape until the glue sets. Wooden cornices are screwed into the wall, nail heads are spackled.
Joint sealing — critical stage for neatness. Joints between elements are filled with acrylic sealant (for polyurethane) or spackle (for wood). Excess is wiped off immediately with a damp cloth. After drying, joints are sanded with fine sandpaper for perfect smoothness and invisibility.
Final finish depends on material and design intent. Wooden molding can be left in natural color, covered with transparent oil or varnish — highlights wood texture. Can be stained with stains or pigmented oils — changes shade but preserves texture visibility. Can be painted with covering paint — hides texture, provides any color. Polyurethane molding is almost always painted — acrylic or latex paint in 2-3 thin coats. Possible patina — applying contrasting paint into relief grooves for aging effect. Possible gilding or silvering — metallic paints or special compounds to imitate gold leaf.
Care and Maintenance: Preserving Beauty for Years
Proper care extends the life of molding and preserves its decorative qualities.
Wooden molding requires attention to finish. If wood is oiled — renew finish every 2-3 years (more often in humid zones, less often in dry). Oil gradually wears off, especially on baseboards and casings. Renewal is simple — light sanding, dusting, applying new oil layer. If lacquered — monitor integrity of lacquer layer. Scratches and chips expose wood to moisture, may cause darkening and swelling. Locally damaged areas can be resanded and relacquered. If painted — repaint as it fades or gets dirty, usually every 5-7 years.
Cleaning wooden molding depends on finish. Oiled and lacquered finishes can be wiped with a damp soft cloth and neutral cleaning agents. Avoid aggressive chemicals, abrasives, excessive moisture. Painted surfaces should be washed carefully — vigorous rubbing may damage paint. Dust can be removed with dry or slightly damp cloth, soft brush.
Polyurethane molding requires little maintenance. Clean with any household cleaners without fear of damaging material. Moisture resistance allows using wet cleaning without restrictions. Painted polyurethane may fade under direct sunlight — if cornices or moldings on southern walls have lost color saturation, simply repaint. Mechanical damage (dents, scratches) is filled with polyurethane or acrylic sealant, sanded, and repainted.
Annual preventive inspection helps identify problems early. Check joint tightness — if gaps appear, fill with sealant. Check baseboards for detachment from walls — if detached, reattach. Check integrity of finish on wooden elements — repair damage as needed.
Common mistakes when selecting and installing molding
Experience shows typical mistakes that can be avoided with proper planning.
Scale error — choosing molding that is too heavy or too thin for the room. A 150 mm high baseboard in a room with 2.6 m ceiling visually presses down, 'eating' height. A 40 mm cornice in a hall with 3.5 m ceiling disappears, looks short. Rule: baseboard height is 1/20 — 1/25 of wall height. For 2.7 m ceilings — 60-80 mm baseboards. For 3 m — 80-120 mm. For 3.5 m — 120-150 mm. Cornices similarly.
Stylistic mismatch — ornate molding in a minimalist interior or vice versa. Baroque carved casings plus minimalist profileless polyurethane baseboards — dissonance. All molding elements in a room must be stylistically consistent. If casings are ornate — cornices and moldings should also have ornamentation. If baseboards are simple modern — casings should also be minimalist.
Ignoring operating conditions — installing ordinary wooden molding in a bathroom without moisture-resistant treatment. Result — swelling, darkening, mold within months. For humid zones — either moisture-resistant species (larch) with quality protection, or polyurethane.
Insufficient wood acclimatization — installing immediately after delivery from outdoors. Wood brought from a cold warehouse into a warm room contains elevated moisture. After installation, it dries out, baseboards detach from walls, joints spread apart. Solution — let wood acclimatize for 2-3 days in the installation room.
Using low-quality adhesive for polyurethane — using cheap adhesive with weak adhesion. Cornices detach within a month. Use specialized polyurethane adhesives with minimum adhesion strength of 70 kg/m².
Incorrect corner cutting — joining baseboards and cornices in corners at incorrect angles, resulting in gaps. Use quality miter box or miter saw with precise angle adjustment. Remember that angles in rooms are not always exactly 90 degrees — measure actual angle and cut accordingly.
Installing on unprepared surfaces — gluing molding onto dusty, weak, peeling bases. Adhesive doesn't hold, elements detach. Clean and prime surfaces before installation.
Insufficient material allowance — purchasing exactly by calculation. Result — one meter of baseboard is missing, and buying more from the same batch is impossible, as color and texture differ. Purchase +10-15% allowance. Leftover pieces may be useful for repairs or can be returned (if the store accepts returns of unused elements).
Ignoring thermal expansion gaps for wood — installing wooden molding tightly without compensating gaps. When expanding due to humidity, elements press against each other, warp, and detach from walls. Leave 1-2 mm gaps at joints, fill with flexible sealant.
Trends and modern solutions in molding use
Modern interior design offers new approaches to using traditional materials.
Wide high baseboards — trend of recent years, originating from classic European interiors. Baseboards 120-200 mm high visually increase ceiling height (paradox, but works), create monumentality and elegance. Especially effective are white wide baseboards on colored walls or contrasting dark ones on light walls.
Recessed baseboard — modern solution where baseboard is recessed into wall by 10-15 mm, creating shadow seam instead of protruding element. Visually, wall appears to float above floor. Requires special installation during wall finishing, but effect is graphic and modern.
Baseboard with built-in LED lighting — molding with cavity for LED strip, creating soft floor lighting. Effect of floating floor, directional lighting for nighttime, decorative function. Available in wooden and polyurethane variants.
Rafter walls made of wooden trim are one of the main trends in modern design. Vertical or horizontal planks 40-80 millimeters wide, with gaps of 30-50 millimeters, create a rhythmic texture and play of light and shadow. Behind the planks, sound-absorbing material can be installed — a solution for home theaters and music rooms. It can conceal wall imperfections and engineering utilities. Wood provides natural warmth, while modern geometry offers contemporary relevance.
Moldings in unexpected colors — a departure from traditionally white trim. Moldings in wall color create monochromatic panels visible only due to relief and play of light. Contrasting black moldings on white walls — a graphic, modern solution. Gold, copper, and colored metallics — glamorous accents.
Geometric compositions from moldings — not traditional rectangular panels, but hexagons, rhombuses, asymmetrical shapes on accent walls. Trim becomes a tool of graphic design.
Combination of wood and polyurethane in one element — wooden base of skirting with polyurethane decorative overlay or vice versa. Combination of wood’s tactile quality with polyurethane’s decorative appeal.
Flexible polyurethane elements for curved surfaces — moldings and skirting that can wrap around arches, bay windows, columns without distortion or complex manipulation. Expand decorative possibilities for non-standard shapes.
Trim as an investment in interior value
Quality trim is not just a cost for finishing, but an investment in the long-term value of the interior and real estate property.
Visual completeness — an interior without trim appears unfinished, budget-like, even if walls are covered with expensive materials. Trim creates architectural logic, framing, transitions. This is the difference between a simply painted box and a thoughtfully designed space.
Protection of finishing investments — skirting protects expensive wallpaper from damage during cleaning. Door casings protect walls around doors from wear. Moldings protect boundaries between different materials from deterioration. Trim extends the life of the main finish.
Increased perceived value upon sale — buyers intuitively evaluate interiors with quality trim as more valuable. Wide wooden skirting, carved casings, classic moldings signal status, quality, attention to detail. This can add 3-5% to the perceived value of the property.
The longevity of quality trim means that investments are made once for decades. Oak skirting will outlast several cosmetic wall renovations. Polyurethane cornices will not require replacement for 30-40 years. This is more economical than cheap materials requiring replacement every 5-7 years.
Ability to refresh the interior without replacing trim — quality neutral trim (white moldings, natural wood skirting) allows changing interior styles through repainting walls, replacing furniture, textiles, without altering the basic architectural structure. This is flexibility and economy.
Conclusion: conscious choice for ideal results
Choosing betweenwooden trimWood and polyurethane trim — this is not a matter of fashion or random preferences, but the result of analyzing specific project conditions, priorities, budget, long-term plans. Wood offers unparalleled natural beauty, tactile warmth, status, and the ability to create unique carved elements — this is the choice for admirers of natural materials, classic interiors, homes where ecological sustainability and connection to nature matter. Polyurethane offers practicality, moisture resistance, ease of installation, complex relief at affordable prices — this is the choice for humid zones, modern interiors, projects with limited budgets or complex forms.
A combined approach leveraging the strengths of both materials often yields optimal results — wooden skirting and casings for tactile appeal in living areas, polyurethane cornices and moldings for decorative appeal and ease of installation, polyurethane elements in humid areas for longevity. This is a balance of aesthetics, practicality, and economy.
It is important to understand that trim is not merely a technical necessity to cover gaps, but a full-fledged architectural tool that shapes the character of the interior. Properly selected trim can visually increase ceiling height, expand narrow spaces, create zoning, emphasize style, add luxury or modern minimalism. Poorly selected trim can disrupt proportions, create stylistic dissonance, cheapen the visual perception of the interior.
Invest time in studying options, consulting specialists, viewing completed projects. Do not economize on material and installation quality — trim is installed for decades. The price difference between good and mediocre materials is insignificant in the context of the overall renovation budget, but the difference in result is enormous. Quality wood or polyurethane trim is the completion of the interior, its architectural logic, protection of finishes, and an investment in the long-term value of your home.