Article Contents:
- Why Molding is Needed: The Ceiling as the Fifth Wall
- Materials for Ceiling Molding: Evolution from Plaster to Polyurethane
- Advantages of Polyurethane for Ceiling Decor
- Types of Ceiling Molding Elements: A Dictionary of Forms
- Ceiling Cornices: Framing and Structure
- Ceiling rosettes: the center of composition
- Ceiling Moldings: Rhythm and Zoning
- Coffers: Depth and Luxury
- Corner elements and decorative overlays
- Design Styles: From Classic to Avant-Garde
- Classicism: Symmetry and Measure
- Baroque: Excess and Theatricality
- Modern: Natural Lines and Asymmetry
- Minimalism: structure without ornament
- Zoning Space with Ceiling Molding
- Principles of Ceiling Zoning
- Methods of Zoning with Ceiling Molding
- Installation of Ceiling Molding: From Preparation to Finish
- Surface Preparation: The Foundation of Quality
- Tools and Materials
- Cornice Installation: Precision and Patience
- Rosette Installation: Centering and Fixation
- Installing Moldings on the Ceiling: Geometry and Rhythm
- Painting: The Final Touch
- Frequently Asked Questions
- Can moldings be installed on a suspended ceiling?
- What is the Cost of Ceiling Molding?
- How Long Does Installation Take?
- Does Molding Require Maintenance?
- Can Molding be Used in Bathrooms and Kitchens?
- How Does Molding Affect the Perception of Ceiling Height?
- In Which Interiors is Molding Inappropriate?
- Conclusion: The Ceiling as the Main Accent of the Interior
Look up. What do you see? A white plane? Or an architectural work that draws the eye, sets the rhythm of the room, creates volume where there was none?Ceiling Moldings— it's not just decoration, it's a tool for transforming space. When used skillfully,Ceiling moldings, the room changes scale, acquires character, and begins to speak the language of architecture. A flat ceiling becomes a multi-level structure without complex suspended systems. A low ceiling visually stretches upward. A high one gains structure and doesn't feel oppressive with emptiness. How is this effect achieved? What elements createa beautiful ceiling with molding, and how to combine them correctly? Let's delve into the details.
Why Ceiling Molding is Needed: The Ceiling as the Fifth Wall
The traditional approach to renovation focuses on walls and floors. The ceiling remains white, smooth, neutral—a background that doesn't attract attention. But this is a mistake. The ceiling occupies the same area as the floor, is constantly in the field of view, and affects the perception of space no less than any other surface. Ignoring it means losing a third of the room's visual potential.
What makes itCeiling molding? Creates architectural structure. Divides the ceiling into zones, each performing its own role. The central zone is the compositional core, where the chandelier is located and attention is concentrated. Peripheral zones are framing that visually raises the ceiling and expands the space. Intermediate zones are rhythmic elements that connect the center and periphery into a single whole.
Adds volume and depth. A flat surface becomes textured. Light falling onmolding on the ceilingcreates a play of shadows that changes depending on the time of day, type of lighting, and viewing angle. In the morning, the ceiling looks one way; in the evening, it looks different. This dynamism enlivens the interior, making it non-static.
Defines the style of the room. Cornices, rosettes, moldings—elements that are immediately read as belonging to a certain aesthetic. Classical profiles with ornamentation speak of a commitment to tradition. Strict geometric forms speak of a modern approach. Lavish Baroque compositions speak of a love for luxury and theatricality.ceiling molding—this is the interior's business card, which a guest reads in a second.
Solves practical problems. Masks imperfections of the base ceiling, conceals technical utilities, creates pockets for hidden lighting, visually corrects the proportions of the room.Plaster ceiling—this is not only aesthetics but also functionality.


Materials for Ceiling Molding: Evolution from Plaster to Polyurethane
Historically, molding was created from plaster. Master plasterers formed ornaments by hand or cast them in molds, mounting them on the ceiling using plaster mortar. This was labor-intensive, expensive, and accessible only to wealthy clients. Plaster is fragile—cracks from vibrations, chips from impacts. Plaster is heavy—load on floor slabs, risk of collapse if improperly installed. Plaster fears moisture—use in bathrooms and kitchens is excluded.
Modern technology offered an alternative—polyurethane.ceilings with moldingsmade of polyurethane gained all the advantages of the aesthetics of molded decor without the drawbacks of plaster.
Our factory also produces:


Advantages of Polyurethane for Ceiling Decor
The lightness of the material radically simplifies installation. A polyurethane cornice 150 mm wide weighs 300-400 grams per linear meter compared to 3-5 kg for a plaster equivalent. One person easily installsCeiling with moldingmade of polyurethane without helpers or special equipment. The load on the floor slabs is minimal—it can be used in old buildings where load-bearing capacity is limited.
Strength and impact resistance. Polyurethane is elastic—upon impact, it doesn't shatter like plaster but absorbs energy. An object falling onceiling moldingwill at worst leave a dent, not a chip. The dent can be filled and painted over, while a chip requires replacing the element.
Moisture resistance opens up new possibilities.Ceiling moldings made of polyurethaneare installed in bathrooms, showers, kitchens, and swimming pools. The material does not absorb moisture, does not deform, and does not develop mold. This expands the application area—now classical decor is available in rooms where plaster molding is impossible.
Dimensional stability guarantees the absence of cracks. Plaster is hygroscopic—it absorbs moisture from the air, expands, then dries and contracts. These cycles lead to cracks at the joints of elements. Polyurethane is chemically inert—it does not react to humidity, temperature (within the household range of -40 to +80°C), and retains its dimensions for decades.
Clarity of relief. Modern molds for casting polyurethane are created from high-detail master models. Every leaf of the acanthus ornament, every bead of the dentil, every groove of the fluting is reproduced with precision to fractions of a millimeter.Polyurethane Ceiling Moldingsis visually indistinguishable from historical plaster molding, and often surpasses it in the clarity of its relief.
Paintability without limitations. Polyurethane accepts any paints—acrylic, latex, alkyd. It can be painted classic white, in pastel tones, in contrasting colors, patinated, or gilded.Ceiling molding decorationbecomes an element of the interior's color concept, not a limitation.
Affordable cost has democratized molding. If plaster decor is the domain of elite projects, then polyurethane decor is a solution for the mid-price segment.Polyurethane ceiling decorationcosts 3-5 times less than plaster with a similar appearance.
Get Consultation
Types of Ceiling Molding Elements: A Dictionary of Forms
a beautiful ceiling with moldingis composed of many elements, each performing its own function. Understanding the typology of elements is the key to competent design.
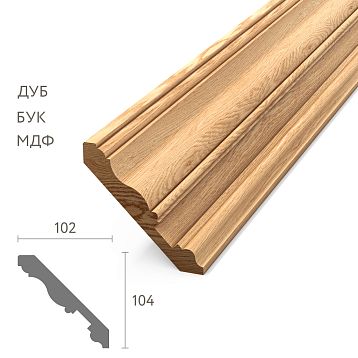
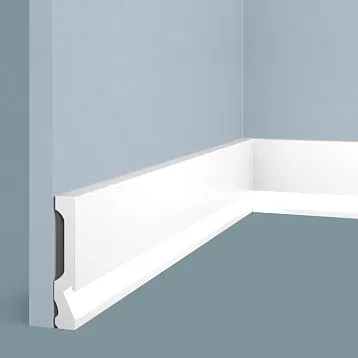
Ceiling Cornices: Framing and Structure
A cornice is a linear element that runs along the perimeter of a room at the junction of the wall and ceiling. It is the foundation of the ceiling composition, rarely omitted.Ceiling molding.
The functions of a cornice are diverse. It masks the technological joint between the wall and ceiling, where cracks often form due to building settlement. It creates a visual completion of the walls from above—without a cornice, the wall ends at the ceiling unnaturally abruptly. It forms a transition from the vertical wall to the horizontal ceiling, softening the angle. It serves as a base for hidden lighting—an LED strip placed behind the cornice, set 50-100 mm from the ceiling, creates a floating ceiling effect.
Cornice dimensions are determined by the proportions of the room. For standard ceilings 2.5-2.7 m high, cornices 80-120 mm wide are suitable. For high ceilings 3.0-3.5 m—cornices 120-180 mm. For rooms with ceilings 4 m and above—cornices 200-300 mm or more, possibly multi-tiered compositions of several profiles.
Cornice profiles vary from simple to complex. Simple one- or two-step profiles without ornamentation suit modern minimalist interiors. Classical profiles with coves, shelves, quarter-rounds—for traditional styles. Ornamented profiles with dentils, egg-and-dart, modillions—for luxurious historical interiors in Baroque or Empire style.
Cornice installation requires precision. Corners are joined at 45 degrees using a miter box or miter saw. Straight sections are joined end-to-end with careful fitting. The cornice is glued with special polyurethane adhesive simultaneously to the wall and ceiling. After installation, joints are filled, sanded, and the cornice is painted along with the walls or ceiling.
Ceiling rosettes: the center of the composition
A ceiling rosette is a single-piece element of round or oval shape, installed in the center of the ceiling under a chandelier. It is the compositional core to which the visual axes of the room converge.
The rosette diameter is chosen proportionally to the ceiling area. For rooms 12-20 m², rosettes 400-600 mm in diameter are optimal. For rooms 20-30 m²—rosettes 600-900 mm. For large halls 40-60 m²—rosettes 1000-1500 mm. A rosette too small will be lost on a vast ceiling; one too large will overwhelm a small room.
The style of rosette ornamentation reflects the interior's aesthetics. Classical rosettes have radially symmetrical floral ornamentation—acanthus leaves, laurel wreaths, rosettes, radiating from the center to the edges. Baroque rosettes are distinguished by lushness, excess decoration, often including putti, mascaron, cartouches. Modern rosettes are simplified geometric, with concentric circles, simple petals, minimal relief.
The functional role of a rosette is not only decorative. The rosette masks the exit point of the chandelier's electrical cable, conceals the mounting hook, and creates a visual support for the hanging chandelier. A chandelier without a rosette appears suspended in a void. The rosette gives it an architectural foundation, connecting it to the ceiling.
Rosette installation is performed with adhesive in the geometric center of the ceiling. For a rectangular room, the center is determined by the intersection of the diagonals. The chandelier cable passes through the central hole of the rosette. After gluing, the rosette is painted along with the ceiling or in a contrasting color to create an accent.
Ceiling Mouldings: Rhythm and Zoning
A moulding is a narrow linear element that is glued directly onto the ceiling to create frames, grids, and zoning. Unlike a cornice, which is at the wall-ceiling junction, a moulding is positioned on the ceiling plane.
The applications of mouldings are diverse. Framing the central ceiling area around a rosette—mouldings form a square or rectangular frame, inside which is the rosette with the chandelier. This visually highlights the center, making the composition complete. Creating coffers—the ceiling is divided by mouldings into rectangular or square coffer cells, creating depth and complexity. Zoning space—in large rooms, mouldings on the ceiling separate functional zones (dining, lounge, work area).
The width of ceiling mouldings is typically 30-80 mm. Narrower elements create light graphics; wider ones create expressive structure. The profile can be simple rectangular or complex with relief, depending on the interior style.
The color of mouldings determines the character of the composition. Mouldings in the ceiling color create a barely noticeable relief, playing only with light and shadow. Mouldings in a contrasting color (e.g., gold on a white ceiling) create an active graphic grid, characteristic of historical interiors.
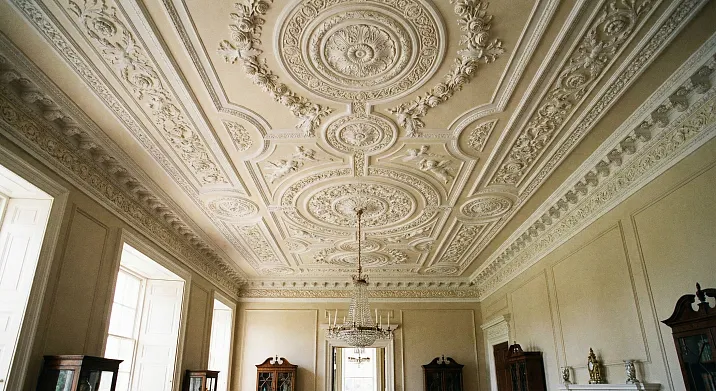
Coffers: Depth and Luxury
A coffered ceiling is a ceiling divided into rectangular or square recesses by mouldings. This is one of the most spectacular solutions in ceiling design.Ceiling with molding.
The coffer structure is formed by gluing mouldings onto the ceiling in a rectangular or square grid pattern. The cell size is determined by the room's proportions and the desired effect. For rooms with ceilings 2.7-3.0 m, a grid with cells 80×80 cm or 100×100 cm is optimal. For high ceilings 3.5-4.0 m—cells 120×120 cm or 150×150 cm.
The interior decoration of coffers can vary. Smooth coffers—inside the cells, the ceiling is painted evenly, without additional decoration; the effect is created solely by the moulding relief and play of shadows. Coffers with rosettes—a small rosette (200-300 mm in diameter) is installed in the center of each cell, creating a rhythmic pattern across the entire ceiling. Coffers with contrasting paint—the inner surface of the cells is painted in a color darker or lighter than the main tone, enhancing the sense of depth. Coffers with lighting—an LED strip is installed along the perimeter of each coffer, creating a spectacular glow from within.
A coffered ceiling requires height. With a standard height of 2.5 m, coffers will visually lower the ceiling, creating a oppressive feeling. The minimum recommended height for coffers is 2.8-3.0 m. Optimal is 3.5 m and above.
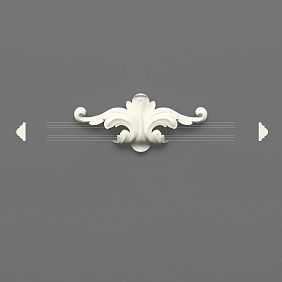
Corner elements and decorative overlays
In addition to linear elements and rosettes, a ceiling composition can include single-piece decorative elements—corner appliqués, cartouches, medallions, ornaments.
Corner elements are installed in the corners of frames formed by mouldings on the ceiling. Instead of a simple 45-degree joint of mouldings, corners are decorated with ornamental appliqués. This enhances the expressiveness of the composition, characteristic of classical and Baroque interiors.
Central appliqués are placed in the center of panels formed by mouldings. For example, the ceiling is divided by mouldings into 9 rectangles (a 3×3 grid). A decorative appliqué—ornament, rosette, cartouche—is installed in the center of each rectangle. This creates a rhythmic pattern, emphasizing the ceiling structure.
Cartouches—oval or shield-shaped appliqués with ornamentation or a smooth central field. On the ceiling, cartouches can be placed symmetrically in the corners from the central rosette, along the room's axes, above doorways. Characteristic of historical styles—Baroque, Rococo, Empire.
Design Styles: From Classic to Avant-Garde
The choice of elements and their combination is determined by the stylistic concept of the interior.ceilings with moldingsThey can embody any aesthetic—from strict classicism to bold avant-garde.
Classicism: Symmetry and Measure
A classical ceiling is characterized by restraint and clarity of composition. A medium-width cornice (100-140 mm) with a classical profile—coves, shelves, possibly dentils (small teeth). A central rosette with a diameter proportional to the room, with a radially symmetrical floral ornament of moderate lushness. Possibly framing the rosette with a moulding forming a square or octagonal frame.
Color — predominantly white. Molding and ceiling are painted the same color, with relief revealed only through chiaroscuro. Light patination is sometimes allowed — darkening the recesses of the relief with gray or beige to enhance volume.
Lighting — a central chandelier in a classic style (crystal, with candelabra, with textile lampshades). Additional accent lighting is possible — a hidden LED strip behind the cornice, creating a soft glow along the perimeter of the ceiling.
Baroque: excess and theatricality
Baroque ceiling — the apotheosis of decorativeness. A wide cornice (180-250 mm) with a multi-step profile, including modillions (brackets), egg-and-dart molding, acanthus leaves. A large rosette (800-1200 mm in diameter for rooms of 30-40 m²) with lush multi-tiered ornamentation. Additional decorative elements are possible — cartouches in the corners of the ceiling, garlands along the perimeter, mascaron between the modillions of the cornice.
Ceiling moldings create complex compositions — not simple rectangles, but ovals, octagons, interlaced lines. Inside the formed fields — ornaments, painting, gilding.
Color — active. Gilding on the protruding parts of the relief, white or colored background in the recesses. Painting inside coffers or panels is possible — imitation of frescoes, grisaille (imitation of sculptural relief through painting), floral ornaments.
Lighting — a massive crystal chandelier with multiple tiers and candle-style lamps. Additionally — wall sconces in the Baroque style, spotlights accentuating decorative elements.
Art Nouveau: Natural Lines and Asymmetry
Art Nouveau ceiling avoids the strict symmetry of Classicism and the excess of Baroque. Cornice with a wavy profile, imitating natural forms — curves of plant stems, water streams. Rosette with asymmetrical ornamentation — stylized irises, lilies, dragonflies, interlaced lines.
Ceiling moldings form not a geometric grid, but smooth curves, ovals, curvilinear figures. Zoning the ceiling into a central part and a peripheral part is possible using a wide molding running in a wavy line.
Color — pastel natural tones. Molding can be painted in ivory, light green, lilac, peach. Ceiling background — a similar tone, but slightly lighter or darker to create a barely noticeable contrast.
Lighting — an Art Nouveau style chandelier with flowing lines, colored glass, floral motifs. Hidden lighting behind the cornice is possible, creating a soft diffused glow.
Minimalism: structure without ornament
Minimalist ceiling uses molding extremely sparingly. Simple cornice 60-100 mm wide with a one- or two-step profile without ornamentation. Rosette is absent or a maximally simple one is used — a round, smooth one with concentric rings, diameter no more than 400-500 mm.
Ceiling moldings, if used, form a strict geometric grid — squares or rectangles of regular shape. The molding profile is the simplest — rectangular or with slightly rounded edges.
Color — monochrome solution. Molding and ceiling are painted the same color (white, light gray, beige), relief is revealed only through the play of light and shadow. Contrast solutions are rare but possible — for example, dark gray moldings on a white ceiling to create clear graphics.
Lighting — built-in spotlights, concealed linear cove lighting, minimalist pendants. A central chandelier may be omitted.
Zoning space with ceiling molding
In modern interiors, especially studios and open-plan spaces, zoning is critical.Ceiling molding— an effective tool for visually separating functional zones without physical partitions.
Principles of ceiling zoning
Ceiling zoning works on the level of subconscious perception. A person entering a room reads the structure of the ceiling and intuitively understands where each zone is. The dining area is highlighted by a frame of moldings on the ceiling — meaning, this is where they eat. The relaxation area is marked by a rosette and pendant light — this is where they relax. The work area has a separate cornice with lighting — this is where they work.
Creating visual boundaries without barriers is the main advantage of ceiling zoning. Physical partitions break up space, create isolated cells, and reduce visual volume. Ceiling zoning preserves openness but structures the space, making it logical and organized.
Enhancing functional zoning achieved by other means. If the dining area is highlighted by flooring (parquet in the common area, tile in the dining area), ceiling zoning enhances this effect. The floor and ceiling work in tandem, creating a clear visual boundary.
Methods of zoning with ceiling molding
Frames made of moldings — the simplest method. A frame made of moldings is glued to the ceiling above each functional zone. The shape of the frame repeats the shape of the zone — rectangular above the dining table, square above the relaxation area with a sofa, oval above the reading area with an armchair. Inside the frame, the ceiling can be painted a different color, a rosette can be installed, or lighting can be placed.
Different types of cornices for different zones. In the living room part of the studio, a wide, ornamented cornice (140-180 mm) with a classic profile is used. In the kitchen part — a simple, smooth cornice of smaller width (80-100 mm) in a contemporary style. The difference in cornices visually separates the zones, emphasizing the difference in their character.
Coffers for accentuating the main zone. In a room, one zone is highlighted as the main one (e.g., the fireplace area in the living room). A coffered ceiling with moldings and rosettes is created above it. The rest of the ceiling is smooth with a simple perimeter cornice. The contrast between complex and simple solutions clearly highlights the main zone.
Multi-level lighting behind the cornices of different zones. Above the relaxation area, the lighting is warm yellow, creating coziness. Above the work area — cool white, stimulating concentration. Above the dining area — neutral daylight, ensuring correct color rendering of food. The color of the lighting zones the space on an emotional level.
Installation of ceiling molding: from preparation to finish
InstallationCeiling moldingsrequires care but is not overly complex. With basic tool-handling skills, installation can be done independently.
Surface preparation: the foundation of quality
The ceiling must be level, clean, and dry. Irregularities exceeding 3-5 mm per meter must be corrected with plaster or filler. Molding follows the shape of the base — if the ceiling is wavy, the cornice will be wavy, the joints of elements will separate, and gaps will appear.
Old coating (whitewash, chalk paint, peeling plaster) is completely removed. Molding is glued onto a solid base. If the base is not solid — the adhesive will tear it off together with the molding after several months or years.
Priming is mandatory. Deep-penetration primer strengthens the surface, improves adhesive adhesion. Primer is applied with a roller or brush in one or two coats with complete drying of each (4-6 hours).
Marking is critical for symmetrical compositions. The center of the ceiling is determined by the intersection of diagonals (for a rectangular room) or by another method for complex shapes. Axes of symmetry are laid out from the center. Installation lines for cornices are marked along the perimeter at the same height (using a laser level or water level).
Tools and materials
For installation you will need: a miter box or miter saw for precise corner cutting; a fine-toothed saw for cutting polyurethane; tape measure, square, pencil for marking; spatulas for applying adhesive and putty; sandpaper or sanding mesh for sanding joints; polyurethane adhesive or mounting adhesive like "liquid nails"; acrylic putty for sealing joints; acrylic primer; acrylic paint for finishing.
Cornice installation: precision and patience
We start from the corner of the room. Cut two pieces of cornice at 45 degrees using a miter box. The angle must be precise — even a deviation of 1-2 degrees will create a gap at the joint. Apply adhesive to the back of the cornice — two strips along the edges that will adhere to the wall and ceiling. Place the cornice against the wall and ceiling according to the markings, press firmly. Hold pressure for 30-60 seconds for initial adhesive setting. Remove excess adhesive that has squeezed out along the edges with a damp sponge immediately, before the adhesive dries.
Continue along the wall, gluing the next pieces of cornice butt-joined to the previous ones. Joints of straight sections should be tight, without gaps. If an element is slightly longer or shorter — trim it to the exact size. It's better to make joints in inconspicuous places (not above the door, not on the central wall).
Corner connections require special attention. Even precisely cut corners sometimes have micro-gaps due to wall imperfections. After the adhesive dries (24 hours), fill the gaps with acrylic putty, smooth with a spatula flush with the surface. After the putty dries (2-4 hours), sand with fine sandpaper to remove unevenness.
Rosette installation: centering and fixation
Determine the center of the ceiling, make a mark. Place the rosette against the ceiling, centering it relative to the mark. Trace with a pencil or make marks along the edges for precise positioning during gluing. If a chandelier cable passes through the rosette, make or enlarge the central hole to the cable diameter.
Apply adhesive to the back of the rosette in an even layer over the entire area or in a zigzag pattern. Do not leave voids — a large-area rosette requires full contact with the ceiling for secure fastening. Place the rosette against the ceiling according to the marks, press firmly. The rosette is heavy and may start to peel under its own weight before the adhesive sets. Secure with temporary props — a long batten (block) resting on the floor, with a soft pad on the top end, presses the rosette against the ceiling. Leave the prop for 24 hours until the adhesive is completely dry.
After removing the prop, inspect the edges of the rosette. If there are micro-gaps between the rosette and the ceiling — fill with putty, smooth, sand after drying.
Molding installation on the ceiling: geometry and rhythm
Mark lines for molding installation on the ceiling according to the project. For coffers — a grid of perpendicular lines with a given pitch. For framing zones — outlines of frames. Use a long level or laser level to ensure straightness of lines.
Cut moldings into pieces of the required length. Cut joint corners at 45 degrees for joining into frames. Glue moldings along the marked lines. The technique is similar to cornice installation — adhesive on the back, pressing, removing excess. Moldings on the ceiling do not experience load from their own weight (pressed against the ceiling from below), they set faster.
Molding joints at frame corners are critical points. Fit corners carefully so that the profile pattern matches. After drying, fill micro-gaps with putty, sand. A perfect molding joint is visually indistinguishable — it appears as a single element.
Painting: the final touch
After the adhesive and putty are completely dry (minimum 48 hours), proceed to painting. Prime the molding with acrylic primer to improve paint adhesion, reduce paint consumption, and equalize surface absorbency. Apply primer with a brush, especially carefully in the recesses of the relief. Primer drying time 2-4 hours.
Paint with acrylic ceiling paint or universal interior paint. Apply paint with a brush or roller in 2-3 coats with intermediate drying of each (2-4 hours). The first coat is a base, covers the primer but may show through. The second coat is covering, creates an even color. The third coat is if necessary, for a perfect result.
If multi-color painting is planned (e.g., gold molding on a white ceiling), first paint the entire ceiling and molding with the base color (white) in 2 coats. Then, with a thin brush or sponge, apply the accent color (gold) only to the protruding parts of the molding — on the edges of the cornice, on the outer petals of the rosette, on the moldings. The recesses remain white, creating contrast and enhancing volume.
Frequently Asked Questions
Yes, there are special lightweight polyurethane rosettes for stretch ceilings that are glued directly onto the fabric with a special adhesive that does not damage the material. An alternative option is installation
Cornice is possible, rosette and moldings are more difficult. The cornice is attached not to the ceiling, but to the wall below the level of the ceiling fabric. As a result, a gap remains between the cornice and the stretch ceiling, into which hidden lighting is installed — a popular solution. A rosette cannot be glued to a stretch fabric — the fabric does not hold adhesive and deforms. For a rosette, a mounting plate (plywood circle) is made, which is attached to the base ceiling before installing the stretch ceiling. A hole is cut in the stretch fabric, secured with a special ring, and the rosette is glued to the mounting plate. Moldings are practically not used on stretch ceilings due to installation complexity.
What is the cost of ceiling molding?
Cornices: from 150 to 1500 rubles per linear meter depending on width and profile complexity. For a 20 m² room with an 18 m perimeter, cornice will cost 3000-27000 rubles. Rosettes: from 500 to 15000 rubles per piece depending on diameter and ornament. Moldings: from 100 to 800 rubles per linear meter. Adhesive: 500-800 rubles per liter, a liter is enough for 20-30 m² of molding. Putty, primer, paint: 1500-3000 rubles per room. Total materials for decorating a 20 m² room ceiling will cost 5000-35000 rubles depending on complexity. Installation by specialists: 300-800 rubles per linear meter of cornice, 1000-3000 per rosette.
How long does installation take?
For a 20 m² room with DIY installation: ceiling preparation (leveling, priming) — 1 day, cornice installation along the perimeter — 4-6 hours, rosette installation — 1 hour, joint sealing with putty — 1 hour, sanding — 1 hour, painting in 2 coats — 4-6 hours (including drying between coats). Total time — 2-3 days including material drying. A professional crew will complete it in 1-1.5 days.
Does molding require maintenance?
Minimal. Dust is removed with a soft dry cloth or vacuum with a soft brush attachment 1-2 times a year. Stains are wiped with a damp sponge with a mild soap solution. Do not use abrasive agents — they scratch the surface. If the paint fades after 5-10 years — refresh with repainting. Polyurethane does not require repair, does not crack, does not deform.
Can molding be used in bathrooms and kitchens?
Yes, polyurethane is moisture-resistant, not afraid of steam and condensation. In the bathroom, molding creates a luxurious look, turning a utilitarian space into a spa zone. In the kitchen, molding withstands elevated temperatures, grease is removed with cleaning agents. For facade molding, this is generally standard operating conditions — precipitation, humidity, temperature fluctuations.
How does molding affect the perception of ceiling height?
Depends on the width of the cornice and the overall composition. A narrow cornice (60-80 mm) practically does not affect the perception of height. A medium cornice (100-140 mm) can visually lower the ceiling by 5-10 cm. A wide cornice (180-250 mm) lowers it by 15-20 cm. But! Hidden lighting behind the cornice compensates for this, creating a floating ceiling effect that is perceived as higher than actual. Coffers at a standard height of 2.5 m visually lower the ceiling, at a height of 3 m and above — they do not affect or even increase the feeling of height by creating structural complexity.
In which interiors is molding inappropriate?
Molding is appropriate almost everywhere with the correct choice of style and scale. Even in a loft, a simple geometric cornice can be used for hidden lighting. In high-tech interiors, a minimalist rosette for a modern chandelier works well. Excessive, lavish molding is inappropriate in small rooms with low ceilings—it creates an oppressive feeling of overload. A dissonance of styles is also inappropriate—baroque molding in Scandinavian minimalism looks alien.
Conclusion: the ceiling as the main accent of the interior
Ceiling Moldingstransforms the forgotten fifth wall into an architectural element that sets the tone for the entire room. A well-designedCeiling with moldingvisually increases the height of the room, creates volume, structures space, zones functional areas, and defines the interior style. It is an investment in aesthetics that pays off with daily visual pleasure for decades.
ModernPolyurethane Ceiling Moldingscombines the classical beauty of plaster molding with the technological advantages of polymers. Easy installation, moisture resistance, durability, and affordable cost make decorative molding accessible to a wide range of customers. Now, ceiling molding is not a privilege of palaces but a solution for modern housing of any level.
A variety of elements—cornices, rosettes, moldings, coffers, decorative overlays—offers endless possibilities for combination. From a minimalist cornice with hidden lighting to a complex coffered ceiling with rosettes and ornaments—each project is unique, reflecting the taste and preferences of the owner.
Company STAVROS is a leading Russian manufacturer of polyurethane decorative molding, offering a full range of elements for ceiling design. 24 years of experience, in-house full-cycle production, highest-quality European raw materials, and control at every stage guarantee premium-class products at a reasonable price.
The STAVROS assortment includes over 100 profiles of ceiling cornices—from minimalist smooth ones 60 mm wide to luxurious ornamented ones 300 mm wide. Each profile is available in several length options to minimize waste during installation. Corner elements for cornices of all profiles eliminate the need for angle cutting and simplify installation.
STAVROS ceiling rosettes—from laconic modern ones 300 mm in diameter to lavish Baroque ones 1500 mm in diameter. Over 200 models in the catalog cover all styles—Classicism, Baroque, Rococo, Empire, Art Nouveau, Art Deco, Minimalism. Sharp relief, absence of cavities and deformations, perfect whiteness—the result of using highest-quality molds and European polyurethane with a density of 180-220 kg/m³.
STAVROS ceiling moldings—dozens of profiles of varying width and complexity for creating frames, coffers, and zoning. Flexible moldings for curvilinear compositions, oval coffers, and arched framing. Decorative overlays, corner elements, cartouches, and ornaments complement the assortment, allowing the implementation of projects of any complexity.
STAVROS's own delivery service ensures transportation within Moscow and St. Petersburg within 1-3 days. Delivery to Russian regions—partnership with leading transport companies, terms 3-10 days depending on distance. Professional packaging protects fragile items from damage—each element is wrapped in film and placed in cardboard boxes with filler.
STAVROS consulting support helps at all stages of the project. The company's designers will develop a ceiling design concept considering the interior style, room proportions, and budget. Technical specialists will calculate the amount of materials, select adhesives and paints, and provide installation recommendations. Video instructions on the website show all installation stages—from marking to finishing.
STAVROS warranty—5 years for interior molding, 10 years for facade molding. This is not a formal obligation but real responsibility to the customer. STAVROS products last for decades, preserving their original appearance, sharpness of relief, and whiteness of the material. Thousands of completed projects in private houses, apartments, and public buildings across Russia confirm quality and reliability.
Createa beautiful ceiling with moldingwith STAVROS products. Transform the ceiling from a bland white surface into an architectural masterpiece that captivates, inspires, and demonstrates impeccable taste. From classical elegance to modern expressiveness—STAVROS offers solutions for any style and budget. Quality, tested by time. Beauty, created for you.