


Article Contents:
- Preparation stage: foundation for successful installation
- Calculating Quantity of Elements
- Marking technology: accuracy as the foundation of quality
- Features of marking for different types of staircases
- Mounting methods: choosing the optimal solution
- Fastening with Threaded Rods
- Connection using wooden dowels
- Mounting with self-tapping screws
- Installing support posts: the foundation of the structure
- Features of installing intermediate posts
- Installing standard balusters: step-by-step algorithm
- Installation Quality Control
- Handrail installation technology
- Methods of connecting the handrail to balusters
- Working with different materials: key features
- Wooden Structures
- Metallic Elements
- Final Finishing and Protection
- Choosing protective coatings
- Quality Control and Work Acceptance
- Operation and maintenance
- Repair and Restoration
- Typical Errors and Ways to Prevent Them
- Modern technologies and innovations
- Conclusion
The safety of the staircase depends not only on the strength of the steps, but also on the quality of installation of protective elements. The question of how to properly install balusters and handrails how to properly install balusters and handrailsconcerns every homeowner who strives to create a reliable and aesthetically pleasing structure. Proper installation of these elements requires not only technical knowledge, but also an understanding of the nuances of working with different materials.
The process of installing balusters and handrails represents a complex engineering task, where each detail plays a critically important role. From the accuracy of marking to the selection of fasteners — everything affects the final result. Incorrect installation can lead not only to aesthetic flaws, but also to serious safety issues with the staircase's operation.


Preparation stage: foundation for successful installation
Any quality work begins with careful preparation. Before starting installation, it is necessary to conduct a detailed analysis of the staircase structure and determine the optimal layout scheme for protective elements.
Tool preparation requires special attention to details. A quality drill with a set of drill bits of different diameters, a miter saw for precise cuts, a laser level for checking horizontal alignment — all of this is the foundation of a professional approach. Measuring tools must be calibrated, and cutting tools must be perfectly sharpened.
Material provision includes not only the balusters and handrails themselves, but also a wide range of fasteners. Threaded rods with a diameter of 8-12 millimeters, self-tapping screws of various lengths, wooden dowels, construction adhesive — each element must correspond to specific mounting tasks.


Calculation of elements quantity
Determining the required number of balusters requires mathematical precision. The standard distance between baluster axes is 120-150 millimeters, ensuring an optimal balance of strength and aesthetics. In homes with small children, this value should be reduced to 100-120 millimeters.
The calculation formula is as follows: the length of the staircase run is divided by the selected installation spacing, and then one is added to the result. The obtained number is rounded up to ensure material reserve.
The height of balusters is determined based on ergonomic requirements. The standard height of handrails is 900 millimeters from the step level, taking into account the thickness of the handrail. Thus, the height of the balusters themselves is usually 850-870 millimeters.
Our factory also produces:


Marking technology: accuracy as the foundation of quality
Marking is the stage where the foundation of the entire future structure is laid. Even the slightest error at this stage can lead to serious problems during installation and operation.
The basic marking line is determined using a taut string between the extreme points of installation. The first baluster is installed at a distance of 50-70 millimeters from the edge of the first step, and the last one — at a similar distance from the edge of the upper landing.
Transferring the marking to the steps is done using a square and a tape measure. Each installation point is marked with a center punch or a thin drill bit to prevent displacement when drilling the main holes.
Get Consultation
Features of marking for different types of staircases
Straight staircases present the least complexity for marking. All balusters are installed parallel to each other, which significantly simplifies the process.
Turn structures require a special approach to marking. In the turning zone, it is necessary to take into account the change in direction of movement and accordingly adjust the angles of baluster installation.
Spiral staircases represent the highest complexity. Each baluster has an individual incline angle that must be precisely calculated to ensure the correct geometry of the handrail.
Mounting methods: choosing the optimal solution
There are several main methods of mounting balusters, each with its own advantages and areas of application. The choice of a specific method depends on the material of the staircase, the type of balusters, and the requirements for structural strength.
Mounting with threaded rods
Threaded rod connection is considered the most reliable method of mounting wooden balusters. A metal rod with a diameter of 8-12 millimeters provides exceptional connection strength and allows for significant lateral loads.
The installation process begins with drilling a central hole in the lower end of the baluster. The depth of the hole should be 60-70 millimeters, and the diameter should exactly match the rod diameter. Drilling accuracy is critically important — even a slight deviation from the axis may cause the entire structure to become misaligned.
The rod is fixed in the baluster using epoxy glue or a special wood adhesive. The rod should protrude from the baluster end by 50-60 millimeters to ensure secure attachment to the base.
A corresponding hole is drilled into the tread or stringer to a depth of 40-50 millimeters. The hole diameter should be 1-2 millimeters larger than the rod diameter to compensate for possible marking inaccuracies.
Connection using wooden dowels
Dowel connection is a traditional carpentry method that ensures strength while preserving the natural appearance of the structure. Wooden dowels with a diameter of 8-10 millimeters are made from the same wood species as the balusters.
The installation technology is similar to threaded rod mounting, but requires higher precision in drilling holes. The dowels should fit snugly, but not so tightly as to cause wood cracking.
The advantage of dowel connection is its eco-friendliness and the possibility of disassembling the structure for repair or replacement of components.
Mounting with self-tapping screws
Screw connection with self-tapping screws is the simplest and fastest method of installing balusters. However, this method has limitations in terms of strength and aesthetics.
For concealed mounting, the screw is screwed in at an angle through the lower part of the baluster into the tread. Pre-drilling prevents wood cracking and ensures accurate positioning of the fastener.
The screw head is recessed into the wood and covered with a wooden plug or putty in the material's color.
Installing support posts: the foundation of the structure
Support posts play a key role in ensuring the rigidity of the entire railing system. Their installation requires special care and precision.
The lower support post is installed on the first step or on the floor in front of the staircase. To ensure maximum strength, a through bolt connection with a locknut from below is used.
The upper post is attached to the top landing or to the floor of the second floor. Depending on the structure of the floor, additional elements may be required to reinforce the mounting point.
Features of installing intermediate posts
On long stair spans, intermediate support posts may be required to provide additional structural rigidity. The distance between posts should not exceed 3-4 meters.
Intermediate posts are installed using the same technology as end posts, but require special attention to ensure their verticality and alignment with the overall railing line.
Installing row balusters: step-by-step algorithm
After installing the support posts, you can proceed with installing the row balusters. This process requires a systematic approach and strict adherence to the technological sequence.
First stage — preparing balusters for installation. Each element is checked for conformity to dimensions, absence of defects, and surface finish quality. Additional sanding or size adjustment is performed if necessary.
Second stage — drilling holes for fasteners. Using a drill guide ensures accuracy and repeatability of the operation. Drilling depth is controlled by a drill depth stop.
Third stage — installing fasteners. Rods or dowels are installed using adhesive, after which the adhesive must be allowed to polymerize.
Installation quality control
Baluster verticality is checked using a level or plumb bob. The allowable deviation from verticality should not exceed 2 millimeters per meter of height.
Alignment of elements is checked by stretching a control string between the end balusters. All intermediate elements must touch the string or be at the minimum distance from it.
The fastening strength is assessed by gently rocking each baluster. Any play or movement is unacceptable and indicates the need to redo the fastening joint.
Handrail Installation Technology
Installing handrails is the final and most critical stage of the railing system assembly. The quality of this operation affects not only the appearance of the staircase but also its usability.
Handrail preparation begins with precise marking of connection points with balusters. The handrail is laid on the upper ends of installed balusters and marked according to the staircase's incline angle.
Handrail trimming is performed using a circular saw with precise cutting angle setting. The quality of the cut is critically important to ensure tight fitting against support posts.
Methods of connecting handrails to balusters
Connection via a transverse rail — the most common method. A wooden rail with a 20×40 mm cross-section is fastened to the upper ends of balusters using self-tapping screws or dowels. A corresponding-sized groove is milled into the handrail.
Direct connection of the handrail to balusters requires high precision in manufacturing mating surfaces. Holes for bolts or dowels are drilled into the handrail, which are installed in the upper ends of the balusters.
Adhesive connection complements mechanical fastening and ensures structural monolithism. Special wood adhesives are used, providing joint strength not less than the strength of the wood itself.
Features of Working with Different Materials
The installation technology of balusters and handrails may vary significantly depending on the material of the components and the staircase base.
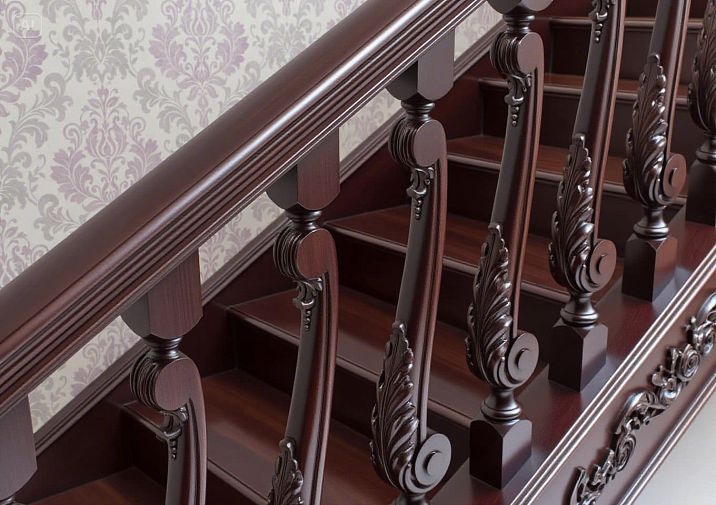
Wooden structures
Solid wood requires special attention to grain direction and natural stresses in the material. All holes must be drilled strictly perpendicular to the surface to prevent chipping.
Glued wood is more dimensionally stable but requires the use of water-resistant adhesives for assembly operations. Temperature and humidity deformations are minimal, simplifying the assurance of assembly accuracy.
The moisture content of wood should not exceed 12% for internal structures. Using raw material inevitably leads to deformations and disruption of the railing's geometry.
Metal elements provide dimensional stability and high strength. Their geometry remains unchanged during operation, simplifying calculations and ensuring compliance with safety standards throughout the service life.
Steel balusters require special fastening methods. Welded connections provide maximum strength but require corrosion protection.
Aluminum structures are lighter than steel but less strong. Connections are made using bolts or special aluminum rivets.
Combined systems combine the advantages of different materials but require special attention to material compatibility and connection methods.
Final finishing and protection
After completing the installation work, all structural elements must be finished to ensure longevity and an attractive appearance.
Joint sanding is performed using fine-grit sandpaper to remove irregularities and prepare the surface for coating application. Special attention is paid to connection areas where glue or mechanical processing marks may be visible.
Wood priming ensures better adhesion of finish coatings and additional protection against moisture. Primer is applied in a thin, even layer with mandatory drying between layers.
Selection of protective coatings
Varnish coatings create a strong protective film on the wood surface. Polyurethane varnishes provide high wear resistance and resistance to mechanical damage.
Oil-based impregnations penetrate deeply into the wood structure, providing internal protection. Such coatings preserve the natural wood texture and allow the wood to "breathe".
Waxes impart a silky sheen and pleasant tactile texture to the surface. Wax coatings require regular renewal but are easily restored in case of local damage.
Quality control and acceptance of work
The final stage of work includes careful inspection of the quality of the completed installation and compliance with design requirements.
Geometric control includes checking the verticality of balusters, the horizontal alignment of the handrail, and conformity to design dimensions. Permissible deviations are regulated by construction standards.
Strength tests are performed by applying controlled loads to various structural elements. The railing must withstand a horizontal load of at least 100 kg/m without residual deformation.
Aesthetic evaluation includes checking surface quality, coating uniformity, and overall appearance of the structure. All defects must be corrected before handing over the work.
Operation and Maintenance
Correctly installed balusters and handrails require minimal maintenance, but regular inspection of the structure's condition is necessary to ensure safety.
Monthly inspection includes checking the strength of fasteners, absence of cracks and other damage. Special attention is paid to connection joints, where maximum stresses are concentrated.
Seasonal maintenance includes renewing protective coatings, tightening loose connections, and correcting minor defects. Preventive maintenance significantly extends the service life of the structure.
Repair and restoration
Local repair allows eliminating most defects without dismantling the entire structure. Replacement of individual balusters or sections of handrails is performed while preserving the overall geometry of the system.
Major restoration may be required after 15-20 years of operation, depending on usage conditions and the quality of the initial installation.
Typical errors and ways to prevent them
Analyzing the most common errors in installing balusters and handrails will help avoid problems and ensure high-quality work.
Inaccurate marking is the most common cause of problems during installation. Using high-quality measuring tools and carefully checking dimensions at each stage helps avoid this error.
Incorrect choice of fasteners may lead to insufficient joint strength or damage to the material. Fastening elements must match the loads and materials of the structure.
Violation of assembly technology often leads to deformations and reduced strength. Strict adherence to the sequence of operations and curing times for adhesive joints is critically important.
Modern technologies and innovations
The development of technologies brings new possibilities to traditional methods of installing balusters and handrails. Understanding that, how to properly install balusters and handrails using modern solutions, opens new horizons of quality and reliability.
Laser levels provide unmatched accuracy in marking and controlling the geometry of the structure. Using such tools significantly improves work quality and reduces installation time.
Modern adhesive compositions have improved strength and durability characteristics. Polyurethane and epoxy adhesives provide joints stronger than the wood itself.
Innovative fastening systems allow creating high-strength detachable joints. This is especially important for structures that may require modification or repair during operation.
Conclusion
The skill of installing balusters and handrails is developed through years of practice and continuous refinement of skills. Each project is unique and requires an individual approach, but the core principles remain unchanged: precision, quality of materials, and strict adherence to technology.
Correct installation of stair railings ensures not only the safety of ladder use, but also creates an aesthetically pleasing interior element. Investments in quality materials and professional installation pay off through the longevity and reliability of the structure.
Modern requirements for the quality and safety of construction structures are constantly increasing, stimulating the development of new technologies and materials. However, the foundation of success has always been the professionalism of the performers and their responsible attitude toward every detail of the work.
When selecting materials for stair railings, special attention should be paid to the supplier's reputation and product quality. The company STAVROS has proven itself as a reliable partner in the production of solid wood products. Years of experience, use of modern technologies, and strict quality control at all production stages enable STAVROS to create products that fully meet the highest standards and exceed even the expectations of the most demanding clients seeking flawless stair structures.


