


Article Contents:
- Anatomy of a Balustrade: Understanding the System
- Balusters: More Than Just Decoration
- Newel Posts: The Load-Bearing Foundation
- Handrail: Completing the Composition
- Baluster Rail: The Professional's Secret Weapon
- Baluster Fastening Methods: An Arsenal of Techniques
- Fastening with Threaded Studs: The Classic of Reliability
- Fastening with Wooden Dowels: Traditional Joinery
- Through-Fastening with Screws: Speed and Accessibility
- Fastening via Baluster Rail: A Professional Solution
- Invisible Fastening: Modern Technologies
- Preparation for Installation: Planning and Marking
- Calculating the Quantity and Spacing of Balusters
- Marking installation locations
- Tool and Material Preparation
- Step-by-Step Baluster Installation Guide
- Step One: Drilling Holes in the Treads
- Step Two: Installing Studs in the Treads
- Step Three: Preparing the Balusters
- Step Four: Installing Balusters onto Studs
- Step Five: Installing the Top Handrail Bracket and Handrail
- Features of installation on different types of staircases
- Straight Flights: The Basic Scenario
- Winder Steps: The Geometry of Complexity
- Spiral Staircases: Maximum Complexity
- Common Mistakes and How to Avoid Them
- Mistake One: Inaccurate Marking
- Mistake Two: Holes Deviating from Vertical
- Mistake Three: Insufficient Hole Depth
- Mistake Four: Weak or Absent Adhesive
- Mistake Five: Installing on Uncured Adhesive
- Finishing: From Installation to Aesthetics
- Concealing Fasteners and Defects
- Sanding and Preparing for Finish
- Choosing a finish coating
- Balustrade Care: Preserving Beauty
- Regular Cleaning
- Recoating
- Fastener Inspection
- DIY Installation or Professional Work?
- When you can do it yourself
- When professionals are needed
- Frequently Asked Questions
- What is the spacing between balusters?
- What is the most reliable baluster fastening method?
- Can balusters be fastened without glue?
- At what angle should the bottom end of a baluster be cut?
- How to treat balusters after installation?
- Is it necessary to use a baluster rail?
- Can a single baluster be replaced without dismantling the entire structure?
- Which wood species is best for balusters?
- How to check the quality of baluster installation?
- How much does professional baluster installation cost?
- Conclusion
A staircase in a home is more than just a functional element connecting floors. It is an architectural focal point that sets the tone for the entire interior. The key role in its appearance and reliability is played by balusters—the vertical supports of the railing that ensure safety and create rhythm, visual lightness, or, conversely, monumentality of the structure. But all this beauty and functionality depend on one critical moment—Baluster attachments to wooden staircase treadsImproper installation turns an elegant balustrade into a shaky structure that creaks, wobbles, and feels unreliable. Proper fastening, on the other hand, makes the staircase monolithic, stable, and safe for decades to come.
By 2026, baluster installation technology has reached a level where even a home craftsman with basic skills can achieve professional-quality installation—provided they understand the principles, choose the right materials, and follow the technology. This article is a comprehensive guide that will walk you through the entire process from planning to finishing, reveal trade secrets, and help you avoid common mistakes.


Anatomy of a Balustrade: Understanding the System
Before picking up tools, you need to understand how a staircase railing system is structured and the role each element plays.


Balusters: More Than Just Decoration
Balusters are vertical posts that fill the space between steps and the handrail. They serve a dual function: structural and aesthetic. Structurally, balusters bear lateral loads when a person leans on the railing or accidentally bumps into it. They provide rigidity to the system and prevent the handrail from sagging.
Aesthetically, balusters shape the visual appearance of the staircase. Closely spaced, slender balusters create rhythm, lightness, and an almost lace-like airiness. Widely spaced, massive balusters emphasize solidity, monumentality, and the weightiness of the structure. Carved patterns, turned profiles, geometric shapes—all of this is the language through which balusters speak about the interior style.
Our factory also produces:


Support Posts: The Load-Bearing Foundation
At stair turns, and at the beginning and end of flights, support posts are installed—more massive elements that bear the main load. The ends of handrails are attached to them, and they ensure the overall rigidity of the balustrade. The cross-section of support posts typically ranges from ninety to one hundred twenty millimeters, while balusters have a cross-section of thirty to fifty millimeters.
The fastening of support posts is critically important for the entire structure. They must be fixed so securely that they can withstand lateral loads without the slightest play. Posts are usually fastened to the staircase frame or to the floor through the bottom step using powerful studs with a diameter of twelve to sixteen millimeters or anchor bolts.
Get Consultation
Handrail: Completing the Composition
The handrail is the top horizontal element of the railing, which is held onto when ascending or descending. It must be absolutely securely fastened to the top ends of the balusters, with no play, sagging, or creaking. A round handrail with a diameter of fifty to sixty millimeters is a classic, time-tested design that provides a comfortable grip for hands of any size.
Round wooden handrail installationis performed in several ways: via a handrail bracket, directly to balusters using dowels, or with special fasteners. The choice of method depends on the staircase design, type of balusters, and aesthetic requirements.
Baluster Rail: The Professionals' Secret Weapon
A baluster rail is a special strip installed on top of the steps, to which balusters are then attached. This solution has many advantages: it simplifies marking and aligning balusters, adds extra rigidity to the structure, allows for easy adjustment of baluster positions, and hides fasteners from view.
The baluster rail is made from the same wood species as the balusters, with a width of eighty to one hundred millimeters and a thickness of twenty to thirty millimeters. It is fastened to the steps with screws, and then the balusters are fixed to it. For sloped flights, the baluster rail is cut at an angle corresponding to the staircase's incline.
Baluster Fastening Methods: An Arsenal of Techniques
There are many waysmount wooden balusters to steps, each with its own advantages, disadvantages, and area of application.
Fastening with Threaded Studs: The Classic of Reliability
This is one of the most common and reliable methods. An axial hole 8-10 mm in diameter and 50-70 mm deep is drilled into the lower end of the baluster. A hole 8-10 mm in diameter and 50-60 mm deep is also drilled into the tread. A threaded stud of the corresponding diameter, 80-100 mm long, is glued into the hole in the tread using epoxy or polyurethane adhesive.
After the adhesive has fully cured (24-48 hours), the baluster is placed onto the protruding part of the stud. The connection is strong, can be disassembled if necessary, and withstands significant lateral and vertical loads. Externally, the fastener is completely hidden—no visible screws or bolt heads.
The critical moment is drilling accuracy. The holes in the baluster and tread must be strictly vertical (or at the required angle for inclined flights) and precisely positioned. The slightest deviation will cause the baluster to stand crookedly, requiring re-drilling of the hole, which weakens the connection.
Fastening with Wooden Dowels: Traditional Joinery
Wooden dowels are cylindrical rods made of hardwood (usually beech), 8-12 mm in diameter. They are inserted into coaxial holes in the baluster and tread with adhesive, creating a strong, non-disassemblable connection.
The advantage of dowels is that they are made of the same material as the entire structure; they work under compression and bending just like wood and do not create stress concentration points. The disadvantage is that the connection is non-demountable; if a baluster needs to be replaced, the dowel will have to be drilled out.
The installation technology is similar to fastening with studs: drilling precise coaxial holes, applying adhesive, inserting the dowel into one hole first, then fitting the second element onto it. It is important to work quickly before the adhesive begins to set and to immediately check the verticality of the baluster with a level.
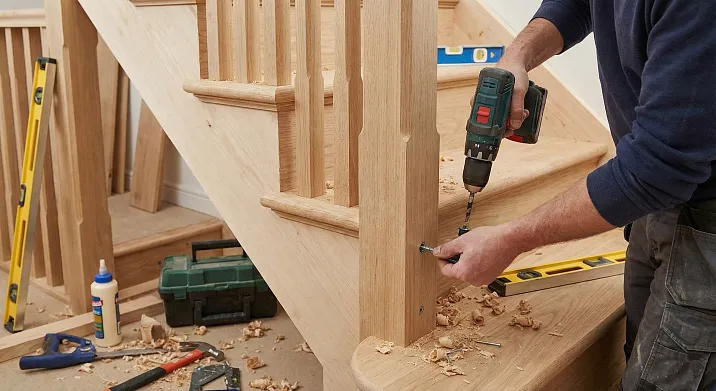
Through Fastening with Screws: Speed and Accessibility
The simplest and fastest method is fastening the baluster to the tread with screws, screwed from the bottom of the tread upwards or from the top of the baluster downwards at an angle. This method does not require complex tools or special skills and saves time.
However, it has significant drawbacks. When fastening from bottom to top, access to the lower surface of the treads is needed, which is not possible on all staircases. When fastening at an angle from the top, the screw heads are visible on the surface of the baluster, which spoils the appearance. They have to be masked with wooden plugs or filler, but the fastening point remains noticeable.
The strength of such a connection is lower than with studs or dowels. The screw works in pull-out; the wood around the thread gradually compacts, and the connection may weaken over time. For temporary structures or non-critical staircases (attic, basement), this method is acceptable, but for a main staircase in a house, it is better to choose a more reliable method.
Fastening via a Sub-Baluster Rail: A Professional Solution
Using a sub-baluster rail significantly simplifies installation and improves the quality of the result. The sub-baluster rail is fastened to the treads with screws 45-50 mm long, spaced 200-300 mm apart. The screw heads are countersunk into the wood and covered with wooden plugs or filled.
On the upper surface of the sub-baluster rail, the installation points for the balusters are marked with equal spacing. Holes are drilled or mortises are milled at these points for the lower ends of the balusters. The lower ends of the balusters are cut at an angle corresponding to the slope of the staircase (usually 30-45 degrees) to ensure a tight fit to the sub-baluster rail.
The balusters are installed into the mortises with wood glue and additionally secured with thin screws, screwed from the bottom of the sub-baluster rail at an angle upwards into the body of the baluster. The fasteners are completely hidden; the balusters stand perfectly straight at equal distances from each other. This method is especially convenient with a large number of balusters—the entire assembly can be done on a workbench, then the finished section is installed on the staircase as a whole.
Invisible Fastening: Modern Technologies
In recent years, special hidden baluster fastening systems have appeared, providing maximum aesthetics with high connection strength. They consist of metal sleeves or plates that are embedded into the ends of the balusters and tread, then connected to each other.
For example, a system with Z-shaped plates: grooves are milled into the lower end of the baluster and into the tread, into which special metal plates are inserted. The baluster is placed onto the plate in the tread, the plates interlock, creating a strong connection. Externally, no fasteners are visible, and disassembly is possible without damaging the elements.
Such systems are more expensive than traditional methods, require precise milling of grooves, and the use of special tools. But for premium projects where impeccable aesthetics are important, they are indispensable.
Preparation for Installation: Planning and Marking
The quality of installation is eighty percent determined by the preparatory stage. Rushing is unacceptable here—it's better to spend an extra hour on careful marking than to redo crookedly installed balusters later.
Calculating the Number and Spacing of Balusters
Building codes require that the distance between balusters (in clear space, i.e., between their nearest surfaces) does not exceed 150 mm. This is a safety requirement—a child's head should not be able to pass between the balusters. For families with small children, it is recommended to reduce the spacing to 100-120 mm.
From an aesthetic point of view, the optimal baluster spacing is 100-120 mm between centers with a baluster diameter of 40-50 mm. This creates a harmonious visual fill without excessive frequency or sparseness.
The number of balusters per tread can vary. The classic option is two balusters per tread (one at the front edge, one closer to the back). A denser fill is three balusters per tread. For wide staircases (over a meter wide), four balusters per tread can be installed.
When calculating, the placement of support posts must be taken into account—they are installed at the beginning and end of the flight, as well as at turns. The distance from the post to the first baluster should be the same as between balusters to maintain rhythm.
Marking installation locations
After determining the quantity and spacing of balusters, marking is performed on the steps. A long straightedge, tape measure, square, and pencil are used. If the balusters will be attached via a subrail, the marking is done on the subrail before it is installed on the staircase.
It is important to ensure precise coaxial alignment of the balusters along the entire length of the flight. For this purpose, installation points for the outermost balusters are marked at the edges of the staircase (on the first and last steps), and a string is stretched between them. All intermediate balusters must be installed strictly along the line of this string.
For inclined flights, the angle of inclination must be taken into account. Balusters are installed vertically, not perpendicular to the steps. This means the lower end of the baluster must be cut at an angle equal to the staircase's angle of inclination. The angle is determined using a protractor or a bevel gauge.
Tool and material preparation
For quality installation, you will need:
-
A drill or screwdriver with a set of wood drill bits with diameters of six, eight, ten, and twelve millimeters
-
A miter saw or miter box for precise angle cutting of baluster ends
-
A level at least sixty centimeters long for checking verticality
-
Tape measure, square, ruler, pencil for marking
-
Hammer, mallet for seating elements
-
Clamps for temporary fixation
-
Wood glue (PVA class D3 or D4, polyurethane)
-
Fasteners: threaded studs M8 or M10, screws, dowels
-
Wood filler for masking defects and fasteners
-
Sandpaper with a grit of one hundred eighty to two hundred forty units
All materials must be prepared in advance. Balusters, subrail, fasteners—everything should be at hand so as not to interrupt the installation process at critical moments when the glue has already been applied and is starting to set.
Step-by-step instructions for installing balusters
Now that everything is prepared, we proceed directly to the installation. Let's consider the process ofattaching a wooden baluster to a stepusing the threaded stud method as the most universal and reliable.
Stage one: drilling holes in the steps
At the baluster installation points, according to the markings, vertical holes are drilled with a diameter of eight or ten millimeters (depending on the diameter of the chosen studs) and a depth of fifty to sixty millimeters. It is critically important to ensure strict verticality of the holes.
To control verticality, a drilling jig or a homemade device—a block with a pre-drilled vertical hole—is used, which is placed against the step and serves as a guide for the drill. A drill press stand can also be used if working on a workbench, or a laser level for visual control.
Drilling should be performed at speeds not exceeding one thousand revolutions per minute, periodically withdrawing the drill to remove chips. Overheating of the drill and wood is unacceptable—this leads to charring of the hole walls and reduced adhesive bonding.
Stage two: installing studs in the steps
Threaded studs are cut into pieces eighty to one hundred millimeters long. One end of the stud (which will be glued into the step) is coated with epoxy or polyurethane glue. Use specifically these types of glue—ordinary PVA is not strong enough for metal-to-wood bonding.
The stud is inserted into the hole in the step and tapped in with light hammer blows until it stops. It is important that the stud enters strictly vertically, without deviating sideways. Excess glue that emerges on the surface is immediately removed with a damp cloth.
After installing all studs, allow the glue to fully cure. The curing time is specified by the glue manufacturer—usually from twelve to forty-eight hours depending on the glue type and room temperature. Do not rush to proceed to the next stage—insufficiently cured glue will not provide joint strength.
Stage three: preparing the balusters
Axial holes are drilled in the lower ends of the balusters with a diameter of eight and a half or ten and a half millimeters (half a millimeter larger than the stud diameter for a loose fit) and a depth of fifty to seventy millimeters. The center of the hole must exactly coincide with the axis of the baluster.
For precise centering, special tooling is used—a center finder or a homemade jig. You can also mark the center by drawing two diagonals from the corners of a square end (for square balusters) or finding the center with a compass (for round ones).
Drilling axial holes is best done on a drilling machine with vertical feed. If using a hand drill, the baluster must be securely fixed in a vise or with clamps, ensuring strict vertical alignment of the tool.
If balusters are installed on an inclined flight, the lower ends must be cut at an angle corresponding to the staircase's slope. The cut is made on a miter saw with precise setting of the required angle. After cutting, the end is sanded to ensure a tight fit against the step or sub-baluster rail.
Stage four: installing balusters on studs
The baluster is placed over the protruding part of the stud. The hole in the baluster should fit onto the stud with slight resistance, without play, but also without jamming. The baluster is seated until full contact of the end with the step using light taps of a mallet on the top end.
Immediately after installation, the verticality of the baluster is checked with a long level in two planes—parallel to the edge of the step and perpendicular to it. If the baluster deviates from vertical, its position is adjusted with light tapping. The permissible deviation is no more than one millimeter over the height of the baluster.
For temporary fixation of the baluster in a vertical position, braces are used—wooden strips that rest one end against the baluster and the other against the step or wall. Clamps can also be used, attaching the baluster to temporary guides.
It is important to check not only the verticality of each individual baluster but also their alignment along the entire length of the flight. For this, a control string is stretched along the balusters—all of them should touch the string or be at an equal distance from it.
Stage five: installation of the upper handrail support and handrail
After all balusters are installed and secured vertically, the handrail installation begins. There are several methods available.install balusters on a wooden staircaseto the handrail.
The most common method is through a handrail support strip (handrail bracket). This is a strip with a cross-section of twenty by thirty millimeters, which is attached to the upper ends of the balusters with screws thirty-five to forty millimeters long. The screws are driven from above through the handrail support down into the end of the baluster. The screw heads are countersunk into the wood.
A groove twenty to twenty-two millimeters wide and fifteen to twenty millimeters deep is routed along the entire length of the handrail along its central axis. The handrail is placed over the handrail support—the strip fits into the groove. The connection is fixed with glue and screws driven from below through the handrail support up into the body of the handrail.
An alternative method is direct attachment of the handrail to the balusters using dowels or studs. Holes are drilled in the upper ends of the balusters and the lower part of the handrail, into which dowels or studs are inserted with glue. This method provides a more monolithic connection but requires the highest precision—the slightest deviation in hole placement will make assembly impossible.
Features of installation on different types of staircases
Different staircase designs require adaptation of baluster installation technology.
Straight flights: the basic situation
A straight flight is the simplest case for installation. All steps have the same width, are positioned at the same angle to the horizon, and the distances between them are equal. Marking is done using a template, all balusters are identical, and the cut angles are the same.
The main thing is to ensure the accuracy of marking on the first step, then use a template to transfer this marking to all other steps. The template is made from thin plywood or acrylic glass, with the centers for baluster installation marked on it. By placing the template on each step and aligning it with the edge, the marking is transferred quickly and accurately.
Winder steps: the geometry of complexity
Winder steps—widening from the inner edge to the outer—create additional difficulties. The distance between balusters on the narrow edge of the step differs from the distance on the wide edge. If balusters are simply installed with equal spacing, they will be too sparse on the outer edge and too dense on the inner edge.
The solution is to vary the number of balusters on winder steps. On narrow sections, there may be one baluster per step; on wide sections, three or four. It is important that the transition from one quantity to another is smooth, without creating visual jumps.
Another approach is using a radial sub-baluster rail, which bends along an arc, following the shape of the winder part of the staircase. Balusters are attached to the sub-baluster rail with equal spacing along its length, resulting in a fan-like arrangement on the steps, evenly filling the space.
Spiral staircases: maximum complexity
Spiral staircases require a special approach. Steps are arranged in a spiral, each turned relative to the previous one at a certain angle. The central part of the step is narrow, the outer part is wide. Balusters must be installed strictly vertically while following the spiral.
Marking is done in place, individually for each step. A plumb bob is used to determine verticality, and a laser level is used to transfer marks. Baluster attachment on spiral staircases is usually done through a sub-baluster rail, which is bent along the spiral. Making such a sub-baluster rail requires special skills—it is either bent from steamed wood or glued from thin laminates.
The upper ends of balusters on a spiral staircase must be cut at different angles to ensure a tight fit against the handrail, which also follows the spiral. Each baluster is unique and requires individual fitting. This makes the installation of a spiral staircase the most labor-intensive and demanding of high skill.
Typical mistakes and how to avoid them
Even experienced craftsmen sometimes make mistakes when installing balusters. Knowing typical errors helps prevent them.
First mistake: inaccurate marking
Rushing during the marking stage is the main cause of problems. Balusters installed with uneven spacing, balusters not aligned in a single line, balusters deviating from vertical—all these are consequences of careless marking.
Solution: spend enough time on marking. Use templates, stretch control strings, check distances multiple times. The proverb 'measure twice, cut once' is relevant here as nowhere else.
Second error: deviation of holes from vertical
If the hole for the stud or dowel is drilled not vertically, the baluster will stand crooked. Correcting this is difficult—you will have to drill out the hole to a larger diameter, install a thicker stud, or fill the hole with a wooden plug and drill again.
Solution: use drilling guides—jigs, vertical drill stands, laser levels. Check the verticality of the drill before starting and during the drilling process.
Mistake three: insufficient hole depth
If the hole for the stud is too shallow, the stud will not penetrate deep enough, making the connection unreliable. The baluster may become loose over time and fall out.
Solution: adhere to the recommended hole depths — at least fifty millimeters in the step and at least fifty millimeters in the baluster. Use a depth gauge or a mark on the drill bit to control the depth.
Mistake four: weak glue or lack of glue
Some craftsmen rely solely on mechanical fasteners (studs, screws), neglecting glue. This is a mistake. The adhesive bond works across the entire contact area, distributes the load evenly, and prevents squeaking and loosening.
Solution: always use high-quality wood glue in combination with mechanical fasteners. Apply glue to the end of the baluster, the stud or dowel, and the surfaces of the baluster base. Excess glue should be removed immediately after installing the element.
Mistake five: installation on uncured glue
If you start loading the joint before the glue has fully cured, the strength will be reduced. Balusters may shift, and the handrail may sag.
Solution: strictly adhere to the curing time specified by the glue manufacturer. Typically, this is at least twenty-four hours at temperatures above eighteen degrees Celsius. At lower temperatures, the time increases.
Finishing: from installation to aesthetics
After completing the installation, the structure requires finishing, which will hide the work marks and give the staircase a finished appearance.
Concealing fasteners and defects
Screw heads, small chips, and scratches left from installation are filled with wood putty of a matching color. The putty is applied with a rubber spatula and leveled flush with the surface. After drying (usually two to four hours), the filled areas are sanded with fine sandpaper with a grit of two hundred twenty to two hundred forty units.
To conceal screw holes, you can use wooden plugs — cylindrical plugs with a diameter of eight to ten millimeters, cut from the same wood species as the balusters. The plug is glued into the hole, the protruding part is cut off with a chisel flush with the surface, and the area is sanded. With proper wood grain matching, such a plug is practically invisible.
Sanding and preparation for finishing
All elements of the balustrade are sanded with an abrasive of one hundred eighty to two hundred twenty grit. Minor irregularities, burrs, and tool marks are removed. Pay special attention to joint areas where steps or gaps may be present. Sanding is done along the wood grain to avoid leaving cross-grain scratches.
After sanding, all dust is thoroughly removed — first with a vacuum, then by wiping with a damp (not wet!) cloth. The wood must be absolutely clean before applying finishing compounds.
Choosing a finish
For interior staircases, transparent coatings that preserve and highlight the natural beauty of the wood are optimal. These include oils, oil-waxes, and water-based or alkyd-urethane varnishes.
Oil coatings penetrate the wood structure, creating a matte or semi-matte surface that is pleasant to the touch. Wood coated with oil breathes, regulates humidity, and retains tactile warmth. Oil is applied in two to three coats with intermediate sanding using a fine abrasive. The drying time for each coat ranges from four to twelve hours depending on the type of oil.
Varnishes create a more durable coating that is resistant to wear and dirt. For staircases that are heavily used, varnish is preferable to oil. Modern water-based varnishes are eco-friendly, odorless, and dry quickly. They are applied in two to three coats with intermediate sanding. The final finish can be matte, semi-matte, or glossy.
If you need to change the color of the wood, use stains or oils with colored pigments before applying the protective coating. They allow you to achieve shades from light golden to dark brown while preserving the visibility of the grain.
Balustrade care: preserving beauty
A properly installed and finished balustrade lasts for decades but requires regular maintenance.
Regular cleaning
Handrails and balusters should be wiped with a soft, dry, or slightly damp cloth once a week. This removes dust and dirt before they become ingrained. Do not use aggressive detergents, abrasive sponges, or solvents — they damage the protective coating.
For stubborn stains, use special wood cleaners suitable for your type of coating. For oil coatings — oil-based cleaners; for varnished surfaces — neutral cleaning agents heavily diluted with water.
Recoating
Oil coatings require renewal every one to two years. The procedure is simple: clean the surface, lightly sand with a fine abrasive (three hundred twenty grit), and apply a fresh coat of oil. This takes a few hours of work and does not require professional skills.
Varnish coatings last five to seven years without renewal under normal use. When wear, dullness, or scratches appear, more serious intervention will be needed. The old varnish is partially or completely removed by sanding, and a new coat is applied. This is labor-intensive work that can be entrusted to professionals.
Fastener inspection
Once a year, check the strength of the baluster connections. Grasp a baluster with your hand and try to wiggle it. There should be no play or movement whatsoever. If a baluster has become loose, the problem must be addressed immediately — tighten the fasteners, add glue, or reinforce the connection with additional elements.
Also, check the handrail — it must be absolutely rigidly fixed, not sagging or squeaking. Any signs of weakened connections require immediate intervention. It is better to spend an hour on preventive maintenance than to deal with broken connections or, God forbid, an injury due to a failed railing.
DIY installation or professional work?
Many homeowners ask this question. The answer depends on several factors.
When you can do it yourself
If you have basic carpentry skills, the necessary tools, time, and the desire to understand the intricacies of the process, installing balusters on a straight flight is quite feasible. It doesn't require special education or years of experience—just attentiveness, care, and following instructions.
The advantages of DIY installation are cost savings (professional work can cost thirty to fifty percent of the material price), satisfaction from creating something with your own hands, and a deep understanding of your staircase's structure, which will be useful for future maintenance.
DIY interior decor— it's not just about saving money, but also an opportunity to realize your creative ideas, create a unique space that fully reflects your tastes and needs.
When Professionals Are Needed
For complex structures—spiral staircases, staircases with winder steps, or curved handrails—it's better to hire specialists. This requires experience, special tools, and knowledge of nuances that come only with practice.
Professionals are also needed if you don't have time to study the technology in detail, lack confidence in your skills, or don't have the necessary tools (buying which may not be justified for a one-time job). Mistakes in balustrade installation can lead not only to aesthetic defects but also to safety issues.
Good craftsmen will complete the work quickly and with quality, providing a guarantee on the result. Yes, it's more expensive, but you gain confidence that the staircase will be safe, beautiful, and durable.
Frequently asked questions
At what distance should balusters be placed from each other?
Building codes require a distance between balusters (clear spacing) of no more than one hundred and fifty millimeters. The optimal spacing from an aesthetic standpoint is one hundred to one hundred and twenty millimeters between baluster centers. For families with small children, it's recommended to reduce this to one hundred millimeters.
What is the most reliable method for attaching balusters?
The most reliable method is attachment using threaded studs or wooden dowels combined with wood glue. This method provides a strong connection that withstands significant loads, while the fasteners are completely hidden from view.
Is it possible to attach balusters without glue?
Technically possible, but not recommended. Glue distributes the load across the entire contact area, prevents squeaking, and avoids loosening of the connection over time. A combination of mechanical fasteners (studs, screws) with glue provides maximum reliability.
At what angle should the bottom end of the baluster be cut?
The cut angle equals the staircase's slope angle. For standard staircases, this is thirty-five to forty-five degrees. The exact angle is determined by measurement or from project documentation. Balusters on landings have a straight cut (ninety degrees).
How to treat balusters after installation?
Transparent coatings are optimal—oils for interior work or water-based varnishes. Oil penetrates the wood structure, preserving its natural appearance and tactile feel. Varnish creates a more durable surface resistant to wear. The choice depends on usage intensity and personal preference.
Is it necessary to use a baluster rail?
A baluster rail is not mandatory but significantly simplifies installation and improves the result. It ensures perfect alignment of balusters, hides fasteners, and adds extra rigidity. For straight flights, it can be omitted; for complex structures, it is highly desirable.
Is it possible to replace a single baluster without dismantling the entire structure?
It depends on the attachment method. With stud or dowel attachment, replacing a single baluster is possible—it is cut out, and a new one is installed in its place. With attachment via a baluster rail, partial dismantling of the structure may be required. Through-fastening with screws is the simplest for replacement.
Which wood species is best for balusters?
For interior staircases, oak, beech, and ash are optimal. Oak is the strongest and most durable, with a pronounced grain. Beech is more uniform, lighter, and slightly less strong. Ash is similar to oak in characteristics, with a beautiful contrasting grain. Pine is a budget option for non-critical staircases.
How to check the quality of baluster installation?
Check the vertical alignment of each baluster with a level, the alignment of all balusters along the line, the uniformity of spacing, and the absence of play when trying to wiggle a baluster. The handrail should be securely fastened, not sag, and not squeak. Visually check for gaps, spaces, or misalignments.
How much does professional baluster installation cost?
The cost varies depending on the region, complexity of the work, and number of balusters. On average, installing one baluster costs from three hundred to seven hundred rubles. For a standard staircase with fifteen to twenty steps and two balusters per step, the labor cost alone amounts to twenty to thirty thousand rubles.
Conclusion
Mounting balusters to steps of a wooden staircase— is a process that requires attention to detail, precision, and an understanding of the structure's principles. But it's not an impossibly difficult task accessible only to select professionals. With basic skills, the right tools, quality materials, and, most importantly, the desire to understand, any DIY enthusiast can perform installation to a level that ensures safety, reliability, and aesthetic perfection.
The key to success is thorough preparation. Study your staircase's structure, choose a suitable attachment method, prepare all materials and tools, and perform precise marking. Don't rush; check each stage of the work. Follow the technology, use quality materials, and don't skimp on fasteners and glue.
The result of your efforts is a staircase that serves not just as a transition between floors, but as a full-fledged architectural element, a home decoration, and a source of pride. A staircase that is safe and comfortable to walk on, that doesn't squeak, wobble, or cause concern. A staircase that, in ten, twenty, thirty years, will retain its strength and beauty, becoming a witness to your family's life and part of your home's history.
For over two decades, STAVROS has specialized in manufacturing high-quality components for wooden staircases. The STAVROS range offers the widest selectionwooden balustersfor staircases — from classic turned forms to modern geometric profiles, from simple round shapes to exquisite carved designs.
All STAVROS products are made from solid noble woods — oak, beech, ash, larch. The wood undergoes proper kiln drying to a moisture content of eight to ten percent, ensuring geometric stability and no deformation during use. The use of high-precision CNC equipment guarantees perfect geometry, surface finish, and interchangeability of components.
STAVROS offers not only standard catalog items but also custom manufacturing from individual sketches — balusters of unique shapes, non-standard sizes, with custom carving. Experienced designers will help develop the staircase concept, select harmoniously matching elements — balusters,Support Columnshandrails, finials.
In addition to manufacturing, STAVROS provides consulting support on installation, fastener selection, and finishing. The company's specialists share their years of experience, help avoid mistakes, and achieve professional results even with DIY installation.
By choosing STAVROS, you choose quality tested by time and thousands of completed projects across Russia and beyond. You get not just wooden parts, but a comprehensive solution for creating your dream staircase — a staircase that is safe, beautiful, durable, and becomes the pride of your home, delighting the eye every day.


