Article Contents:
- Balusters: Functionality and Aesthetics in One Element
- Variety of Forms and Materials
- Technical Specifications and Standards
- Preparation Stage: Key to Successful Installation
- Choosing the Mounting Method
- Required Tools and Materials
- Marking and Planning
- Installation Process: Step by Step to Perfection
- Installing Balusters on Stringer Ladders
- How to Install Balusters on Ladders with Treads
- Installing Balusters on Concrete Ladders
- Final Finishing and Protection
- Professional Installation Secrets: Nuances and Details
- Accuracy of Marking - Guarantee of Success
- Pre-Assembly and Inspection
- Working with Wood: Consider Material Characteristics
- Fasteners: Selection and Use
- Aesthetic Aspects: Harmony and Proportions
- Common Mistakes When Installing Balusters and How to Avoid Them
- Incorrect Marking and Planning
- Ignoring Material Characteristics
- Insufficiently Reliable Mounting
- Incorrect Saw Cut Angle
- Neglecting Vertical Alignment
- Maintenance and Care: Extending Service Life
- Wooden Balusters
- Metal Balusters
- Glass Balusters
- Innovative Solutions and Modern Trends
- Minimalism and Functionality
- Combining materials
- Integration of Lighting
- Ecological and natural properties
- Individualization and uniqueness
- Economic aspects: price-to-quality ratio
- Material selection based on budget
- Long-term investments
- Impact on property value
- Practical tips for different types of staircases
- Helical staircases
- Turn staircases
- Straight staircases
- Staircases with balusters
- How to install balusters yourself: step-by-step guide for beginners
- Step 1: Preparation and planning
- Step 2: Marking
- Step 3: Preparing balusters
- Step 4: Installing support posts
- Step 5: Installing intermediate balusters
- Step 6: Installing Handrails
- Step 7: Final finishing
- Conclusion: beauty and functionality in every detail
Staircase in a house is not just a functional element connecting floors. It is an architectural centerpiece capable of transforming the interior, adding elegance, and becoming the homeowner’s true pride. The key role in the aesthetic perception of the staircase is played by balusters — vertical elements of the railing that not only ensure safety but also form the visual appearance of the entire structure. The question of how to install balusters, how to install balustersconcerns many homeowners who have decided to transform their interiors themselves. Let’s dive into this exciting process and reveal all the secrets of professional installation.


Balusters: functionality and aesthetics in one element
Before beginning installation, it is necessary to understand what balusters are and what role they play in staircase construction. Balusters are vertical supports that hold the handrail of the staircase. They serve a dual function: ensuring safety by preventing falls from the staircase, and serving as a decorative element that gives the structure completeness and style.


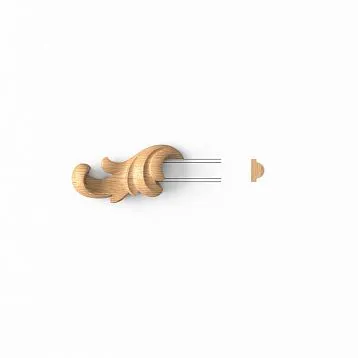
Variety of shapes and materials
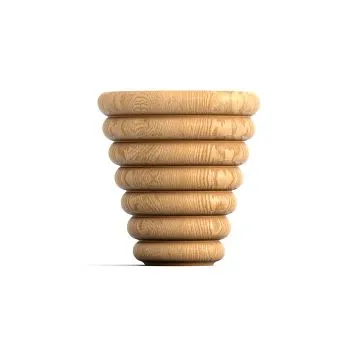
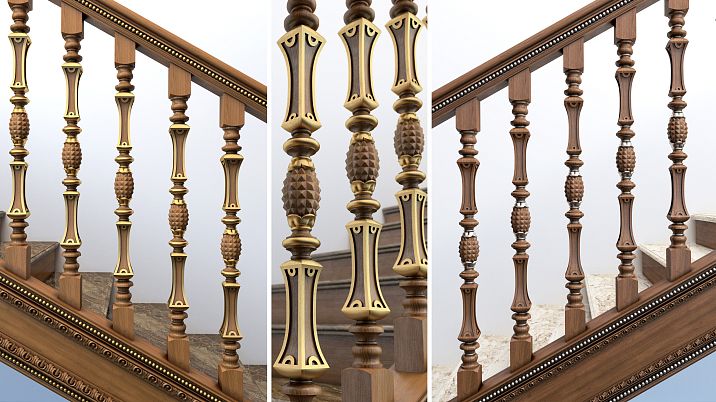
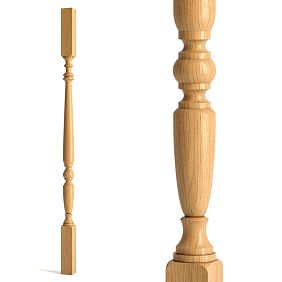
The modern market offers an impressive variety of balusters, differing in shape, size, and material. Classic turned balusters from solid wood, strict square or rectangular ones, elegant metal ones, futuristic glass ones — your choice is limited only by your imagination and stylistic preferences.
The most popular materials for manufacturing balusters are:
- Wood — a traditional material possessing natural beauty and warmth. Wooden balusters can be made from various species: oak, beech, ash, pine, larch. Each species has its own texture, color, and strength characteristics.
- Metal — a strong and durable material, allowing for the creation of both strict minimalist and complex forged balusters. Metal elements can be made from steel, aluminum, brass, or bronze.
- Glass — a modern material creating an effect of lightness and airiness. Glass balusters are especially suitable for interiors in high-tech or minimalist styles.
- Composite materials — combinations of wood with metal, glass with metal, and other combinations, allowing for the creation of unique design solutions.
Our factory also produces:


Technical Specifications and Standards
When selecting balusters, it is necessary to consider not only their aesthetic qualities but also technical parameters. The standard height of balusters is 90-100 cm from the step level — this is sufficient to ensure the safety of an adult person. The cross-section of support posts is usually 100x100 mm or more, while intermediate balusters may have a cross-section of 40x40 mm to 60x60 mm for square balusters and a diameter of 40-60 mm for round ones.
Preparation Stage: Key to Successful Installation
Get Consultation
Preparation Stage: Key to Successful Installation
Success of any construction or installation process depends on 80% on proper preparation. Installing balusters is no exception. A properly conducted preparatory stage will help avoid many problems during installation and ensure the longevity and reliability of the structure.
Choosing the Mounting Method
There are several ways to mount balusters to the staircase, and the choice of a specific method depends on the type of staircase construction, the material of the balusters, and your preferences. Let's consider the main methods:
- Mounting with dowels or screws — a classic method, where holes are drilled into the end of the baluster and into the mounting location (step, stringer, or sub-baluster), and then dowels are inserted or screws are screwed in. This method ensures secure mounting and is suitable for most types of staircases.
- Mounting with threaded rods — a technologically advanced method, where an axial hole is drilled into the baluster for screwing in a metal rod. This method is considered one of the most reliable.
- Mounting through a sub-baluster — a method where balusters are mounted to a special strip (sub-baluster), which is then mounted to the staircase. This method simplifies the installation process and allows for a more neat appearance.
- Through-mounting — a method where the baluster passes through the step and is secured to the lower structures. This method ensures maximum strength but requires more complex preparation.
Required Tools and Materials
For successful baluster installation, you will need the following tools and materials:
Tools:
- Drill or screwdriver
- Drills of various diameters
- Circular saw or fine-toothed hacksaw
- Measuring tape and pencil for marking
- Level (preferably laser)
- Plumb bob
- Clamps
- Sandpaper of various grits
- Chisel (for fitting joints)
- Hammer
- Square
Materials:
- Balusters and support posts
- Fasteners (dowels, screws, threaded rods)
- Wood glue (if wooden elements are used)
- Sub-baluster (if the corresponding mounting method is chosen)
- Finishing materials (varnish, paint, oil)
Marking and Planning
Before mounting, carefully plan the placement of balusters and mark the positions. This will ensure even distribution of elements and a harmonious appearance of the staircase.
- Determining the number of balusters - usually the number of supports matches the number of steps, but in homes with small children or pets, for safety, it is recommended to install two balusters per step.
- Marking installation locations - mark the mounting points on the first and last steps, then place a rail against them and transfer the line to all steps using a square. On this line, mark the centers of support posts and intermediate balusters, maintaining equal spacing between them.
- Preparing holes - for convenience, you can mark mounting points on the floor or steps by drilling 2-3 mm deep indentations. It is also helpful to use a homemade drill guide, which significantly speeds up the work.
Installation process: step by step to perfection
Now that the preparatory stage is complete, you can proceed directly to installing the balusters. Let's examine the step-by-step installation process for different types of staircase constructions.
Installing balusters on a staircase with stringers
A staircase on stringers - a construction in which steps are mounted on a load-bearing beam. In this case, balusters are attached directly to the steps at a right angle, and their upper part is cut at an angle corresponding to the staircase's incline.
- Preparing balusters - if the upper part of the balusters will be cut at an angle, it is necessary to pre-mark the cut line. This can be done using a protractor or a template corresponding to the staircase's incline angle.
- Drilling holes - drill holes in the lower part of the baluster and at the point of its installation on the step for the chosen fastener (nail, screw, or threaded bolt). The hole diameter must match the diameter of the fastener.
- Installing balusters - apply adhesive to the hole on the step, insert the fastener, and install the baluster. Ensure it stands vertically using a level or plumb bob. If necessary, clamp the baluster until the adhesive dries.
- Installing handrails - after installing all balusters, install the handrail rail by screwing it to the upper ends of the balusters. Then install the handrail, which should fit into the groove of the handrail rail. The handrail is secured with adhesive and screws from the underside, ensuring a concealed connection.
how to install balusters On a staircase with stringers
A staircase on stringers - a construction in which balusters are mounted on a load-bearing beam. In this case, both the lower and upper ends of the balusters are cut according to the staircase's incline.
- Preparing balusters - the ends of the balusters must be cut at an angle corresponding to the stringer's incline. Only then will the balusters stand vertically. It is recommended to drill a hole in the end before trimming - this makes it easier to determine the center. After trimming, the hole is drilled to the required depth.
- Mounting on nails or screws - the process is similar to attaching balusters to steps: holes are drilled in the stringer and the end of the baluster, into which nails or screws are inserted.
- Mounting on a baluster support - an alternative method using a helper strip (baluster support). On the lower and upper baluster support rails, mark the position of balusters at equal distances from each other. The ends of the balusters are cut at an angle according to the stringer's incline. Adhesive is applied to the sanded ends, and the elements are secured to the rails with screws. Then the entire assembly is mounted to the stringer.
Installing balusters on a concrete staircase
Installing balusters on a concrete staircase has its own characteristics, related to the need to mount them to a solid base.
- Marking and drilling holes - on the concrete surface, mark the locations for balusters and drill holes for anchor bolts or chemical anchors. The hole depth must meet the manufacturer's requirements for the fastener.
- Installing fasteners - install anchor bolts or insert chemical anchors into the drilled holes according to the instructions.
- Installing balusters - mount the balusters onto the fasteners, ensure their verticality, and securely fix them.
- Installing handrails - the process is similar to installing handrails on a wooden staircase.
Final finishing and protection
After completing the installation, the staircase structure requires final finishing, which includes:
- Sanding - all wooden elements are carefully sanded to create a smooth surface. This process may include several stages using abrasive materials of different grits.
- Protective treatment - wooden elements are treated with protective compounds (varnish, oil, wax) to prevent exposure to moisture, ultraviolet light, and biological factors.
- Decorative finishing - if needed, staircase elements are painted or stained to achieve the desired aesthetic effect.
Professional installation secrets: nuances and subtleties
Over fifty years of work in the field of designing and installing staircase structures, I have accumulated many professional secrets that will help you achieve an ideal result. I will share some of them.
Marking accuracy - the key to success
Never neglect marking accuracy. Even a small deviation at the beginning can lead to significant problems at the final stage. Use quality measuring tools and check results multiple times.
Pre-assembly and inspection
Pre-Assembly and Inspection
Before final assembly, it is recommended to perform a dry assembly of the structure without using glue or fasteners. This will allow you to identify potential issues and make necessary adjustments.
Pay special attention to the verticality of balusters - even a slight tilt will be noticeable and spoil the overall impression of the staircase. Use a plumb bob or laser level to check verticality.
Working with wood: consider material properties
If you are working with wooden balusters, remember that wood is a living material that can change its dimensions depending on humidity and temperature. Before starting work, ensure the material has acclimated to the room where the staircase will be installed.
When drilling holes in wooden elements, use drill bits with a centering tip - this ensures accurate hole placement. To prevent chipping when the drill bit exits, place a piece of scrap wood under the part.
Fasteners: selection and use
The choice of fasteners depends on the material of the balusters and the type of staircase construction. For wooden balusters, it is recommended to use hardwood dowels or specialized wood screws. For metal balusters, bolted connections or welding are suitable.
When using glue, choose compositions intended for the corresponding materials. For wooden elements, PVA glue is suitable, providing strong bonding and no harmful emissions.
Aesthetic aspects: harmony and proportions
In addition to technical aspects, do not forget the aesthetic side. The staircase should harmoniously fit into the interior and match the overall style of the room.
Pay attention to proportions: the ratio of baluster thickness to step width, baluster height to overall staircase height. Properly chosen proportions will create a sense of harmony and completeness.
Typical errors when installing balusters and how to avoid them
Over the years of work, I have observed numerous errors made by both beginners and experienced craftsmen when installing balusters. Knowing these errors will help you avoid problems and achieve a professional result.
Incorrect marking and planning
Error: Lack of detailed plan for baluster placement or inaccurate marking.
Solution: Before starting work, create a detailed plan taking into account all staircase features. Use quality measuring tools and check the marking multiple times.
Ignoring material properties
Error: Failure to account for material properties of the balusters (e.g., wood shrinkage or expansion).
Solution: Study the properties of the selected material and consider them during installation. Allow wooden elements to acclimate to the room before installation.
Insufficiently secure fastening
Error: Using insufficient quantity of fasteners or inappropriate fastening materials.
Solution: Choose fasteners appropriate for the baluster material and staircase type. Do not compromise on the quantity or quality of fasteners — this affects the safety of the structure.
Incorrect miter angle
Error: Incorrect calculation of the miter angle for the top or bottom of balusters, resulting in their tilt or poor fit against handrails.
Solution: Use a protractor to accurately determine the staircase's slope angle. Create a template for marking the miter line on all balusters.
Neglecting Vertical Alignment
Error: Installing balusters with deviation from vertical, which is visually noticeable and may reduce structural strength.
Solution: Use a plumb bob or laser level to check the vertical alignment of each baluster. Secure elements with clamps if necessary until the adhesive has fully dried.
Maintenance and Care: Extending Service Life
Proper care of balusters and other staircase elements will preserve their beauty and functionality for many years. Let's consider the main aspects of caring for different types of balusters.
Wooden Balusters
Wooden elements require regular care to maintain their aesthetic and structural qualities:
- Regular cleaning - remove dust with a soft cloth or specialized brushes. For removing stains, use a mild soap solution or specialized wood care products.
- Moisture protection - excessive humidity can cause deformation of wooden elements. Monitor the room's humidity level and prevent water from contacting wooden surfaces.
- Sunlight protection - direct sunlight can cause fading and cracking of wood. If the staircase is in an area of intense sunlight, use curtains or blinds.
- Periodic renewal of protective coating - varnishes, oils, and waxes applied to wooden items wear over time. It is recommended to periodically (every 3-5 years) renew the protective coating.
Metal Balusters
Metallic elements are more resistant to external influences, but also require certain care:
- Dust and dirt cleaning - regularly wipe metal surfaces with a soft cloth. For removing stubborn stains, use specialized metal cleaning agents.
- Corrosion protection - if signs of corrosion appear on metal elements, remove rust with fine-grit sandpaper and apply an anti-corrosion coating.
- Renewal of decorative coating - as needed, renew the decorative coating of metal elements (paint, varnish, patina).
Glass Balusters
Glass elements require special care to maintain their transparency and shine:
- Regular cleaning - wipe glass surfaces with specialized glass cleaners that do not contain abrasive particles.
- Fingerprint removal - glass surfaces quickly become smudged with fingerprints. To remove them, use a microfiber cloth and specialized glass cleaners.
- Checking fasteners - periodically check the reliability of glass element fasteners, as loosening can lead to glass damage.
Innovative solutions and modern trends
The world of design and construction is constantly evolving, and in the field of staircase construction, new materials, technologies, and design solutions are continuously emerging. Let's consider some modern trends that may inspire you to create a unique staircase.
Minimalism and functionality
Modern interiors favor simple forms and clean lines. Minimalist balusters with square or rectangular cross-sections and no excessive decoration are in trend. Such elements fit perfectly into minimalist interiors and create a sense of space and light.
Combining materials
Combining different materials in one structure allows creating unique design solutions. Popular combinations include wood with metal, glass with wood, and metal with glass. Such combinations create interesting contrasts and textures, turning the staircase into a true work of art.
Integration of lighting
Built-in LED elements can transform an ordinary staircase into a light installation. Especially striking is the combination with glass or semi-transparent materials. Lighting steps or balusters not only creates an interesting visual effect but also enhances safety during nighttime use.
Ecological and natural
Products made from eco-friendly materials with minimal processing are gaining increasing popularity. The natural texture of wood has become a standalone decorative element. In trend is the use of wood retaining its natural grain, knots, and irregularities, which gives the staircase a unique character and warmth.
Individualization and Uniqueness
Standard solutions are giving way to individual projects that reflect the personality and taste of the home owner. Clients increasingly choose unique designs created specifically for their interiors. These may include balusters of unusual shapes, artistic carvings, or other decorative elements that make the staircase truly unique.
Economic aspects: price-to-quality ratio
When planning the installation of balusters, it is important to consider not only aesthetic and functional aspects, but also the economic component. Let's consider how to find the optimal price-to-quality ratio.
Material selection considering budget
The cost of balusters varies significantly depending on the material used. Solid wood balusters made from expensive species (oak, beech, ash) will cost more than those made from pine or MDF. Metal and glass elements also have different costs depending on the quality of the material and the complexity of manufacturing.
With a limited budget, consider the following options:
- Use a combination of materials (for example, solid wood for support posts, and more affordable material for intermediate balusters)
- Choose simple baluster shapes, which are cheaper than complex turned or carved elements
- DIY installation, which will save on professional services
Long-term investments
It is important to understand that saving on material quality and fasteners may lead to additional expenses in the future. Quality items made from solid wood or strong metal will last for decades, whereas cheaper alternatives will need to be replaced much more frequently.
Investments in quality materials and professional installation pay off through:
- Durability of the structure
- Absence of need for frequent repairs or replacement of elements
- Increased property value due to a quality and aesthetically pleasing staircase
Impact on property value
A beautiful staircase with quality balusters can significantly increase property value. This is explained by several factors:
- Aesthetic appeal, creating a positive first impression for potential buyers
- Quality indicator, showing that other elements of the house are also of high quality
- Uniqueness, making the house special and standing out in the real estate market
Practical tips for different types of staircases
Each type of staircase has its own characteristics that must be considered when installing balusters. Let's consider specific recommendations for different constructions.
Helical staircases
Helical staircases present special difficulty in installing balusters due to the constantly changing angle of inclination. When working with such constructions:
- Use templates to mark the angle of cut for each baluster
- Consider using metal balusters, which are easier to adapt to complex geometry
- Pay special attention to the reliability of fastening, as helical staircases experience heavy loads during operation
Turned staircases with landings
Staircases with landings require special attention when installing balusters on corner sections:
- On landings, use support posts with larger cross-sections to ensure additional strength
- Carefully plan the placement of balusters on landing sections to maintain even spacing
- If necessary, adapt the shape or size of balusters on landings to maintain a harmonious appearance
Straight stair railings
Straight railings are the easiest to install balusters, but there are also nuances here:
- Use a guide rail to ensure all balusters are strictly vertical
- Evenly distribute balusters along the entire length of the stair run, maintaining equal spacing
- Pay attention to the first and last balusters of the stair run - they must be especially securely fastened, as they experience the greatest load
Staircases on brackets
Staircases on brackets (console staircases) have a special construction, where steps are attached to the wall using special brackets (brackets). When installing balusters on such staircases:
- Use special fittings adapted for mounting to the ends of console steps
- Consider using glass panels instead of traditional balusters to preserve the effect of lightness and airiness
- Provide additional reinforcement at baluster mounting points, as console steps have less mounting area
how to install balusters DIY: Step-by-step guide for beginners
If you have decided to install balusters yourself but lack experience in such work, the following step-by-step guide will help you tackle this task.
Step 1: Preparation and Planning
- Measure the staircase and determine the required number of balusters
- Choose the material and style of balusters that match your interior
- Purchase all necessary materials and tools
- Create a detailed plan for baluster placement, taking into account even spacing
Step 2: Marking
- Mark the locations for support posts at the beginning and end of the stair run
- Draw a line connecting these points - it will serve as a reference for installing intermediate balusters
- Mark the position of each baluster, maintaining equal spacing between them
- Mark the centers of balusters on the treads or stringers
Step 3: Baluster Preparation
- If necessary, cut the top and/or bottom ends of balusters at the required angle
- Drill holes in the ends of balusters for fasteners
- Sand all surfaces, especially cut areas
- Apply protective coating (varnish, paint, oil) if needed
Step 4: Installing Support Posts
- Install support posts at the beginning and end of the staircase run
- Ensure their verticality using a level or plumb bob
- Securely fasten posts to the floor or staircase structure
Step 5: Installing Intermediate Balusters
- Begin installation with balusters closer to the support posts
- Apply adhesive to the holes on the treads or stringers (if using wooden elements)
- Install the baluster by inserting the fastener into the prepared hole
- Check vertical alignment using a level or plumb bob
- Secure the baluster with clamps if necessary until the adhesive dries
- Repeat the process for all remaining balusters
Step 6: Installing Handrails
- Install the handrail support rail on the top ends of the balusters
- Screw the rail to each baluster with two screws
- Apply adhesive to the top surface of the rail
- Install the handrail, aligning its groove with the rail
- Secure the handrail with screws from the underside of the rail
Step 7: Final Finishing
- Fill all visible screw holes with wood putty or wooden plugs
- Sand all surfaces to achieve a smooth finish
- Apply a finish (varnish, paint, oil) to all wooden elements
- After the finish dries, check the reliability of all connections
Conclusion: Beauty and functionality in every detail
Installing balusters is not just a technical task—it is a creative process that transforms an ordinary staircase into a work of art. Properly selected and correctly installed balusters not only ensure safety when using the staircase but also become an important design element of the interior, giving it individuality and style.
In this article, we reviewed various aspects of the baluster installation process: from material selection and fastening methods to final finishing and maintenance of the completed structure. We discussed common mistakes and how to avoid them, modern trends and innovative solutions, economic aspects, and practical tips for different types of staircases.
Whether you decide to install balusters yourself or hire professionals, knowledge of the basic principles and nuances of the process will help you make the right choice and achieve a result that will delight you for many years.
STAVROS Company specializes in producing high-quality balusters, support posts, and other staircase elements made of solid wood. Years of experience, modern equipment, and skilled craftsmen enable the creation of products that meet the highest standards of quality and aesthetics. Choosing STAVROS products means choosing reliability, beauty, and individuality that will become a true decoration of your home.