


Article Contents:
- What are ready-made slatted wall panels: not to be confused with a set of slats
- Construction of a ready-made slatted panel
- Standard Sizes
- How a ready-made panel differs visually from a set of slats
- When ready-made panels are more cost-effective than individual sets
- First criterion: surface area
- Second criterion: wall evenness
- Third criterion: customization
- Fourth criterion: number of objects
- Criterion five: independent installation
- How interior molding makes a finished solution deeper
- Cornice as a finishing touch
- Molding framing of the slat zone
- Ceiling moldings: completeness from above
- Spot accents: overlay elements
- Approach for turnkey apartments: speed without loss of quality
- Typical scenario: three modules per object
- Typical scenario for two- and three-room apartments
- Approach for commercial spaces
- Restaurant and cafe: atmosphere for reasonable money
- Office: business atmosphere through details
- Showroom and shop: background for the product
- Where it's important not to overdo the decor
- Small space + rich decor = pressure
- Lots of decor + lots of material = chaos
- Different styles in one space
- Cheap molding next to expensive panels
- How to choose ready-made slatted panels by geometry and texture
- Slat width and spacing: proportions decide everything
- Covering and Surface Readiness
- Material of the battens: solid wood or MDF
- Quality of the substrate
- Table: ready-made batten panels vs. piece-by-piece batten set
- Practical steps: from idea to finished wall
- FAQ: Questions and Answers
- About the Company STAVROS
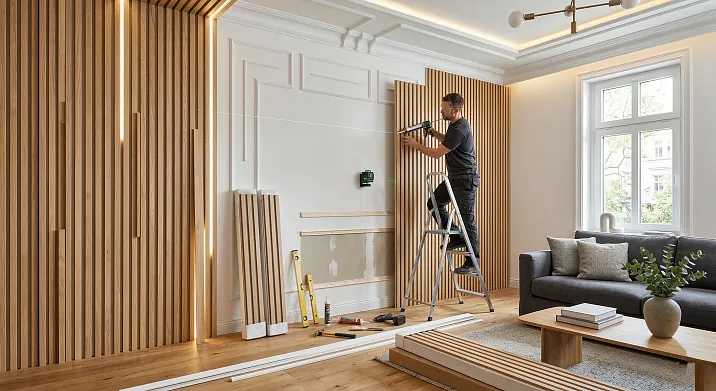
Quick repair doesn't mean bad. This is a thesis that many professional designers and builders find hard to accept, because for years the industry has cultivated the opposite: 'a real interior takes time.' But the modern finishing materials market has changed. Solutions have emerged that reduce installation labor without compromising visual results. Ready-made batten panels for walls are exactly such a solution. Andinterior moldingsmade of polyurethane is a tool that turns quick repair into a thoughtful architectural project.
About how these two products work together — honestly, specifically, and without fluff.


What are ready-made batten panels for walls: not to be confused with a set of battens
Before talking about the advantages, it is necessary to clearly define what exactly is meant. 'Ready-made batten panels for walls' are modular products in which the battens are already fixed to a substrate (MDF or another rigid base) with a fixed spacing. The panel arrives from the factory ready-made: install it — and see the result.
This fundamentally differs from a 'set of slats' that need to be cut to size, spaced, aligned on the frame, and each fastened separately. A set of slats is a more flexible solution with greater customization possibilities, but with incomparably higher labor costs. A ready-made panel is a standardized product that works precisely when the wall is even, the task is clear, and time is expensive.


Construction of a ready-made slatted panel
A standard ready-made slatted panel consists of:
-
Backing – an MDF sheet 6–9 mm thick. Creates a rigid base for installation and serves as a 'screen' behind the slats, forming the depth of the gaps.
-
Slats – wooden (solid oak, ash, larch) or MDF profiles, fixed to the backing at a specified pitch.
-
Finish – tint + oil, varnish, or 'paint-ready'. Applied during production.
A ready-made panel is a finished semi-finished product that only requires proper installation on the wall. No on-site assembly, no pitch adjustment, no spacing fitting.
Our factory also produces:


Standard Sizes
Typical dimensions of ready-made slatted panels:
-
Height: 2400 mm (for a standard 2.7 m ceiling, accounting for floor and ceiling gaps) or 2700 mm
-
Width: 120–300 mm depending on the number of slats in the panel
-
Slat width: 30–100 mm
-
Gap: 10–30 mm (fixed during production)
Several panels are joined side by side, creating a continuous slatted surface of the required width. The joints between panels fall on the gap—and with proper installation, they are not visible.
Get Consultation
How a finished panel differs visually from a set of individual slats
A finished panel and a set of individual slats with the same parameters (slat width, spacing, finish) are visually indistinguishable—provided the individual set is installed with high quality. The difference lies in geometric precision: the spacing in a finished panel is guaranteed by factory tooling. In an individual set, it depends on the installer's skill.
In practice, this means: when viewing a finished slatted wall at an angle (grazing light), slight deviations in spacing are often visible with an individual set—some gaps are slightly wider, others slightly narrower. With a finished panel—perfect rhythm from the first slat to the last.
When finished panels are more advantageous than an individual set
This is a question with no universal answer—but there is clear logic.
First criterion: surface area
For small surfaces—up to 5–6 sq. m—the difference in labor intensity between finished panels and an individual set is minor. For areas of 10 sq. m and more, finished panels significantly speed up installation: instead of positioning dozens of slats one by one, you work with several large modules.
Criterion two: wall evenness
Ready-made slatted wall panels are mounted on a flat surface or on a frame. If the wall is even — direct mounting. If the wall has variations exceeding 5 mm — a frame is necessary in any case, and the difference with piece-by-piece assembly is leveled out.
Criterion three: customization
If a non-standard slat width, non-standard spacing, or complex geometry (arches, bevels, niches) is needed — piece-by-piece assembly is more flexible. Ready-made panels work optimally on standard flat surfaces.
Criterion four: number of projects
For construction companies that perform turnkey renovations in several apartments simultaneously, ready-made panels mean savings on labor costs, which directly impacts the margin. One installer mounts ready-made panels twice as fast as individual slats.
Criterion five: DIY installation
For people doing renovations themselves, ready-made panels are a significantly more accessible option. Piece-by-piece slat installation requires experience, patience, and basic tools. A ready-made panel can be installed on a flat wall using mounting adhesive and a level in a few hours.
How interior molding makes the ready-made solution deeper
This is where it gets really interesting. Ready-made slatted panels are about speed and geometry.Relief Decor in Interior— is an architectural framework that turns a quick solution into a thoughtful project. Without molding, ready-made panels are 'good.' With molding, they are 'excellent.'
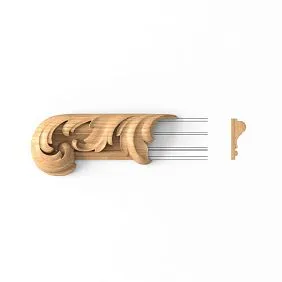
Cornice as a finishing touch
Ceiling cornice is the first thing to add to ready-made slatted panels. Without a cornice, the wall/ceiling transition looks unfinished: panels end abruptly under the ceiling, and the eye is drawn to that spot. The cornice covers this transition, creating a horizontal architectural line.
Decorative stuccofor the cornice is selected based on scale and style:
-
For panels in a minimalist interior — a smooth polyurethane cove 50–60 mm without ornament
-
For modern classic — a cornice with a moderate profile (cavetto, ovolo) 80–100 mm
-
For neoclassical — a rich classical profile from 100 mm
Molding framing of the slatted zone
If ready-made slatted panels do not cover the entire wall but only a part of it — such as a dining area, niche, or area behind a sofa — molding framing turns this fragment into a complete architectural object. A rectangular frame of molding around the slatted panel is a 'picture' on the wall, not just 'attached slats.'
Molding width for framing: 30–60 mm. Profile — in accordance with the style of the panels. Color: contrasting to the slats (white molding + dark slats) or unified (molding in the tone of the cornice).
Ceiling moldings: completeness from above
When wall slat panels are complemented by ceiling moldings—geometric fields, coffers, or simple perimeter molding—the space acquires a three-dimensional architectural structure. This is no longer just 'slats glued on'—this is interior design.
For an apartment with standard ceiling height of 2.7 m: 40 mm perimeter molding placed 20 cm from the walls + ceiling cornice = complete ceiling decor without construction.
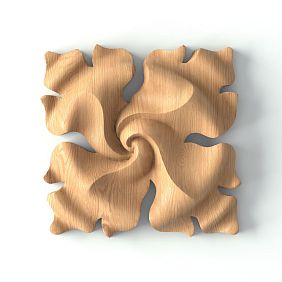
Spot accents: overlay elements
interior moldingsin the form of relief overlays, medallions, decorative inserts adds spot accents where a visual 'anchor' is needed:
-
Ceiling rosette above the chandelier—a traditional and still effective technique
-
Overlay medallion on an accent wall next to a slat panel
-
Decorative overlay above a doorway in a classic interior
These elements—small in size and quick to install—change the perception of space disproportionately to their size. A detail placed in the right spot works harder than expensive furniture against the wrong background.
Approach for turnkey apartments: speed without loss of quality
Turnkey apartments are a special context. Developers and construction companies working with a large volume of projects are interested in reducing labor intensity while maintaining quality. Ready-made slatted panels here are an optimization tool that directly affects the cost.
Typical scenario: three modules per project
For a studio or one-bedroom apartment, three architectural modules are enough to create a complete interior:
-
An accent slatted panel on one wall — in the living or sleeping area. Three to four ready-made panels side by side = a finished accent wall in 3–4 hours of installation.
-
A ceiling cornice around the perimeter — a delicate polyurethane cove molding. Installation around the entire apartment perimeter = 2–3 hours.
-
Lighting behind the slats or near the cornice — an adhesive-backed LED strip.
Total: an interior with architectural character — in one working day for installation plus a day for finishing work. This is a real figure, verified by practice.
Typical scenario for two- and three-bedroom apartments
The logic is the same, but with differentiation by rooms:
-
Living room: accent slatted wall + cornice + ceiling moldings
-
Bedroom: slatted panel behind the headboard + delicate cornice
-
Children's room: slatted panels in pastel tones + smooth cornice
-
Hallway: horizontal panel on one wall + cornice + hooks/hangers integrated into the system
Each room gets its own accent within a unified architectural logic. This creates a sense of an 'apartment with a concept,' not just a set of separate rooms.
Approach for commercial spaces
In commercial spaces — restaurants, offices, showrooms, beauty salons — ready-made slatted panels and moldings work as tools for creating an atmosphere that retains the customer.
Restaurant and cafe: atmosphere at a reasonable price
A restaurant interior is primarily about atmosphere. The visitor doesn't analyze how much the finishing materials cost. They feel: this is a place you want to stay. Slatted panels of dark oak in the dining area, warm light through the gaps, an expressive cornice — this combination creates a sense of a warm, 'enveloping' space where it's comfortable to spend time.
For restaurants, practicality alongside aesthetics is important: the lacquered coating of the slats is easy to clean. The polyurethane cornice is not afraid of moisture and steam. These properties are critical for public catering establishments.
Office: business atmosphere through details
In the office, slatted panels on the meeting room wall or in the reception area create a business-like, professional image without unnecessary costs. Dark oak or gray tint in the meeting room + geometric cornice = strictness and concentration. Natural wood in the reception area + delicate molding = friendliness and quality.
For office spaces, ready-made panels are especially convenient: installation happens quickly (often on weekends to avoid disrupting the workflow), the geometry is perfect, and the result is predictable.
Showroom and store: background for the product
In the showroom, slatted panels create a neutral yet expressive background for the product being presented. Neutral gray or white + slat structure = a background that doesn't compete with the product but creates a sense of quality in the space.
Where it's important not to overdo the decor
Molding is a powerful tool. That's precisely why it's easy to overdo it. There are several risk areas you need to be aware of.
Small room + rich decor = pressure
The rule of scale is absolute: the size of decorative elements must correspond to the size of the room. In an 8 sq. m kitchen, a cornice with a 120 mm projection creates a feeling of an overhanging structure. In a 4 sq. m hallway, rich moldings on the ceiling turn the corridor into a 'box with decor.' For small rooms — only delicate, minimal decor.
Lots of decor + lots of material = chaos
Slatted panels on all four walls + rich cornice + moldings + ceiling rosette + relief overlays = an overloaded interior where there is not a single accent because everything is screaming at once. The 'one main element' rule works ironclad.
Different styles in one room
This was already discussed above — but let's repeat, because it's the most common mistake: dark rails in a brutalist style + a classic ornamental cornice = a conflict that can't be resolved by anything except removal. Style determines everything.
Cheap molding next to expensive panels
This is a mistake that's hard to anticipate before purchase. A polystyrene cornice with unclear relief next to solid oak panels — this contrast kills the sense of quality. Both elements should be of the same level.
How to choose ready-made slatted panels by geometry and texture
Choosing ready-made slatted panels involves several specific parameters that need to be checked before ordering.
Slat width and spacing: proportions decide everything
The visual character of a slatted surface is determined primarily by the ratio of slat width to gap:
-
Slat wider than gap (e.g., slat 60 mm, gap 15 mm): the surface is perceived as 'wooden' with rhythmic lines. Warm, natural.
-
Slat equals gap (50/50): balanced rhythm. Geometrically clean.
-
Gap wider than slat (slat 30 mm, gap 25 mm): surface appears 'lacy', light. Good for partitions and partial panels.
For walls in residential interiors, the 'slat wider than gap' ratio is most in demand: it creates warmth and materiality.
Coating and surface readiness
Ready-made panels are supplied in several surface readiness options:
Toning + oil — slats already have final color and protective oil coating. Install — and it's ready. No finishing intervention needed.
Toning + varnish — more durable coating. Varnish creates film on surface, resistant to moisture and dirt. For kitchens and hallways.
No coating / for painting — maximum color choice freedom. Paint any shade. Requires additional step.
Slat material: solid wood or MDF
Solid oak — natural fiber texture, tactile warmth, durability. Higher price.
MDF — uniform surface without natural pattern, ideal for painting. More affordable. Requires more careful handling during installation (vulnerable to mechanical impacts).
Substrate Quality
MDF substrate must be dense, without delamination or voids. Thickness 6–9 mm. Thin or poor-quality substrate will deform during installation and create 'waves' on the finished surface. Check upon receipt: the surface must be absolutely flat, corners must be straight.
Table: Prefabricated Slatted Panels vs. Individual Slat Set
| Parameter | Prefabricated Panels | Individual Set |
|---|---|---|
| Installation speed | High | Low–medium |
| Geometric precision | Factory-made, perfect | Depends on the craftsman |
| Customization Flexibility | Limited | High |
| DIY Difficulty | Low | Medium–high |
| Working with Curved Surfaces | Only flexible panels | Possible |
| Optimal for volume | Yes (10+ sq. m) | No |
| Price | Comparable or higher | Depends on wood species |
Practical steps: from idea to finished wall
Step 1. Determine the panel zone: entire wall or accent part? From floor to ceiling or only the area behind furniture?
Step 2. Calculate the area and number of panels with a 10–15% reserve.
Step 3. Choose the wood species and finish — order a sample. Evaluate it in the room under your lighting.
Step 4. Select cornice and moldings according to style and scale. Calculate the length along the perimeter.
Step 5. Plan the lighting — before installation.
Step 6. Installation: first the frame (if the wall is uneven) → battens → cornice → moldings → finishing work.
FAQ: Questions and Answers
Can ready-made slatted panels be installed without a frame, directly on the wall?
Yes, on a flat wall (deviation no more than 3 mm) — mounting adhesive + dowels at the corners. On uneven walls (deviation more than 5 mm) — only via a frame. Installing without a frame on an uneven wall creates 'waves' that are clearly visible under grazing light.
How to join ready-made panels in a room corner?
Internal corner: slats are cut at a 45-degree angle. External corner: the same. Alternative — a corner profile (metal or wooden) that conceals the joint. This is easier and neater for an inexperienced installer.
Do ready-made MDF panels need to be acclimatized?
MDF is less sensitive to humidity changes than solid wood. But 2–3 days of conditioning in the room is a reasonable measure for any wooden materials.
How to attachdecorative moldingnext to slatted panels?
The cornice is installed after the slatted panels — on the wall and ceiling with adhesive, additionally with dowels for heavy profiles. Molded framing of the slatted area — with mounting adhesive around the perimeter. Joints are filled, sanded, and painted.
Can ready-made slatted panels for painting be repainted without dismantling?
Yes. Water-based or acrylic paint + preliminary sanding + primer. Repainting is possible without loss of quality if the technology is followed. This is one of the key advantages of MDF panels for painting.
How to visually assess the quality of a finished panel before purchase from a photo?
You can't. Order a sample. Assess the substrate flatness, edge finish quality, and step accuracy. No photo can reliably show these parameters.
How many panels are needed for an accent wall 3×2.7 m?
Wall area: 3 × 2.7 = 8.1 sq. m. Standard panel 0.3 × 2.4 m = 0.72 sq. m. Calculated quantity: 8.1 / 0.72 ≈ 11.25 panels. With a 15% reserve — 13 panels.
About the company STAVROS
Quick renovation and quality results are not a contradiction, but a properly structured process. When materials are precise, geometry is verified in production, and decor is selected as a system — the installer works quickly, and the result lasts for years.
STAVROS manufactures ready-made slatted wall panels from solid oak, ash, and MDF with factory finishes — oil, varnish, paintable. Precise geometry, stable spacing, uniform shade within a batch.interior moldingsPolyurethane — cornices, moldings, applied relief elements — in a full range for any style: from a minimalist smooth cove to a rich classic profile.
Both products — from one source. This simplifies color coordination, reduces logistics, and provides a single contact for any issues. Samples, consultations, quantity calculation based on your dimensions — standard STAVROS service.
STAVROS — because a good interior starts with the right materials, chosen once and for a long time.


