Article Contents:
- What Are Furniture Overlays and Why They Change Everything
- Overlay Typology: From Functional to Jewelry-like
- Corner Overlays: Accents at Joints
- Vertical and Horizontal Overlays: Rhythm and Structure
- Central Overlays: Focal Points
- Decorative Moldings: Framing and Structure
- Restoration and Transformation: New Life for Old Furniture
- Surface diagnosis and preparation
- Compositional Solution: From Chaos to Harmony
- Overlay Installation: Technique and Nuances
- Kitchen: The Epicenter of Transformation
- Choosing Overlays for the Kitchen: Beauty and Practicality
- Transforming a Standard Set: Step-by-Step Plan
- Doors and Dressers: Targeted Interventions
- Entry and Interior Doors: First Impression
- Dressers and Cabinets: Drawer Symmetry
- Hardware: When Details Define Perception
- Furniture Handles: Ergonomics Meets Aesthetics
- Furniture Legs: From Invisible Support to Style-Defining Element
- Installation: flawless result technology
- Professional toolset
- Typical mistakes and their prevention
- STAVROS Catalog: A Wealth of Choice for Any Project
- Classic Collections
- Baroque and Rococo Collections
- Modern and Ethnic Collections
- Frequently Asked Questions About Furniture Overlays
- Can Wooden Overlays Be Glued to Laminated Surfaces?
- How to Paint Overlays to the Desired Color?
- How Long Do Decorative Overlays Last?
- Can Overlays Be Removed Without Damaging the Facade?
- Where to Buy Fasteners and Consumables for Installation?
- Conclusion: art accessible to everyone
Is a solid old dresser gathering dust at the dacha, kitchen facades looking dreary, and the hallway cabinet hopelessly outdated in style, though still structurally sound? It's a shame to throw it away, buying new is expensive, and you don't want to live with it anymore. A familiar situation? Then you should learn about the magic of decorative furnishings for furniture— carved overlays, moldings, and solid wood hardware that can transform boring, mass-produced furniture into an exclusive interior piece in just a few hours of work. This is not fantasy, but a reality accessible to anyone willing to spend a little time and a minimal budget to transform their home.


What are furniture overlays and why do they change everything
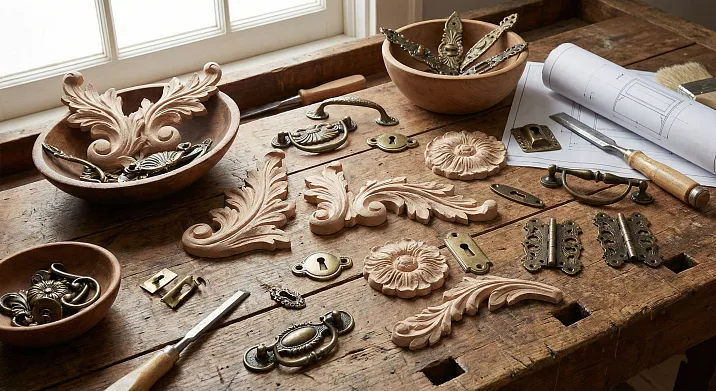
A decorative overlay is a three-dimensional element made of wood, polyurethane, or composite materials that is attached to the surface of a furniture front, door, or wall. Sizes range from miniature 50×50 millimeters to impressive 400×600 millimeters and larger. The relief depth ranges from flat 3-5 millimeters to voluminous 30-50 millimeters in the protruding parts of the carving. The shape can be anything: geometric rosettes, floral ornaments, animal motifs, heraldic elements, abstract compositions.
The fundamental difference between an overlay and painting or a sticker is the real volume, the physical relief that creates a play of light and shadow, changing throughout the day depending on the angle of the light. It is a tactile texture you want to touch. It is materiality, weight, solidity that cannot be imitated by a flat image.Door decorative trimworks not only on a visual level—it changes the very nature of the surface, turning a plane into a three-dimensional composition.
The history of furniture overlays dates back to the Renaissance, when Italian masters began decorating furniture with carved wooden panels, creating the effect of rich finishing while saving on expensive wood. Thin carved overlays made of walnut or oak were glued onto a base of cheaper wood species, creating the illusion of furniture entirely carved from solid wood. This technology has survived to this day, enriched with new materials and manufacturing methods, but retaining the main thing—the ability to transform the simple into the luxurious.


Overlay typology: from functional to jewelry-like
The classification of furniture overlays is based on shape, purpose, style, and material of manufacture. Understanding this typology allows for a conscious selection of elements for a specific project, creating harmonious compositions, and avoiding stylistic cacophony.
Our factory also produces:


Corner overlays: accents at joints
Corner overlays are elements placed at the corners of furniture fronts, door panels, or molding frames. Their function is to decorate the joint, create a visual accent, and emphasize the geometry of a rectangle or square. The sizes of corner overlays are usually compact—60×60, 80×80, 100×100 millimeters—so as not to overload the corners, but sufficient to create an expressive accent.
The shape of corner overlays can be symmetrical relative to the diagonal—then the same overlay is installed in all four corners of the frame. Or asymmetrical—then a separate, mirror-image overlay is needed for each corner. Symmetrical ones are more versatile, asymmetrical ones are more expressive but require precise selection of a set.Corner decorative overlaysare especially effective in combination with moldings, where they mask corner joints and create the impression of a solid carved frame.
The stylistic range of corner overlays covers the entire historical and geographical spectrum: classical acanthus leaves, Baroque volutes, Art Deco geometry, Eastern arabesques, Celtic weaves. The choice of style is determined by the overall character of the interior, but contrasting combinations are also acceptable—for example, Baroque overlays on modern minimalist furniture create an interesting eclectic effect.
Get Consultation
Vertical and horizontal overlays: rhythm and structure
Vertical overlays are elongated in height—typical proportions are 1:3, 1:4, 1:5, with sizes like 60×240, 80×400, 100×500 millimeters. They are used to divide tall cabinet fronts, create vertical accents, and visually elongate the space. Several vertical overlays placed at equal distances from each other create a rhythmic structure reminiscent of pilasters or columns.
Horizontal overlays have the opposite proportions—width exceeds height by 3-5 times. Sizes are 240×60, 400×80, 600×100 millimeters. They divide wide fronts into sections, create horizontal divisions, and work as decorative belts. Inkitchen frontshorizontal overlays are often placed in the center of the door, creating an accent strip that unites the upper and lower tiers of the set into a single composition.
The ornamentation of vertical and horizontal overlays is usually adapted to the proportions—elongated floral motifs, repeating geometric patterns, fluting, meanders. It is important to maintain the scale of the ornament relative to the size of the overlay—a pattern that is too small will get lost, one that is too large will be cut off at the edges, creating a sense of a fragment instead of a holistic composition.
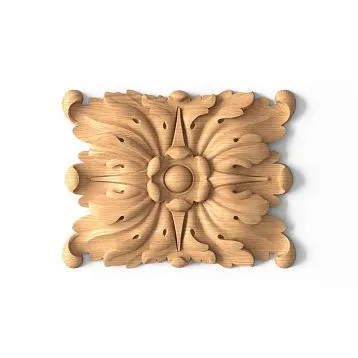
Central overlays: focal points
Central overlays are large elements placed in the geometric center of a front, door, or panel. Their sizes start from 150×150 millimeters and can reach 400×600 millimeters for large surfaces. A central overlay is the main decorative accent around which the entire composition is built. It requires free space around it to reveal its beauty without visual noise.
The themes of central overlays are diverse: classical rosettes with radial symmetry, floral bouquets, narrative scenes, heraldic shields, monograms and ciphers. The complexity of the carving on central overlays is usually maximal—these are elements that attract close attention, require detailed workmanship, and demonstrate the carver's skill.Carved appliqués for furnitureof this level turn an ordinary cabinet into a museum exhibit.
Placing central overlays requires precision—an error of even 10-15 millimeters from the true center is noticeable to the eye and creates a sense of imbalance. Marking is done using diagonals—the point of their intersection is the geometric center. The center of the overlay is aligned with the center of the front, and fastening is done from the center to the edges to avoid displacement.
Decorative moldings: framing and structure
Moldings are profiled linear products used to create frames, borders, and divisions on furniture fronts. Unlike point overlays, moldings are measured in linear meters and cut to size for a specific task. The width of furniture moldings is usually more modest than that of wall moldings—20-60 millimeters—so as not to overload the relatively small surfaces of furniture.
The profile of a molding can be simple—semicircular, quarter-round, rectangular stepped—or complex—with alternating curves, beads, shelves, grooves. Carved moldings are additionally decorated with ornamentation—floral, geometric—that repeats along the entire length. Such moldings are used as finishing elements, crowning cornices, framing particularly significant fronts.
The combination of moldings and overlays is a classic technique for decorating furniture. Moldings form rectangular or square frames, into the corners of which corner overlays are installed, and in the center—a central overlay. Such a composition creates the illusion of a complex paneled door on an actually flat front.Ideas for decorating furniture frontsfrom STAVROS demonstrate dozens of variations of such combinations in different styles.
Restoration and Transformation: New Life for Old Furniture
Is there any point in restoring old furniture when new furniture is available in any store? Definitely yes, if the furniture is solid, made of solid wood, with quality joinery, but looks outdated. Soviet wall units, polished dressers, lacquered sideboards from the 70s-80s are often sturdier than modern chipboard and MDF products, but look hopelessly archaic.Decorative Insertscan radically change the aesthetics of such furniture without altering the structure.
Diagnosis and surface preparation
Before starting decoration, old furniture requires an assessment of its condition. Critical defects — loose joints, through cracks, damaged hinges, missing fragments — must be repaired before decorative work begins. Structural restoration is a separate task requiring carpentry skills. If the structure is sound, we proceed to surface preparation.
Old lacquer or polish coating must be removed or matted. Complete removal is done with strippers — chemical compounds that soften the old lacquer, allowing it to be scraped off with a spatula. The process is messy, requires good ventilation, and protection for hands and eyes. After stripping, the surface is sanded with P120-P180 abrasive to remove lacquer residue and level it. Matting is a simpler method where the old lacquer is sanded with coarse P60-P80 abrasive until the shine completely disappears. A matte surface provides adhesion for the new coating.
Surface defects — dents, chips, scratches — are filled with wood filler. After the filler dries, the filled areas are sanded until completely flush with the main surface. If opaque painting (enamel, paint) is planned, the preparation quality must be perfect — any unevenness will show through the paint. For transparent finishes (stain, oil, lacquer), preparation can be less meticulous — the wood grain hides minor defects.
Compositional Solution: From Chaos to Harmony
Where and how many overlays to place to achieve beauty, not gaudiness? This is a question of composition, a sense of proportion, understanding the laws of visual perception. The first rule — less is more. Three to five quality overlays, thoughtfully placed, work more effectively than ten randomly glued ones. The second rule — symmetry and rhythm. Symmetrical placement relative to the central axis creates a sense of order and stability. Rhythmic repetition of identical elements with equal intervals creates structure, a musicality to the composition.
For a wardrobe with two doors, mirror symmetry is optimal: central overlays on each door strictly centered, or frames made of moldings with corner overlays, identical on both doors. For a dresser with three or four drawers, rhythm works: one overlay on each drawer front, strictly centered or offset to one edge, but identically on all drawers. For a large kitchen cabinet front, a complex composition can be created: a central large overlay, a frame of moldings around it, and corner overlays at the frame's corners.
The scale of the overlays must correspond to the size of the front. On a door 400 millimeters wide, an overlay 200 millimeters in diameter will look huge; on an 800-millimeter door — proportional. A universal ratio: the overlay size is 25-40% of the front size. For a 600-millimeter door, overlays of 150-240 millimeters are optimal. This ensures expressiveness without overload.
Mounting Overlays: Technique and Nuances
Attaching decorative overlays to furniture is done in two main ways: with adhesive only, and with adhesive plus additional fixation with nails or screws. Purely adhesive bonding is more aesthetically pleasing — there is no visible fastening, but it requires quality surface preparation and precise positioning. Combined fastening is more reliable, especially for large, heavy overlays, but requires concealing the fasteners.
Adhesive for Overlaysis chosen depending on the material of the base and the overlay. For wood on wood, carpenter's PVA or polyurethane adhesive is optimal — they create a strong, flexible bond that withstands humidity fluctuations. For polyurethane overlays on any substrate, acrylic mounting adhesive is suitable — thick, with good initial adhesion. For particularly heavy overlays, two-component epoxy adhesive is used — it provides maximum strength but requires precise mixing of components and quick work.
Adhesive application technique: a snake or grid of adhesive is applied to the back of the overlay, covering 40-60% of the area. There's no need to spread a solid layer over the entire surface — excess will squeeze out at the edges and stain the front. The overlay is applied to the marked spot and pressed with a force of 5-10 kg for 30-60 seconds. Squeezed-out adhesive is immediately removed with a damp cloth — once dry, it's difficult to remove without damaging the finish.
Additional nail fixation is done with thin finish nails without heads or with miniature heads. Nail length — overlay thickness plus 15-20 millimeters. Nails are driven into the least noticeable places — recesses in the carving, at the border of the ornament and background. Heads are countersunk with a nail set by 1-2 millimeters, and the holes are filled with filler matching the overlay color. After sanding and painting, the fastener traces are invisible.
Kitchen: The Epicenter of Transformation
Kitchen fronts are a battleground between functionality and aesthetics. On one hand, it's a work zone where surfaces are subjected to intense impact — grease splashes, moisture, mechanical knocks. On the other — it's the heart of the home, where aesthetics are critical.Decorating Kitchen Frontswith overlays allows transforming a standard MDF set into an exclusive kitchen in a classic or country style.
Choosing Overlays for the Kitchen: Beauty and Practicality
Kitchen overlays must be not only beautiful but also resistant to specific operating conditions. Wooden overlays are coated with polyurethane lacquer in 3-4 layers — this creates a durable, water-resistant film that withstands wet cleaning and does not absorb grease and dirt. Polyurethane overlays are less aesthetic but more practical — they are not afraid of water, steam, temperature fluctuations, and are easy to clean with any means.
The size of kitchen overlays is determined by the size of the fronts. For standard fronts 400-600 millimeters wide, overlays 100-150 millimeters in diameter or vertical ones 60×200 millimeters are optimal. For wide fronts 700-900 millimeters, large central overlays 180-220 millimeters or compositions of several elements can be used. It's important that overlays do not interfere with door opening or catch on adjacent fronts when opening.
The style of kitchen overlays should match the overall kitchen style. For a classic kitchen, symmetrical rosettes, acanthus leaves, and floral garlands are suitable. For country — simple geometric shapes, imitation of raised panels. For Provence — floral motifs, grapevines. For a modern kitchen — minimalist geometric overlays that create relief without excessive decorativeness.
Transforming a Standard Set: Step-by-Step Plan
Take a standard kitchen set — white or beige MDF fronts with film coating, unremarkable but structurally sound. The task — transform it into a classic kitchen with carved elements, creating the illusion of expensive furniture at minimal cost. Budget — 15-25 thousand rubles for overlays, moldings, paint. Work time — 2-3 days including coating drying time.
Step one — choosing and purchasing decor. For a kitchen with 12 fronts (6 upper, 6 lower) you will need: 12 central overlays 120-140 millimeters in diameter, 8-10 meters of molding 30-40 millimeters wide for creating frames on key fronts, 20-24 corner overlays 60×60 millimeters for frame corners. Additionally — primer, paint in the chosen color, lacquer, adhesive, brushes, rollers, painter's tape.
Step two — preparing the fronts. The fronts are removed from the hinges and laid on the work surface face up. The surface is degreased with alcohol or a special silicone remover. If the film coating is smooth, light abrasive treatment with fine sandpaper is performed to improve primer adhesion. Hardware (handles, hinges) is removed or protected with painter's tape.
Step three — marking and mounting decor. The center is marked on each front where the central overlay will be installed. For fronts where frames of moldings are planned, rectangles are marked at a distance of 50-70 millimeters from the edge of the front. Moldings are cut at 45-degree angles, assembled into frames, and glued to the fronts. Corner overlays are installed at the frame corners. Central overlays are glued according to the markings. The entire structure is left for a day for adhesive polymerization.
Step four — painting. After the glue dries, the fronts are primed with acrylic primer, which creates an even base for the paint. After 2-4 hours, the first coat of paint — acrylic enamel of the chosen color — is applied. For a classic kitchen, pastel tones are optimal — ivory, light gray, soft blue, cream. After 6-8 hours, the second coat of paint is applied. Overlays can be painted to match the fronts or in a contrasting color — for example, gold or patinated silver for an antique effect.
Step five — protective coating and installation. After the paint is completely dry (24 hours), a protective varnish — polyurethane matte or semi-matte — is applied to protect the paint from wear and moisture. One day after varnishing, the fronts are ready for installation. Hardware is mounted, fronts are hung on hinges, gaps are adjusted. The result is an exclusive kitchen that is indistinguishable from an expensive furniture showroom.
Doors and dressers: targeted interventions
If a complete furniture transformation is a large-scale project, then targeted decorationof cabinet and dresser doors— these are quick, local improvements that yield impressive results with minimal effort. One large carved overlay in the center of a cabinet door can radically change the perception of the entire piece of furniture, shifting it from the category of bland, standard items to that of designer furniture.
Entry and interior doors: first impression
A door is a boundary between spaces, and its decor sets expectations for what lies beyond. An unremarkable, smooth door speaks of indifference to detail.A decorated doorwith carved overlays, moldings, and beautiful hardware creates a sense of thoughtfulness, care for beauty, and respect for guests.
For an entry door, overlays serve an additional function — they reinforce the structure, creating additional stiffening ribs. Massive vertical overlays along the edges of the panel act as additional load-bearing elements. A large central overlay with a heraldic or floral ornament becomes the house's calling card, by which the owners are recognized.
For interior doors, the decor is more delicate. Smooth paneled doors are adorned with frames made of thin moldings with corner overlays at the angles. This creates the illusion of a more complex construction while maintaining the smoothness of the panel. Solid doors can be divided by moldings into several sections, imitating a paneled construction.door decoration by hand— a weekend project accessible to everyone.
Dressers and cabinets: symmetry of drawers
A dresser with 3-4 drawers is an ideal object for decorating with overlays. Symmetrical placement of identical overlays in the center of each drawer front creates a rhythmic vertical composition. An alternative is placing overlays not in the center but with the same offset to the right or left edge on all drawers, creating an asymmetric yet orderly pattern.
The size of overlays on a dresser should be modest — drawer fronts are usually not large, 300-500 millimeters wide. Overlays with a diameter of 80-120 millimeters are optimal — they are noticeable but not overwhelming. For narrow drawers in the upper tier, miniature overlays of 60-80 millimeters can be used; for wide lower drawers, larger ones of 120-150 millimeters, which will create a visual hierarchy and emphasize the dresser's structure.
Color solution: overlays matching the fronts create a subtle relief decor that manifests through the play of light and shadow. Contrasting overlays — dark on a light background or light on a dark one — create graphic accents and attract attention. Gilded or silvered overlays on neutral fronts add luxury, making the furniture more prestigious.
Hardware: when details define perception
Decorative overlays transform surfaces, but there are elements we not only see but constantly touch — these areFurniture hardware: handles, legs, supports. Their material, shape, color, and surface texture are critically important for tactile comfort and the overall impression of the furniture.
Furniture handles: ergonomics meets aesthetics
A handle is the only furniture element we touch dozens of times a day. Its shape should provide a comfortable grip, its size should correspond to the size of the hand, and its material should be pleasant to the touch. Wooden handles made of solid oak or beech are warm, non-slip, not cold in winter, not hot in summer. They are ideal for furniture in living spaces where comfort is critical.
Classification of handles by construction: pulls (U-shaped handles where fingers wrap around the bridge), knobs (mushroom-shaped handles grasped from above), rails (long horizontal handles pulled with the whole palm). For cabinets and dressers, pulls 96-128 millimeters long are optimal — they provide a reliable two-finger grip. For heavy doors, longer handles of 160-256 millimeters are required, allowing the use of the entire palm.
Carved handles for furniturewith ornaments turn a utilitarian part into a decorative element. Floral motifs, geometric patterns, animalistic forms make each drawer opening an aesthetic experience. It is important that the carving does not interfere with the grip and does not create sharp edges that could cause injury. Smooth, flowing shapes are an ergonomic priority.
Furniture legs: from invisible support to style-defining element
Legs determine the height of furniture above the floor, influence the perception of its massiveness or lightness, and open up or close off the space underneath. Low legs of 50-100 millimeters create a sense of squatness, solidity — such furniture is visually heavy, monumental. High legs of 150-300 millimeters lift the body, create airiness, lightness — the furniture seems to float, elegant.
Turned legs made of solid wood are manufactured on lathes. The profile can be simple — conical, cylindrical, or complex — with alternating thickenings and waists, creating a baluster-like shape. Carved legs are additionally adorned with flutes, spiral grooves, and floral ornaments. Cabriole legs in the Rococo style are a furniture classic, where the S-shaped curve creates dynamism and elegance.
Replacing standard plastic or metal legs with wooden turned ones radically changes the perception of furniture. A standard IKEA sofa with replaced legs looks like a designer piece. A dresser with turned oak legs moves from the category of utilitarian furniture to items with character. This is an investment of 2-5 thousand rubles for a set of four legs, which yields an effect comparable to buying new furniture worth 50-100 thousand rubles.
Installation: Technology for Flawless Results
Even the most beautiful overlays will not save a project if the installation is done carelessly. Crooked joints, visible gaps, glue marks, misalignment of elements relative to the markings — all this instantly kills the impression, creating a sense of a cheap imitation instead of quality decor.Overlay installation technologyrequires care, precision, patience.
Professional toolset
The basic toolset for installing furniture overlays includes: a tape measure and metal ruler for marking, a square for checking right angles, a pencil or marking knife for drawing lines, a miter box or miter saw for cutting moldings at precise angles, a fine-toothed saw or jigsaw for fitting overlays, a spatula or brush for applying adhesive, clamps or painter's tape for securing elements while the adhesive sets, and a damp cloth for removing excess adhesive.
Additional tools for advanced projects: an orbital sander for surface preparation, a paint sprayer or roller for even painting, a pneumatic nail gun for concealed overlay fastening, a drill with bits for pre-drilling screw holes, a screwdriver for fastening hardware, a nail set for countersinking nail heads, a set of fillers and sanding sponges for final finishing.
Materials: adhesive (PVA wood glue, polyurethane construction adhesive, two-component epoxy depending on the task), finishing nails or screws for additional fastening, wood filler in several colors for concealing fasteners and filling gaps, acrylic primer for preparing the surface for painting, paint or varnish for the final coating, sandpaper with grit from P80 to P240 for sanding at different stages.
Typical Errors and Their Prevention
First mistake — insufficient surface preparation. Installing overlays on a dirty, greasy, dusty surface guarantees peeling within a few months. Solution: thorough cleaning, degreasing with alcohol or a special compound, sanding to create roughness that improves adhesion.
Second mistake — excess adhesive. A large amount of adhesive does not improve joint strength but guarantees excess squeezing out from under the overlay edges, which will stain the facade and be visible under clear varnish. Solution: apply adhesive moderately, in a zigzag pattern or dots, covering 40-60% of the contact area. Immediately remove any squeezed-out adhesive with a damp cloth.
Third mistake — rushing. Attempting to continue work before the adhesive is fully dry leads to element shifting and geometry distortion. Solution: strictly observe the technological pauses indicated by the adhesive manufacturer. Typically, this is 24 hours for full polymerization, although initial setting occurs in 5-10 minutes.
Fourth mistake — inaccurate marking. Shifting an overlay by 3-5 millimeters from the true center of the facade is noticeable to the eye, creating a sense of curvature and imbalance. Solution: careful marking using a tape measure, ruler, and square. To find the center of a rectangle, use the diagonal method — their intersection point is the center. Before gluing, place the overlay without adhesive, evaluate visually, and adjust the position if necessary.
Fifth mistake — style mismatch. Baroque overlays on minimalist furniture, classic rosettes on high-tech furniture create stylistic cacophony. Solution: maintain stylistic unity between overlays and furniture, and between different overlays in one project. All overlays should be from the same collection, of the same style and scale.
STAVROS Catalog: a wealth of choice for any project
Where to find quality decorative overlays that will last for decades without losing their shape and beauty?STAVROS Decorative Overlays Catalog— features over 800 items made from solid oak, beech, ash, as well as polyurethane for wet rooms and budget projects. The stylistic range covers the entire history of decorative art from antiquity to modernism.
Classic Collections
Classic — symmetrical compositions with botanical motifs, acanthus leaves, rosettes, volutes. Sizes range from miniature 50×50 millimeters to impressive 400×600 millimeters. A relief depth of 8-25 millimeters ensures expressive play of light and shadow without excessive bulkiness. Material — solid oak or beech, guaranteeing durability and the possibility of multiple restorations.
Color options for classic overlays: natural wood under clear varnish, where the grain and natural wood color are visible; tinted wood in dark shades — walnut, wenge, ebony; painted wood in white, cream, gray for integration into neutral interiors; gilded or silvered wood for creating a luxury effect.
Baroque and Rococo collections
Baroque — maximalism in decoration, an abundance of scrolls, complex multi-tiered compositions where relief can reach 40-50 millimeters in protruding parts. Overlays in the Baroque style are large — minimum size 150×150 millimeters, maximum limited only by technological capabilities (up to 600×800 millimeters for special projects). They require spacious facades, high ceilings, and correspondingly scaled rooms.
Rococo — a more delicate version of Baroque, with finer scrolls, more asymmetrical compositions, and smoother lines. Rocaille (shells), cartouches, botanical garlands, and mascaron create a sense of whimsical luxury without heaviness. Rococo overlays are optimal for bedroom, boudoir, and living room furniture, where an atmosphere of sophistication and comfort is required.
Modern and ethnic collections
For modern interiors, STAVROS offers geometric overlays — circles, squares, triangles, polygons with minimal relief of 5-10 millimeters. They create structure without excessive decorativeness, working more on a tactile level than a visual one. Sizes are compact — 80×80, 100×100, 120×120 millimeters, allowing their use on modern furniture with small facades.
Ethnic collections include Eastern arabesques, Celtic weaves, Scandinavian runes, African geometric patterns. These are overlays for specific interiors where the ethnic component is key. They allow creating an authentic atmosphere without using antique furniture or expensive accessories. An overlay with a Celtic pattern on a cabinet door instantly conveys the style and sets the mood of the space.
Frequently asked questions about furniture overlays
Can wooden overlays be glued to laminated surfaces?
Yes, but with preliminary preparation. The laminated surface is smooth and has low adhesion. Before installing overlays, the laminate must be matted — treated with coarse sandpaper P60-P80 until the gloss completely disappears. The matte surface will provide mechanical bonding with the adhesive. Use polyurethane or epoxy adhesive, which have maximum adhesion to smooth surfaces.
Additionally, priming the matted surface with an acrylic primer with high adhesion is recommended. The primer creates an intermediate layer between the laminate and the adhesive, improving bonding. After the primer dries (2-4 hours), overlays can be glued using standard technology.
How to paint overlays in the desired color?
Overlays made from solid wood are excellent for painting. For transparent tinting that preserves the grain, use water- or alcohol-based stains. They are applied with a brush or sponge, and excess is wiped off with a cloth. After the stain dries (2-4 hours), a protective varnish is applied in 2-3 coats with intermediate sanding.
For opaque painting, the overlay surface is primed with an acrylic primer, which fills the wood pores and creates an even base. After the primer dries, acrylic or alkyd enamel is applied in 2-3 coats. The first coat creates a base coverage, the second and third — color intensity and surface evenness. A final coat of polyurethane varnish will protect the paint from wear.
How long do decorative overlays last?
The service life of wooden overlays with proper installation and care is measured in decades. In European palaces, carved panels from the seventeenth-eighteenth centuries are preserved and still look excellent. Critical factors for longevity: quality of the adhesive joint (if the adhesive is chosen correctly and applied according to technology, the joint will outlast the wood itself), protective coating (varnish or paint protects from moisture, UV rays, mechanical damage), operating conditions (stable humidity 40-60%, absence of direct contact with water).
Polyurethane overlays are less durable — service life is 15-25 years, after which the material begins to lose elasticity and cracks may appear. However, they are not afraid of moisture, do not require complex maintenance, and are 2-3 times cheaper than wooden ones.
Can overlays be removed without damaging the facade?
An overlay glued with PVA or acrylic adhesive can be removed with minimal damage. Use a thin spatula or string, which are carefully inserted between the overlay and the base, breaking the adhesive layer. Work slowly, without jerking, to avoid splitting the overlay or damaging the facade. After removal, adhesive residue is removed by sanding or with a solvent.
Overlays on polyurethane or epoxy adhesive are more difficult to remove — these adhesives create an especially strong bond. Typically, heating with a construction hairdryer to 60-80°C is required, at which point the adhesive softens, after which the overlay is carefully separated. Local heating does not damage the facade if done carefully and without overheating one spot.
Where to buy fasteners and consumables for installation?
Everything needed for installing overlays can be purchased at hardware stores or online. PVA wood glue is sold in packages from 100 ml to 5 liters, costing 50-500 rubles depending on volume and brand. Polyurethane construction adhesive — 150-400 rubles per 310 ml tube. Finish nails — 100-200 rubles per pack of 100 pieces. Wood putty — 80-300 rubles per 400 g can.
Some decor manufacturers, including STAVROS, offer ready-made installation kits, including adhesive, fasteners, and instructions. This is convenient for beginners who don't know exactly which materials are needed. The cost of a kit is usually 10-20% higher than the sum of individual components, but saves time on selection and eliminates errors of buying unsuitable materials.
Conclusion: art accessible to everyone
Decorative overlays are not a luxury accessible to a few, but a tool for transforming interiors that anyone can use. The cost of materials for a complete transformation of a kitchen set is 15-30 thousand rubles. Work time — 2-3 days for a person without special skills. The result — exclusive furniture that looks 5-10 times more expensive than store-bought. This is math that works in your favor.
The company STAVROS has been producing decorative elements for furniture for 23 years. Over this time, vast experience has been accumulated, technologies have been refined, and collections have been created covering all conceivable styles and directions. In-house full-cycle production ensures quality control at every stage — from wood procurement to finishing. Modern CNC milling equipment guarantees perfect repeatability of sizes and profiles. A hand-carving section, where masters with many years of experience work, gives products individuality, making each overlay unique.
The STAVROS catalog is not just a list of products, it is a source of inspiration for thousands of completed projects.Ideas for decorating furniture facadesshow how to combine different elements, create compositions, work with color and texture. It is an online-accessible design school where you can learn to see potential in ordinary furniture, understand the laws of composition, and feel measure and proportion.
The STAVROS stock program allows shipping popular items on the day of order. This is critical for projects with tight deadlines when there is no time to wait weeks for custom manufacturing. Production of non-standard elements takes 10-20 working days — an optimal timeframe for individual projects requiring unique sizes or styling.
Delivery across all of Russia makes STAVROS products accessible regardless of geography. From Kaliningrad to Vladivostok, from Murmansk to Makhachkala — everywhere you can get quality wooden overlays, moldings, and hardware. Packaging ensures safety during transportation — each item is wrapped in protective film and placed in corrugated cardboard with cushioning inserts.
STAVROS technical support works at all stages of a project. Before purchase — consultations on element selection, quantity calculation, advice on combining. During installation — assistance in solving technical problems, recommendations on materials and technologies. After completion — care advice, possibility of purchasing additional elements to expand the project.
ChoosingDecorative Accents for FurnitureChoosing STAVROS, you get not just a product, but a partner in creating your dream interior. You get confidence in material quality, professional support, the widest selection, optimal price-to-value ratio. You get the opportunity to bring your ideas to life, create a unique space that reflects your individuality, taste, and understanding of beauty. This is an investment in quality of life that pays off every day when you look with pleasure at the transformed furniture and realize — I did this myself, this is the result of my labor, my creativity, my vision of beauty.